icuで絵文字,ひらがな、カタカナ、漢字、アルファベットを識別する
FreeType2で文字をラスタライズしたいときに、絵文字と日本語でフォントを変えないといけなかったりするので、その自動判別の方法を調べた。絵文字かどうかはUnicodeのBinary Propertyを調べる。アルファベットかひらがなか漢字かなどはScriptで判別可能。
#include <iostream>

#include <unicode/ucnv.h>
#include <unicode/brkiter.h>

#include <unicode/uscript.h>

// 要リンク
#pragma comment(lib, "icuuc.lib")

// icudt67.dll
// icuuc67.dll
bool isEmoji(UChar32 c) {

  // Unicodeの文字にはバイナリプロパティというのがあり、
  // そこを調べると文字についての色々な情報がわかる。
  // 絵文字かどうかの判別はバイナリプロパティがEmoji系になっているかどうかでわかる

  int32_t check=0;

  // cが絵文字ならどれかで非ゼロになるはず

  check += u_getIntPropertyValue(c, UCHAR_EMOJI);
  check += u_getIntPropertyValue(c, UCHAR_EMOJI_PRESENTATION);
  check += u_getIntPropertyValue(c, UCHAR_EMOJI_MODIFIER);
  check += u_getIntPropertyValue(c, UCHAR_EMOJI_MODIFIER_BASE);
  check += u_getIntPropertyValue(c, UCHAR_EMOJI_COMPONENT);

  return (bool)check;
}
int main() { std::setlocale(LC_ALL, ""); // 元の文字列の定義 std::u16string u16s = u"👨👧さa感マ"; ///////////////////////////// // ICUの設定 icu::UnicodeString usr(u16s.c_str()); UErrorCode err; icu::BreakIterator* bi = icu::BreakIterator::createCharacterInstance( icu::Locale::getDefault(), err); bi->setText(usr); // イテレータで1書記素ずつループする int32_t current = bi->first(); while (current != icu::BreakIterator::DONE) { // 文字の長さを知る必要があるので、 // 「現在の文字の位置」と「前の文字の位置」が必要 int32_t prev = current; current = bi->next(); if (current == UBRK_DONE) { break; } int32_t count = current - prev;//文字の長さ // UTF16配列としてのprev番目の文字をUTF32で取得 UChar32 c = usr.char32At(prev); // バイナリプロパティで絵文字かどうかチェック if (isEmoji(c) == true) { printf("絵文字\n"); } else{
// スクリプトを取得し文字の種類を特定 UScriptCode script = uscript_getScript(c, &err); switch (script) { case USCRIPT_LATIN: printf("latin\n"); break; case USCRIPT_HIRAGANA: printf("ひらがな\n"); break; case USCRIPT_KATAKANA: printf("カタカナ\n"); break; case USCRIPT_HAN: printf("漢字\n"); break; } } } }
結果
ひらがな
latin
漢字
カタカナ
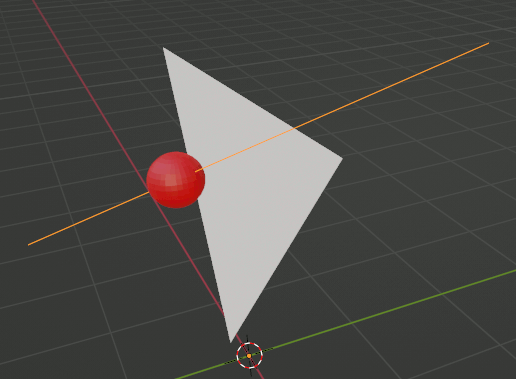
glm::intersectRayTriangleについて
三角形とレイの交点を求める。
void draw_intersect() {
  // 三角形を定義
  auto p0 = glm::vec3(-0.944245, 1.16309, -0.236938);
  auto p1 = glm::vec3(1.10855, -0.444616, 0.859098);
  auto p2 = glm::vec3(-0.21789, -0.660092, -0.62216);

  // レイの定義
  auto origin = glm::vec3(-0.846075, -0.217401, 0.880718); // レイ始点
  auto endp = glm::vec3(0.356164, -0.323941, -1.58961); // レイ終点
  auto dir = glm::normalize(endp - origin);// レイ方向計算+normalize

  glm::vec2 bary;// 重心座標系のu,v
  float distance;// originから交点までの距離

  glm::intersectRayTriangle(origin, dir, p0, p1, p2, bary, distance);


  // 三角形の描画
  glBegin(GL_TRIANGLES);
  glColor3d(1, 0, 0);
  glVertex3fv(glm::value_ptr(p0));
  glColor3d(0, 1, 0);
  glVertex3fv(glm::value_ptr(p1));
  glColor3d(0, 0, 1);
  glVertex3fv(glm::value_ptr(p2));
  glEnd();

  // レイを表示
  glColor3d(1, 1, 1);
  glLineWidth(1);
  glBegin(GL_LINES);
  glVertex3fv(glm::value_ptr(origin));
  glVertex3fv(glm::value_ptr(endp));
  glEnd();
  glLineWidth(3);
  glColor3d(1, 1, 1);
  glBegin(GL_LINES);
  glVertex3fv(glm::value_ptr(origin));
  glVertex3fv(glm::value_ptr(origin + dir * distance));
  glEnd();

  // 交点を強調表示
  glColor3f(1, 1, 1);
  glPointSize(15);
  glBegin(GL_POINTS);
  glVertex3fv(glm::value_ptr(origin + dir * distance));
  glEnd();

}

第六引数 baryPosition
baryPositionは重心座標系を返す。重心座標系はu,v,wで表せるが、u+v+w==1なので、w=1-u-vとなる。従ってbaryPositionにはu,vしか入っていない。wは自分で計算する。
void draw_intersect2() {
  auto p0 = glm::vec3(-0.944245, 1.16309, -0.236938);
  auto p1 = glm::vec3(1.10855, -0.444616, 0.859098);
  auto p2 = glm::vec3(-0.21789, -0.660092, -0.62216);

  auto origin = glm::vec3(-0.846075, -0.217401, 0.880718);
  auto endp = glm::vec3(0.356164, -0.323941, -1.58961);
  auto dir = glm::normalize(endp - origin);

  glm::vec2 bary;
  float distance;
  glm::intersectRayTriangle(origin, dir, p0, p1, p2, bary, distance);

  // 重心座標系
  float u = bary.x;
  float v = bary.y;
  float w = 1-u-v;

  // 三角形の頂点の色
  glm::vec3 r(1, 0, 0);
  glm::vec3 g(0, 1, 0);
  glm::vec3 b(0, 0, 1);

  // 交点の色を重心座標系から求める
  glm::vec3 cc =
    w * r +
    u * g +
    v * b;

  // 三角形の描画
  glBegin(GL_TRIANGLES);
  glColor3fv(glm::value_ptr(r));
  glVertex3fv(glm::value_ptr(p0));
  glColor3fv(glm::value_ptr(g));
  glVertex3fv(glm::value_ptr(p1));
  glColor3fv(glm::value_ptr(b));
  glVertex3fv(glm::value_ptr(p2));
  glEnd();

  // レイを表示
  glColor3d(1, 1, 1);
  glLineWidth(1);
  glBegin(GL_LINES);
  glVertex3fv(glm::value_ptr(origin));
  glVertex3fv(glm::value_ptr(endp));
  glEnd();


  glLineWidth(3);
  glColor3d(1, 1, 1);
  glBegin(GL_LINES);
  glVertex3fv(glm::value_ptr(origin));
  glVertex3fv(glm::value_ptr(origin + dir * distance));
  glEnd();

  // 交点を表示
  glPointSize(20);
  glColor3f(1,1,1);
  glBegin(GL_POINTS);
  glVertex3fv(glm::value_ptr(origin + dir * distance));
  glEnd();

  glPointSize(15);
  glColor3fv(glm::value_ptr(cc));
  glBegin(GL_POINTS);
  glVertex3fv(glm::value_ptr(origin + dir * distance));
  glEnd();

}

重心座標系について。
というかこのプログラムの色算出間違っていた。上が正解。体力があれば下記事も修正する。
glm::intersectRayPlaneでレイと面の交点を求める
#include <iostream>

#include <gl/glm-0.9.9/gtx/string_cast.hpp>

#include <gl/glm-0.9.9/glm.hpp>


// 球とRay , 面とRayの交差判定に必要
#include <gl/glm-0.9.9/gtx/intersect.hpp>

int main() {

  // 三点で面を定義
  glm::vec3 p0 = { -0.74092 ,1.31512,1.3569 };
  glm::vec3 p1 = { -1.71194 ,-0.053312 ,2.44526 };
  glm::vec3 p2 = { -0.131372 ,-0.116652 ,0.100522 };

  // 面上に存在する点1つ
  glm::vec3 planeo = p0;

  // 面の法線
  glm::vec3 planen = glm::normalize(glm::cross(p1 - p0, p2 - p0));

  // レイの定義
  glm::vec3 rays = { 1.45134 ,1.48362 ,2.90831 };
  glm::vec3 raye = { -2.87985 ,-1.52254 ,0.203716 };

  // レイの方向
  glm::vec3 rayn = glm::normalize(raye - rays);

  // raysからの距離
  float distance;

  glm::intersectRayPlane(
    rays,
    rayn,
    planeo,
    planen,
    distance
  );

  glm::vec3 x = rays + rayn * distance;

  std::cout << glm::to_string(x) << std::endl;
  // vec3(-1.011684, -0.225897, 1.370285)
}
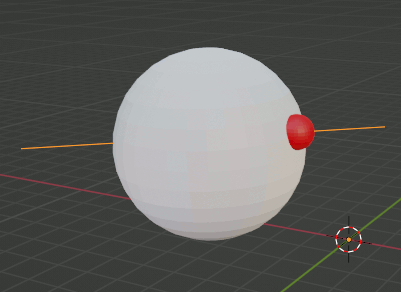
glm::intersectRaySphereでレイと球の交点を求める
glm::intersectRaySphereで球とレイの交点を算出できる。
この関数があるので自前実装にはあまり意味がない。
欠点はレイの始点に近い方の点しか取れない所。ただし普通の用途では問題ない。
#include <iostream>

#include <gl/glm-0.9.9/gtx/string_cast.hpp>

#include <gl/glm-0.9.9/glm.hpp>

// 球とRay , 面とRayの交差判定に必要
#include <gl/glm-0.9.9/gtx/intersect.hpp>

int main()
{
  /////////////////////////////
  ////// 球と線分の交点 ///////
  /////////////////////////////

  // テスト値を設定
  const glm::vec3 center{ -2.72692 ,-2.51743,3.0258 };
  const float r = 2.44975f;
  const glm::vec3 from{ 1.69882,-1.63121,3.75584 };
  const glm::vec3 to{ -7.42946 ,-4.48611 ,2.84412 };

  const glm::vec3 raynorm = glm::normalize(to - from);

  // 球と線分の交点を格納
  glm::vec3 CROSS;

  float direction;// fromからの距離
  if (glm::intersectRaySphere(from, raynorm, center, glm::pow(r, 2), direction) == true) {

    // fromに近い方の頂点が取得可能
    CROSS = from + raynorm * direction;

    std::cout << glm::to_string(CROSS);

    // 出力結果
    // vec3(-0.346964, -2.271036, 3.551510)
  }
  else {

    std::cout << "交差していない";

  }


}
glmのベクトル等のデータ型と関数を使って球とレイの交点を求めるプログラムを再考する
正直今更あまり意味がない(なぜあまり意味がないかは後日)のだが、以前つくった球とレイの交点を求めるプログラム。glm::vec使用版。画面をマウスドラッグで回転させたりするときに使ったりする。
cross.hpp
#pragma once

#include <gl/glm-0.9.9/glm.hpp>
#include <gl/glm-0.9.9/gtx/string_cast.hpp>
#include <array>

#include<vector>

namespace szl {
  template<typename T, size_t MAX>//最大二個まで結果を返せるようにしておく
  class LimitedArray {
    std::array<T, MAX> _data;
    size_t count;
  public:
    LimitedArray() :count(0) {}

    void push_back(const T& v) {

      if (count >= MAX)
        throw "count >= MAX";

      _data[count++] = v;
    }
    void pop_back() {

      if (count == 0)
        throw "count == 0";

      count--;
    }
    T& back() {

      if (count == 0)
        throw "count == 0";

      return _data[count - 1];
    }
    const T& back()const {
      return _data[count - 1];
    }
    const T* data()const { return _data; }
    T* data() { return _data; }

    size_t size()const { return count; }

    const T& operator[](const size_t index)const {
      return _data[index];
    }
    T& operator[](const size_t index) {
      return _data[index];
    }

  };
  struct HalfLineSegment {
    glm::vec3 S; // 始点
    float t;     // 長さ
    glm::vec3 V; // 方向

    HalfLineSegment() {}
    HalfLineSegment(glm::vec3 _s, float _t, glm::vec3 _v) :S(_s), t(_t), V(_v) {}

    glm::vec3 E()const {
      return S + t * V;
    }
  };
  //! @brief 球と直線の交点を求める
  //! @param [in] center 球の中心
  //! @param [in] r 球の半径
  //! @param [in] from 直線上の点1
  //! @param [in] to 直線状の点2
  //! @return 座標値 0個 または 2個
  // 参考 https://knzw.tech/raytracing/?page_id=78
  LimitedArray< HalfLineSegment, 2> sphere_line_cross(
    const glm::vec3& center,
    const float r,
    const glm::vec3& from,
    const glm::vec3& to
  ) {
    LimitedArray< HalfLineSegment, 2> ret;

    //線分の始点をpで表す。
    //球を0,0,0原点で計算するので、直線の方を球の中心分移動する
    glm::vec3 p = from - center;

    //直線の方程式を p + tvとする。
    glm::vec3 v = to - from;

    float A = std::pow(glm::length(v), 2);
    float B = 2 * glm::dot(p, v);
    float C = std::pow(glm::length(p), 2) - r * r;

    float D = B * B - 4 * A * C; //判別式
    float A2 = A * 2;

    if (D < 0.0)
      return ret;

    float sqrtD = std::sqrt(D);
    float t1 = (-B + sqrtD) / A2;
    float t2 = (-B - sqrtD) / A2;

    ret.push_back(HalfLineSegment(p + center, t1, v));
    ret.push_back(HalfLineSegment(p + center, t2, v));

    return ret;

  }
  //! @brief 球と直線の交点を求めてfromに近い方の点を返す
  //! @param [in] center 球の中心
  //! @param [in] r 球の半径
  //! @param [in] from 直線上の点1
  //! @param [in] to 直線状の点2
  //! @return 座標値
  glm::vec3 sphere_line_hit(
    const glm::vec3& center,
    const float r,
    const glm::vec3& from,
    const glm::vec3& to
  ) {
    LimitedArray< HalfLineSegment, 2> hits = sphere_line_cross(center, r, from, to);

    glm::vec3 ret;

    switch (hits.size()) {
    case 1:
      ret = hits[0].E();
      break;
    case 2:

      if (glm::distance(from, hits[0].E()) <
        glm::distance(from, hits[1].E())) {
        ret = hits[0].E();
      }
      else {
        ret = hits[1].E();
      }
      break;
    default:
      ret = glm::vec3{
        std::numeric_limits<float>::infinity(),
        std::numeric_limits<float>::infinity(),
        std::numeric_limits<float>::infinity()
      };
    }

    return ret;

  }
  bool isValid(const glm::vec3& vec) {
    auto c = glm::isinf(vec);
    return c.x && c.y && c.z;
  }
}
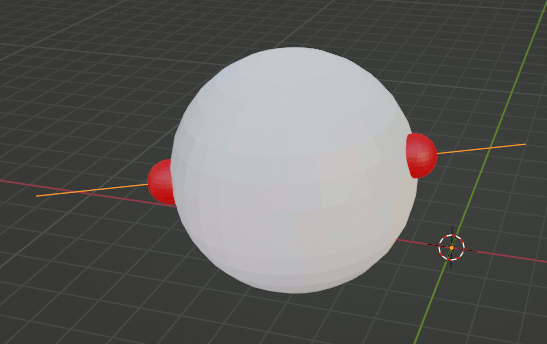
テストコード
#include <iostream>

#include "cross.hpp"

int main()
{
  // テスト値を設定
  const glm::vec3 center{ -2.72692 ,-2.51743,3.0258 };
  const float r= 2.44975f;
  const glm::vec3 from{ 1.69882,-1.63121,3.75584 };
  const glm::vec3 to{ -7.42946 ,-4.48611 ,2.84412 };

  // 交点を計算
  auto hits = szl::sphere_line_cross(center, r, from, to);

  glm::vec3 P = szl::sphere_line_hit(center, r, from, to);

  // 結果を表示
  std::cout << glm::to_string(P) << std::endl;
  std::cout << glm::to_string(hits[0].E()) << std::endl;
  std::cout << glm::to_string(hits[1].E()) << std::endl;

}
出力
球と直線をBlenderで設定して、出力した座標に球を配置してみる。正しく計算できていることがわかる
vec3(-4.877646, -3.688022, 3.098992)
vec3(-0.346963, -2.271036, 3.551510)
glmを試す
追記:(導入)
公開してからダウンロード元を書いていなかったので追記。
glm-master.zip を展開し、glm-master/ を適当な場所へ置き、glm/glm.hppをincludeできるように設定する。以下のサンプルプログラムはやや変なことをしているので気が向いたら後で修正する。
概要
OpenGLで非推奨になったglTranslate等の代わりになるライブラリglmを積極的に使っていこうと思う。includeだけで使え、リンクの必要はない。
注意点として、テンプレートを多用している関係上double→floatなどの暗黙的型変換が効かないので、0.1ではなくちゃんと0.1fと書かなければいけないような場所が多い。
使用例として、以前に書いたfreeglutのコピペ用コードをglmを使って書き直してみる。
#include <Windows.h>
#include <gl/GL.h>
#include <gl/GLU.h>
#include <gl/freeglut.h>

// mat4 等
#include <gl/glm-0.9.9/glm.hpp>

// perspective , transform 等
#include <gl/glm-0.9.9/gtc/matrix_transform.hpp>

// value_ptr 等
#include <gl/glm-0.9.9/gtc/type_ptr.hpp>


// freeglut:
// http://freeglut.sourceforge.net/

// glm
// https://github.com/g-truc/glm

//ウィンドウの幅と高さ
int width, height;

double rotate_angle = 0;


//描画関数
void disp(void) {


    glClearColor(0.2, 0.2, 0.2, 1);
    glClear(GL_COLOR_BUFFER_BIT | GL_DEPTH_BUFFER_BIT);

    glViewport(0, 0, width, height);

#if 0
    //カメラの設定
    glMatrixMode(GL_PROJECTION);
    glLoadIdentity();
    gluPerspective(60, width / (double)height, 0.1, 3);
    glMatrixMode(GL_MODELVIEW);
    glLoadIdentity();
    glTranslated(0, 0, -2);
    glRotated(rotate_angle, 0, 1, 0);
#else

    // 行列を計算
    glm::mat4 P = glm::perspective(glm::radians(60.f), width / (float)height, 0.1f, 3.f);

    glm::mat4 M;
    M = glm::identity<glm::mat4>();
    M = glm::translate(M, glm::vec3(0.f, 0.f, -2.f));
    M = glm::rotate(M, glm::radians((float)rotate_angle), glm::vec3(0.f, 1.f, 0.f));

    // 行列の設定

    glMatrixMode(GL_PROJECTION);
    glLoadMatrixf(glm::value_ptr(P));

    glMatrixMode(GL_MODELVIEW);
    glLoadMatrixf(glm::value_ptr(M));

#endif

    double v = 0.7;

    glBegin(GL_QUADS);
    glColor3d(0, 0, 1);
    glVertex2d(-v, -v);
    glColor3d(1, 0, 1);
    glVertex2d(v, -v);
    glColor3d(1, 1, 1);
    glVertex2d(v, v);
    glColor3d(0, 1, 1);
    glVertex2d(-v, v);

    glEnd();
    glFlush();
}

//ウィンドウサイズの変化時に呼び出される
void reshape(int w, int h) {
    width = w; height = h;

    disp();
}

void timer(int value)
{
    rotate_angle += 5;

    disp();
    glutTimerFunc(10, timer, 0);
}

//エントリポイント
int main(int argc, char** argv)
{
    glutInit(&argc, argv);
    glutInitWindowPosition(100, 50);
    glutInitWindowSize(500, 500);
    glutInitDisplayMode(GLUT_SINGLE | GLUT_RGBA);

    glutCreateWindow("sample");
    glutDisplayFunc(disp);
    glutReshapeFunc(reshape);
    glutTimerFunc(1000, timer, 0);//タイマー
    glutMainLoop();

    return 0;
}
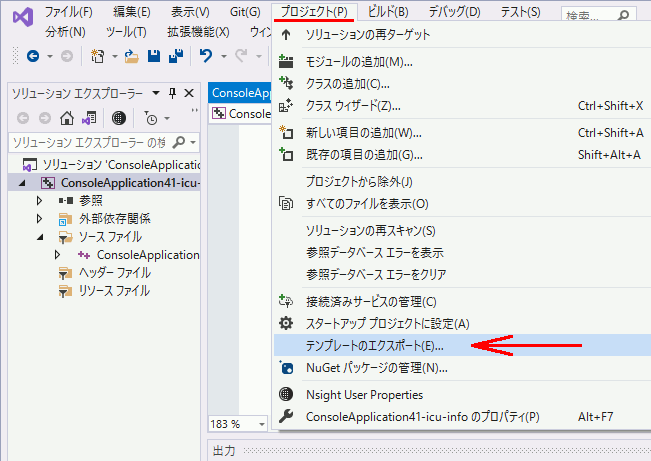
VC++のプロジェクトをテンプレート化して再利用
Visual C++ 2019で作ったプロジェクト。ライブラリディレクトリの設定や基本的なコードなどをいちいち設定したりコピーペーストするのも良いがプロジェクトテンプレート化しておけば1クリックで再現できるようになる。
テンプレートのエクスポート
新しいプロジェクトの設定を終え、コードを書く。
プロジェクト→テンプレートのエクスポートを選択しウィザードを開く。
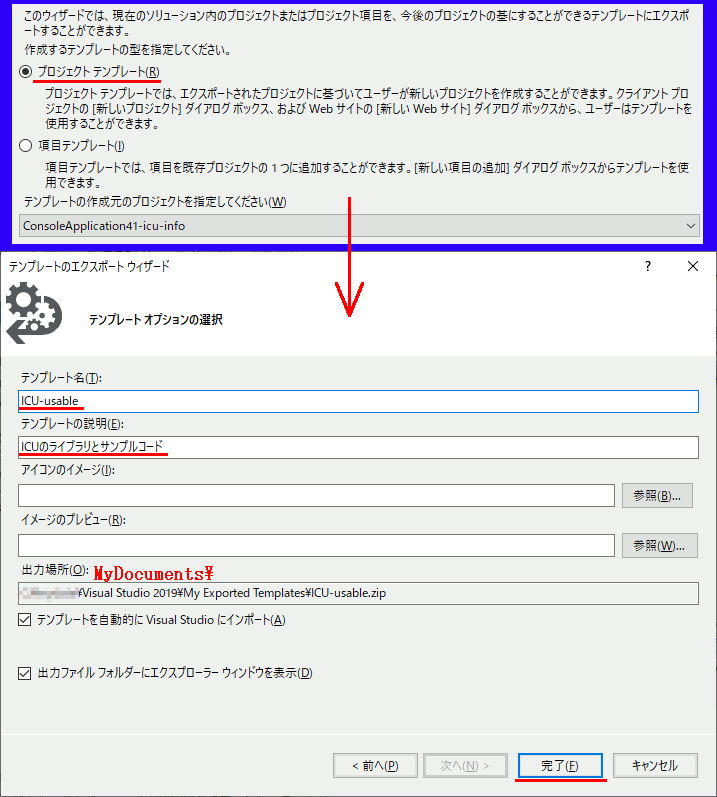
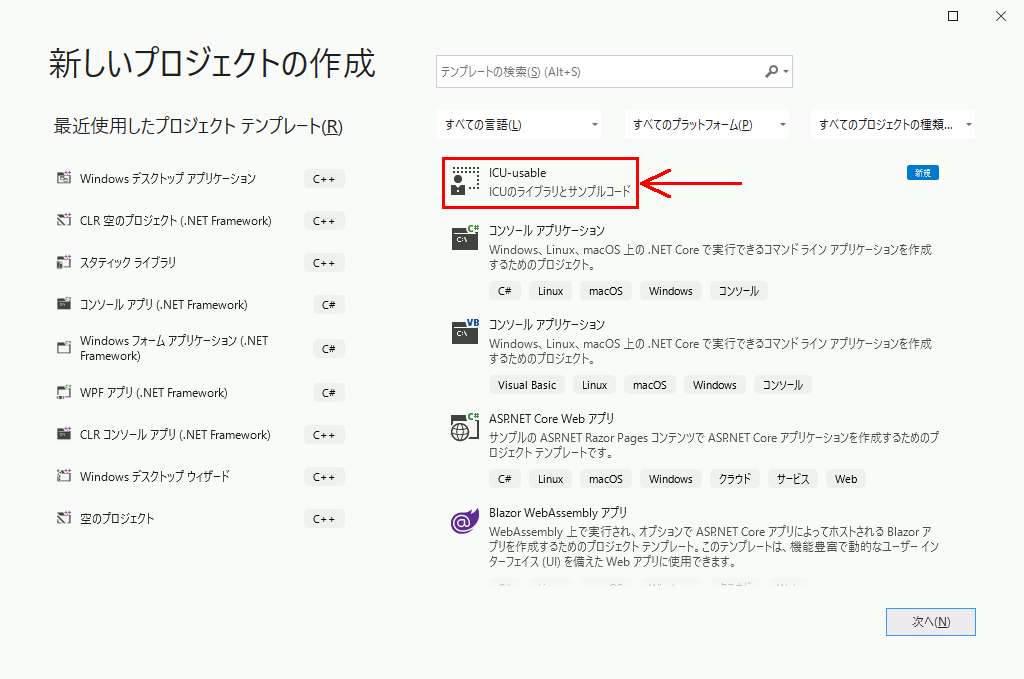
テンプレートのエクスポートを完了すると、新しいプロジェクトの生成の一覧に表示される。
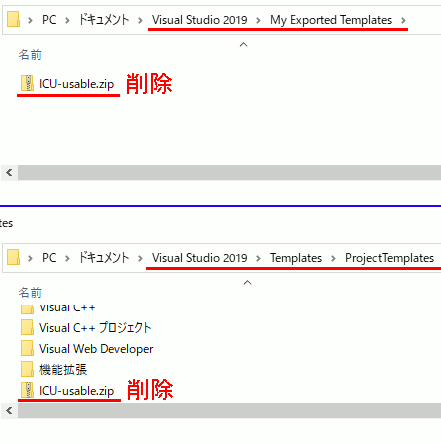
作成したテンプレートの削除方法
プロジェクトテンプレートを削除するとき、出力先のディレクトリにあるzipファイルを削除しても消えない。
同時に、Visual Studio2019\Templates\ProjectTemplates\ にあるzipファイルも削除すれば消える。
Easy Satisfying Animation in Blenderのチュートリアルを試す(2)
残りもやる。
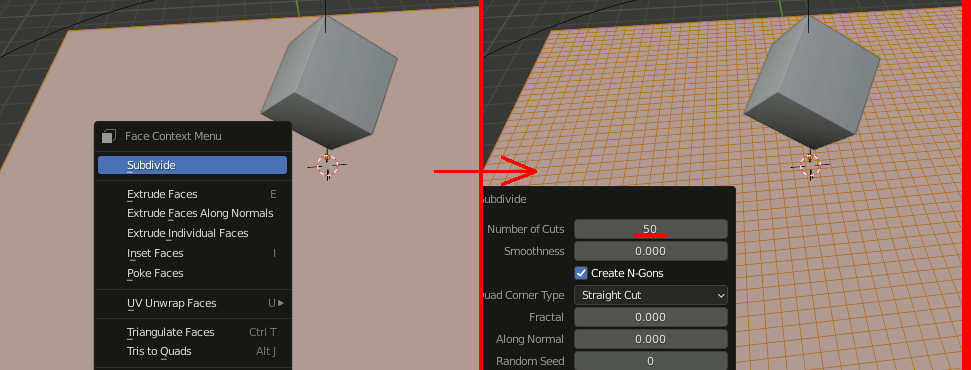
Planeを一枚追加して8倍する。ちょうど下のメッシュと同じサイズになる。
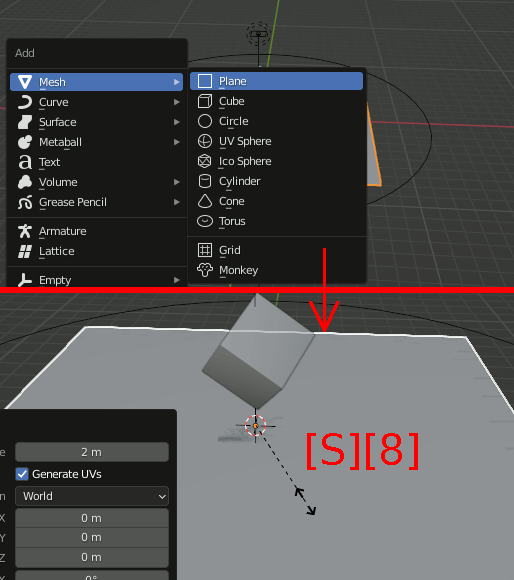
Subdivideで50分割する。
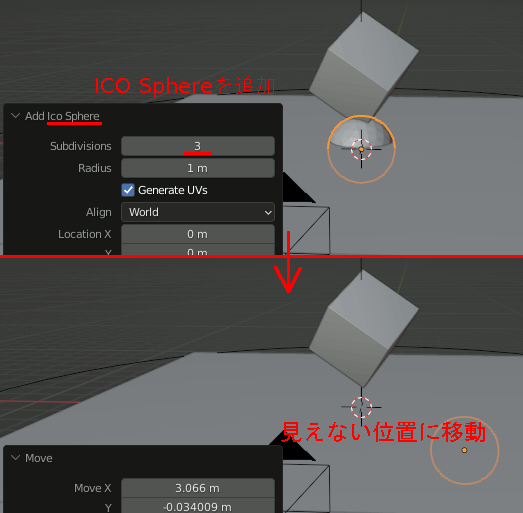
ICO Sphereを追加し分割数を3、見えない位置に移動しておく。
SphereにEmissionを設定し、強さを30にする。色を設定するのだが、動画内の色と数字がどう見ても合っていなかった。多分フレーム落ちしている。色合い的にはこっちが近い。

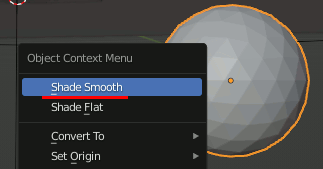
ICO Sphereを右クリックして Shade Smoothを設定する。
PlaneにParticleを設定。ObjectにIcosphereを設定する。
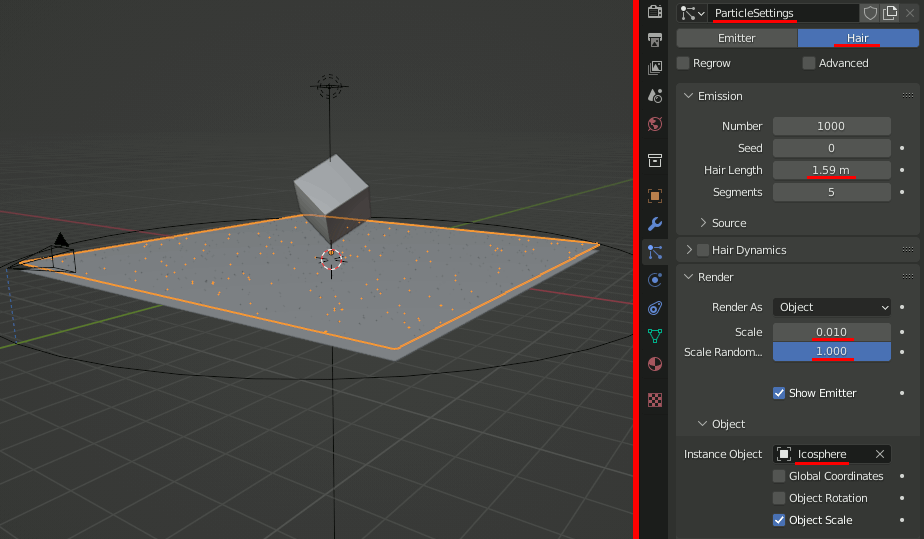
スケールを適用しておく。
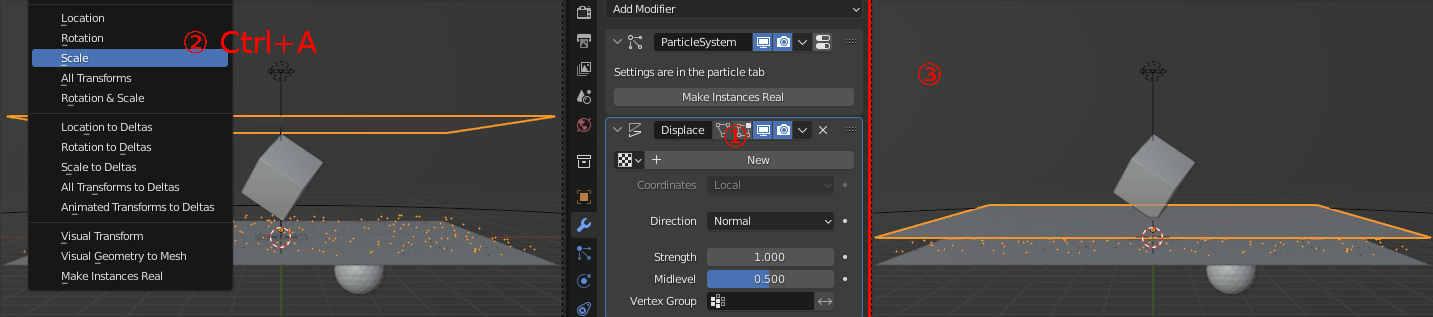
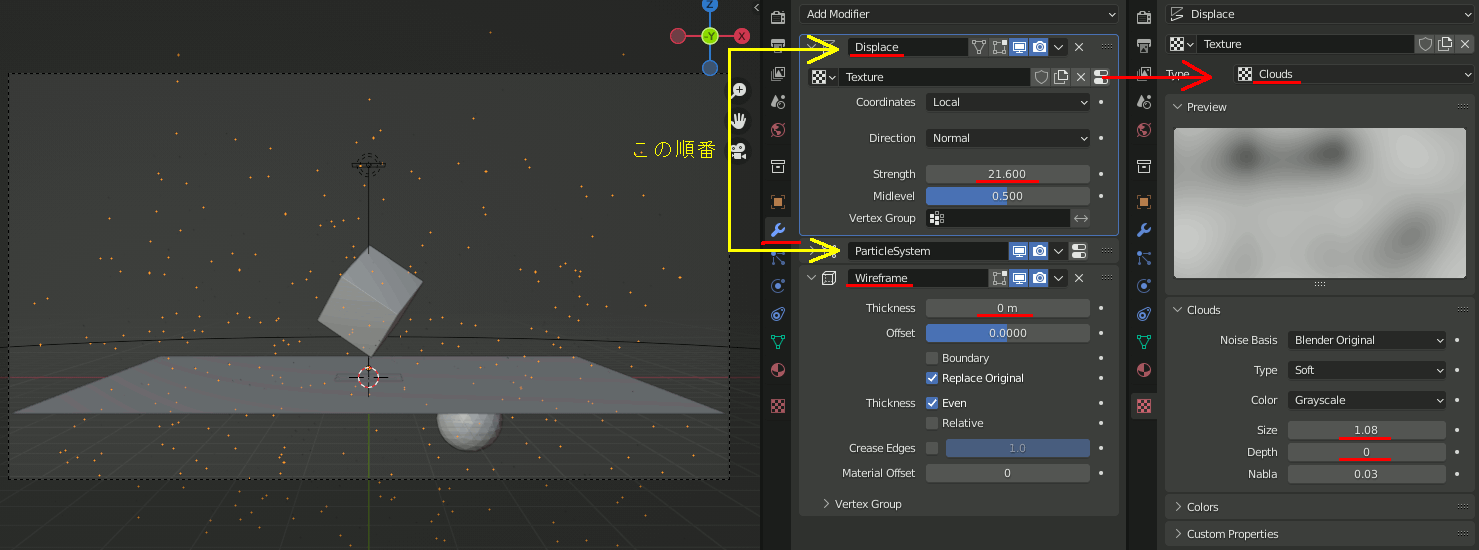
Displace、及びそのテクスチャ、wireframeモディファイアを設定。DisplaceとParticleSystemの順番に注意する。
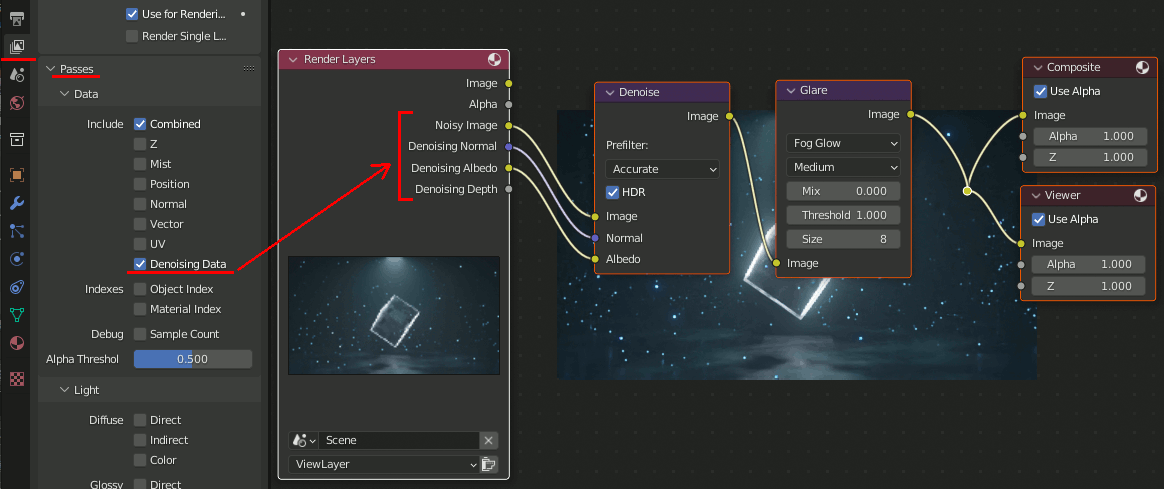
CompositでGlareとDenoiseを設定。この時、View Layer PropertiesでDenosing Dataをチェックする。

Blender カメラを軌道で周回+オブジェクトを注視する
Easy Satisfying Animation in Blenderのチュートリアルを試す の途中。
軌道を設置

[Curve]→[Nurbs Circle]を追加
カメラに Follow Path を設定
・Forward Axis =-X
・Up Axis = Z
・Follow Curveをチェック
さらに、カメラの回転を
・X=90

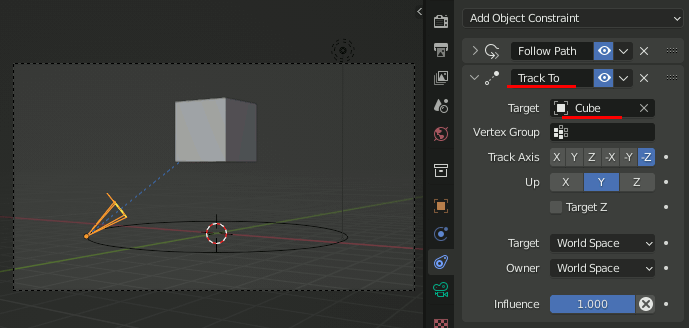
カメラに Track To を設定

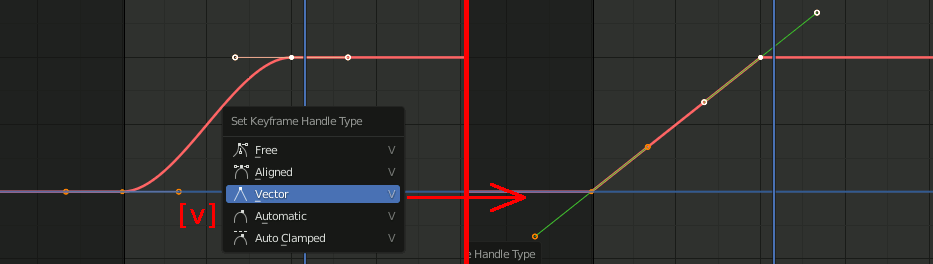
ループ速度を一定にしたい場合
GraphEditor

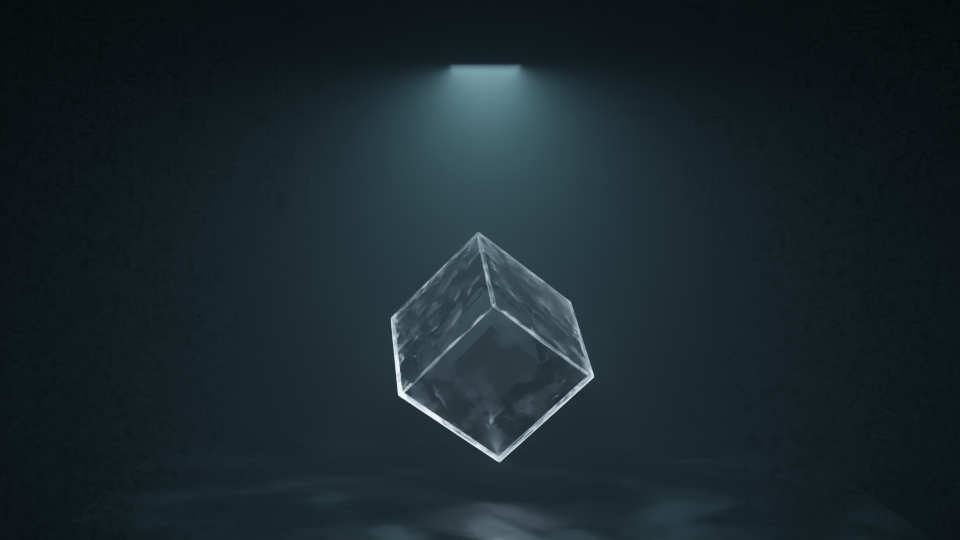
Easy Satisfying Animation in Blenderのチュートリアルを試す
基本的な設定
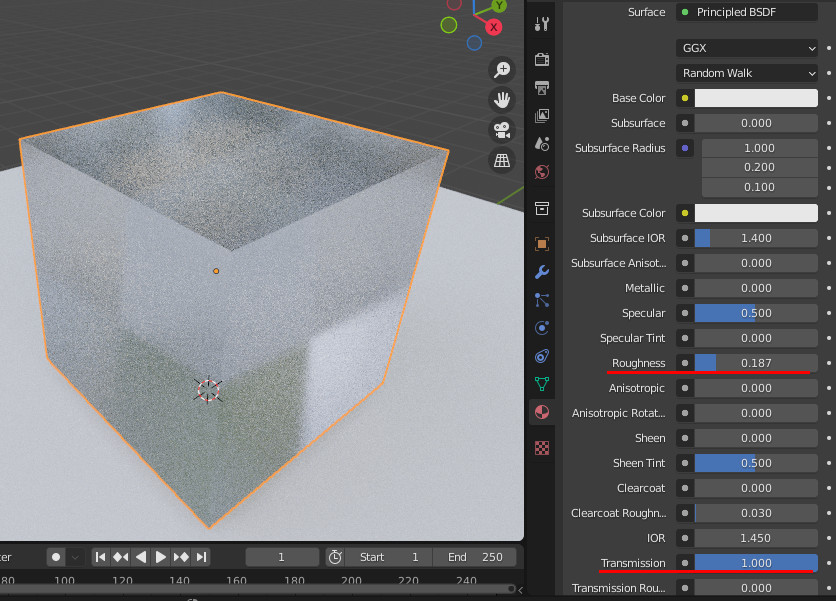
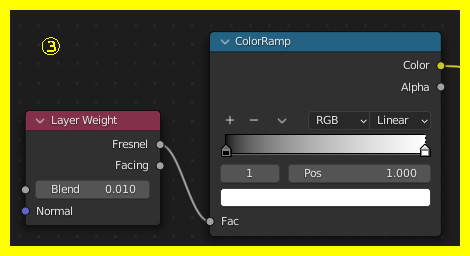
Cubeにマテリアルを追加し、以下を設定
・Roughness = 0.187
・Transmission = 1.0
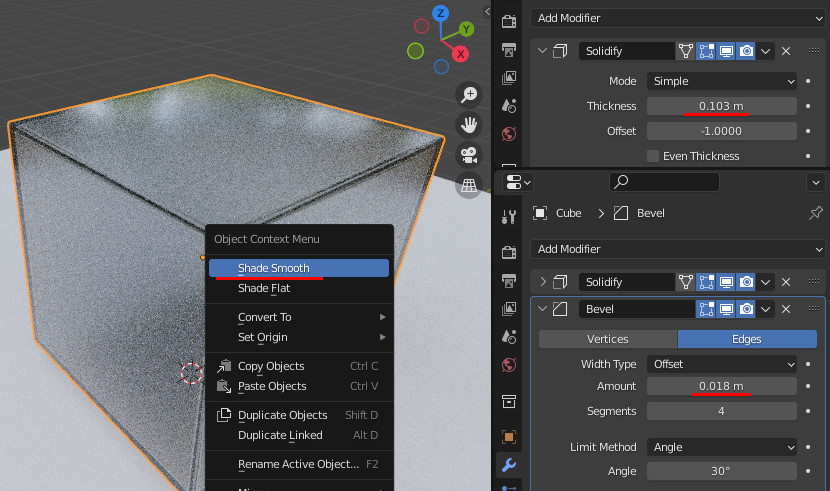
CubeにBevelモディファイアを追加し、
・Amount=0.018
・Segments = 4
CubeにSolidifyモディファイアを追加し、
・Thickness = 0.103
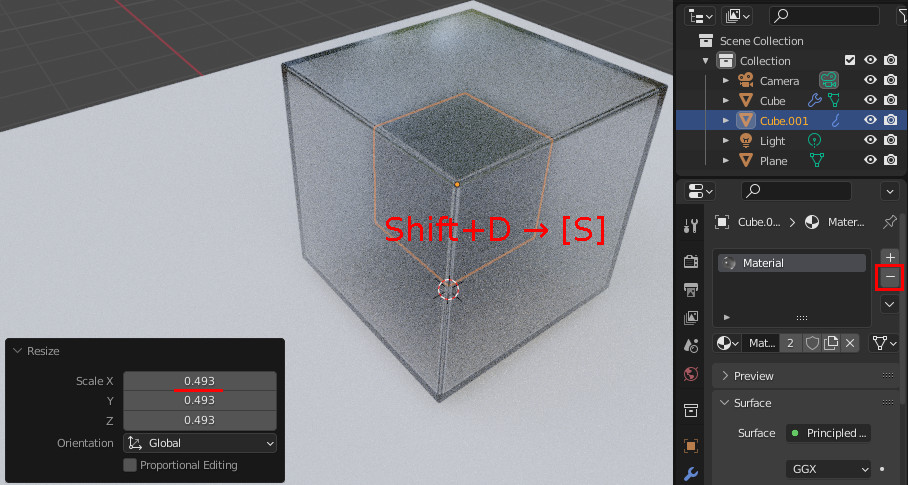
Cubeを複製し、0.493倍にリサイズ。
マテリアルが上記で設定した物と共通になっているので、削除しリンクを切る。新たにマテリアルを設定しておく。
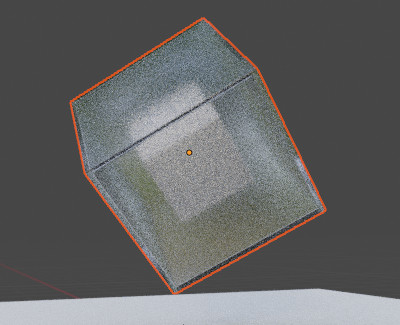
量補を選択し[R]で回転する。

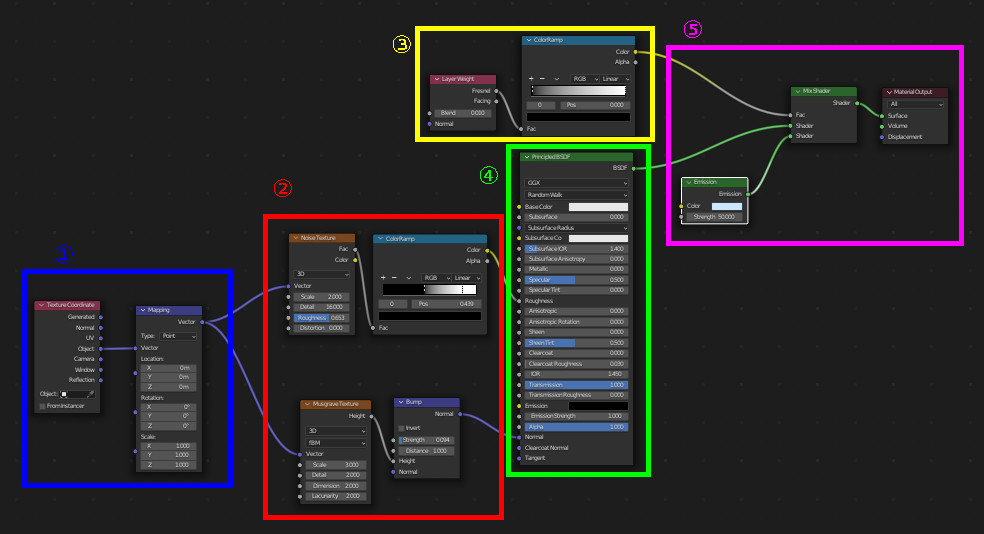
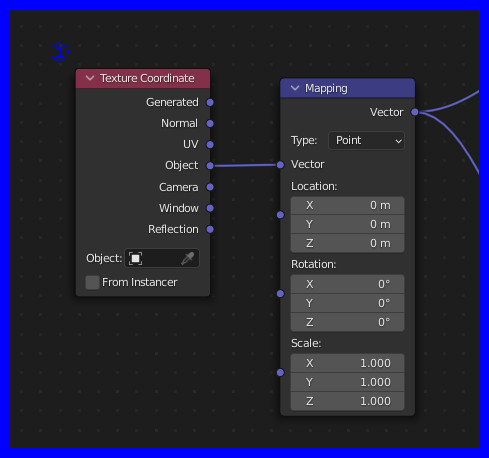
マテリアルの詳細な設定
大きい方のCubeのマテリアルを以下のように設定する:
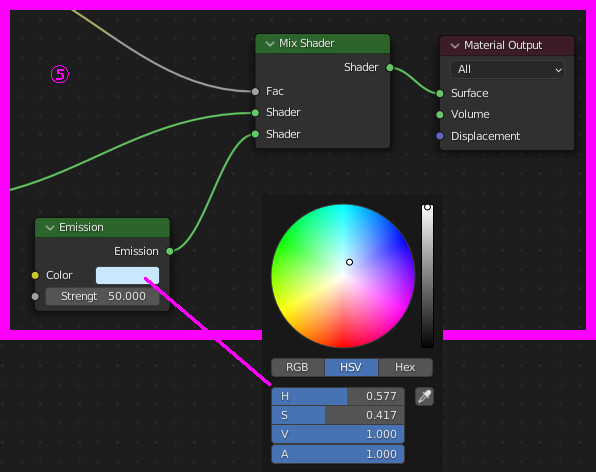

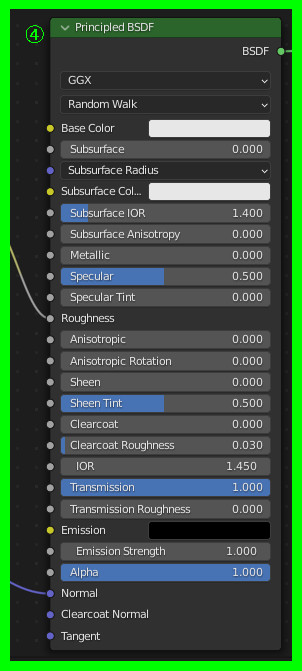
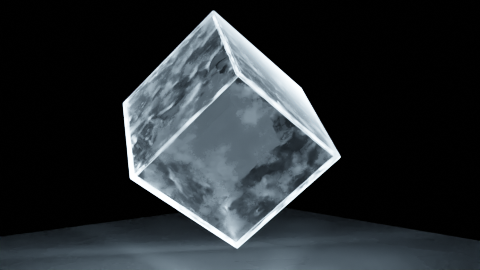
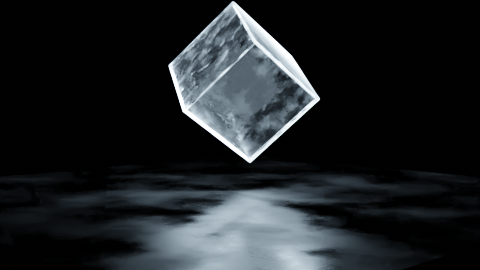
ここまでの結果
床部分のPlaneのマテリアルの設定

この結果
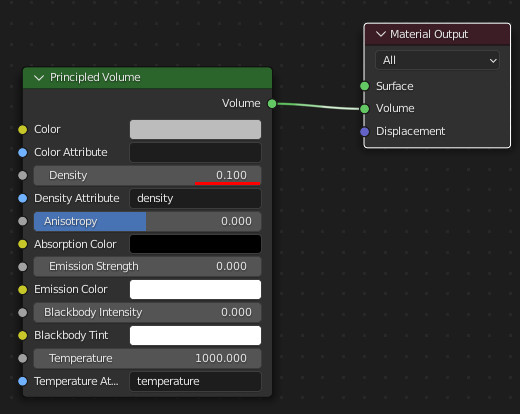
volumeとライトの設定
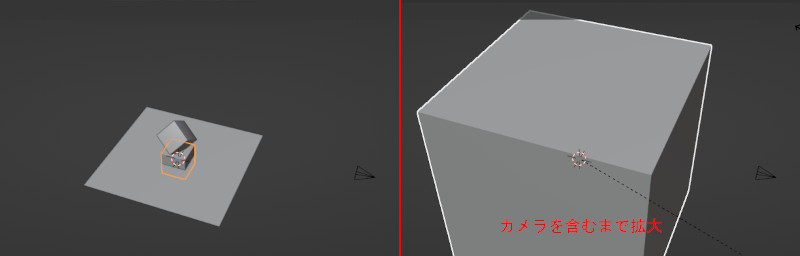
Cubeをもう一つ追加し、カメラが含まれるまで拡大する
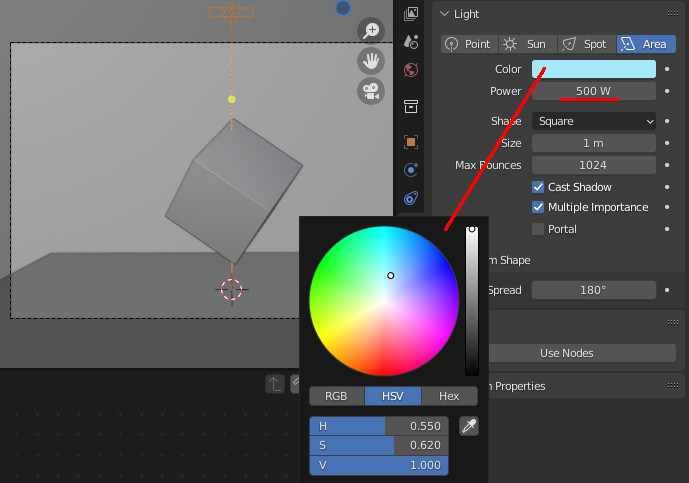
さらにAreaライトを追加し、Cubeの上部に配置する。
ここまでの結果