スポンサーリンク
三角形の重心座標系を計算してみる
重心座標系は、ある三角形が頂点A,B,Cからなるとき、三角形上の点Pの座標を、ABCの座標とパラメータuvwを使って、P=wA+uB+vC の形で表す方法。
此の何が嬉しいかというと、例えば三角形ABCの上に点Pがあったとする。次に三角形ABCを変形して三角形A'B'C'を作る。この時、点PはA'B'C'上ではどの位置(x,y,z)に該当するかを知りたい。
こんな時、あらかじめPの重心座標系を求め、uvwを計算しておけば、ABCの座標が変わってもuvwからP'のxyzを求めることができる。

u,v,wの計算方法
BarycentricCoordinates.hpp
#pragma once

// https://www.study.suzulang.com/3dcg-functions/vmmath-hpp
#include "vmmath.hpp"

#include<array>
//! @brief ABCの頂点から外積で求められる平行四辺形の面積
//! @param [in] A 頂点1の三次元座標
//! @param [in] B 頂点2の三次元座標
//! @param [in] C 頂点3の三次元座標
//! @return 平行四辺形の面積
double parellogram(
  const std::array<double, 3>& A,
  const std::array<double, 3>& B,
  const std::array<double, 3>& C
) {
  // P = wA+uB+vC

  std::array<double, 3> AtoB;
  szl::mathv::vector_from_line3(AtoB, A, B);

  std::array<double, 3> AtoC;
  szl::mathv::vector_from_line3(AtoC, A, C);

  //外積を求める
  std::array<double, 3> parallelogramABC;
  szl::mathv::outer3(parallelogramABC, AtoB, AtoC);

  //△ABCの面積の二倍
  return szl::mathv::length3(parallelogramABC);

}
//! @brief 三角形ABC上の点Pの重心座標系での位置を求める
//! @param [out] u △CAP/△ABC
//! @param [out] v △ABP/△ABC
//! @param [out] w △BCP/△ABC
//! @param [in] A 頂点1
//! @param [in] B 頂点2
//! @param [in] C 頂点3
//! @param [in] P 三角形内部の点
//! @return なし
void BarycentricCoordinates(
  double* u,
  double* v,
  double* w,
  const std::array<double, 3> A,
  const std::array<double, 3> B,
  const std::array<double, 3> C,
  const std::array<double, 3> P

) {

  double parellogramABC = parellogram(A, B, C);
  *u = parellogram(C, A, P) / parellogramABC;
  *v = parellogram(A, B, P) / parellogramABC;
  *w = parellogram(B, C, P) / parellogramABC;

}
実験
LineCross.hpp
以前作った、線分の交差判定のプログラムで定義した頂点データに色情報を追加する。
struct RGB {
  int r, g, b;
};

template<typename ScalarT>
struct Point {
  ScalarT x, y;
  RGB color; // 色情報
  Point(const ScalarT X, const ScalarT Y) :x(X), y(Y) {}

  template<typename T>
  Point(const Point<T>& src) {
    x = src.x;
    y = src.y;

    color.r = src.color.r;
    color.g = src.color.g;
    color.b = src.color.b;
  }
  Point() {}

};
scanConversion.hpp
以前作ったscanConversion.hppの、点を打つPlot関数を以下のように変更する。これは三角形内部の色をABC山頂点に与えた色情報を使うようにし、補間を重心座標系で行うようにする。
#pragma once

#include "NByteData.hpp"
#include "LineCross.hpp"

#include "BarycentricCoordinates.hpp"

template<typename PixelType>
struct imagedata {
  int width;
  int height;
  PixelType* img;
};

//! @brief 水平な線分ともう一方の線分との交差判定を行う
//! @param [out] cross 交差していた場合の座標(ピクセル単位)
//! @param [in] scanL 水平な線分
//! @param [in] L 線分
bool isPixelHorizonalCross(
  Pointi* cross,
  const LineSegmenti& scanL,
  const LineSegmenti& L) {

  //三角形塗りつぶしようなので、scanLは必ずLの始点・終点よりも広い範囲をとる
  //そのため始点・終点のY座標が一致していたら交差しているのでtrueを返す
  if (scanL.s.y == L.s.y) {
    *cross = L.s;
    return true;
  }
  if (scanL.s.y == L.e.y) {
    *cross = L.e;
    return true;
  }

  return isCrossPixel(cross, scanL, L);

}

//! @brief 画素に色を設定
//! @param [in,out] img 画像データ
//! @param [in] P 書き込み先の座標
//! @param [in] A 頂点1の座標と色
//! @param [in] B 頂点2の座標と色
//! @param [in] C 頂点3の座標と色
//! @return なし
template<typename PixelType>
void Plot(
  imagedata<PixelType> *img,
  Pointi P,
  const Pointi A,
  const Pointi B,
  const Pointi C
  ) {

  std::array<double, 3> _A{ A.x,A.y,0 };
  std::array<double, 3> _B{ B.x,B.y,0 };
  std::array<double, 3> _C{ C.x,C.y,0 };
  std::array<double, 3> _P{ P.x,P.y,0 };

  //変更
  double u, v, w;
  BarycentricCoordinates(
    &u,&v,&w,
    _A, _B, _C,
    _P
  );
  // P = wA+uB+vC

  unsigned char cR = w * A.color.r;
  unsigned char cG = u * B.color.g;
  unsigned char cB = v * C.color.b;

  PixelType Color{ cR,cG,cB };
  img->img[P.y * img->width + P.x] = Color;

}

//! @brief 走査変換で頂点ABCからなる三角形を描画
//! @param [in,out] img 画像データ
//! @param [in] A 頂点1の座標
//! @param [in] B 頂点2の座標
//! @param [in] C 頂点3の座標
template<typename PixelType>
void scanConversion(
  imagedata<PixelType> *img,
  const Pointi A,
  const Pointi B,
  const Pointi C
) {

  //入力された頂点をY座標が小さい順にソート
  Pointi m[3]{ A,B,C };
  std::sort(
    std::begin(m), std::end(m),
    [](const auto& s, const auto& t) {
    return s.y < t.y;
  });

  //X座標の最大・最小より少し広い範囲
  const int xmin = std::min_element(
    std::begin(m), std::end(m),
    [](const auto& s, const auto& t) {return s.x < t.x; }
  )->x - 1;
  const int xmax = std::max_element(
    std::begin(m), std::end(m),
    [](const auto& s, const auto& t) {return s.x < t.x; }
  )->x + 1;

  /*
           0
         / |
       /   |
     /     |
    1      |
     \     |
      \    |
       \   |
        \  |
         \ |
           2

  ソートにより三角形の配列mはy座標順に並んでいる


  */

  // 走査線と 01,02
  for (int y = m[0].y; y < m[1].y; y++) {
    //上半分について処理

    LineSegmenti scan(
      Pointi(xmin, y),
      Pointi(xmax, y)
    );

    Pointi cross01;
    Pointi cross02;

    LineSegmenti L01(m[0], m[1]);
    LineSegmenti L02(m[0], m[2]);

    bool ab = isPixelHorizonalCross(&cross01, scan, L01);
    bool ac = isPixelHorizonalCross(&cross02, scan, L02);

    if (ab == true && ac == true) {
      int cxmin = (std::min)(cross01.x, cross02.x);
      int cxmax = (std::max)(cross01.x, cross02.x);
      for (int x = cxmin; x <= cxmax; x++) {
        Pointi P(x, y);
        Plot(img, P,A,B,C);//変更
      }
    }


  }
  // 走査線と 12 , 01
  for (int y = m[1].y; y <= m[2].y; y++) {
    LineSegmenti scan(
      Pointi(xmin, y),
      Pointi(xmax, y)
    );

    Pointi cross12;
    Pointi cross02;

    LineSegmenti L12(m[1], m[2]);
    LineSegmenti L02(m[0], m[2]);

    bool bc = isPixelHorizonalCross(&cross12, scan, L12);
    bool ac = isPixelHorizonalCross(&cross02, scan, L02);

    if (bc == true && ac == true) {
      int cxmin = (std::min)(cross12.x, cross02.x);
      int cxmax = (std::max)(cross12.x, cross02.x);
      for (int x = cxmin; x <= cxmax; x++) {
        Pointi P(x, y);
        Plot(img, P, A, B, C);//変更
      }

    }
  }

}
呼び出し例
#pragma warning(disable:4996)

#include <iostream>
#include <vector>
#include "Bresenham.hpp"

#include "scanConversion.hpp"

void ppmP3_write(
  const char* const fname,
  const int width,
  const int height,
  const unsigned char* const p,
  const int vmax
);

using ucrgb = NByteData<3>;
ucrgb Black = ucrgb{ 0,0,0 };
ucrgb White = ucrgb{ 255,255,255 };
ucrgb Red = ucrgb{ 255,0,0 };

void test1(imagedata<ucrgb>& img,bool fill);
void test2(imagedata<ucrgb>& img,bool fill);
void test3(imagedata<ucrgb>& img,bool fill);
void test4(imagedata<ucrgb>& img,bool fill);
void test5(imagedata<ucrgb>& img,bool fill);
void test6(imagedata<ucrgb>& img, bool fill);
int main()
{

  int width = 200;
  int height = 200;
  std::vector<ucrgb> image;


  image.resize(width*height, White);

  imagedata<ucrgb> imginfo;
  imginfo.width = width;
  imginfo.height = height;
  imginfo.img = &image[0];

  std::fill(image.begin(), image.end(), White);
  test1(imginfo,true);

  std::fill(image.begin(), image.end(), White);
  test2(imginfo, true);

  std::fill(image.begin(), image.end(), White);
  test3(imginfo, true);

  std::fill(image.begin(), image.end(), White);
  test4(imginfo, true);

  std::fill(image.begin(), image.end(), White);
  test5(imginfo, true);

  std::fill(image.begin(), image.end(), White);
  test6(imginfo, true);

}
//! @brief PPM(RGB各1byte,カラー,テキスト)を書き込む
//! @param [in] fname ファイル名
//! @param [in] width 画像の幅
//! @param [in] height 画像の高さ
//! @param [in] p 画像のメモリへのアドレス
//! @param [in] vmax 全てのRGBの中の最大値。普通の画像なら255
//! @details RGBRGBRGB....のメモリを渡すと、RGBテキストでファイル名fnameで書き込む
void ppmP3_write(
  const char* const fname,
  const int width,
  const int height,
  const unsigned char* const p,
  const int vmax
) {

  FILE* fp = fopen(fname, "wb");
  fprintf(fp, "P3\n%d %d\n%d\n", width, height, vmax);

  size_t k = 0;
  for (size_t i = 0; i < (size_t)height; i++) {
    for (size_t j = 0; j < (size_t)width; j++) {
      fprintf(fp, "%d %d %d ",
        p[k * 3 + 0],
        p[k * 3 + 1],
        p[k * 3 + 2]
      );
      k++;
    }
    fprintf(fp, "\n");
  }

  fclose(fp);
}
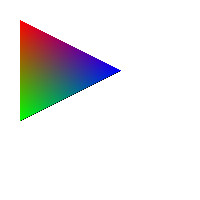
void test1(imagedata<ucrgb>& imginfo, bool fill) {
  Pointi A{ 20,20 };
  Pointi B{ 20,120 };
  Pointi C{ 120,70 };

  //追加
  A.color = RGB{ 255,0,0 };
  B.color = RGB{ 0,255,0 };
  C.color = RGB{ 0,0,255 };

  Bresenham(&imginfo.img[0], imginfo.width, imginfo.height, A.x, A.y, B.x, B.y, Black);
  Bresenham(&imginfo.img[0], imginfo.width, imginfo.height, B.x, B.y, C.x, C.y, Black);
  Bresenham(&imginfo.img[0], imginfo.width, imginfo.height, C.x, C.y, A.x, A.y, Black);

  if (fill) {
    scanConversion<ucrgb>(&imginfo, A, B, C);
  }


  ppmP3_write(R"(C:\test\t1.ppm)", imginfo.width, imginfo.height, imginfo.img->data(), 255);

}

void test2(imagedata<ucrgb>& imginfo, bool fill) {
  Pointi A{ 20,20 };
  Pointi B{ 120,20 };
  Pointi C{ 100,100 };

  //追加
  A.color = RGB{ 255,0,0 };
  B.color = RGB{ 0,255,0 };
  C.color = RGB{ 0,0,255 };

  Bresenham(&imginfo.img[0], imginfo.width, imginfo.height, A.x, A.y, B.x, B.y, Black);
  Bresenham(&imginfo.img[0], imginfo.width, imginfo.height, B.x, B.y, C.x, C.y, Black);
  Bresenham(&imginfo.img[0], imginfo.width, imginfo.height, C.x, C.y, A.x, A.y, Black);

  if (fill) {
    scanConversion<ucrgb>(&imginfo, A, B, C);
  }


  ppmP3_write(R"(C:\test\t2.ppm)", imginfo.width, imginfo.height, imginfo.img->data(), 255);

}

void test3(imagedata<ucrgb>& imginfo, bool fill) {
  Pointi A{ 100,20 };
  Pointi B{ 20,50 };
  Pointi C{ 130,100 };

  //追加
  A.color = RGB{ 255,0,0 };
  B.color = RGB{ 0,255,0 };
  C.color = RGB{ 0,0,255 };

  Bresenham(&imginfo.img[0], imginfo.width, imginfo.height, A.x, A.y, B.x, B.y, Black);
  Bresenham(&imginfo.img[0], imginfo.width, imginfo.height, B.x, B.y, C.x, C.y, Black);
  Bresenham(&imginfo.img[0], imginfo.width, imginfo.height, C.x, C.y, A.x, A.y, Black);

  if (fill) {
    scanConversion<ucrgb>(&imginfo, A, B, C);
  }


  ppmP3_write(R"(C:\test\t3.ppm)", imginfo.width, imginfo.height, imginfo.img->data(), 255);

}

void test4(imagedata<ucrgb>& imginfo, bool fill) {
  Pointi A{ 20,20 };
  Pointi B{ 20,20 };
  Pointi C{ 20,20 };

  //追加
  A.color = RGB{ 255,0,0 };
  B.color = RGB{ 0,255,0 };
  C.color = RGB{ 0,0,255 };

  Bresenham(&imginfo.img[0], imginfo.width, imginfo.height, A.x, A.y, B.x, B.y, Black);
  Bresenham(&imginfo.img[0], imginfo.width, imginfo.height, B.x, B.y, C.x, C.y, Black);
  Bresenham(&imginfo.img[0], imginfo.width, imginfo.height, C.x, C.y, A.x, A.y, Black);

  if (fill) {
    scanConversion<ucrgb>(&imginfo, A, B, C);
  }


  ppmP3_write(R"(C:\test\t4.ppm)", imginfo.width, imginfo.height, imginfo.img->data(), 255);

}
void test5(imagedata<ucrgb>& imginfo, bool fill) {
  Pointi A{ 20,20 };
  Pointi B{ 100,20 };
  Pointi C{ 50,20 };

  //追加
  A.color = RGB{ 255,0,0 };
  B.color = RGB{ 0,255,0 };
  C.color = RGB{ 0,0,255 };

  Bresenham(&imginfo.img[0], imginfo.width, imginfo.height, A.x, A.y, B.x, B.y, Black);
  Bresenham(&imginfo.img[0], imginfo.width, imginfo.height, B.x, B.y, C.x, C.y, Black);
  Bresenham(&imginfo.img[0], imginfo.width, imginfo.height, C.x, C.y, A.x, A.y, Black);

  if (fill) {
    scanConversion<ucrgb>(&imginfo, A, B, C);
  }

  ppmP3_write(R"(C:\test\t5.ppm)", imginfo.width, imginfo.height, imginfo.img->data(), 255);

}

void test6(imagedata<ucrgb>& imginfo, bool fill) {
  Pointi A{ 20,20 };
  Pointi B{ 20,50 };
  Pointi C{ 20,100 };

  //追加
  A.color = RGB{ 255,0,0 };
  B.color = RGB{ 0,255,0 };
  C.color = RGB{ 0,0,255 };

  Bresenham(&imginfo.img[0], imginfo.width, imginfo.height, A.x, A.y, B.x, B.y, Black);
  Bresenham(&imginfo.img[0], imginfo.width, imginfo.height, B.x, B.y, C.x, C.y, Black);
  Bresenham(&imginfo.img[0], imginfo.width, imginfo.height, C.x, C.y, A.x, A.y, Black);

  if (fill) {
    scanConversion<ucrgb>(&imginfo, A, B, C);
  }

  ppmP3_write(R"(C:\test\t6.ppm)", imginfo.width, imginfo.height, imginfo.img->data(), 255);

}
実行結果
この記事のトラックバックURL: