ゴミ箱の内容量を取得
windowsはいつの頃からか、ゴミ箱の中身のファイルサイズ合計が表示されなくなった。
知りたかったのでC++ + Win32APIでゴミ箱のファイル容量を取得してみる。
#include <iostream>
#include <windows.h>
#include <shellapi.h>   // shell32.lib


void GetRecycleBin(const char* drive = nullptr) {

  printf("\"%s\"\n", drive);


  SHQUERYRBINFO   rbInfo = { sizeof(SHQUERYRBINFO) };
  DWORDLONG     i64MB;

  // ごみ箱の情報を取得する
  if (SHQueryRecycleBin(drive, &rbInfo) == S_OK) {

    i64MB = (rbInfo.i64Size / 1024 / 1024);
    printf("ファイルサイズ合計 :%I64u MiB\n", i64MB);
    printf("ファイル数合計   :%I64u 個\n", rbInfo.i64NumItems);

  }
  else {
    printf("ごみ箱の情報を取得できません。\n");
  }
  printf("-----------------------\n");
}

// メイン関数
int main(void)
{

  GetRecycleBin("C:\\");
  GetRecycleBin("H:\\");
  GetRecycleBin("");

  getchar();
  return 0;
}
"C:\"
ファイルサイズ合計 :1299 MiB
ファイル数合計 :114 個
-----------------------
"H:\"
ファイルサイズ合計 :6454 MiB
ファイル数合計 :739 個
-----------------------
""
ファイルサイズ合計 :7754 MiB
ファイル数合計 :853 個
-----------------------
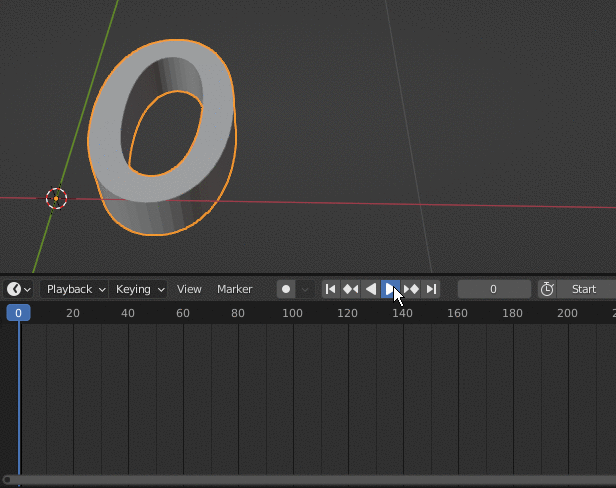
Blender 2.10のアニメーションでフレームが変わったときにTextを変更する
bpy.app.handlers.frame_change_pre.appendに指定した関数がフレームが変わるたびに走る。
この例では、テキストオブジェクトに現在のフレーム数を代入している。
import bpy


def frame_change_pre(scene):

    bpy.data.objects['Text'].data.body = str(scene.frame_current)


bpy.app.handlers.frame_change_pre.append(frame_change_pre)
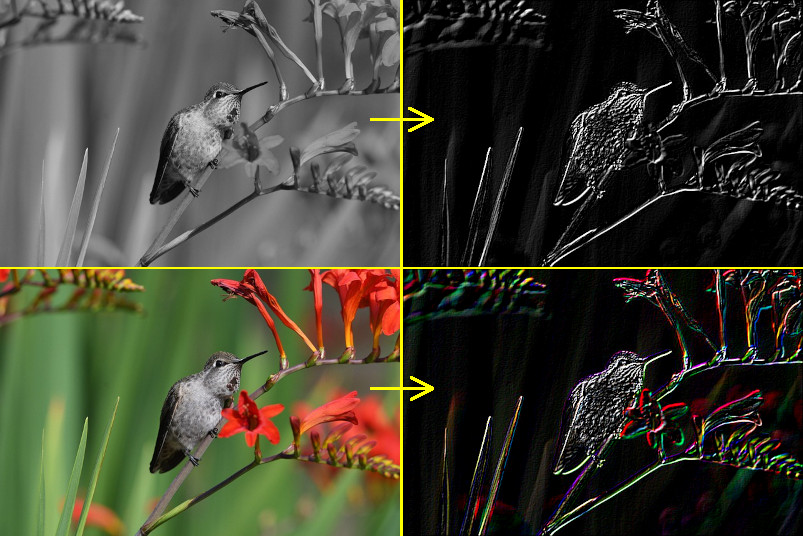
C++でSobelフィルタを実装
3x3のソーベルフィルタを実装する。
SobelFilter.hpp
#pragma once


#include <valarray>
#include <array>
//! @brief ソーベルフィルタ
//! @note フィルタを変えれば他の用途にも使える
class SobelFilter {

  // フィルタサイズ 3x3
  static constexpr int FilterSize = 3;


  std::array < std::array<int, FilterSize>, FilterSize > filterH; //!< 水平方向
  std::array < std::array<int, FilterSize>, FilterSize > filterV; //!< 垂直方向

  int m_width;  //!< 入出力画像の幅
  int m_height; //!< 入出力画像の高さ
  const unsigned char* m_pimg; //!< 元画像へのポインタ


  // -1 →(+1)→ 0
  //  0 →(+1)→ 1
  //  1 →(+1)→ 2

  //! @brief 水平のフィルタを取得
  int fH(const int x, const int y)const {
    return filterH[x + 1][y + 1];
  }
  //! @brief  垂直のフィルタを取得
  int fV(const int x, const int y)const {
    return filterV[x + 1][y + 1];
  }

public:
  //! @brief 一画素のサイズ。RGBで3バイト
  static constexpr int PixelSize = 3;

  using Vector3d = std::valarray<int>;

  //! @brief [in] w 画像幅
  //! @brief [in] h 画像幅
  //! @brief [in] pimg 元画像へのポインタ
  SobelFilter(int w, int h, const unsigned char* pimg) {

    //ソーベルフィルタ作成
    filterH[0] = { -1, 0, 1 };
    filterH[1] = { -2, 0, 2 };
    filterH[2] = { -1, 0, 1 };
    filterV[0] = { -1,-2,-1 };
    filterV[1] = { 0, 0, 0 };
    filterV[2] = { 1, 2, 1 };

    // 画像へアクセスする諸々の設定
    m_width = w;
    m_height = h;
    m_pimg = pimg;

  }


  //! @brief 元画像の(x,y)座標の画素を取得
  Vector3d pixel(const int x, const int y) {
    const unsigned char* p = &m_pimg[(y * m_width + x) * PixelSize];

    return Vector3d({ p[0], p[1], p[2] });
  }

  // (x,y)座標のフィルタ後の値を取得
  Vector3d get(const int x, const int y) {
    Vector3d tmp({ 0,0,0 });

    std::array<Vector3d, FilterSize * 2> px;;
    std::fill(px.begin(), px.end(), Vector3d{ 0,0,0 });

    //水平9画素についての合計
    px[0] =
      pixel(x - 1, y - 1) * fH(-1, -1) +
      pixel(x  , y - 1) * fH( 0, -1) +
      pixel(x + 1, y - 1) * fH( 1, -1);

    px[1] =
      pixel(x - 1, y) * fH(-1, 0) +
      pixel(x  , y) * fH( 0, 0) +
      pixel(x + 1, y) * fH( 1, 0);

    px[2] =
      pixel(x - 1, y + 1) * fH(-1, 1) +
      pixel(x  , y + 1) * fH( 0, 1) +
      pixel(x + 1, y + 1) * fH( 1, 1);

    ////////////////////////////////////////////////
    // 垂直9画素についての合計
    px[3] =
      pixel(x - 1, y - 1) * fV(-1, -1) +
      pixel(x, y - 1) * fV(0, -1) +
      pixel(x + 1, y - 1) * fV(1, -1);

    px[4] =
      pixel(x - 1, y) * fV(-1, 0) +
      pixel(x, y) * fV(0, 0) +
      pixel(x + 1, y) * fV(1, 0);

    px[5] =
      pixel(x - 1, y + 1) * fV(-1, 1) +
      pixel(x, y + 1) * fV(0, 1) +
      pixel(x + 1, y + 1) * fV(1, 1);

    for (auto& k : px) {
      for (int i = 0; i < PixelSize; i++) {
        tmp[i] += k[i];
      }
    }

    for (int i = 0; i < PixelSize; i++) {
      tmp[i] = (tmp[i] < 0) ? 0 : tmp[i];
      tmp[i] = (tmp[i] > 255) ? 255 : tmp[i];
    }


    return tmp;

  }
};
//! @brief width 画像横画素数
//! @brief height 画像縦画素数
//! @param [in] pimg 入力画像
//! @param [out] dst 出力先
//! @return なし
void sobel(
  const int width,
  const int height,
  const unsigned char* pimg,
  unsigned char* dst
) {


  SobelFilter sf(width, height, pimg);

  size_t sz = SobelFilter::PixelSize;

  for (int x = 1; x < width - 1; x++) {
    for (int y = 1; y < height - 1; y++) {

      SobelFilter::Vector3d px = sf.get(x, y);

      for (size_t p = 0; p < sz; p++) {
        dst[(y * width + x) * sz + p] = px[p];
      }
    }

  }
}
呼び出し例
#include <iostream>

#include <vector>

#include "SobelFilter.hpp"

#include "NByteData.hpp" // https://www.study.suzulang.com/2dcg-functions/nbyte-data-type

#include "ppmP3_read.hpp" // https://www.study.suzulang.com/cppppm-readerwriter/ppm-p3-reader-cpp

void ppmP3_write(
  const char* const fname,
  const int width,
  const int height,
  const unsigned char* const p,
  const int vmax
);
int main()
{
  int width;
  int height;
  int vmax;

  unsigned char* pimg;
  ppmP3_read("C:\\data\\b.ppm", &width, &height, &vmax, &pimg);

  std::vector<unsigned char> ret(width * height * 3);
  sobel(width, height, pimg, ret.data());

  ppmP3_write("C:\\data\\sobel.ppm", width, height, ret.data(), 255);


  std::cout << "Hello World!\n";
}
//! @brief PPM(RGB各1byte,カラー,テキスト)を書き込む
//! @param [in] fname ファイル名
//! @param [in] width 画像の幅
//! @param [in] height 画像の高さ
//! @param [in] p 画像のメモリへのアドレス
//! @param [in] vmax 全てのRGBの中の最大値。普通の画像なら255
//! @details RGBRGBRGB....のメモリを渡すと、RGBテキストでファイル名fnameで書き込む
void ppmP3_write(
  const char* const fname,
  const int width,
  const int height,
  const unsigned char* const p,
  const int vmax
) {

  FILE* fp = fopen(fname, "wb");
  fprintf(fp, "P3\n%d %d\n%d\n", width, height, vmax);

  size_t k = 0;
  for (size_t i = 0; i < (size_t)height; i++) {
    for (size_t j = 0; j < (size_t)width; j++) {
      fprintf(fp, "%d %d %d ",
        p[k * 3 + 0],
        p[k * 3 + 1],
        p[k * 3 + 2]
      );
      k++;
    }
    fprintf(fp, "\n");
  }

  fclose(fp);
}
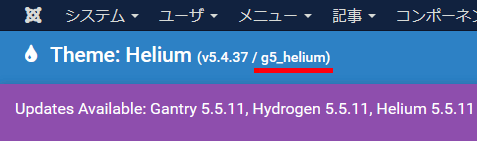
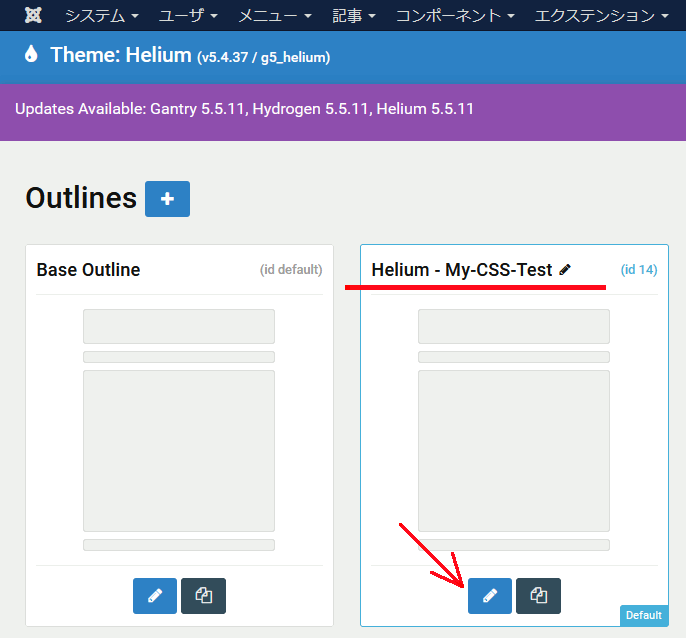
Joomla 3 のGantry 5に追加のcssファイルを導入する
Step 1. custom.scssファイルを用意する
Gantry 5 にはcssではなくscssを指定する。
SCSSについての説明は、とりあえず極限まで簡略化すると、SCSSの文法はCSS+書きやすい新たな構文 という感じなので、ひとまず拡張子を.cssから.scssにするだけで良い。
説明を読むとcssも受け付けるというようなことを書いてあったのだが、試した限りだと上手くいかない。
そして、ファイル名を「custom.scss」とした上で、内容に以下の一行を記述する。
Step 2. 実際に使用したい、スタイルを記述したcssファイルを用意し、ファイル名を変更
.scssに拡張子を変更する事に加え、ファイル名の先頭に_を加える
変更前:
変更後:
Step 3. custom.scssファイルに、使用したいcssファイルの指定を加える
最初のステップで作成したcustom.scssファイルの次の行に、_と拡張子.scssを除いたスタイルの記述されたファイル名を指定する。
ここまでで、custom.scssの内容は以下のようになる。
@import "textcolor";
ここまでのまとめ
custom.scssに、スタイルを記述したscssファイルを指定する。
Step 4. 自分が使っているテーマを確認
テーマを見て、g5_heliumといったテーマ名を確認する。
Step 5. FTPで上記scssファイルをアップロード
以下のディレクトリへ、二つのscssファイルをアップロードする。
例えば、
scss/ディレクトリがない場合は自分で作成する。
アップロードが終わると、以下の構成になっている
www/mywebsite/templates/g5_helium/custom/scss/custom.scss
www/mywebsite/templates/g5_helium/custom/scss/_textcolor.scss
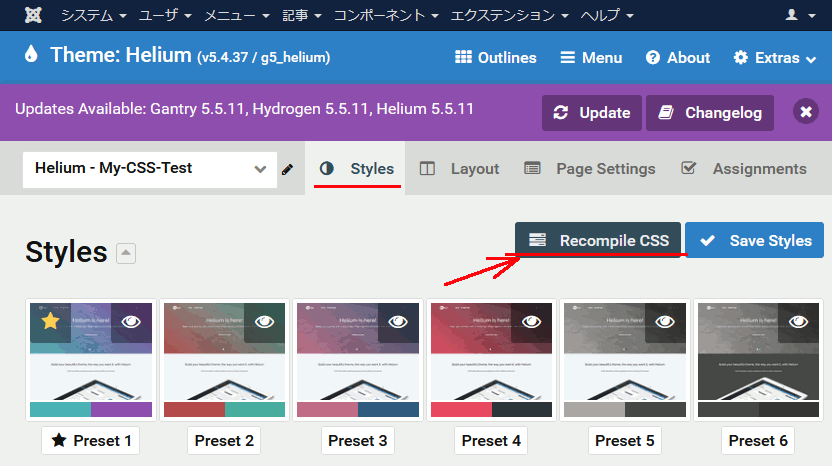
Step 6. Gantry 5の設定からscssのコンパイル
scssファイルはスタイルそのものではなく、「cssに近い文法で書ける、cssを生成するためのメタ言語であり、cssにコンパイルして使用する」。
なのでGantry 5 の設定画面でコンパイルする。
適用したいアウトラインを選択
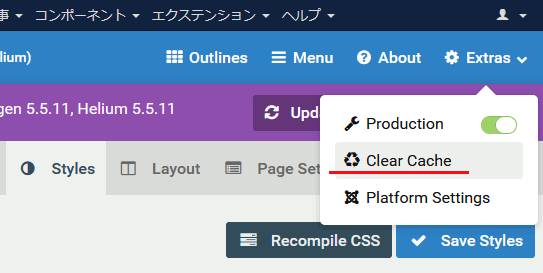
Clear Cache
画面右、Extras→Clear Cacheでキャッシュをクリアする
コンパイル
Stylesの画面右、Recomple CSSをクリックする。
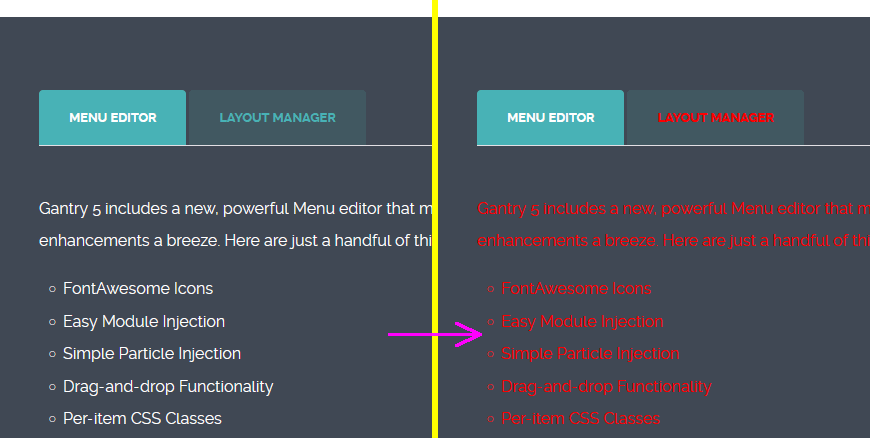
結果
画像の追加について
以下のディレクトリにテンプレートに使用する画像を入れるらしい。
参考
How to add Custom CSS/SCSS in Gantry 5 Theme
https://www.rcatheme.com/documentation/gantry5/how-to-add-custom-css-scss-in-gantry5-theme
Creating Custom File Overrides
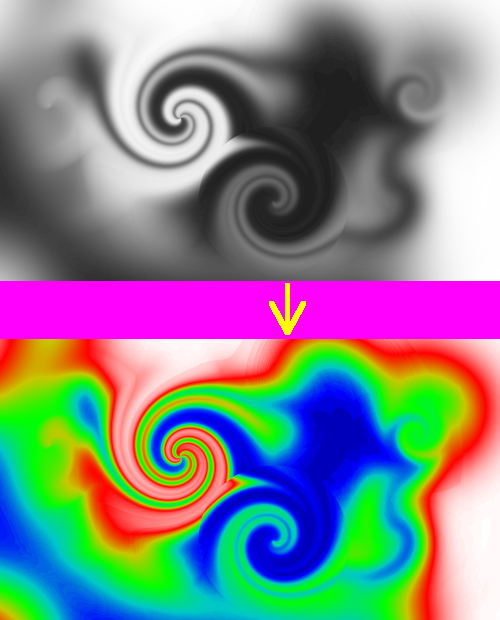
グレイスケール値をサーモグラフィーのように表示
thermography.h
#pragma once

#include <vector>
#include<cassert>

class Thermography {
  using InputColor = std::array<int, 3>;
  using CalcColor = std::array<double, 3>;
  using OutputColor = std::array<unsigned char, 3>;

  std::vector< InputColor > m_ctable;
  double m_dmin;
  double m_dmax;
private:

  template<typename Return>
  Return clamp(Return _min, Return _max, double value) const {
    if (value < _min)
      return _min;
    if (value > _max)
      return _max;
    return value;
  }

  //! @brief 0.0~1.0 の範囲のRGBを取得
  CalcColor calc(const int from, const double ratio)const {
    constexpr int R = 0, G = 1, B = 2;
    const int to = from + 1;

    double r = (m_ctable[from][R] + (m_ctable[to][R] - m_ctable[from][R]) * ratio) / 255.0;
    double g = (m_ctable[from][G] + (m_ctable[to][G] - m_ctable[from][G]) * ratio) / 255.0;
    double b = (m_ctable[from][B] + (m_ctable[to][B] - m_ctable[from][B]) * ratio) / 255.0;

    return CalcColor{r,g,b};
  }

  //! @brief 0~255の範囲のRGBを取得
  OutputColor toOutput(const CalcColor& cc)const {
    return
      OutputColor{
        clamp<unsigned char>(0 ,255 ,cc[0] * 255),
        clamp<unsigned char>(0 ,255 ,cc[1] * 255),
        clamp<unsigned char>(0 ,255 ,cc[2] * 255)
    };

  }


public:
  // @brief カラーテーブルを設定する
  template<class It>
  void setColorTable(It first, It last) {
    for (auto c = first;c!= last;c++)
      m_ctable.push_back(*c);
  }
  // @brief カラーテーブルを設定する
  void setColorTable(
    std::initializer_list< InputColor > colors
  ) {
    setColorTable(colors.begin(), colors.end());
  }

  // @brief 着色する値の範囲を設定
  void setArea(double _min, double _max) {
    m_dmin = _min;
    m_dmax = _max;
  }

  //! @brief 値をRGB色へ変換
  OutputColor thermography(const double value)const {
    constexpr int R = 0, G = 1, B = 2;

    int N = m_ctable.size();
    // 値の正規化
    double nvalue;
    double vwidth = m_dmax - m_dmin;
    nvalue = (value - m_dmin) / vwidth;

    int from, to;
    double ratio;
    //////////////////////////////
    // 範囲外
    if (nvalue <= 0.0) {
      from = 0;
      ratio = 0.0;
    }
    else if (nvalue >= 1.0) {
      from = m_ctable.size() - 2;
      ratio = 1.0;
    }
    //////////////////////////////
    // 範囲内なら from ~ to の間で正規化してratioにする
    else {
      from = nvalue * (N - 1);
      to = from + 1;

      double NnFrom = from / double(N - 1);
      double NnTo = to / double(N - 1);
      ratio = (nvalue - NnFrom) / (NnTo - NnFrom);
    }

    CalcColor rgb = calc(from, ratio);

    return toOutput(rgb);

  }
};
呼び出し例
#include <iostream>

// https://www.study.suzulang.com/2dcg-functions/nbyte-data-type
#include "NByteData.hpp"

#include "ppmP3_read.hpp"

#include "thermography.h"

#include <vector>
#include <array>

void ppmP3_write(
  const char* const fname,
  const int width,
  const int height,
  const unsigned char* const p,
  const int vmax
);

int main()
{
  using PixelT = NByteData<3>;

  std::vector<PixelT> mem;

  // 画像読み込み
  int width;
  int height;
  int vmax;

  ppmP3_read(
    "C:\\test\\ppp.ppm",
    &width,
    &height,
    &vmax,
    [&mem](const size_t pixelcount) {
    mem.resize(pixelcount);
    return (unsigned char*)&mem[0];
  }
  );
  //////////////////////////////////////////////
  //////////////////////////////////////////////
  std::vector< std::array<int, 3>> ColorTable{
    std::array<int, 3>{ 0 , 0,  0 }, // 黒
    std::array<int, 3>{ 0 , 0, 255}, // 青
    std::array<int, 3>{ 0 ,200,200}, // 水色
    std::array<int, 3>{ 0 ,255, 0 }, // 緑
    std::array<int, 3>{200,200, 0 }, // 橙
    std::array<int, 3>{255, 0 , 0 }, // 赤
    std::array<int, 3>{255,255,255}  // 白
  };

  Thermography c;
  c.setArea(0, 255);//この範囲外の値は0,255として扱われる
  c.setColorTable(ColorTable.begin(), ColorTable.end());
  // 色を反転
  for (auto& p : mem) {

    std::array<unsigned char,3> rgb = c.thermography(p.data()[0]);

    p.data()[0] = rgb[0];
    p.data()[1] = rgb[1];
    p.data()[2] = rgb[2];

    p.data()[0] = (p.data()[0] > 255) ? 255 : p.data()[0];
    p.data()[1] = (p.data()[1] > 255) ? 255 : p.data()[1];
    p.data()[2] = (p.data()[2] > 255) ? 255 : p.data()[2];

  }

  /////////////////////////////////
  /////////////////////////////////
  ppmP3_write(
    "C:\\test\\qqq.ppm",
    width,
    height,
    (unsigned char*)&mem[0], 255);

}


//! @brief PPM(RGB各1byte,カラー,テキスト)を書き込む
//! @param [in] fname ファイル名
//! @param [in] width 画像の幅
//! @param [in] height 画像の高さ
//! @param [in] p 画像のメモリへのアドレス
//! @param [in] vmax 全てのRGBの中の最大値。普通の画像なら255
//! @details RGBRGBRGB....のメモリを渡すと、RGBテキストでファイル名fnameで書き込む
void ppmP3_write(
  const char* const fname,
  const int width,
  const int height,
  const unsigned char* const p,
  const int vmax
) {

  FILE* fp = fopen(fname, "wb");
  fprintf(fp, "P3\n%d %d\n%d\n", width, height, vmax);

  size_t k = 0;
  for (size_t i = 0; i < (size_t)height; i++) {
    for (size_t j = 0; j < (size_t)width; j++) {
      fprintf(fp, "%d %d %d ",
        p[k * 3 + 0],
        p[k * 3 + 1],
        p[k * 3 + 2]
      );
      k++;
    }
    fprintf(fp, "\n");
  }

  fclose(fp);
}
ppmP3_read.hpp
#include <iostream>

// https://www.study.suzulang.com/2dcg-functions/nbyte-data-type
#include "NByteData.hpp"

// https://suzulang.com/ppmp3_read-memalloc-ver/
#include "ppmP3_read.hpp"

#include "thermography.h"

#include <vector>
#include <array>

void ppmP3_write(
  const char* const fname,
  const int width,
  const int height,
  const unsigned char* const p,
  const int vmax
);

int main()
{
  using PixelT = NByteData<3>;

  std::vector<PixelT> mem;

  // 画像読み込み
  int width;
  int height;
  int vmax;

  ppmP3_read(
    "C:\\test\\ppp.ppm",
    &width,
    &height,
    &vmax,
    [&mem](const size_t pixelcount) {
    mem.resize(pixelcount);
    return (unsigned char*)&mem[0];
  }
  );
  //////////////////////////////////////////////
  //////////////////////////////////////////////
  std::vector< std::array<int, 3>> ColorTable{
    std::array<int, 3>{ 0 , 0,  0 }, // 黒
    std::array<int, 3>{ 0 , 0, 255}, // 青
    std::array<int, 3>{ 0 ,200,200}, // 水色
    std::array<int, 3>{ 0 ,255, 0 }, // 緑
    std::array<int, 3>{200,200, 0 }, // 橙
    std::array<int, 3>{255, 0 , 0 }, // 赤
    std::array<int, 3>{255,255,255}  // 白
  };

  Thermography c;
  c.setArea(0, 255);//この範囲外の値は0,255として扱われる
  c.setColorTable(ColorTable.begin(), ColorTable.end());
  // 色を反転
  for (auto& p : mem) {

    std::array<unsigned char,3> rgb = c.thermography(p.data()[0]);

    p.data()[0] = rgb[0];
    p.data()[1] = rgb[1];
    p.data()[2] = rgb[2];

    p.data()[0] = (p.data()[0] > 255) ? 255 : p.data()[0];
    p.data()[1] = (p.data()[1] > 255) ? 255 : p.data()[1];
    p.data()[2] = (p.data()[2] > 255) ? 255 : p.data()[2];

  }

  /////////////////////////////////
  /////////////////////////////////
  ppmP3_write(
    "C:\\test\\qqq.ppm",
    width,
    height,
    (unsigned char*)&mem[0], 255);

}


//! @brief PPM(RGB各1byte,カラー,テキスト)を書き込む
//! @param [in] fname ファイル名
//! @param [in] width 画像の幅
//! @param [in] height 画像の高さ
//! @param [in] p 画像のメモリへのアドレス
//! @param [in] vmax 全てのRGBの中の最大値。普通の画像なら255
//! @details RGBRGBRGB....のメモリを渡すと、RGBテキストでファイル名fnameで書き込む
void ppmP3_write(
  const char* const fname,
  const int width,
  const int height,
  const unsigned char* const p,
  const int vmax
) {

  FILE* fp = fopen(fname, "wb");
  fprintf(fp, "P3\n%d %d\n%d\n", width, height, vmax);

  size_t k = 0;
  for (size_t i = 0; i < (size_t)height; i++) {
    for (size_t j = 0; j < (size_t)width; j++) {
      fprintf(fp, "%d %d %d ",
        p[k * 3 + 0],
        p[k * 3 + 1],
        p[k * 3 + 2]
      );
      k++;
    }
    fprintf(fp, "\n");
  }

  fclose(fp);
}
WordPress 5.8 以降でwebpをアップロードできない時の対応
環境
・さくらのレンタルサーバー
・Wordpress 5.9
現象
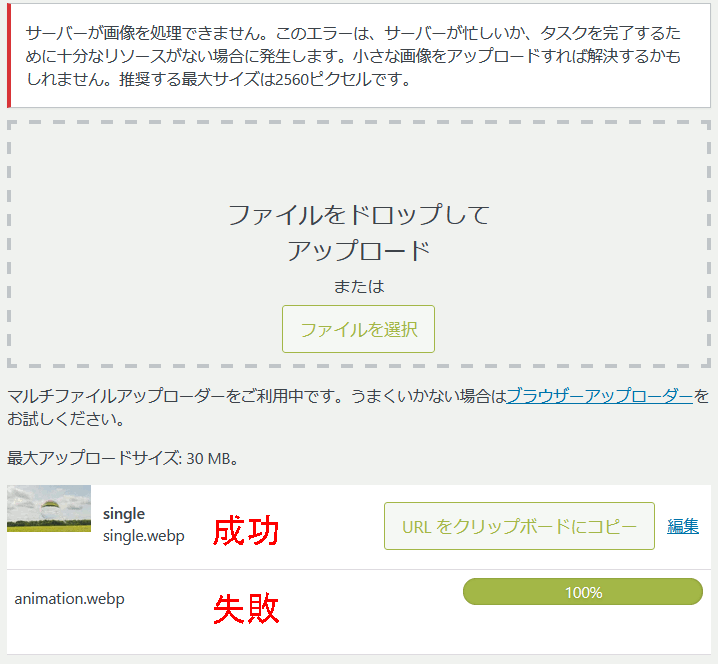
WordPress 5.8 からwebpに正式対応している。にもかかわらずwebpファイルをアップロードできない問題に遭遇した。
より具体的に言うと、一枚画像は転送できるが、アニメーションwebpは転送できないという状況に遭遇した。
対応
WordPressがWebPを使えるためには、サーバー側でImageMagickを有効にしていなければいけない。
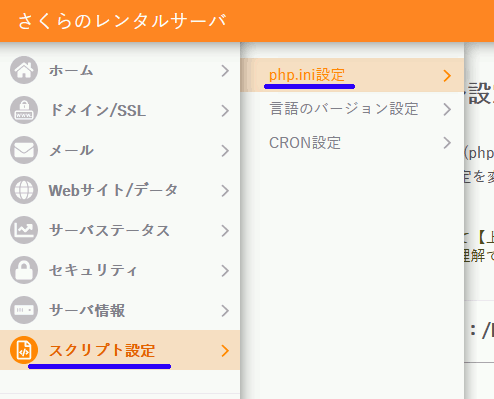
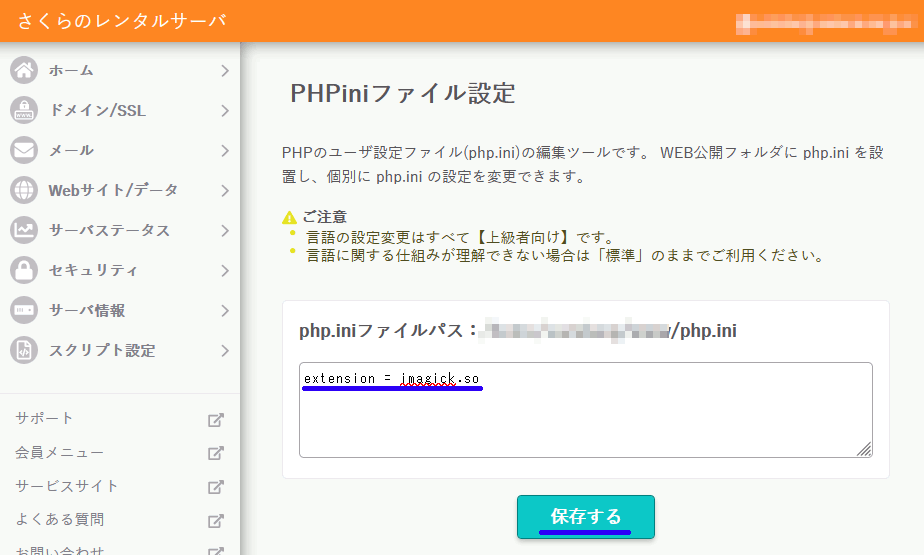
さくらのレンタルサーバーの場合デフォルトでは無効になっているので、以下の手順で有効化する。
1.コントロールパネルへログイン
https://secure.sakura.ad.jp/rs/cp/
アップロード例
アニメーションgif版:17.5MB
webp版:210KB
参考
WordPressのWebP対応に関する記述
In WordPress, the lossless WebP format is only supported when the hosting server uses Imagick (the PHP library) until LibGD adds support.
https://make.wordpress.org/core/2021/06/07/wordpress-5-8-adds-webp-support/
さくらのレンタルサーバーでimagickを有効にする手順
ImageMagick+ffmpeg+Pythonで比較動画を作る
0.ImageMagickで画像を横に並べる方法
具体例:
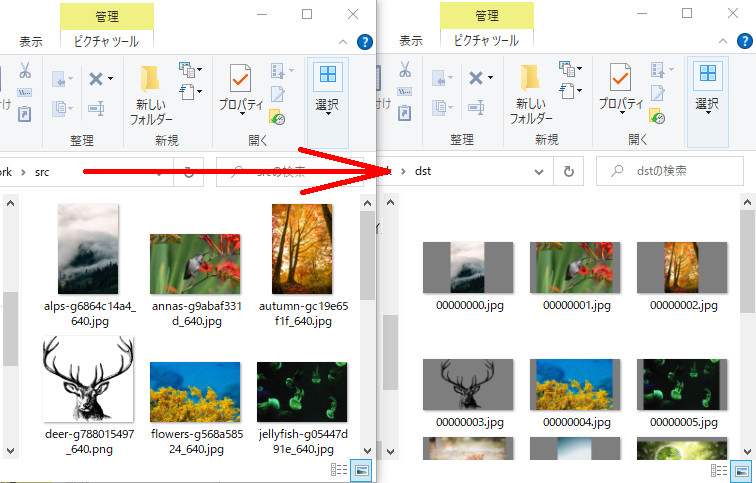
1.Pythonで「ディレクトリ内の全ての画像に対して」ImageMagickをかける
上記、magickのappendを、ディレクトリの中の全ての画像に対して行う関数を作成する。
このスクリプトで"glass/"ディレクトリと"metalic/"ディレクトリ内の連番画像をappendでつなげて"appends/"ディレクトリへ保存する
import subprocess  # コマンドラインを実行する
import os          # パス文字列の操作など
import glob        # ファイル一覧取得など

############################################
############################################

##
# @brief 画像データを横に二つ並べる処理を全ての画像に対して行う
# @param [in] dir_left 左側に配置する画像が存在するディレクトリ
# @param [in] dir_right 右側に配置する画像が存在するディレクトリ
# @param [in] dir_out 出力先のディレクトリ
def image_append(dir_left , dir_right , dir_out):

  # 各ディレクトリの中のファイル一覧
  L_images = glob.glob(dir_left  + "/*.png", recursive=True)
  R_images = glob.glob(dir_right + "/*.png", recursive=True)

  # L_images,R_imagesのリストの要素をそれぞれiL,iRとして
  for(iL,iR) in zip(L_images,R_images):

    # 拡張子なしの left側のファイル名を取得
    oname = os.path.splitext(os.path.basename(iL))[0]

    # 出力ファイル名作成
    opathname = dir_out + "/" + oname + ".png"


    # コマンド作成
    command = "magick convert +append " + iL + " " + iR + " " + opathname

    # 作成したコマンドの確認
    print(command)

    # コマンドの実行
    subprocess.call(command)


############################################
############################################

# 連番画像作成 引数は全てディレクトリ名
image_append("glass" , "metalic" , "appends")
2.連番画像を動画にするffmpegをPythonから呼び出す
これ単体ならわざわざPythonから呼び出す必要はないが、上記スクリプトに続けて呼び出したいのでPythonからcallする。
import subprocess  # コマンドラインを実行する
import os          # パス文字列の操作など
import glob        # ファイル一覧取得など


############################################
############################################

##
# @brief 連番画像から動画を作成
# @param [in] source 画像の場所とファイル名のパターン
# @param [in] outFileName 出力ファイル名
# @param [in] startNumber 画像の連番の開始番号
def mp4out(source,outFileName,startNumber):

  # コマンド作成
  command = f'ffmpeg -start_number {startNumber} -r 15 -i {source} -vcodec libx264 -pix_fmt yuv420p -vf "scale=trunc(iw/2)*2:trunc(ih/2)*2" -framerate 60 {outFileName}'

  # コマンドの実行
  subprocess.call(command)


############################################
############################################


# 動画作成 ファイル名、出力ファイル名、連番の最初の番号
mp4out("appends/%04d.png","out.mp4",1)
3.まとめ
構成
C:\TEST\DATA
│  compmv.py ... pythonスクリプト
│  out.mp4   ... ffmpegで生成した動画ファイル。mp4outで生成される
│
├─appends
│      0000.png
│      0001.png
│      0002.png
│      0003.png
│      0004.png
│      .... 結合済み画像 image_appendで出力される
│
├─glass
│      0001.png
│      0002.png
│      0003.png
│      0004.png
│      .... 連番画像1
│
└─metalic
        0001.png
        0002.png
        0003.png
        0004.png
        .... 連番画像2
スクリプト全体
import subprocess  # コマンドラインを実行する
import os          # パス文字列の操作など
import glob        # ファイル一覧取得など

############################################
############################################
##
# @brief 画像データを横に二つ並べる処理を全ての画像に対して行う
# @param [in] dir_left 左側に配置する画像が存在するディレクトリ
# @param [in] dir_right 右側に配置する画像が存在するディレクトリ
# @param [in] dir_out 出力先のディレクトリ
def image_append(dir_left , dir_right , dir_out):

  # 各ディレクトリの中のファイル一覧
  L_images = glob.glob(dir_left  + "/*.png", recursive=True)
  R_images = glob.glob(dir_right + "/*.png", recursive=True)

  # L_images,R_imagesのリストの要素をそれぞれiL,iRとして
  for(iL,iR) in zip(L_images,R_images):

    # 拡張子なしの left側のファイル名を取得
    oname = os.path.splitext(os.path.basename(iL))[0]

    # 出力ファイル名作成
    opathname = dir_out + "/" + oname + ".png"


    # コマンド作成
    command = "magick convert +append " + iL + " " + iR + " " + opathname

    # 作成したコマンドの確認
    print(command)

    # コマンドの実行
    subprocess.call(command)
############################################
############################################
##
# @brief 連番画像から動画を作成
# @param [in] source 画像の場所とファイル名のパターン
# @param [in] outFileName 出力ファイル名
# @param [in] startNumber 画像の連番の開始番号
def mp4out(source,outFileName,startNumber):

  # コマンド作成
  command = f'ffmpeg -start_number {startNumber} -r 15 -i {source} -vcodec libx264 -pix_fmt yuv420p -vf "scale=trunc(iw/2)*2:trunc(ih/2)*2" -framerate 60 {outFileName}'

  # コマンドの実行
  subprocess.call(command)
############################################
############################################

# 連番画像作成
image_append("glass" , "metalic" , "appends")

# 動画作成
mp4out("appends/%04d.png","out.mp4",1)
結果
ImageMagick + ffmpeg + Pythonでスライドショー的なmp4動画を作る
ImageMagickで画像サイズを変更、ffmpegで連番画像を動画に変換。
その一連の作業をPythonスクリプトで行う。
create_slideshow_movie.py
# usage:
# srcdir dstdir [0/1/2]
# 0 ... 連番画像作成 + 動画作成
# 1 ... 連番画像作成
# 2 ... 動画作成

import subprocess

import sys
import os
import shutil
import glob
#import random

############################################

# コマンドライン引数
args = sys.argv

# ディレクトリを二つ取得
dir_in   = args[1]
dir_out  = args[2]
mode     = int(args[3])

############################################

# 入力画像一覧
file_name_list = glob.glob(dir_in + "/*.*", recursive=True)

if mode==0 or mode==1:

  index=0

  for infile in file_name_list:

    sindex = str(index).zfill(8)
    index += 1

    # 変換後の画像サイズ
    xysize = "426x240" # "1920x1080"

    # 拡張子抜きのファイル名
    resultname = os.path.splitext(os.path.basename(infile))[0]

    # 出力ファイル名作成
    outfile = dir_out + "/" + sindex + ".jpg"

    # ImageMagickのコマンド作成
    cmd = "magick " + infile + " -gravity center -background gray -resize " + xysize + " -extent " + xysize + " " + outfile

    # ImageMagick実行
    subprocess.call(cmd)

if mode==0 or mode==2:

  # https://qiita.com/livlea/items/a94df4667c0eb37d859f
  # 連番画像を0.2fps(5秒で1枚)の動画と考えて、
  # それを15fps(1秒に15枚)の動画として作成。結果、5秒間に15x5枚同じ画像を表示する動画となる。
  subprocess.call('ffmpeg -framerate 0.2 -i ' + dir_out + '/' + '%08d.jpg' + ' -vcodec libx264 -pix_fmt yuv420p -r 15 out.mp4')
こんなスクリプトを作って、以下のように実行する。
実行結果:
ImageMagickでアスペクトを維持して画像サイズを変更、必要なら余白を加える
-gravityでセンタリング、-resizeでスケーリング、-extentで切り取る範囲、-backgroundで余白の色。
-resizeはデフォルトでアスペクト比を維持するので、-resizeで指定した画像サイズがそのまま結果となるとは限らない。そこで-extentを併用する。
-resizeによってスケーリングの範囲内に必ず画像が収まるので、結果画像(切り出す範囲)を-extentで指定する。-resizeのw,hよりextentのw,hの方が大きかった部分は、backgroundで塗りつぶされる。