CUDAの挙動を再現するC++のプログラム
線分を書くプログラムが動かなくて困ったので、C++でCUDAの動きを再現するプログラムを書いた。
fakeCUDA.hpp
#pragma once

struct COORD {
  int x, y;
  COORD(int _x, int _y) {
    x = _x;
    y = _y;
  }
  COORD(int _x) {
    x = _x;
    y = 1;
  }
  COORD() {
    x = 0;
    y = 0;
  }
};

using MyBlockIdx = COORD;
using MyThreadIdx = COORD;

using DimBlock = COORD;
using DimGrid = COORD;

struct thData {
  MyBlockIdx blockIdx;
  DimBlock blockDim;
  MyThreadIdx threadIdx;
};
//! @brief grid x block回関数fを呼び出す
//! @param grid グリッド
//! @param block ブロック
//! @param f 呼び出す関数
//! @param args N個の引数
template<class F, class ...Args>
void fakeCudaKernel(DimBlock grid, DimGrid block, F&& f, Args&&... args) {

  thData _thread;
  _thread.blockDim = block;

  for (int gx = 0; gx < grid.x; gx++) {
    for (int gy = 0; gy < grid.y; gy++) {
      for (int bx = 0; bx < block.x; bx++) {
        for (int by = 0; by < block.y; by++) {
          _thread.blockIdx.x = gx;
          _thread.blockIdx.y = gy;
          _thread.threadIdx.x = bx;
          _thread.threadIdx.y = by;
          f(_thread, args...);

        }
      }

    }
  }
}
使用方法
#include <iostream>
#include <algorithm>

#include "fakeCUDA.hpp"

#pragma warning(disable:4996)
//カーネルに該当する関数
void line(
  thData t,
  unsigned int* pimage,
  const int width,
  const int height,
  const int sx,
  const int sy,
  const int ex,
  const int ey) {

  //アクセス法
  //このスレッドが担当する画素のx位置を二次元座標で求める
  int xpos = t.blockIdx.x * t.blockDim.x + t.threadIdx.x;
  //int ypos = blockIdx.y * blockDim.y + threadIdx.y;

  double a = (ey - sy) / double(ex - sx);//傾き
  double b = sy - a * sx;//切片

  //xposは0~になっているので、offsetを足す
  int x = xpos +(std::min)(sx,ex);

  if (x < 0 || x >= width)return;
  if (x < (std::min)(sx, ex) || x >= (std::max)(sx, ex))return;

  int y = a * x + b;

  if (y < 0 || y >= height)return;
  if (y < (std::min)(sy, ey) || y >= (std::max)(sy, ey))return;


  int pos = y * width + x;

  pimage[pos] = 1;

}
void pbmP1_Write(const char* const fname, const int width, const int height, const unsigned int* const p);
int main()
{

  int width = 100;
  int height = 50;

  int sx = 40; // 線分の始点・終点を設定
  int sy = 5;
  int ex = 10;
  int ey = 20;

  //ループ回数を決定
  int xlen = (std::max)(sx, ex) - (std::min)(sx, ex);

  // xlenを grids×blocksで表現
  int blocks = 512;
  int grids = (xlen + 511) / blocks;

  DimBlock block(blocks, 1);
  DimGrid grid(grids, 1);

  unsigned int* p_cpu = new unsigned int[width*height];
  for (int i = 0; i < width*height; i++) {
    p_cpu[i] = 0;
  }

  fakeCudaKernel(grid, block, line, p_cpu, width, height,sx,sy,ex,ey);


  ///////////////////////////////////////////////
  // 結果出力

  pbmP1_Write("cudaline.pbm", width, height, p_cpu);


  delete[] p_cpu;

}
//! @brief PBM(1byte,テキスト)を書き込む
//! @param [in] fname ファイル名
//! @param [in] width 画像の幅
//! @param [in] height 画像の高さ
//! @param [in] p 画像のメモリへのアドレス
//! @details 1画素1Byteのメモリを渡すと、0,1テキストでファイル名fnameで書き込む
void pbmP1_Write(const char* const fname, const int width, const int height, const unsigned int* const p) { // PPM ASCII

  FILE* fp = fopen(fname, "wb");
  fprintf(fp, "P1\n%d\n%d\n", width, height);

  size_t k = 0;
  for (size_t i = 0; i < (size_t)height; i++) {
    for (size_t j = 0; j < (size_t)width; j++) {
      fprintf(fp, "%d ", p[k] /*? 1 : 0*/);
      k++;
    }
    fprintf(fp, "\n");
  }

  fclose(fp);
}
CUDAで直線を書くことを考える(3)少ないスレッド数
前回のプログラムでは、画像全ての画素に対して、線分上のピクセルかどうかを判断した。無駄が多いように感じるので、全てのx座標に対するy座標を算出するように書き換えた。
#include "cuda_runtime.h"
#include "device_launch_parameters.h"

#include <stdio.h>
#include <stdlib.h>
///////////////////////////////////////////////
// GPU側 //////////////////////////////////////
__global__ void line(
  unsigned char* pimage,
  const int width,
  const int height,
  const int sx,
  const int sy,
  const int ex,
  const int ey) {

  //アクセス法
  //このスレッドが担当する画素のx位置を二次元座標で求める
  int xpos = blockIdx.x * blockDim.x + threadIdx.x;
  //int ypos = blockIdx.y * blockDim.y + threadIdx.y;

  double a = (ey - sy) / double(ex - sx);//傾き
  double b = sy - a * sx;//切片

  //xposは0~になっているので、offsetを足す
  int x = xpos + min(sx, ex);

  if (x < 0 || x >= width)return;
  if (x < min(sx,ex) || x >= max(sx, ex))return;

  int y = a * x + b;//xの時のy座標を求める

  if (y < 0 || y >= height)return;
  if (y < min(sy, ey) || y >= max(sy, ey))return;


  int pos = y * width + x;

  pimage[pos] = 1;//画素へ書き込み

}
/////
void pbmP1_Write(const char* const fname, const int width, const int height, const unsigned char* const p);

int main()
{
  int width = 100;
  int height = 50;

  int sx = 40; // 線分の始点・終点を設定
  int sy = 5;
  int ex = 10;
  int ey = 20;

  //書き込む画素数を算出
  int xlen = max(sx, ex) - min(sx, ex);

  // xlenを grids×blocksで表現
  int blocks = 512;
  int grids = (xlen+511) / blocks;


  dim3 block(blocks,1);
  dim3 grid(grids,1);

  unsigned char* p_cpu = new unsigned char[width*height];
  for (int i = 0; i < width*height; i++) {
    p_cpu[i] = 0;
  }

  unsigned char* p_gpu;//GPU側メモリ確保
  cudaError_t ce = cudaMalloc((void**)&p_gpu, width*height);
  printf("error:%d\n", ce);
  line << <grid, block >> > (p_gpu, width, height, sx, sy, ex, ey);

  //GPU→CPU側へメモリコピー
  cudaMemcpy(p_cpu, p_gpu, width*height, cudaMemcpyDeviceToHost);
  cudaFree(p_gpu);


  ///////////////////////////////////////////////
  // 結果出力

  pbmP1_Write("cudaline.pbm", width, height, p_cpu);

  delete[] p_cpu;

  return 0;
}

//! @brief PBM(1byte,テキスト)を書き込む
//! @param [in] fname ファイル名
//! @param [in] width 画像の幅
//! @param [in] height 画像の高さ
//! @param [in] p 画像のメモリへのアドレス
//! @details 1画素1Byteのメモリを渡すと、0,1テキストでファイル名fnameで書き込む
void pbmP1_Write(const char* const fname, const int width, const int height, const unsigned char* const p) { // PPM ASCII

  FILE* fp = fopen(fname, "wb");
  fprintf(fp, "P1\n%d\n%d\n", width, height);

  size_t k = 0;
  for (size_t i = 0; i < (size_t)height; i++) {
    for (size_t j = 0; j < (size_t)width; j++) {
      fprintf(fp, "%d ", p[k] );
      k++;
    }
    fprintf(fp, "\n");
  }

  fclose(fp);
}
CUDAで直線を書くことを考える(2)(書いてみる)
前回のC++のプログラムをCUDAで書き直してみる。
流石に無駄が多すぎることは自分でもわかるので次回はもっとましな方法を考える。
#include "cuda_runtime.h"
#include "device_launch_parameters.h"

#include <stdio.h>
#include <stdlib.h>

///////////////////////////////////////////////
// GPU側 //////////////////////////////////////
__global__ void line(
  unsigned char* pimage,
  const int width,
  const int height,
  const int sx,
  const int sy,
  const int ex,
  const int ey) {

  //アクセス法
  //このスレッドが担当する画素の位置を二次元座標で求める
  int xpos = blockIdx.x * blockDim.x + threadIdx.x;
  int ypos = blockIdx.y * blockDim.y + threadIdx.y;


  int pos = ypos * width + xpos;
  if (xpos >= width || ypos >= height)return;
  if (pos < 0 || pos >= width * height)return;

  double a = (ey - sy) / double(ex - sx);//傾き
  double b = sy - a * sx;//切片
  double y = int(a * xpos + b);

  if (ypos < min(sy, ey))return;
  if (xpos < min(sx, ex))return;
  if (ypos > max(sy, ey))return;
  if (xpos > max(sx, ex))return;

  if (y == ypos) {
    pimage[pos] = 1;
  }
  else {
    pimage[pos] = 0;
  }

}
/////
void pbmP1_Write(const char* const fname, const int width, const int height, const unsigned char* const p);

int main()
{
  int width = 100;
  int height = 50;

  int sx = 98; // 線分の始点・終点を設定
  int sy = 48;
  int ex = 1;
  int ey = 3;

  // 最小単位 合計で512未満
  //10×10の領域に分けて計算する
  dim3 block(10, 10);

  //グリッド数
  // スレッド数はblock数×grid数なので(10x100)x(10x100)=1000x1000
  // 多すぎるが今回はそこまで考えない
  dim3 grid(100, 100);

  unsigned char* p_cpu = new unsigned char[width*height];
  for (int i = 0; i < width*height; i++) {
    p_cpu[i] = 1;
  }

  unsigned char* p_gpu;//GPU側メモリ確保
  cudaError_t ce = cudaMalloc((void**)&p_gpu, width*height);
  printf("error:%d\n", ce);
  line << <grid, block >> > (p_gpu, width, height,sx,sy,ex,ey);

  //GPU→CPU側へメモリコピー
  cudaMemcpy(p_cpu, p_gpu, width*height, cudaMemcpyDeviceToHost);
  cudaFree(p_gpu);


  ///////////////////////////////////////////////
  // 結果出力

  pbmP1_Write("C:\\dev\\cudaline.pbm", width, height, p_cpu);

  delete[] p_cpu;

  return 0;
}

//! @brief PBM(1byte,テキスト)を書き込む
//! @param [in] fname ファイル名
//! @param [in] width 画像の幅
//! @param [in] height 画像の高さ
//! @param [in] p 画像のメモリへのアドレス
//! @details 1画素1Byteのメモリを渡すと、0,1テキストでファイル名fnameで書き込む
void pbmP1_Write(const char* const fname, const int width, const int height, const unsigned char* const p) { // PPM ASCII

  FILE* fp = fopen(fname, "wb");
  fprintf(fp, "P1\n%d\n%d\n", width, height);

  size_t k = 0;
  for (size_t i = 0; i < (size_t)height; i++) {
    for (size_t j = 0; j < (size_t)width; j++) {
      fprintf(fp, "%d ", p[k] ? 1 : 0);
      k++;
    }
    fprintf(fp, "\n");
  }

  fclose(fp);
}
CUDAで直線を書くことを考える(1)(考えるだけ)
前置き
ブレゼンハムを並列化するには?と思ったのだが、そもそもブレゼンハムは、「シングルスレッドで高速化するためには全部整数演算にすればいいんだ」というアルゴリズムなので(多分)、並列化とは相性が悪そうなんじゃないかと言うことで、とりあえず普通の数学的な式をそのまま使用してみる。
なお私はCUDA入門者なのであまり人様の参考になるようなことは書けない。
ベースとなる直線のプログラム(C++)
#include <iostream>
#include<vector>
#include<algorithm>

#pragma warning(disable:4996)

//! @brief PBM(1byte,テキスト)を書き込む
//! @param [in] fname ファイル名
//! @param [in] width 画像の幅
//! @param [in] height 画像の高さ
//! @param [in] p 画像のメモリへのアドレス
//! @details 1画素1Byteのメモリを渡すと、0,1テキストでファイル名fnameで書き込む
void pbmP1_Write(const char* const fname, const int width, const int height, const unsigned char* const p) { // PPM ASCII

  FILE* fp = fopen(fname, "wb");
  fprintf(fp, "P1\n%d\n%d\n", width, height);

  size_t k = 0;
  for (size_t i = 0; i < (size_t)height; i++) {
    for (size_t j = 0; j < (size_t)width; j++) {
      fprintf(fp, "%d ", p[k] ? 0 : 1);
      k++;
    }
    fprintf(fp, "\n");
  }

  fclose(fp);
}

const std::uint8_t white = 255;
const std::uint8_t black = 0;
//! @brief 与えられたピクセル座標が線分の方程式の上ならそのピクセルを塗りつぶす
//! @param pimage 書き込み先
//! @param width 画像サイズ
//! @param height 画像サイズ
//! @param sx 始点
//! @param sy 始点
//! @param ex 終点
//! @param ey 終点
//! @param pixelx 処理するピクセル
//! @param pixely 処理するピクセル
void multiline_core(std::uint8_t* pimage, int width, int height, int sx, int sy, int ex, int ey, int pixelx, int pixely) {
  double a = (ey - sy) / double(ex - sx);//傾き
  double b = sy - a * sx;//切片


  int pos = pixely * width + pixelx;

  if (pos < 0 || pos >= width * height)return;

  double y = int(a * pixelx + b);

  if (pixely < std::min(sy, ey))return;
  if (pixelx < std::min(sx, ex))return;
  if (pixely > std::max(sy, ey))return;
  if (pixelx > std::max(sx, ex))return;

  if (y == pixely) {
    pimage[pos] = black;
  }

}
//! @brief 全ての画素について、そのピクセルが直線上にあるかをテストする
//! @param image 書き込み先
//! @param width 画像サイズ
//! @param height 画像サイズ
//! @param sx 始点
//! @param sy 始点
//! @param ex 終点
//! @param ey 終点
void multiline(
  std::vector<std::uint8_t>& image,
  int width, int height,
  int sx, int sy, int ex, int ey) {

  //全てのピクセルについて直線上にあるかをチェック
  for (int x = 0; x < width; x++) {
    for (int y = 0; y < height; y++) {
      multiline_core(
        image.data(),
        width, height,
        sx, sy, ex, ey, x, y);
    }
  }

}
int main()
{

  int width = 100;
  int height = 50;

  int sx = 98; // 線分の始点・終点を設定
  int sy = 48;
  int ex = 1;
  int ey = 3;

  std::vector<std::uint8_t> image(width * height * 1, white);

  multiline(image, width, height, sx, sy, ex, ey);

  pbmP1_Write("c:\\test\\a.pbm", width, height, image.data());

}
普通に考えると「あるピクセルの隣のピクセルを塗る」という考え方でループするのだが、1ピクセル1スレッドで並列化する場合は「このピクセルは塗るべきか?をそれぞれのピクセルに対してチェックする」という考え方をすれば、ループする必要はない。

次回
上記プログラムをCUDAで実装する。
CUDAのblock,gridの計算をファイル出力してみる
久しぶりにCUDAを勉強しようと思ったら忘れていたので、block,gridの設定がカーネル内でどうなるかを確認するプログラムを書いた。
#include "cuda_runtime.h"
#include "device_launch_parameters.h"

#include <stdio.h>
#include <stdlib.h>
///////////////////////////////////////////////
// GPU側 //////////////////////////////////////
__global__ void threadpos(
  unsigned char* c,
  const int width,
  const int height) {

  //アクセス法
  //このスレッドが担当する画素の位置を二次元座標で求める
  size_t xpos = blockIdx.x * blockDim.x + threadIdx.x;
  size_t ypos = blockIdx.y * blockDim.y + threadIdx.y;

  if (xpos >= width || ypos >= height)return;

  int pos = ypos * width + xpos;

  c[pos * 6 + 0] = blockIdx.x;
  c[pos * 6 + 1] = blockIdx.y;
  c[pos * 6 + 2] = threadIdx.x;
  c[pos * 6 + 3] = threadIdx.y;
  c[pos * 6 + 4] = xpos;
  c[pos * 6 + 5] = ypos;

}
/////
int main()
{
  int width = 10;
  int height = 10;
  int item = 6;


  // 最小単位 合計で512未満
  //5×5の領域に分けて計算する
  dim3 block(5, 5);

  //グリッド数
  dim3 grid(2, 2);

  unsigned char* p_cpu = new unsigned char[width*height*item];
  for (int i = 0; i < width*height*item; i++) {
    p_cpu[i] = 0;
  }

  unsigned char* p_gpu;//GPU側メモリ確保
  cudaMalloc((void**)&p_gpu, width*height * item);
  threadpos << <grid, block >> > (p_gpu, width,height);

  //GPU→CPU側へメモリコピー
  cudaMemcpy(p_cpu, p_gpu, width*height * item, cudaMemcpyDeviceToHost);
  cudaFree(p_gpu);


  ///////////////////////////////////////////////
  // 結果出力

  FILE* fpblock = fopen("block.txt", "w");
  FILE* fpthread = fopen("thread.txt", "w");
  FILE* fpxy = fopen("xy.txt", "w");
  for (size_t y = 0; y < height; y++) {
    for (size_t x = 0; x < width; x++) {
      int pos = y * width + x;

      fprintf(fpblock,"[%2d %2d]",
        p_cpu[pos * item + 0],
        p_cpu[pos * item + 1]
      );
      fprintf(fpthread, "[%2d %2d]",
        p_cpu[pos * item + 2],
        p_cpu[pos * item + 3]
      );
      fprintf(fpxy, "(%2d %2d)",
        p_cpu[pos * item + 4],
        p_cpu[pos * item + 5]
      );

    }
    fprintf(fpblock,"\n");
    fprintf(fpthread, "\n");
    fprintf(fpxy, "\n");
  }
  fclose(fpblock);
  fclose(fpthread);
  fclose(fpxy);

  delete[] p_cpu;

    return 0;
}
WebGLでtree.js+OrbitControls.js
OrbitControls.jsを使うとかなり簡単にマウスドラッグでカメラ回転がで着るようになる。
準備
ダウンロード
以下より、three.js-master.zipをダウンロードし展開する。
コピー&ペースト
以下サイトのCubeを表示するHTML+JavaScripファイルを作り.htmlファイルで保存する。
https://ics.media/tutorial-three/camera_orbitcontrols/
注意
そのままコピペすると以下のエラーが出る。
恐らく原因は、three.jsはweb上の指定バージョンの物を使っているのに、OrbitControls.jsはダウンロードした最新バージョンを使っていて、かつ、自分で書いたスクリプトの部分が古いバージョンに対応したコードになっているから。
before
<html>
  <head>
    <meta charset="utf-8" />
    <script src="https://cdnjs.cloudflare.com/ajax/libs/three.js/110/three.min.js"></script>
    <script src="js/controls/OrbitControls.js"></script>
    <script>

        // ...

        // カメラコントローラーを作成
        const controls = new THREE.OrbitControls(camera);

        // ...

    </script>
  </head>
  <body>
    <canvas id="myCanvas"></canvas>
  </body>
</html>
after
なのでthree.jsもダウンロードしてorbitcontrols.js共にローカルのファイルを使用して、スクリプト本体もdomElement指定を追加してやる。
<html>
  <head>
    <meta charset="utf-8" />
    <script src="three.js-master/build/three.min.js"></script>
    <script src="three.js-master/examples/js/controls/OrbitControls.js"></script>
    <script>

        // ...

        // カメラコントローラーを作成
        const controls = new THREE.OrbitControls(camera,renderer.domElement);

        // ...

    </script>
  </head>
  <body>
    <canvas id="myCanvas"></canvas>
  </body>
</html>
コード
上にも書いたが、domElementを渡していないソースコードが多いが、最新のバージョンではこれが必須になっているらしい。
<html>
  <head>
    <meta charset="utf-8" />
    <script src="three.js-master/build/three.min.js"></script>
    <script src="three.js-master/examples/js/controls/OrbitControls.js"></script>
    <script>
      // ページの読み込みを待つ
      window.addEventListener('load', init);

      function init() {
        // サイズを指定
        const width = 960;
        const height = 540;

        // レンダラーを作成
        const renderer = new THREE.WebGLRenderer({
          canvas: document.querySelector('#myCanvas')
        });
        renderer.setSize(width, height);

        // シーンを作成
        const scene = new THREE.Scene();

        // カメラを作成
        const camera = new THREE.PerspectiveCamera(45, width / height);
        // カメラの初期座標を設定
        camera.position.set(0, 0, 1000);

        // カメラコントローラーを作成
        const controls = new THREE.OrbitControls(camera,renderer.domElement);

        // 形状とマテリアルからメッシュを作成します
        const mesh = new THREE.Mesh(
          new THREE.BoxGeometry(300, 300, 300),
          new THREE.MeshNormalMaterial()
        );
        scene.add(mesh);

        tick();

        // 毎フレーム時に実行されるループイベントです
        function tick() {
          // レンダリング
          renderer.render(scene, camera);
          requestAnimationFrame(tick);
        }
      }
    </script>
  </head>
  <body>
    <canvas id="myCanvas"></canvas>
  </body>
</html>
Gimpでブラシを作る
ブラシの保存先を調べる
このディレクトリに保存したブラシファイルがブラシとして認識される。

画像をブラシ(.gbr)形式で保存
画像を上記ディレクトリに拡張子.gbrでExportする。
ブラシ一覧の下にある「Refresh Brushes」をクリックするとブラシファイルが読み込まれる。
カラーのブラシを作る場合
画像をグレースケールモードで.gbr保存すれば色が使える。黒がパレットの色、白が透明となる。

注意 ブラシを作ったままだとGrayscaleモードになっているので色が出ない。RGBに戻すことを忘れないようにする。

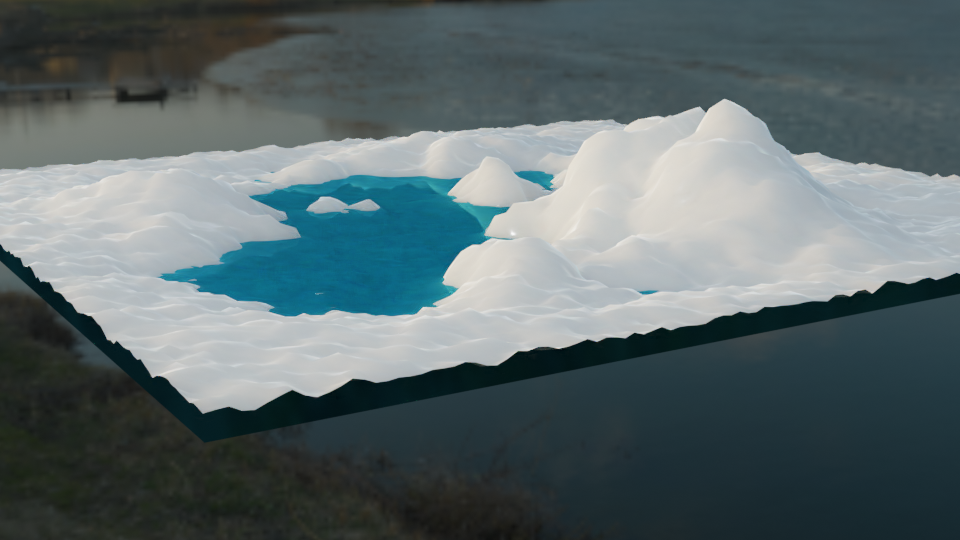
動画 Create Ice Lake in Blender 2.91 の要点抜粋
0.Landscapeで地形生成
LandscapeでLakeのPresetを選択し池を作る
1.RealSnowアドオン
① Blender標準でRealSnowアドオンが入っているので有効化する。
② 適当になにかモデル(ICO Sphereなど)を追加し、RealSnowを適用

③ 地形を選択し、RealSnowで作成されたマテリアルを設定
④ Sphereと雪のオブジェクトはいらない(欲しいのはMaterialだけ)ので削除する
2.池のマテリアルを設定
3.HDRI設定
背景画像を以下からダウンロードしてWorldに設定
https://hdrihaven.com/hdri/?h=lakes
レンダリング
FreeType2を試す-6- 絵文字を出力
絵文字を扱う上で最も重要なことは、絵文字が使えるフォントを指定する点。ただしサンプルで使用しているseguiemj.ttfはアルファベットは使えるが日本語が使えないので、実用的な事を言えば絵文字と絵文字以外でフォントを切り替える必要がある。
あと、UTF32で文字を指定しないと失敗するように思う。
pnmwrite.hpp (出力用関数群)
#pragma once

#include<cstdio>
#include <bitset>


//! @brief PBM(1byte,テキスト)を書き込む
void pbmP1_Write(const char* const fname, const int width, const int height, const unsigned char* const p) { // PPM ASCII

  FILE* fp = fopen(fname, "wb");
  fprintf(fp, "P1\n%d\n%d\n", width, height);

  size_t k = 0;
  for (size_t i = 0; i < (size_t)height; i++) {
    for (size_t j = 0; j < (size_t)width; j++) {
      fprintf(fp, "%d ", p[k] ? 0 : 1);
      k++;
    }
    fprintf(fp, "\n");
  }

  fclose(fp);
}

//! @brief PGM(1byte,テキスト)を書き込む
void pgmP2_Write(
  const char* const fname,
  const int width,
  const int height,
  const unsigned char* const p
) { // PPM ASCII

  FILE* fp = fopen(fname, "wb");
  fprintf(fp, "P2\n%d %d\n255\n", width, height);

  size_t k = 0;
  for (size_t i = 0; i < (size_t)height; i++) {
    for (size_t j = 0; j < (size_t)width; j++) {
      fprintf(fp, "%d ", p[k]);
      k++;
    }
    fprintf(fp, "\n");
  }

  fclose(fp);
}


//! @brief PPM(1byte,テキスト)を書き込む
void ppmP3_Write(
  const char* const fname,
  const int width,
  const int height,
  const unsigned char* const p
) {

  FILE* fp = fopen(fname, "wb");
  fprintf(fp, "P3\n%d %d\n255\n", width, height);

  size_t k = 0;
  for (size_t i = 0; i < (size_t)height; i++) {
    for (size_t j = 0; j < (size_t)width; j++) {
      //RGBAなので、* 3でなく* 4にしている
      fprintf(fp, "%d %d %d ", p[k * 4 + 2], p[k * 4 + 1], p[k * 4 + 0]);
      k++;
    }
    fprintf(fp, "\n");
  }

  fclose(fp);
}
プログラム本体
#include <ft2build.h>
#include FT_FREETYPE_H

// MONO変換用
#include FT_BITMAP_H

#pragma warning(disable:4996)

#pragma comment(lib,"freetype.lib")


#include "pnmwrite.hpp"


int main()
{

  FT_Library  library; // handle to library
  FT_Error error;

  error = FT_Init_FreeType(&library);
  if (error)
    return -1;

  FT_Face face;

  // フォントファイル読み込み
  error = FT_New_Face(
    library,
    "C:\\Windows\\Fonts\\seguiemj.ttf", // 絵文字が使えるフォントを指定
    0,
    &face
  );

  //文字コード指定
  error = FT_Select_Charmap(
    face,               // target face object
    FT_ENCODING_UNICODE // エンコード指定
  );


  if (error == FT_Err_Unknown_File_Format)
    return -1;
  else if (error)
    return -1;

  //この二つの値でフォントサイズ調整
  FT_F26Dot6 fontsize = 16 * 64 * 2;
  FT_UInt CHAR_RESOLUTION = 300;
  error = FT_Set_Char_Size(
    face,                // handle to face object
    0,                   // char_width in 1/64th of points
    fontsize,            // char_height in 1/64th of points
    CHAR_RESOLUTION,     // horizontal device resolution
    CHAR_RESOLUTION);    // vertical device resolution

    // 文字の取得
  FT_ULong character = U'😀'; // UTF32で文字を指定

  FT_UInt char_index = FT_Get_Char_Index(face, character);

  //モノクロ
  error = FT_Load_Glyph(face, char_index, FT_LOAD_RENDER | FT_LOAD_MONOCHROME);

  //グレイスケール
  //error = FT_Load_Glyph(face, char_index, FT_LOAD_RENDER );

  //カラー
  //error = FT_Load_Glyph(face, char_index, FT_LOAD_RENDER | FT_LOAD_COLOR);

  if (error)
    return -1; // ignore errors


  int Width = face->glyph->bitmap.width;
  int Height = face->glyph->bitmap.rows;


  switch (face->glyph->bitmap.pixel_mode) {
  case FT_PIXEL_MODE_NONE:
    printf("FT_PIXEL_MODE_NONE");
    break;
  case FT_PIXEL_MODE_MONO:
    printf("FT_PIXEL_MODE_MONO");
    {
      FT_Bitmap glyphbitmap;
      FT_Bitmap_Init(&glyphbitmap);
      FT_Bitmap_Convert(library, &face->glyph->bitmap, &glyphbitmap, 1);

      FT_Render_Glyph(face->glyph, FT_RENDER_MODE_MONO);
      pbmP1_Write(
        "C:\\test\\freetypetest.pbm",
        Width,
        Height,
        glyphbitmap.buffer
      );
    }

    break;
  case FT_PIXEL_MODE_GRAY:
    printf("FT_PIXEL_MODE_GRAY");

    pgmP2_Write(
      "C:\\test\\freetypetest.pgm",
      Width,
      Height,
      face->glyph->bitmap.buffer
    );

    break;
  case FT_PIXEL_MODE_GRAY2:
    printf("FT_PIXEL_MODE_GRAY2");
    break;
  case FT_PIXEL_MODE_GRAY4:
    printf("FT_PIXEL_MODE_GRAY4");
    break;
  case FT_PIXEL_MODE_LCD:
    printf("FT_PIXEL_MODE_LCD");
    break;
  case FT_PIXEL_MODE_LCD_V:
    printf("FT_PIXEL_MODE_LCD_V");
    break;
  case FT_PIXEL_MODE_BGRA:
    printf("FT_PIXEL_MODE_BGRA");

    ppmP3_Write(
      "C:\\test\\freetypetest.ppm",
      Width,
      Height,
      face->glyph->bitmap.buffer
    );

    break;
  }


  // FreeType2の解放
  FT_Done_Face(face);
  FT_Done_FreeType(library);
}


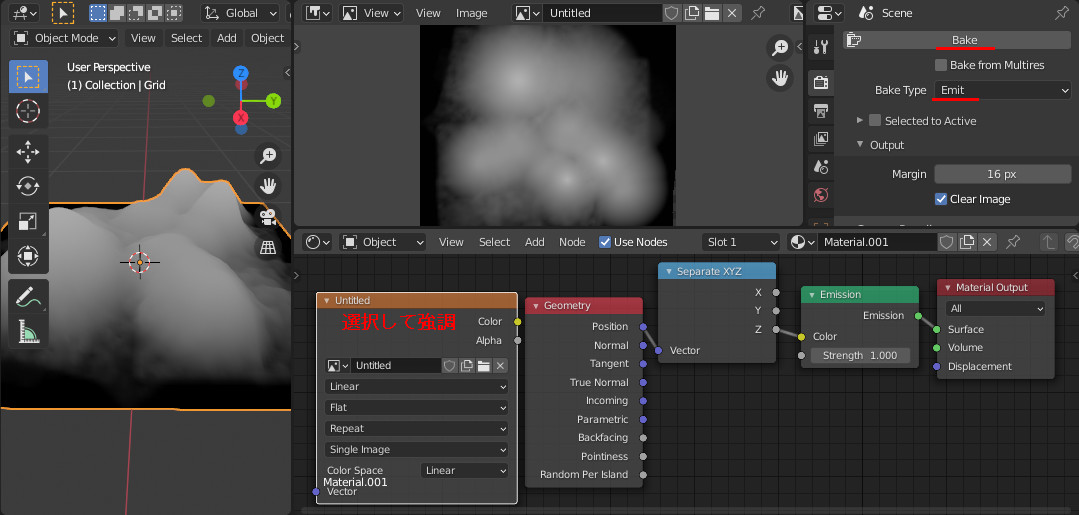
Blender 2.9 でHeight mapをBake
Normal MapのBakeをやったのでついでにHeight MapのBakeを調べた。
端的に言えばモデルを作り、そのマテリアルにGeometryのPositionをSeparateでZだけ取り出してEmissonのColorとして繋げたものを繋いでやればいい(らしい)。
あとはベイク時の設定、UV展開やBake Typeなどをやっておく必要がある。