Twisting Crystals in Blender のチュートリアルを試す(1)
まず、レンダラをCyclesにする
CubeのTwist
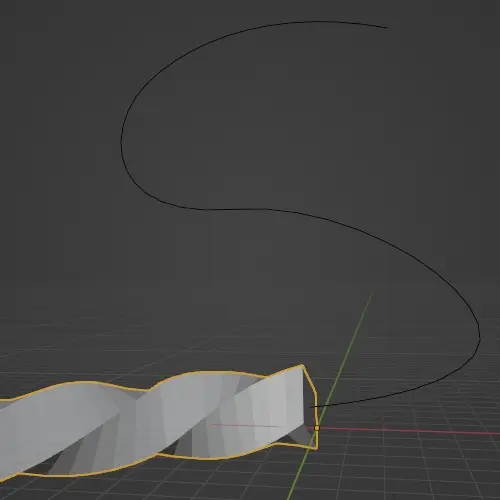
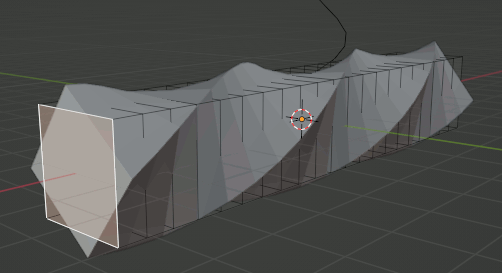
次にデフォルトのCubeをEditモードでX方向に約6倍する。動画内では適当に伸ばしている。
さらにCtrl+Rでループカットを行い、20分割する。動画内では分割数は割と適当に指定している。
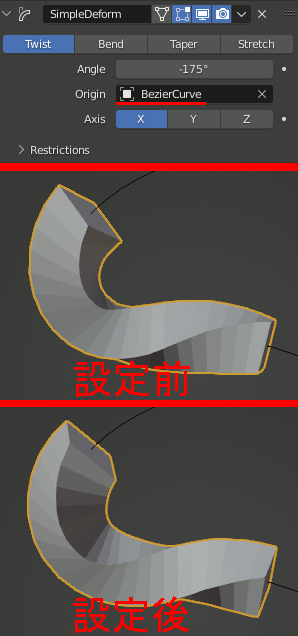
加えて、SimpleDeformモディファイアを追加し、 TwistにAngle:-175を指定する。
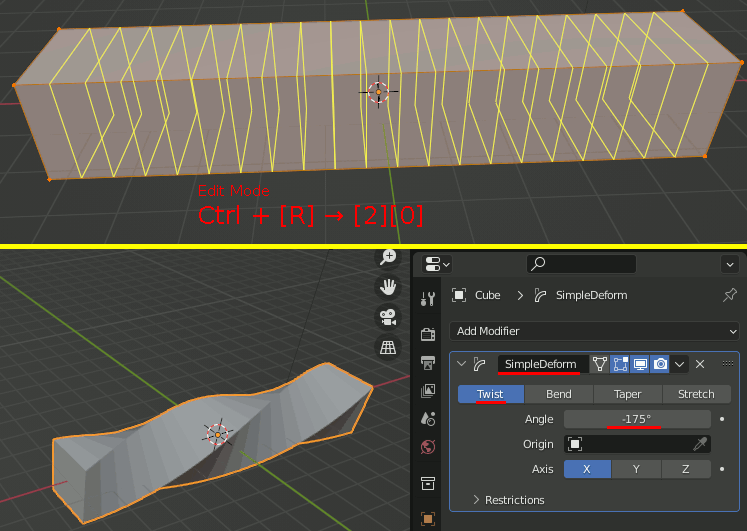
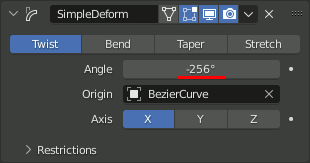
注意 Angle は最終的には-256に設定
ここでCubeの名前をCOREに変更し、必要であればカメラやライトを削除しておく
Curve
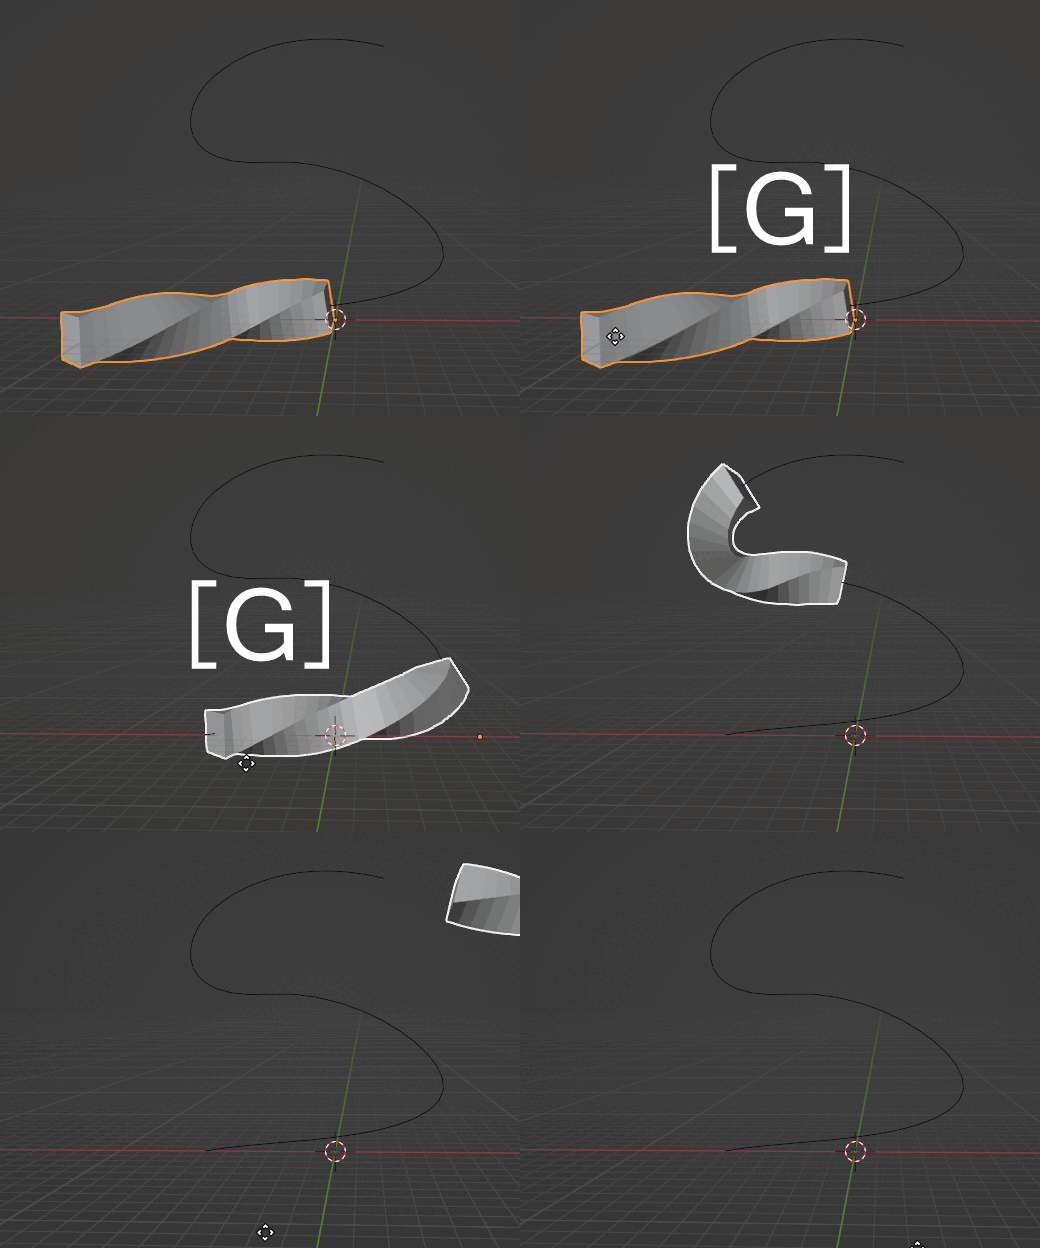
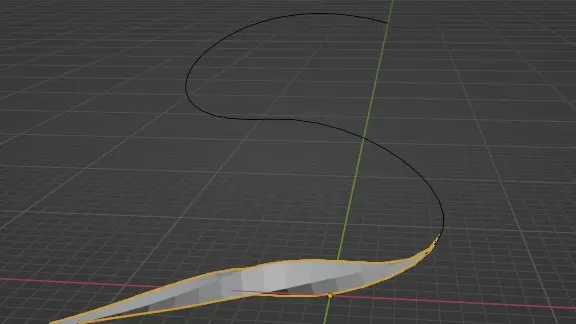
Bezierカーブを追加。物体の移動する経路を作る
X,Yの移動をロックするとGキーだけで経路上を移動できるようになる。
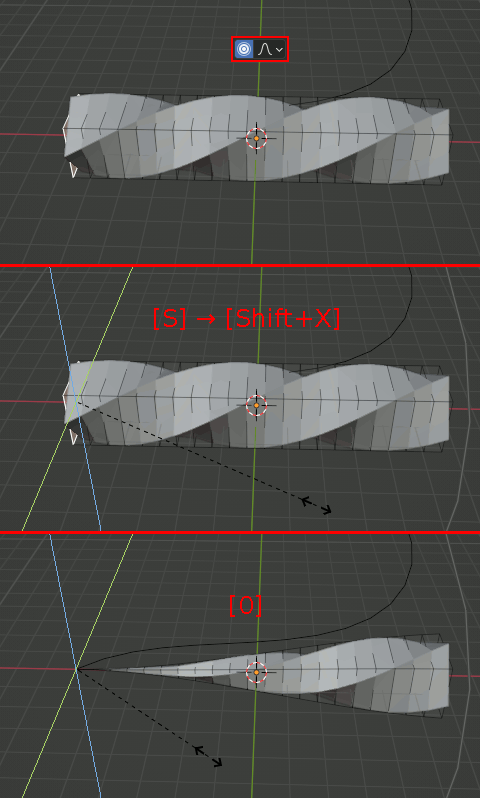
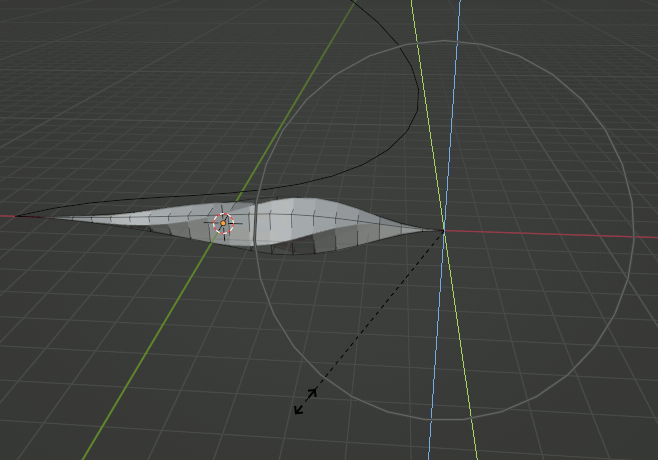
SimpleDeformモディファイアを追加し、OriginをBezierCurveに設定。
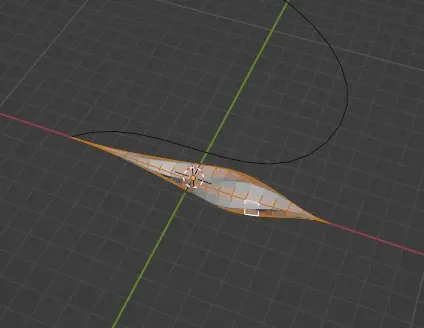
Proportional Editingで形状を整える。
続く
HTMLの見出しに1.1.等の連番を付けるCSS
<h1><h2>の見出しに、1. や1.1. といった見出し番号を付ける。
概要
counter-reset で見出しの番号を初期化する
counter-increment で見出しの番号を進める
content , counter で見出しの表示方法を指定する
見出し連番の例
HTML
<html>

<head>
    <link rel="stylesheet" href="style.css">
</head>

<body>
  <h1>東京都</h1>
    <h2>港区</h2>
      <h3>浜松町</h3>
      <h3>芝浦</h3>
      <h3>六本木</h3>
    <h2>中央区</h2>
      <h3>月島</h3>
      <h3>日本橋</h3>
    <h2>北区</h2>
      <h3>浮間</h3>
      <h3>東十条</h3>
  <h1>北海道</h1>
    <h2>札幌市</h2>
    <h2>赤平市</h2>
    <h2>沙流郡</h2>
  <h1>京都府</h1>
    <h2>木津川市</h2>
      <h3>市坂</h3>
      <h3>加茂町</h3>
      <h3>吐師</h3>
    <h2>福知山市</h2>
    <h2>竹野郡</h2>
      <h3>網野町</h3>
      <h3>丹後町</h3>
      <h3>弥栄町</h3>

</body>

</html>
CSS (style.css)
body {

  /* H1のカウンタをリセット */
  counter-reset: counter_H1;
}

/********************************/
h1::before {

  /* H1の表示方式の設定 */
  content: counter(counter_H1) " ";

  /* H1のカウンタを進める */
  counter-increment: counter_H1;
}

h1{
  /* H2のカウンタをリセット */
  /* H1 が出てきたときは、H2は1から始まるのでリセットする*/
  counter-reset: counter_H2;

  /* 表示用 */
  color:red;
  padding-left:0px;
}

/********************************/

h2::before{
  /* H2の表示方式の設定 */
  content: counter(counter_H1) "-" counter(counter_H2) " ";

  /* H2のカウンタを進める */
  counter-increment: counter_H2;
}
h2{
  /* H3のカウンタをリセット */
  /* H2が出てきたときは、H3は1から始まるのでリセットする*/
  counter-reset: counter_H3;

  /* 表示用 */
  color:green;
  padding-left:30px;
}

/********************************/

h3::before{
  /* H3 の表示方式の設定 */
  content: counter(counter_H1) "-" counter(counter_H2) "-" counter(counter_H3) " ";

  /* H3のカウンタを進める */
  counter-increment: counter_H3;
}
h3{
  /* 表示用 */
  color:blue;
  padding-left:60px;
}
HarfBuzzでFreeType2のレイアウトを調整(2)ラテン系文字とか絵文字
前回作ったプログラムでラテン系の文字や絵文字を描いてみる。
アルファベットの上にaccentがついているもの
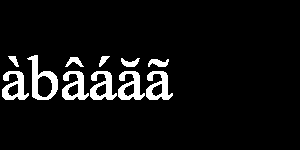
int main()
{

  FT_Library  library;
  FT_Error error;

  error = FT_Init_FreeType(&library);
  if (error)
    return -1;


  /////////////////////////////////////////////
  FT_Face* face_jp = my_LoadFonts(library, "C:\\Windows\\Fonts\\Times.ttf");
  ////////////////////////
  hb_font_t* hbfont;
  hb_buffer_t* hbbuf;
  ////////////////////////
  std::u32string text = U"àbâáăã";
  ////////////////////////
  hbbuf = hb_buffer_create();
  hb_buffer_add_utf32(hbbuf, (const std::uint32_t*)text.data(), -1, 0, -1);
  hb_buffer_set_direction(hbbuf, HB_DIRECTION_LTR);
  hb_buffer_set_script(hbbuf, HB_SCRIPT_LATIN);
  hb_buffer_set_language(hbbuf, hb_language_from_string("en", -1));
  ////////////////////////
  hbfont = hb_ft_font_create(*face_jp, nullptr);
  hb_shape(hbfont, hbbuf, NULL, 0);
  ////////////////////////
  my_FaceDraw(hbbuf, face_jp);
  ////////////////////////
  hb_buffer_destroy(hbbuf);
  hb_font_destroy(hbfont);
  ////////////////////////
  FT_Done_Face(*face_jp);

  pbmP1_Write("C:\\test\\freetypetest_mgl.pbm", imageWidth, imageHeight, &image[0]);

  /////////////////////////////////////////////

  // FreeType2の解放
  FT_Done_FreeType(library);
}
絵文字
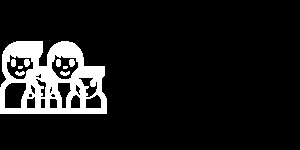
int main() { FT_Library library; FT_Error error; error = FT_Init_FreeType(&library); if (error) return -1; ///////////////////////////////////////////// FT_Face* face_jp = my_LoadFonts(library, "C:\\Windows\\Fonts\\seguiemj.ttf"); //////////////////////// hb_font_t* hbfont; hb_buffer_t* hbbuf; //////////////////////// std::u32string text = U"👨👨👧👦";//FreeType2だけだと5つの絵文字になる //////////////////////// hbbuf = hb_buffer_create(); hb_buffer_add_utf32(hbbuf, (const std::uint32_t*)text.data(), -1, 0, -1); hb_buffer_set_direction(hbbuf, HB_DIRECTION_LTR); hb_buffer_set_script(hbbuf, HB_SCRIPT_LATIN);//一応LATIN指定しておく hb_buffer_set_language(hbbuf, hb_language_from_string("en", -1));//一応en指定しておく //////////////////////// hbfont = hb_ft_font_create(*face_jp, nullptr); hb_shape(hbfont, hbbuf, NULL, 0); //////////////////////// my_FaceDraw(hbbuf, face_jp); //////////////////////// hb_buffer_destroy(hbbuf); hb_font_destroy(hbfont); //////////////////////// FT_Done_Face(*face_jp); pbmP1_Write("C:\\test\\freetypetest_mge.pbm", imageWidth, imageHeight, &image[0]); ///////////////////////////////////////////// // FreeType2の解放 FT_Done_FreeType(library); }
HarfBuzzでFreeType2のレイアウトを調整(1)
HarfBuzzの目的
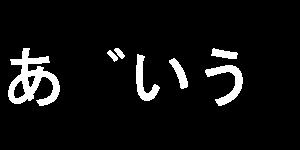
あという文字に゛という結合文字がついている場合、理想的にはあ゙と表示される。
ところがFreeTyp2だけでラスタライズすると、以下のようになる。
HarfBuzzを使うと、これを以下のように美しくラスタライズできる。
FreeType2だけの場合
まず比較のためにFreeType2だけでラスタライズするプログラムを書く。
#include <string>
#include <array>

#include <ft2build.h>
#include FT_FREETYPE_H

#pragma warning(disable:4996)

#if _DEBUG
#pragma comment(lib,"freetyped.lib")
#else
#pragma comment(lib,"freetype.lib")
#endif

//////////////////////////
// 書き込み先画像
const int imageWidth = 300;
const int imageHeight = 150;
std::array<unsigned char, imageWidth* imageHeight> image;
//////////////////////////

//! @brief imageへの書き込み時のピクセル計算
inline int pixel_pos(const int x, const int y) {
  return y * imageWidth + x;
}

//! @brief imageへbmpの内容を書き込む
//! @param [in] bmp 文字画像
//! @param [in] startx image画像内の書き込み開始位置
//! @param [in] starty image画像内の書き込み開始位置
void draw(const FT_Bitmap& bmp, int startx, int starty);

//! @brief PBM(1byte,テキスト)を書き込む
//! @param [in] fname ファイル名
//! @param [in] width 画像の幅
//! @param [in] height 画像の高さ
//! @param [in] p 画像のメモリへのアドレス
//! @details 1画素1Byteのメモリを渡すと、0,1テキストでファイル名fnameで書き込む
void pbmP1_Write(const char* const fname, const int width, const int height, const unsigned char* const p);

int main()
{

  FT_Library  library; // handle to library
  FT_Error error;

  error = FT_Init_FreeType(&library);
  if (error)
    return -1;

  FT_Face face;      // handle to face object

  // フォントファイル読み込み
  error = FT_New_Face(
    library,
    "C:\\Windows\\Fonts\\msgothic.ttc",
    0,
    &face
  );
  //std::u32string text = U"あいう";   // ①
   std::u32string text = U"あ゙いう"; // ②

  //文字コード指定
  error = FT_Select_Charmap(face,FT_ENCODING_UNICODE);

  if (error == FT_Err_Unknown_File_Format)
    return -1;
  else if (error)
    return -1;

  //文字サイズをピクセルで指定
  FT_Set_Pixel_Sizes(face,0,64);

  int pen_x = 0;
  int pen_y = 0;

  for (size_t k = 0; k < text.size(); k++) {

    // 文字の取得
    FT_ULong character = text[k];
    FT_UInt char_index = FT_Get_Char_Index(face, character);

    // グリフ(字の形状)読込
    error = FT_Load_Glyph(face, char_index, FT_LOAD_RENDER);
    if (error)
      return -1; // ignore errors

      // 文字を画像化
    FT_Render_Glyph(face->glyph, FT_RENDER_MODE_NORMAL);

    // 画像書き込み
    draw(
      face->glyph->bitmap,
      pen_x + face->glyph->bitmap_left,
      pen_y - face->glyph->bitmap_top + 100
    );

    // 描画位置を更新
    pen_x += face->glyph->advance.x >> 6;
    pen_y += face->glyph->advance.y >> 6;
  }

  // ファイル書き込み
  pbmP1_Write("C:\\test\\freetypetest.pbm",imageWidth,imageHeight,&image[0]);

  // FreeType2の解放
  FT_Done_Face(face);
  FT_Done_FreeType(library);
}
//! @brief imageへbmpの内容を書き込む
//! @param [in] bmp 文字画像
//! @param [in] startx image画像内の書き込み開始位置
//! @param [in] starty image画像内の書き込み開始位置
void draw(const FT_Bitmap& bmp, int startx, int starty) {

  int Width = bmp.width;
  int Height = bmp.rows;

  for (size_t y = 0; y < Height; y++) {
    for (size_t x = 0; x < Width; x++) {

      int xx = startx + x;
      int yy = starty + y;

      if (xx < 0)continue;
      if (yy < 0)continue;

      if (xx > imageWidth - 1)continue;
      if (yy > imageHeight - 1)continue;

#if 0
      //枠書き込み
      if (x == 0 || y == 0 || y == Height - 1 || x == Width - 1) {
        image[pixel_pos(xx, yy)] = 1;
      }
#endif

      if (bmp.buffer[y * Width + x]) {
        image[pixel_pos(xx, yy)] = 1;
      }
    }
  }

}
//! @brief PBM(1byte,テキスト)を書き込む
//! @param [in] fname ファイル名
//! @param [in] width 画像の幅
//! @param [in] height 画像の高さ
//! @param [in] p 画像のメモリへのアドレス
//! @details 1画素1Byteのメモリを渡すと、0,1テキストでファイル名fnameで書き込む
void pbmP1_Write(const char* const fname, const int width, const int height, const unsigned char* const p) { // PPM ASCII

  FILE* fp = fopen(fname, "wb");
  fprintf(fp, "P1\n%d\n%d\n", width, height);

  size_t k = 0;
  for (size_t i = 0; i < (size_t)height; i++) {
    for (size_t j = 0; j < (size_t)width; j++) {
      fprintf(fp, "%d ", p[k] ? 0 : 1);
      k++;
    }
    fprintf(fp, "\n");
  }

  fclose(fp);
}
HarfBuzz + FreeType2
#include <string>
#include <array>

#include <ft2build.h>
#include FT_FREETYPE_H

#include <hb.h>
#include <hb-ft.h>

#pragma warning(disable:4996)

#ifdef _DEBUG
#pragma comment(lib,"freetyped.lib")
#pragma comment(lib,"harfbuzzd.lib")
#else
#pragma comment(lib,"freetype.lib")
#pragma comment(lib,"harfbuzz.lib")
#endif


const int imageWidth = 300;
const int imageHeight = 150;
std::array<unsigned char, imageWidth* imageHeight> image;

//! @brief imageへの書き込み時のピクセル計算
int pixel_pos(const int x, const int y) {
  return y * imageWidth + x;
}

//! @brief imageへbmpの内容を書き込む
//! @param [in] bmp 文字画像
//! @param [in] startx image画像内の書き込み開始位置
//! @param [in] starty image画像内の書き込み開始位置
void draw(const FT_Bitmap& bmp, int startx, int starty);

//! @brief PBM(1byte,テキスト)を書き込む
//! @param [in] fname ファイル名
//! @param [in] width 画像の幅
//! @param [in] height 画像の高さ
//! @param [in] p 画像のメモリへのアドレス
//! @details 1画素1Byteのメモリを渡すと、0,1テキストでファイル名fnameで書き込む
void pbmP1_Write(const char* const fname, const int width, const int height, const unsigned char* const p);


//! @brief フォントの読込 FreeType2の処理
//! @param [in] library FT_Library
//! @param [in] fontfile フォントファイルへのパス
//! @return フェイスオブジェクト
FT_Face* my_LoadFonts(
  FT_Library& library,
  const char* fontfile
  ) {
  FT_Face* face = new FT_Face;
  FT_Error error;

  // フォントファイル読み込み
  error = FT_New_Face(
    library,
    fontfile,
    0,
    face
  );

  //文字コード指定
  error = FT_Select_Charmap(
    *face,         // target face object
    FT_ENCODING_UNICODE // エンコード指定
  );
  if (error == FT_Err_Unknown_File_Format)
    return nullptr;
  else if (error)
    return nullptr;

  int pixel_size_y = 64;
  error = FT_Set_Pixel_Sizes(
    *face,      // handle to face object
    0,         // pixel_width
    pixel_size_y);   // pixel_height

  return face;
}
//! @brief HarfBuzzで計算した座標を使いFreeType2で文字列を描画する
void my_FaceDraw(hb_buffer_t* hbbuf,FT_Face* face) {

  // 描画先をクリア
  std::fill(image.begin(), image.end(), 0);

  //文字数を格納 (書記素数ではない。例えば「あ゙」は2文字)
  unsigned int glyph_count;

  hb_glyph_info_t* glyph_info = hb_buffer_get_glyph_infos(hbbuf, &glyph_count);
  hb_glyph_position_t* glyph_pos = hb_buffer_get_glyph_positions(hbbuf, &glyph_count);

  hb_position_t cursor_x = 0;
  hb_position_t cursor_y = 0;

  // 各文字ごとに描画する
  for (unsigned int i = 0; i < glyph_count; i++) {

    // codepointという変数名だが実際にはグリフインデクスが入っている
    hb_codepoint_t glyphid = glyph_info[i].codepoint;

    // 一文字分のオフセット。本来描画される位置からどれぐらいずれるか
    hb_position_t x_offset = glyph_pos[i].x_offset >> 6;// 結合文字の゛は本来の位置より左側に描画するので
    hb_position_t y_offset = glyph_pos[i].y_offset >> 6;// x_offsetにはマイナスの値が入る

    // 次の文字の描画開始位置までのピクセル数
    hb_position_t x_advance = glyph_pos[i].x_advance >> 6;
    hb_position_t y_advance = glyph_pos[i].y_advance >> 6;


    ///////////////////////////////////////
    ///////////////////////////////////////
    ///////////////////////////////////////
    FT_Error error = FT_Load_Glyph(*face, glyphid, FT_LOAD_RENDER);
    if (error) {
      continue;
    }
      // 文字を画像化
    FT_Render_Glyph( (*face)->glyph, FT_RENDER_MODE_NORMAL);

    // 画像書き込み
    // オフセットを加えて座標調整する
    draw(
      (*face)->glyph->bitmap,
      cursor_x + x_offset + (*face)->glyph->bitmap_left,
      cursor_y + y_offset - (*face)->glyph->bitmap_top + 100
    );
    ///////////////////////////////////////
    ///////////////////////////////////////
    ///////////////////////////////////////

    // 次の文字の描画開始値
    cursor_x += x_advance;
    cursor_y += y_advance;
  }

}
int main()
{

  FT_Library  library; // handle to library
  FT_Error error;

  error = FT_Init_FreeType(&library);
  if (error)
    return -1;

  /////////////////////////////////////////////
  FT_Face* face_jp = my_LoadFonts(library, "C:\\Windows\\Fonts\\msgothic.ttc");
  ////////////////////////
  hb_font_t* hbfont;
  hb_buffer_t* hbbuf;
  ////////////////////////
  std::u32string text = U"あ゙いう";
  ////////////////////////
  hbbuf = hb_buffer_create();
  hb_buffer_add_utf32(hbbuf, (const std::uint32_t*)text.data(), -1, 0, -1);// 描画したいテキストの設定
  hb_buffer_set_direction(hbbuf, HB_DIRECTION_LTR);// 文字の方向を左から右として設定
  hb_buffer_set_script(hbbuf, HB_SCRIPT_HIRAGANA);// Unicodeの用字(Script)として日本語を指定
  hb_buffer_set_language(hbbuf, hb_language_from_string("jp", -1));// 言語として日本語を設定
  ////////////////////////
  hbfont = hb_ft_font_create(*face_jp, nullptr);
  hb_shape(hbfont, hbbuf, NULL, 0);
  ////////////////////////
  my_FaceDraw(hbbuf, face_jp);//FreeType2とHarfBuzzで文字列描画
  ////////////////////////
  hb_buffer_destroy(hbbuf);// バッファ破棄
  hb_font_destroy(hbfont); // フォント破棄
  ////////////////////////
  FT_Done_Face(*face_jp);

  pbmP1_Write("C:\\test\\freetypetest_mgj.pbm", imageWidth, imageHeight, &image[0]);


  /////////////////////////////////////////////

  // FreeType2の解放
  FT_Done_FreeType(library);
}
//! @brief imageへbmpの内容を書き込む
//! @param [in] bmp 文字画像
//! @param [in] startx image画像内の書き込み開始位置
//! @param [in] starty image画像内の書き込み開始位置
void draw(const FT_Bitmap& bmp, int startx, int starty) {

  int Width = bmp.width;
  int Height = bmp.rows;

  for (size_t y = 0; y < Height; y++) {
    for (size_t x = 0; x < Width; x++) {


      int xx = startx + x;
      int yy = starty + y;

#if 0
      if (x == 0 || y == 0 || x == Width - 1 || y == Height - 1) {
        image[pixel_pos(xx, yy)] = 1;
      }
#endif

      if (xx < 0)continue;
      if (yy < 0)continue;
      if (xx >= imageWidth)continue;
      if (yy >= imageHeight)continue;

      if (bmp.buffer[y * Width + x]) {
        image[pixel_pos(xx, yy)] = 1;
      }
    }
  }

}

//! @brief PBM(1byte,テキスト)を書き込む
//! @param [in] fname ファイル名
//! @param [in] width 画像の幅
//! @param [in] height 画像の高さ
//! @param [in] p 画像のメモリへのアドレス
//! @details 1画素1Byteのメモリを渡すと、0,1テキストでファイル名fnameで書き込む
void pbmP1_Write(const char* const fname, const int width, const int height, const unsigned char* const p) { // PPM ASCII

  FILE* fp = fopen(fname, "wb");
  fprintf(fp, "P1\n%d\n%d\n", width, height);

  size_t k = 0;
  for (size_t i = 0; i < (size_t)height; i++) {
    for (size_t j = 0; j < (size_t)width; j++) {
      fprintf(fp, "%d ", p[k] ? 0 : 1);
      k++;
    }
    fprintf(fp, "\n");
  }

  fclose(fp);
}
続く。
HarfBuzzをCMake
HarfBuzzはFreeType2で文字を描くときにレイアウトを調整するライブラリ。
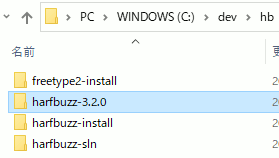
まず、harfbuzz-3.2.0をダウンロードする。
https://harfbuzz.github.io/install-harfbuzz.html
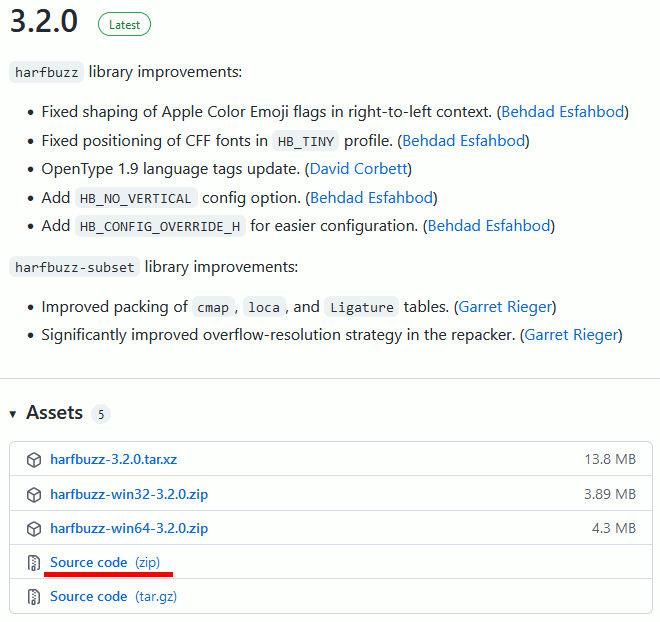
github.com/harfbuzz/harfbuzz/releases から、以下へ飛び、Source code (zip) からダウンロードする
harfbuzz-3.2.0 ... 展開したフォルダ
harfbuzz-sln ... CMakeで作ったsolutionが入るフォルダ
harfbuzz-install BUILD→INSTALLでライブラリが入るフォルダ
freetype2-install ... コンパイル済みのfreetype2
注意として、FreeType2はコンパイル済みとする。
CMake
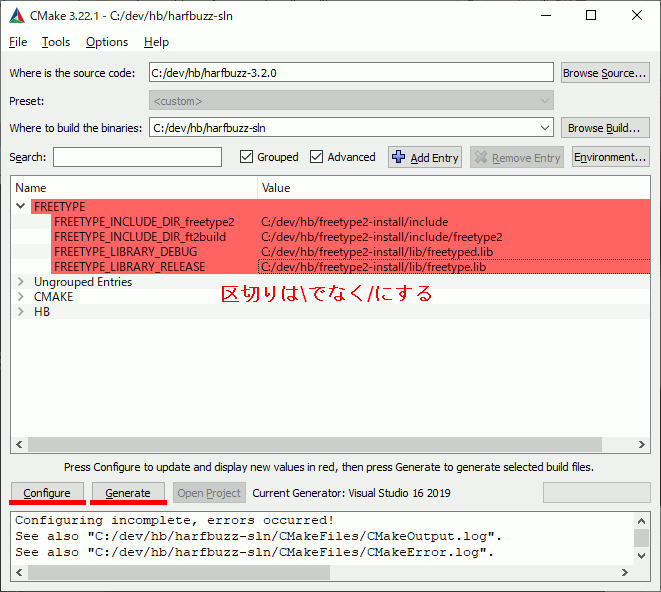
三回Configureする。
一回目はただConfigureする。
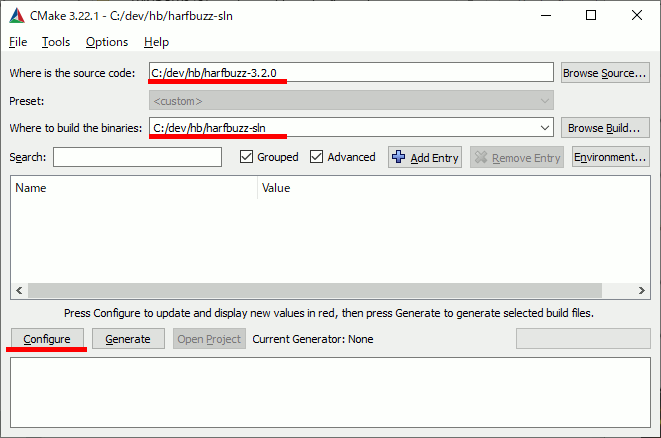
二回目は、CMAKE_INSTALL_PREFIXに、インストール先のパスを指定。
続いて、HB → HB_HAVE_FREETYPE のチェックを入れる。
再びConfigureする。
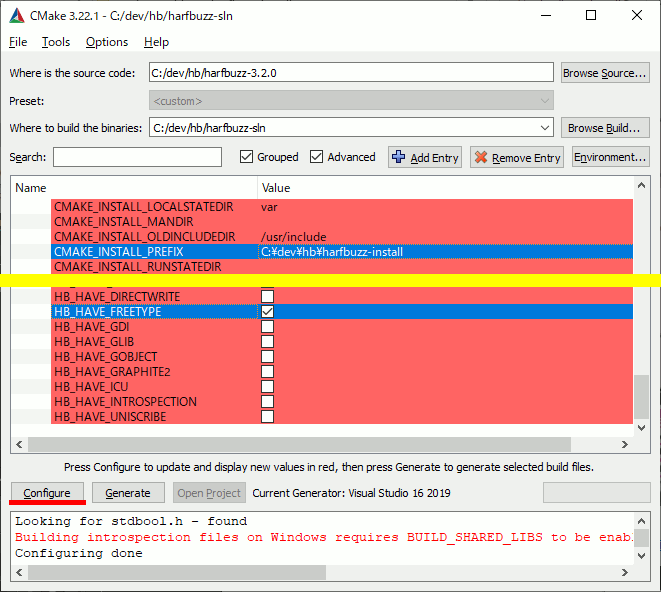
FREETYPEをチェックしたのでFREETYPEのパスを指定する。
これでConfigureし、Generateする。
VC++でビルド
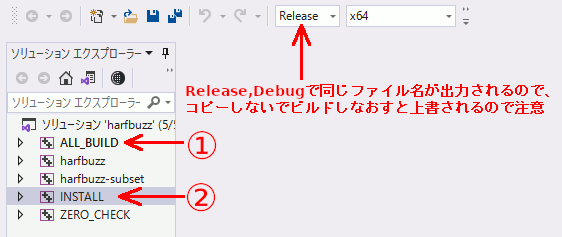
ALL_BUILDしてINSTALLする。Release版、Debug版が同じファイル名で出力されるので、両方ほしい場合は先に作ったほうをコピーしておく必要がある。
icuで絵文字,ひらがな、カタカナ、漢字、アルファベットを識別する
FreeType2で文字をラスタライズしたいときに、絵文字と日本語でフォントを変えないといけなかったりするので、その自動判別の方法を調べた。絵文字かどうかはUnicodeのBinary Propertyを調べる。アルファベットかひらがなか漢字かなどはScriptで判別可能。
#include <iostream>

#include <unicode/ucnv.h>
#include <unicode/brkiter.h>

#include <unicode/uscript.h>

// 要リンク
#pragma comment(lib, "icuuc.lib")

// icudt67.dll
// icuuc67.dll
bool isEmoji(UChar32 c) {

  // Unicodeの文字にはバイナリプロパティというのがあり、
  // そこを調べると文字についての色々な情報がわかる。
  // 絵文字かどうかの判別はバイナリプロパティがEmoji系になっているかどうかでわかる

  int32_t check=0;

  // cが絵文字ならどれかで非ゼロになるはず

  check += u_getIntPropertyValue(c, UCHAR_EMOJI);
  check += u_getIntPropertyValue(c, UCHAR_EMOJI_PRESENTATION);
  check += u_getIntPropertyValue(c, UCHAR_EMOJI_MODIFIER);
  check += u_getIntPropertyValue(c, UCHAR_EMOJI_MODIFIER_BASE);
  check += u_getIntPropertyValue(c, UCHAR_EMOJI_COMPONENT);

  return (bool)check;
}
int main() { std::setlocale(LC_ALL, ""); // 元の文字列の定義 std::u16string u16s = u"👨👧さa感マ"; ///////////////////////////// // ICUの設定 icu::UnicodeString usr(u16s.c_str()); UErrorCode err; icu::BreakIterator* bi = icu::BreakIterator::createCharacterInstance( icu::Locale::getDefault(), err); bi->setText(usr); // イテレータで1書記素ずつループする int32_t current = bi->first(); while (current != icu::BreakIterator::DONE) { // 文字の長さを知る必要があるので、 // 「現在の文字の位置」と「前の文字の位置」が必要 int32_t prev = current; current = bi->next(); if (current == UBRK_DONE) { break; } int32_t count = current - prev;//文字の長さ // UTF16配列としてのprev番目の文字をUTF32で取得 UChar32 c = usr.char32At(prev); // バイナリプロパティで絵文字かどうかチェック if (isEmoji(c) == true) { printf("絵文字\n"); } else{
// スクリプトを取得し文字の種類を特定 UScriptCode script = uscript_getScript(c, &err); switch (script) { case USCRIPT_LATIN: printf("latin\n"); break; case USCRIPT_HIRAGANA: printf("ひらがな\n"); break; case USCRIPT_KATAKANA: printf("カタカナ\n"); break; case USCRIPT_HAN: printf("漢字\n"); break; } } } }
結果
ひらがな
latin
漢字
カタカナ
glm::intersectRayTriangleについて
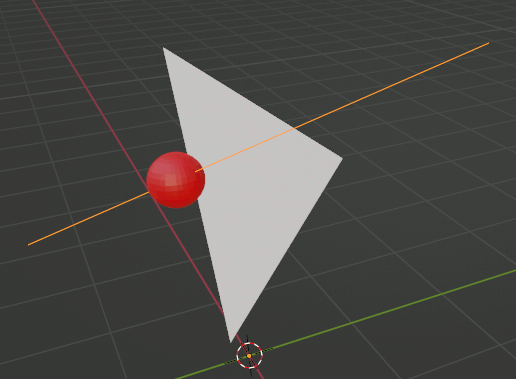
三角形とレイの交点を求める。
void draw_intersect() {
  // 三角形を定義
  auto p0 = glm::vec3(-0.944245, 1.16309, -0.236938);
  auto p1 = glm::vec3(1.10855, -0.444616, 0.859098);
  auto p2 = glm::vec3(-0.21789, -0.660092, -0.62216);

  // レイの定義
  auto origin = glm::vec3(-0.846075, -0.217401, 0.880718); // レイ始点
  auto endp = glm::vec3(0.356164, -0.323941, -1.58961); // レイ終点
  auto dir = glm::normalize(endp - origin);// レイ方向計算+normalize

  glm::vec2 bary;// 重心座標系のu,v
  float distance;// originから交点までの距離

  glm::intersectRayTriangle(origin, dir, p0, p1, p2, bary, distance);


  // 三角形の描画
  glBegin(GL_TRIANGLES);
  glColor3d(1, 0, 0);
  glVertex3fv(glm::value_ptr(p0));
  glColor3d(0, 1, 0);
  glVertex3fv(glm::value_ptr(p1));
  glColor3d(0, 0, 1);
  glVertex3fv(glm::value_ptr(p2));
  glEnd();

  // レイを表示
  glColor3d(1, 1, 1);
  glLineWidth(1);
  glBegin(GL_LINES);
  glVertex3fv(glm::value_ptr(origin));
  glVertex3fv(glm::value_ptr(endp));
  glEnd();
  glLineWidth(3);
  glColor3d(1, 1, 1);
  glBegin(GL_LINES);
  glVertex3fv(glm::value_ptr(origin));
  glVertex3fv(glm::value_ptr(origin + dir * distance));
  glEnd();

  // 交点を強調表示
  glColor3f(1, 1, 1);
  glPointSize(15);
  glBegin(GL_POINTS);
  glVertex3fv(glm::value_ptr(origin + dir * distance));
  glEnd();

}
第六引数 baryPosition
baryPositionは重心座標系を返す。重心座標系はu,v,wで表せるが、u+v+w==1なので、w=1-u-vとなる。従ってbaryPositionにはu,vしか入っていない。wは自分で計算する。
void draw_intersect2() {
  auto p0 = glm::vec3(-0.944245, 1.16309, -0.236938);
  auto p1 = glm::vec3(1.10855, -0.444616, 0.859098);
  auto p2 = glm::vec3(-0.21789, -0.660092, -0.62216);

  auto origin = glm::vec3(-0.846075, -0.217401, 0.880718);
  auto endp = glm::vec3(0.356164, -0.323941, -1.58961);
  auto dir = glm::normalize(endp - origin);

  glm::vec2 bary;
  float distance;
  glm::intersectRayTriangle(origin, dir, p0, p1, p2, bary, distance);

  // 重心座標系
  float u = bary.x;
  float v = bary.y;
  float w = 1-u-v;

  // 三角形の頂点の色
  glm::vec3 r(1, 0, 0);
  glm::vec3 g(0, 1, 0);
  glm::vec3 b(0, 0, 1);

  // 交点の色を重心座標系から求める
  glm::vec3 cc =
    w * r +
    u * g +
    v * b;

  // 三角形の描画
  glBegin(GL_TRIANGLES);
  glColor3fv(glm::value_ptr(r));
  glVertex3fv(glm::value_ptr(p0));
  glColor3fv(glm::value_ptr(g));
  glVertex3fv(glm::value_ptr(p1));
  glColor3fv(glm::value_ptr(b));
  glVertex3fv(glm::value_ptr(p2));
  glEnd();

  // レイを表示
  glColor3d(1, 1, 1);
  glLineWidth(1);
  glBegin(GL_LINES);
  glVertex3fv(glm::value_ptr(origin));
  glVertex3fv(glm::value_ptr(endp));
  glEnd();


  glLineWidth(3);
  glColor3d(1, 1, 1);
  glBegin(GL_LINES);
  glVertex3fv(glm::value_ptr(origin));
  glVertex3fv(glm::value_ptr(origin + dir * distance));
  glEnd();

  // 交点を表示
  glPointSize(20);
  glColor3f(1,1,1);
  glBegin(GL_POINTS);
  glVertex3fv(glm::value_ptr(origin + dir * distance));
  glEnd();

  glPointSize(15);
  glColor3fv(glm::value_ptr(cc));
  glBegin(GL_POINTS);
  glVertex3fv(glm::value_ptr(origin + dir * distance));
  glEnd();

}
重心座標系について。
というかこのプログラムの色算出間違っていた。上が正解。体力があれば下記事も修正する。
glm::intersectRayPlaneでレイと面の交点を求める
#include <iostream>

#include <gl/glm-0.9.9/gtx/string_cast.hpp>

#include <gl/glm-0.9.9/glm.hpp>


// 球とRay , 面とRayの交差判定に必要
#include <gl/glm-0.9.9/gtx/intersect.hpp>

int main() {

  // 三点で面を定義
  glm::vec3 p0 = { -0.74092 ,1.31512,1.3569 };
  glm::vec3 p1 = { -1.71194 ,-0.053312 ,2.44526 };
  glm::vec3 p2 = { -0.131372 ,-0.116652 ,0.100522 };

  // 面上に存在する点1つ
  glm::vec3 planeo = p0;

  // 面の法線
  glm::vec3 planen = glm::normalize(glm::cross(p1 - p0, p2 - p0));

  // レイの定義
  glm::vec3 rays = { 1.45134 ,1.48362 ,2.90831 };
  glm::vec3 raye = { -2.87985 ,-1.52254 ,0.203716 };

  // レイの方向
  glm::vec3 rayn = glm::normalize(raye - rays);

  // raysからの距離
  float distance;

  glm::intersectRayPlane(
    rays,
    rayn,
    planeo,
    planen,
    distance
  );

  glm::vec3 x = rays + rayn * distance;

  std::cout << glm::to_string(x) << std::endl;
  // vec3(-1.011684, -0.225897, 1.370285)
}
glm::intersectRaySphereでレイと球の交点を求める
glm::intersectRaySphereで球とレイの交点を算出できる。
この関数があるので自前実装にはあまり意味がない。
欠点はレイの始点に近い方の点しか取れない所。ただし普通の用途では問題ない。
#include <iostream>

#include <gl/glm-0.9.9/gtx/string_cast.hpp>

#include <gl/glm-0.9.9/glm.hpp>

// 球とRay , 面とRayの交差判定に必要
#include <gl/glm-0.9.9/gtx/intersect.hpp>

int main()
{
  /////////////////////////////
  ////// 球と線分の交点 ///////
  /////////////////////////////

  // テスト値を設定
  const glm::vec3 center{ -2.72692 ,-2.51743,3.0258 };
  const float r = 2.44975f;
  const glm::vec3 from{ 1.69882,-1.63121,3.75584 };
  const glm::vec3 to{ -7.42946 ,-4.48611 ,2.84412 };

  const glm::vec3 raynorm = glm::normalize(to - from);

  // 球と線分の交点を格納
  glm::vec3 CROSS;

  float direction;// fromからの距離
  if (glm::intersectRaySphere(from, raynorm, center, glm::pow(r, 2), direction) == true) {

    // fromに近い方の頂点が取得可能
    CROSS = from + raynorm * direction;

    std::cout << glm::to_string(CROSS);

    // 出力結果
    // vec3(-0.346964, -2.271036, 3.551510)
  }
  else {

    std::cout << "交差していない";

  }


}
glmのベクトル等のデータ型と関数を使って球とレイの交点を求めるプログラムを再考する
正直今更あまり意味がない(なぜあまり意味がないかは後日)のだが、以前つくった球とレイの交点を求めるプログラム。glm::vec使用版。画面をマウスドラッグで回転させたりするときに使ったりする。
cross.hpp
#pragma once

#include <gl/glm-0.9.9/glm.hpp>
#include <gl/glm-0.9.9/gtx/string_cast.hpp>
#include <array>

#include<vector>

namespace szl {
  template<typename T, size_t MAX>//最大二個まで結果を返せるようにしておく
  class LimitedArray {
    std::array<T, MAX> _data;
    size_t count;
  public:
    LimitedArray() :count(0) {}

    void push_back(const T& v) {

      if (count >= MAX)
        throw "count >= MAX";

      _data[count++] = v;
    }
    void pop_back() {

      if (count == 0)
        throw "count == 0";

      count--;
    }
    T& back() {

      if (count == 0)
        throw "count == 0";

      return _data[count - 1];
    }
    const T& back()const {
      return _data[count - 1];
    }
    const T* data()const { return _data; }
    T* data() { return _data; }

    size_t size()const { return count; }

    const T& operator[](const size_t index)const {
      return _data[index];
    }
    T& operator[](const size_t index) {
      return _data[index];
    }

  };
  struct HalfLineSegment {
    glm::vec3 S; // 始点
    float t;     // 長さ
    glm::vec3 V; // 方向

    HalfLineSegment() {}
    HalfLineSegment(glm::vec3 _s, float _t, glm::vec3 _v) :S(_s), t(_t), V(_v) {}

    glm::vec3 E()const {
      return S + t * V;
    }
  };
  //! @brief 球と直線の交点を求める
  //! @param [in] center 球の中心
  //! @param [in] r 球の半径
  //! @param [in] from 直線上の点1
  //! @param [in] to 直線状の点2
  //! @return 座標値 0個 または 2個
  // 参考 https://knzw.tech/raytracing/?page_id=78
  LimitedArray< HalfLineSegment, 2> sphere_line_cross(
    const glm::vec3& center,
    const float r,
    const glm::vec3& from,
    const glm::vec3& to
  ) {
    LimitedArray< HalfLineSegment, 2> ret;

    //線分の始点をpで表す。
    //球を0,0,0原点で計算するので、直線の方を球の中心分移動する
    glm::vec3 p = from - center;

    //直線の方程式を p + tvとする。
    glm::vec3 v = to - from;

    float A = std::pow(glm::length(v), 2);
    float B = 2 * glm::dot(p, v);
    float C = std::pow(glm::length(p), 2) - r * r;

    float D = B * B - 4 * A * C; //判別式
    float A2 = A * 2;

    if (D < 0.0)
      return ret;

    float sqrtD = std::sqrt(D);
    float t1 = (-B + sqrtD) / A2;
    float t2 = (-B - sqrtD) / A2;

    ret.push_back(HalfLineSegment(p + center, t1, v));
    ret.push_back(HalfLineSegment(p + center, t2, v));

    return ret;

  }
  //! @brief 球と直線の交点を求めてfromに近い方の点を返す
  //! @param [in] center 球の中心
  //! @param [in] r 球の半径
  //! @param [in] from 直線上の点1
  //! @param [in] to 直線状の点2
  //! @return 座標値
  glm::vec3 sphere_line_hit(
    const glm::vec3& center,
    const float r,
    const glm::vec3& from,
    const glm::vec3& to
  ) {
    LimitedArray< HalfLineSegment, 2> hits = sphere_line_cross(center, r, from, to);

    glm::vec3 ret;

    switch (hits.size()) {
    case 1:
      ret = hits[0].E();
      break;
    case 2:

      if (glm::distance(from, hits[0].E()) <
        glm::distance(from, hits[1].E())) {
        ret = hits[0].E();
      }
      else {
        ret = hits[1].E();
      }
      break;
    default:
      ret = glm::vec3{
        std::numeric_limits<float>::infinity(),
        std::numeric_limits<float>::infinity(),
        std::numeric_limits<float>::infinity()
      };
    }

    return ret;

  }
  bool isValid(const glm::vec3& vec) {
    auto c = glm::isinf(vec);
    return c.x && c.y && c.z;
  }
}
テストコード
#include <iostream>

#include "cross.hpp"

int main()
{
  // テスト値を設定
  const glm::vec3 center{ -2.72692 ,-2.51743,3.0258 };
  const float r= 2.44975f;
  const glm::vec3 from{ 1.69882,-1.63121,3.75584 };
  const glm::vec3 to{ -7.42946 ,-4.48611 ,2.84412 };

  // 交点を計算
  auto hits = szl::sphere_line_cross(center, r, from, to);

  glm::vec3 P = szl::sphere_line_hit(center, r, from, to);

  // 結果を表示
  std::cout << glm::to_string(P) << std::endl;
  std::cout << glm::to_string(hits[0].E()) << std::endl;
  std::cout << glm::to_string(hits[1].E()) << std::endl;

}
出力
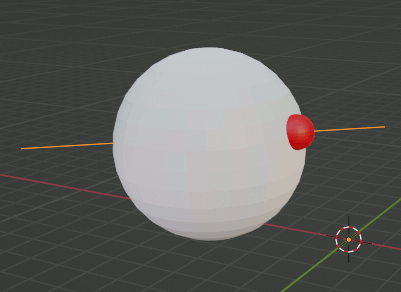
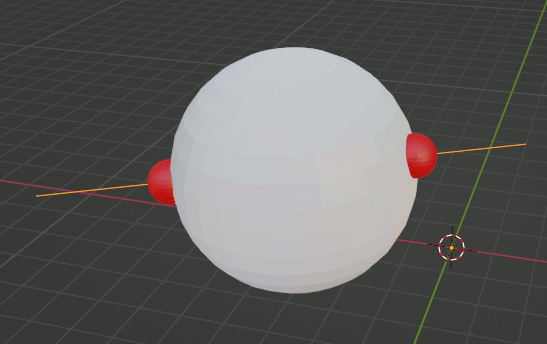
球と直線をBlenderで設定して、出力した座標に球を配置してみる。正しく計算できていることがわかる
vec3(-4.877646, -3.688022, 3.098992)
vec3(-0.346963, -2.271036, 3.551510)


