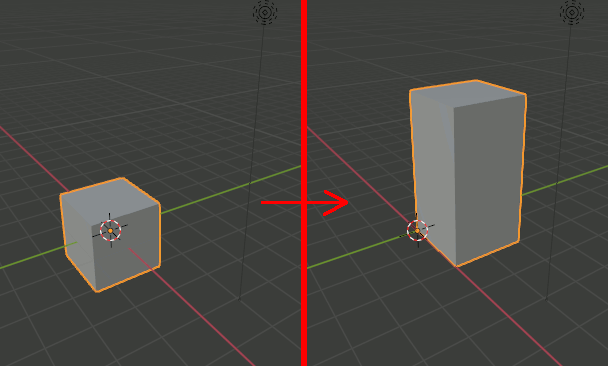
オブジェクトの頂点に行列を適用するプログラムにUIを付けてアドオン風にする
import bpy
import mathutils
# 行列をモデルに適用するボタン
class execButton(bpy.types.Operator):
  bl_idname = "szl.multmatrixbutton"
  bl_label = "multi matrix"

  def execute(self, context):

      M11 = context.scene.myinputs.m11
      M12 = context.scene.myinputs.m12
      M13 = context.scene.myinputs.m13
      M14 = context.scene.myinputs.m14
      #######################################
      M21 = context.scene.myinputs.m21
      M22 = context.scene.myinputs.m22
      M23 = context.scene.myinputs.m23
      M24 = context.scene.myinputs.m24
      #######################################
      M31 = context.scene.myinputs.m31
      M32 = context.scene.myinputs.m32
      M33 = context.scene.myinputs.m33
      M34 = context.scene.myinputs.m34
      #######################################
      M41 = context.scene.myinputs.m41
      M42 = context.scene.myinputs.m42
      M43 = context.scene.myinputs.m43
      M44 = context.scene.myinputs.m44

      #######################################
      #apply matrix
      matrix = mathutils.Matrix((
      (M11  ,M12  ,M13  ,M14),
      (M21  ,M22  ,M23  ,M24),
      (M31  ,M32  ,M33  ,M34),
      (M41  ,M42  ,M43  ,M44)))

      msh = bpy.context.active_object
      for vt in msh.data.vertices:

          src = mathutils.Vector((vt.co[0],vt.co[1],vt.co[2],1))

          dst = matrix @ src

          vt.co[0] = dst[0]
          vt.co[1] = dst[1]
          vt.co[2] = dst[2]

      return{'FINISHED'}
# 行列を単位行列にする
class execButtonLoadIdentity(bpy.types.Operator):
  bl_idname = "szl.loadidentitybutton"
  bl_label = "load identity"

  def execute(self, context):
    context.scene.myinputs.m11 =1.0
    context.scene.myinputs.m12 =0.0
    context.scene.myinputs.m13 =0.0
    context.scene.myinputs.m14 =0.0
    #######################################
    context.scene.myinputs.m21 =0.0
    context.scene.myinputs.m22 =1.0
    context.scene.myinputs.m23 =0.0
    context.scene.myinputs.m24 =0.0
    #######################################
    context.scene.myinputs.m31 =0.0
    context.scene.myinputs.m32 =0.0
    context.scene.myinputs.m33 =1.0
    context.scene.myinputs.m34 =0.0
    #######################################
    context.scene.myinputs.m41 =0.0
    context.scene.myinputs.m42 =0.0
    context.scene.myinputs.m43 =0.0
    context.scene.myinputs.m44 =1.0

    return{'FINISHED'}
#テキストボックスを定義
class myCInputs(bpy.types.PropertyGroup):

    m11: bpy.props.FloatProperty(name="m11")
    m12: bpy.props.FloatProperty(name="m12")
    m13: bpy.props.FloatProperty(name="m13")
    m14: bpy.props.FloatProperty(name="m14")
    #######################################
    m21: bpy.props.FloatProperty(name="m21")
    m22: bpy.props.FloatProperty(name="m22")
    m23: bpy.props.FloatProperty(name="m23")
    m24: bpy.props.FloatProperty(name="m24")
    #######################################
    m31: bpy.props.FloatProperty(name="m31")
    m32: bpy.props.FloatProperty(name="m32")
    m33: bpy.props.FloatProperty(name="m33")
    m34: bpy.props.FloatProperty(name="m34")
    #######################################
    m41: bpy.props.FloatProperty(name="m41")
    m42: bpy.props.FloatProperty(name="m42")
    m43: bpy.props.FloatProperty(name="m43")
    m44: bpy.props.FloatProperty(name="m44")
class myCTool_PT_panel(bpy.types.Panel):
    bl_label = "行列適用"
    bl_category = "行列適用"
    bl_space_type = "VIEW_3D"
    bl_region_type = "UI"

    def draw(self, context):
        layout = self.layout

        column = layout.column(align=True)

        # テキストボックスを並べる
        row = column.row(align=True)
        row.prop(context.scene.myinputs, "m11", text="")
        row.prop(context.scene.myinputs, "m12", text="")
        row.prop(context.scene.myinputs, "m13", text="")
        row.prop(context.scene.myinputs, "m14", text="")
        row = column.row(align=True)
        row.prop(context.scene.myinputs, "m21", text="")
        row.prop(context.scene.myinputs, "m22", text="")
        row.prop(context.scene.myinputs, "m23", text="")
        row.prop(context.scene.myinputs, "m24", text="")
        row = column.row(align=True)
        row.prop(context.scene.myinputs, "m31", text="")
        row.prop(context.scene.myinputs, "m32", text="")
        row.prop(context.scene.myinputs, "m33", text="")
        row.prop(context.scene.myinputs, "m34", text="")
        row = column.row(align=True)
        row.prop(context.scene.myinputs, "m41", text="")
        row.prop(context.scene.myinputs, "m42", text="")
        row.prop(context.scene.myinputs, "m43", text="")
        row.prop(context.scene.myinputs, "m44", text="")

        # ボタンを配置
        layout.operator("szl.loadidentitybutton")
        layout.operator("szl.multmatrixbutton")
classes = (
    myCInputs,
    execButton,
    execButtonLoadIdentity,
    myCTool_PT_panel
)


def register():
    for cls in classes:
        bpy.utils.register_class(cls)

    bpy.types.Scene.myinputs = bpy.props.PointerProperty(type=myCInputs)

def unregister():
    for cls in classes:
        bpy.utils.unregister_class(cls)
    del bpy.types.Scene.myinputs

if __name__ == "__main__":
    register()
Blender Python Addonのチェックボックスの追加とプロパティへのアクセス
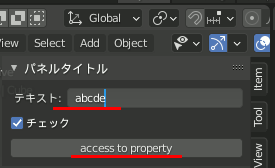
Blender PythonでUIにGUI部品を追加するときは、「チェックボックス」「エディットボックス」として追加するのではなく、
「String型のプロパティ」を登録するとエディットボックスとして表示され、
「Bool型のプロパティ」を登録するとチェックボックスとして表示される。
import bpy

#テキストボックスを定義
class myCInputs(bpy.types.PropertyGroup):
    myTextField: bpy.props.StringProperty(
        name="テキスト",
        description="説明文",
        default="",
        maxlen=1024, # 最大文字数
        subtype="NONE"
    )
    myCheckField: bpy.props.BoolProperty(
        name="チェック",
        default=True
    )
class myCTool_PT_panel(bpy.types.Panel):
    bl_label = "パネルタイトル"
    bl_category = "タブタイトル"
    bl_space_type = "VIEW_3D"
    bl_region_type = "UI"

    def draw(self, context):
        layout = self.layout

        #横に並べるならrow.propを使う
        # row = layout.row()

        layout.prop(context.scene.myinputs, "myTextField")
        layout.prop(context.scene.myinputs, "myCheckField")

classes = (
    myCInputs,
    myCTool_PT_panel
)


def register():
    for cls in classes:
        bpy.utils.register_class(cls)

    bpy.types.Scene.myinputs = bpy.props.PointerProperty(type=myCInputs)


def unregister():
    for cls in classes:
        bpy.utils.unregister_class(cls)
    del bpy.types.Scene.myinputs

if __name__ == "__main__":
    register()
値の取得方法
import bpy
# ボタンを定義
class execButton(bpy.types.Operator):
  bl_idname = "szl.button"
  bl_label = "access to property"

  def execute(self, context):
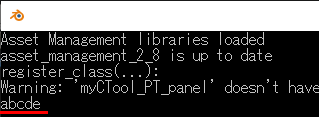
    print( context.scene.myinputs.myTextField)# 他のGUI部品の値を取得
    return{'FINISHED'}
# ボタン以外のUIを定義
class myCInputs(bpy.types.PropertyGroup):
    myTextField: bpy.props.StringProperty(
        name="テキスト",
        description="説明文",
        default="",
        maxlen=1024, # 最大文字数
        subtype="NONE"
    )

    myCheckField: bpy.props.BoolProperty(
        name="チェック",
        default=True
    )
class myCTool_PT_panel(bpy.types.Panel):
    bl_label = "パネルタイトル"
    bl_category = "タブタイトル"
    bl_space_type = "VIEW_3D"
    bl_region_type = "UI"

    def draw(self, context):
        layout = self.layout

        #横に並べるならrow.propを使う
        # row = layout.row()

        layout.prop(context.scene.myinputs, "myTextField")
        layout.prop(context.scene.myinputs, "myCheckField")
        layout.operator("szl.button")
classes = (
    myCInputs,
    execButton,
    myCTool_PT_panel,
)


def register():
    for cls in classes:
        bpy.utils.register_class(cls)

    bpy.types.Scene.myinputs = bpy.props.PointerProperty(type=myCInputs)


def unregister():
    for cls in classes:
        bpy.utils.unregister_class(cls)
    del bpy.types.Scene.myinputs

if __name__ == "__main__":
    register()
Blender Python アドオンのパネルにエディットボックスを追加
テキストフィールドを追加するときはpropを使用する。
import bpy
class myCInputs(bpy.types.PropertyGroup):
    # テキストボックスを定義
    myTextField: bpy.props.StringProperty(
        name="タイトル",
        description="説明文",
        default="",
        maxlen=1024, # 最大文字数
        subtype="NONE"
    )
    # subtype:
    #   ['FILE_PATH', 'DIR_PATH',
    #    'FILE_NAME', 'BYTE_STRING',
    #    'PASSWORD', 'NONE']
class myCTool_PT_panel(bpy.types.Panel):
    bl_label = "パネルタイトル"
    bl_category = "タブタイトル"
    bl_space_type = "VIEW_3D"
    bl_region_type = "UI"

    def draw(self, context):
        layout = self.layout

        #横に並べるならrow.propを使う
        # row = layout.row()

        layout.prop(context.scene.myinputs, "myTextField")
classes = (
    myCInputs,
    myCTool_PT_panel
)


def register():
    for cls in classes:
        bpy.utils.register_class(cls)

    # bpy.types.Scene.myinputs変数を作成し、テキストボックスを代入
    bpy.types.Scene.myinputs = bpy.props.PointerProperty(type=myCInputs)


def unregister():
    for cls in classes:
        bpy.utils.unregister_class(cls)
    del bpy.types.Scene.myinputs

if __name__ == "__main__":
    register()
Blender Pythonでモデルの頂点に変換行列を適用する
import bpy
import mathutils

msh = bpy.context.active_object

Sx = 1
Sy = 1
Sz = 2

Tx = 1
Ty = 1
Tz = 1

Tmatrix = mathutils.Matrix((
(Sx ,0  , 0  , 0),
(0  ,Sy , 0  , 0),
(0  ,0  , Sz , 0),
(0  ,0  , 0  , 1)))

Smatrix = mathutils.Matrix((
(1  ,0  ,0  ,Tx),
(0  ,1  ,0  ,Ty),
(0  ,0  ,1  ,Tz),
(0  ,0  ,0  , 1)))

Matrix = Tmatrix @ Smatrix


for vt in msh.data.vertices:

    src = mathutils.Vector((vt.co[0],vt.co[1],vt.co[2],1))

    dst = Matrix @ src

    vt.co[0] = dst[0]
    vt.co[1] = dst[1]
    vt.co[2] = dst[2]
Blender Python Meshオブジェクトの頂点のIndexをエッジの接続順にソートする(ループしている場合)
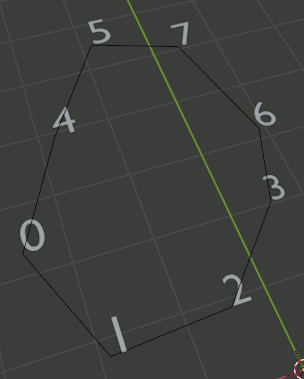
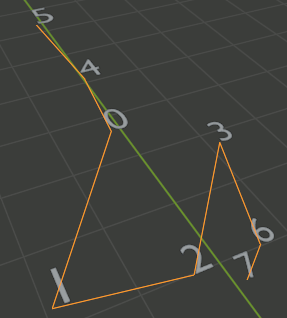
前回は端点がある連続したエッジだったが、エッジがループしている場合のコードも書く。ループしているときはどのエッジでもいいから一本取り出して、その二点から探索を開始する。
探索終了は、探索した結果一番最初の要素が見つかったら終了する。
import bpy


######################################################
# textオブジェクトの追加
def add_text_numbers(vertexes):

    # 新しいCollrectionを作成
    newCol = bpy.data.collections.new('Vertex Numbers')
    # 現在のシーンにコレクションをリンク
    bpy.context.scene.collection.children.link(newCol)

    for v in range(len(vertexes)):

        fontCurve1 = bpy.data.curves.new(type="FONT",name="fontCurve1")
        obj = bpy.data.objects.new("vert[ "+str(v)+" ]",fontCurve1)
        obj.data.body = "" + str(v) # textオブジェクトの内容
        obj.location.x=vertexes[v].co.x
        obj.location.y=vertexes[v].co.y
        obj.location.z=vertexes[v].co.z
        obj.scale=[0.5,0.5,0.5]

        newCol.objects.link(obj)


######################################################
# 現在選択中のオブジェクトを取得
def select_object():
   ob = bpy.context.active_object

   if ob.type != 'MESH':
       raise TypeError("Active object is not a Mesh")

   mesh = ob.data

   #print( len(mesh.edges) )
   #print( len(mesh.vertices) )

   return mesh.vertices, mesh.edges

######################################################
######################################################
# @bref 端点を取得
# @param [in] verts 頂点リスト
# @param [in] edges エッジリスト
# @param [in] target 端点は二つあるので0,1のどちらか
# @return 頂点番号
def get_end_points(verts,edges,target):
    dic = {}

    for v in range(len(verts)):
        dic[v] = 0

    for e in edges:
        dic[e.vertices[0]] += 1
        dic[e.vertices[1]] += 1

    ends = []
    for i in range(len(dic)):
        if dic[ i ] == 1:
            ends.append( i )
    #########################
    ## ループしている場合 ###
    if not ends:
        return None
    return ends[target]


######################################################
######################################################
# @brief vtxを持つエッジのリストを取得
# @param [in] edges エッジリスト
# @param [in] vtx 頂点index
# @return エッジindexの配列
def get_edge_by_point(edges,vtx):
    edgelist = []
    for e in _edges:
        if e.vertices[0] == vtx or e.vertices[1] ==vtx:
            edgelist.append(e.index)

    return edgelist

######################################################
######################################################
# @brief V1を持ち、V2を持たないエッジ
# @param [in] V1 頂点index(持つ頂点)
# @param [in] v2 頂点index(持たない頂点)
# @return 見つかったエッジindex
# @retval None そのようなエッジはなかった
def get_edge_V1_but_V2(edges,V1,V2):
    for e in _edges:
        if e.vertices[0] == V1 and e.vertices[1] != V2:
            return e.index
        if e.vertices[1] == V1 and e.vertices[0] != V2:
            return e.index
    return None


######################################################
######################################################
# @brief edgeを構成する2頂点のうち、vertexでないほうの頂点を返す
# @param [in] edge エッジリスト
# @param [in] vertex 基準となる頂点のIndex
# @return 頂点番号
def get_another_point_on_edge(edge,vertex):
    if edge.vertices[0] == vertex:
        return edge.vertices[1]
    if edge.vertices[1] == vertex:
        return edge.vertices[0]


######################################################
######################################################
# @brief 一直線に連続した順番の頂点一覧を取得
# @param [in] verts 頂点リスト
# @param [in] edges エッジリスト
# @param [in] order 端点のどちら側から探索するか(0 or 1)
# @return 頂点一覧
def get_connected_vertex_list(verts,edges,order):

    # 結果の格納先
    vlist = []

    # 最初の頂点を取得。「端点」は二つだけ存在するので
    # 結果は二つ求まる(0,1)。そのうちのorder番を取得
    EP = get_end_points(verts,edges,order)
    if EP is not None:
        vlist.append(EP) #その要素が結果の一番目

        edgeidxlist = get_edge_by_point(edges,EP)# EPを持つエッジの一覧。要素数1の配列になるはず

        # エッジ最初の頂点を持つエッジ
        endpointedge = edges[edgeidxlist[0]]

        #EP(最初の端点)でない方の頂点を取得
        another = get_another_point_on_edge( endpointedge , EP )
        # 端点を持つエッジの、端点でないほうの頂点は、二番目の頂点
        vlist.append(another)

    else:
        #############################
        ## ループしている場合 #######
        if order == 0:
            vlist.append( edges[0].vertices[0] )
            vlist.append( edges[0].vertices[1] )
        else:
            vlist.append( edges[0].vertices[1] )
            vlist.append( edges[0].vertices[0] )

    # 無限ループを使うのでループ上限を設けておく
    looplimit = 100

    while True:

        # 前回の前回見つけた頂点
        before = vlist[len(vlist)-2]

        # 前回見つけた頂点。この頂点の次の頂点を探したい
        now = vlist[len(vlist)-1]

        #nowを持ち、beforeを持たないエッジを検索
        nextedge = get_edge_V1_but_V2(edges,now,before)

        # 端点には「nowを持ち、beforeを持たないエッジ」がないので、Noneが入っている
        if nextedge is None:
            break

        #nextedgeの、nowでない方の頂点を取得
        next = get_another_point_on_edge( edges[nextedge] , now )

        #####################################
        ## ループしている場合 ###############
        if next == vlist[0]:
            break
        vlist.append(next)

        looplimit -= 1
        if looplimit == 0:
            break

    return vlist


# 頂点群を取得
ret = select_object()

_verts = ret[0]
_edges = ret[1]

# 頂点番号のテキストオブジェクトを追加
add_text_numbers(_verts)

vtx_c_list = get_connected_vertex_list(_verts,_edges,0)
print(vtx_c_list)
Blender Python Meshオブジェクトの頂点のIndexをエッジの接続順にソートする
import bpy
######################################################
# textオブジェクトの追加
def add_text_numbers(vertexes):

    # 新しいCollrectionを作成
    newCol = bpy.data.collections.new('Vertex Numbers')
    # 現在のシーンにコレクションをリンク
    bpy.context.scene.collection.children.link(newCol)

    for v in range(len(vertexes)):

        fontCurve1 = bpy.data.curves.new(type="FONT",name="fontCurve1")
        obj = bpy.data.objects.new("vert[ "+str(v)+" ]",fontCurve1)
        obj.data.body = "" + str(v) # textオブジェクトの内容
        obj.location.x=vertexes[v].co.x
        obj.location.y=vertexes[v].co.y
        obj.location.z=vertexes[v].co.z
        obj.scale=[0.5,0.5,0.5]

        newCol.objects.link(obj)


######################################################
# 現在選択中のオブジェクトを取得
def select_object():
   ob = bpy.context.active_object

   if ob.type != 'MESH':
       raise TypeError("Active object is not a Mesh")

   mesh = ob.data

   #print( len(mesh.edges) )
   #print( len(mesh.vertices) )

   return mesh.vertices, mesh.edges
######################################################
######################################################
# @brief 端点を取得
# @param [in] verts 頂点リスト
# @param [in] edges エッジリスト
# @param [in] target 端点は二つあるので0,1のどちらか
# @return 頂点番号
def get_end_points(verts,edges,target):
    dic = {}

    for v in range(len(verts)):
        dic[v] = 0

    for e in edges:
        dic[e.vertices[0]] += 1
        dic[e.vertices[1]] += 1

    ends = []
    for i in range(len(dic)):
        if dic[ i ] == 1:
            ends.append( i )

    return ends[target]


######################################################
######################################################
# @brief vtxを持つエッジのリストを取得
# @param [in] edges エッジリスト
# @param [in] vtx 頂点index
# @return エッジindexの配列
def get_edge_by_point(edges,vtx):
    edgelist = []
    for e in _edges:
        if e.vertices[0] == vtx or e.vertices[1] ==vtx:
            edgelist.append(e.index)

    return edgelist

######################################################
######################################################
# @brief V1を持ち、V2を持たないエッジ
# @param [in] V1 頂点index(持つ頂点)
# @param [in] v2 頂点index(持たない頂点)
# @return 見つかったエッジindex
# @retval None そのようなエッジはなかった
def get_edge_V1_but_V2(edges,V1,V2):
    for e in _edges:
        if e.vertices[0] == V1 and e.vertices[1] != V2:
            return e.index
        if e.vertices[1] == V1 and e.vertices[0] != V2:
            return e.index
    return None


######################################################
######################################################
# @brief edgeを構成する2頂点のうち、vertexでないほうの頂点を返す
# @param [in] edge エッジリスト
# @param [in] vertex 基準となる頂点のIndex
# @return 頂点番号
def get_another_point_on_edge(edge,vertex):
    if edge.vertices[0] == vertex:
        return edge.vertices[1]
    if edge.vertices[1] == vertex:
        return edge.vertices[0]


######################################################
######################################################
# @brief 一直線に連続した順番の頂点一覧を取得
# @param [in] verts 頂点リスト
# @param [in] edges エッジリスト
# @param [in] order 端点のどちら側から探索するか(0 or 1)
# @return 頂点一覧
def get_connected_vertex_list(verts,edges,order):

    # 結果の格納先
    vlist = []

    # 最初の頂点を取得。「端点」は二つだけ存在するので
    # 結果は二つ求まる(0,1)。そのうちのorder番を取得
    EP = get_end_points(verts,edges,order)

    vlist.append(EP) #その要素が結果の一番目


    edgeidxlist = get_edge_by_point(edges,EP)# EPを持つエッジの一覧。要素数1の配列になるはず

    # エッジ最初の頂点を持つエッジ
    endpointedge = edges[edgeidxlist[0]]

    #EP(最初の端点)でない方の頂点を取得
    another = get_another_point_on_edge( endpointedge , EP )
    # 端点を持つエッジの、端点でないほうの頂点は、二番目の頂点
    vlist.append(another)

    # 無限ループを使うのでループ上限を設けておく
    looplimit = 100

    while True:

        # 前回の前回見つけた頂点
        before = vlist[len(vlist)-2]

        # 前回見つけた頂点。この頂点の次の頂点を探したい
        now = vlist[len(vlist)-1]

        #nowを持ち、beforeを持たないエッジを検索
        nextedge = get_edge_V1_but_V2(edges,now,before)

        # 端点には「nowを持ち、beforeを持たないエッジ」がないので、Noneが入っている
        if nextedge is None:
            break

        #nextedgeの、nowでない方の頂点を取得
        next = get_another_point_on_edge( edges[nextedge] , now )
        vlist.append(next)

        looplimit -= 1
        if looplimit == 0:
            break

    return vlist
# 頂点群を取得
ret = select_object()

_verts = ret[0]
_edges = ret[1]

# 頂点番号のテキストオブジェクトを追加
add_text_numbers(_verts)

vtx_c_list = get_connected_vertex_list(_verts,_edges,0)
print(vtx_c_list)
結果
Blender Python Meshオブジェクトの頂点のIndexをText objectで追加する
まだやってなかったと思う。多分。
import bpy
######################################################
# textオブジェクトの追加
def add_text_numbers(vertexes):

    # 新しいCollrectionを作成
    newCol = bpy.data.collections.new('Vertex Numbers')
    # 現在のシーンにコレクションをリンク
    bpy.context.scene.collection.children.link(newCol)

    for v in range(len(vertexes)):

        fontCurve1 = bpy.data.curves.new(type="FONT",name="fontCurve1")
        obj = bpy.data.objects.new("vert[ "+str(v)+" ]",fontCurve1)
        obj.data.body = "" + str(v) # textオブジェクトの内容
        obj.location.x=vertexes[v].co.x
        obj.location.y=vertexes[v].co.y
        obj.location.z=vertexes[v].co.z
        obj.scale=[0.5,0.5,0.5]

        newCol.objects.link(obj)
######################################################
# 現在選択中のオブジェクトを取得
def select_object():
   ob = bpy.context.active_object

   if ob.type != 'MESH':
       raise TypeError("Active object is not a Mesh")

   mesh = ob.data

   #print( len(mesh.edges) )
   #print( len(mesh.vertices) )

   return mesh.vertices
# 頂点群を取得
verts = select_object()

# 頂点番号のテキストオブジェクトを追加
add_text_numbers(verts)
Unreal Engine 4 ブループリント(6)クリックした三次元座標を取得
クリック位置の検出はPlayerControlのブループリントでGet Hit Result Under Cursor by Channelノードを追加しHit ResultからBreak Hit Resultを見れば取り出せる。
作業
まず以前やった方法でアクタのクリックの検出をできるようにする。
https://suzulang.com/unrealengine4-blueprint-4-actorclickevent/
アクタのクリック検出にはPlayerControlのオーバーライドが必要なので、この作業で必然的にPlayerControlのブループリントができたことになる。これをMyPlayerControlとして、以下のように設定する
テスト
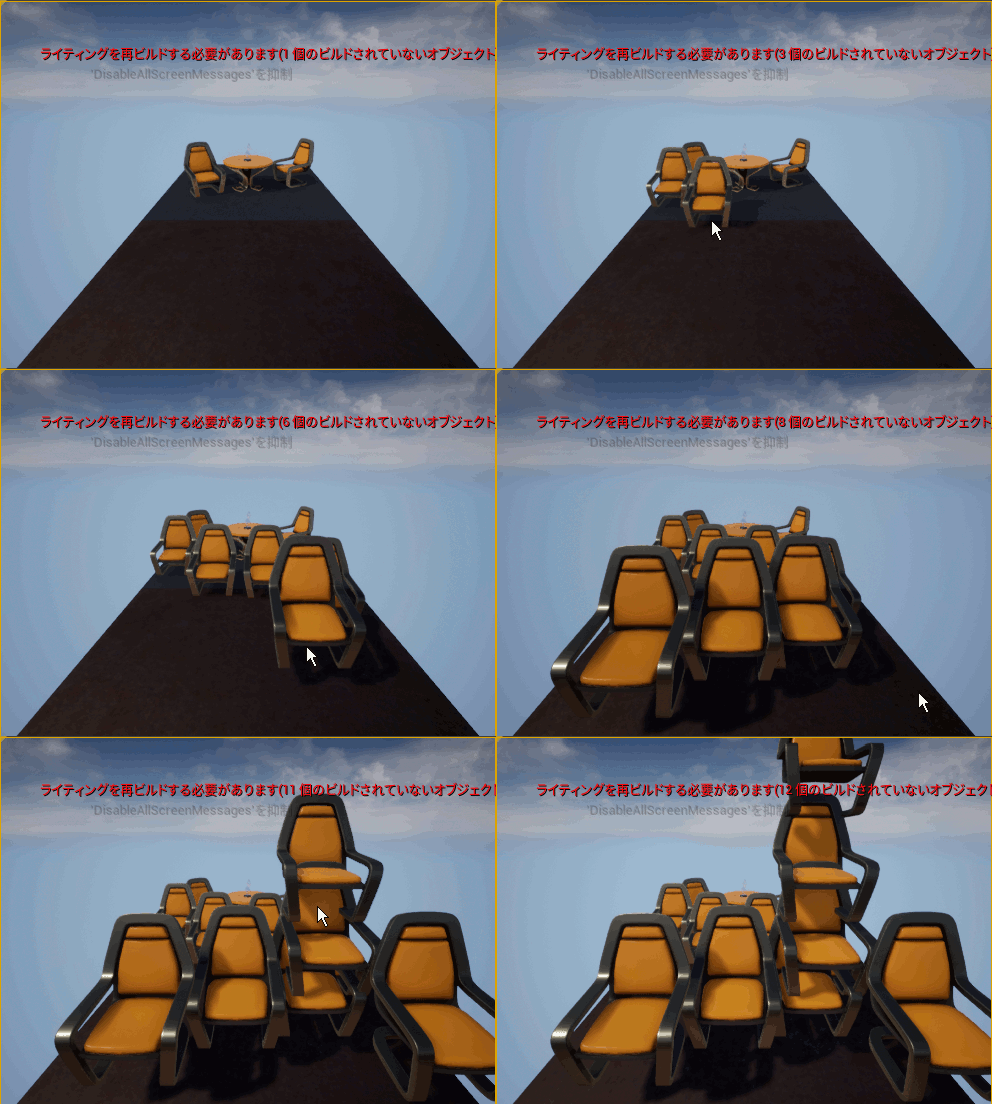
クリック位置にオブジェクトをスポーンする
Unreal Engine 4 ブループリント(5)アクタに力を加える(初速、射出等)
アクタに力を加える
Add Forceノードを使えば簡単に力を加えられる。力の方向の数字が大きいのはデフォルトのアクタの重量が100kgなど重いため。
ここでは、アクタが他の物体にヒットしたときに、0.5秒置いて左上方向に力がかかるようにした。
床か壁にぶつかると、その0.5秒後に左上に力がかかるので延々と壁にぶつかり続ける。
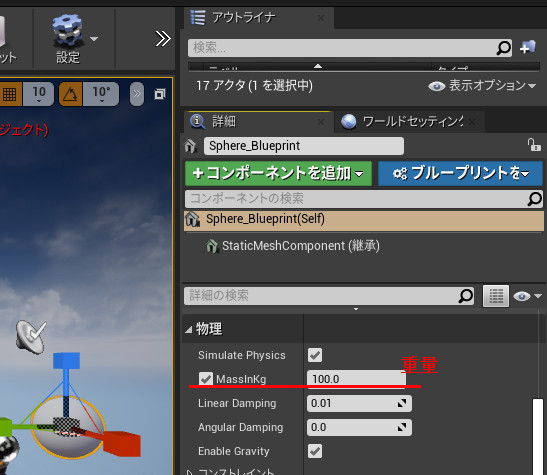
重量を変更するには、アクタを選択し、詳細→物理→MassInKgをチェックし、数字を入力する。
こちらのサイトが大変詳しいです:
https://qiita.com/mml/items/e614b441438ac9788d81
Add Force以外にもいろいろな力の加え方がこちらのサイトでまとめられています:
初速を与える
初速は開始直後に与える力。
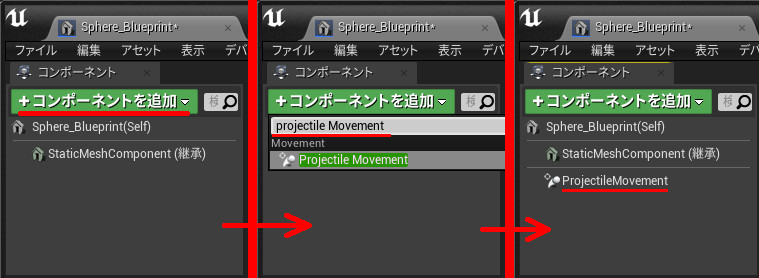
ブループリントを開き、projectile Movementコンポーネントを追加する
ProjectileMovementを選択すると詳細が設定できるようになるので、Initial Speed、Velocityを設定する
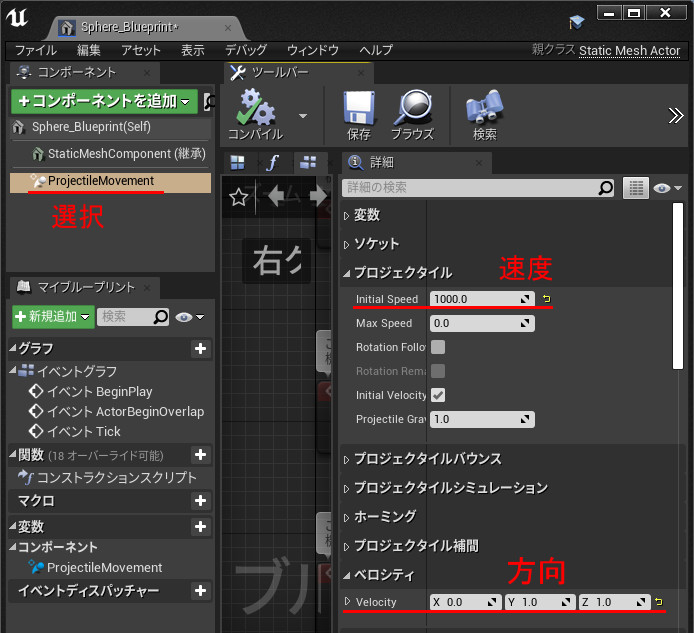
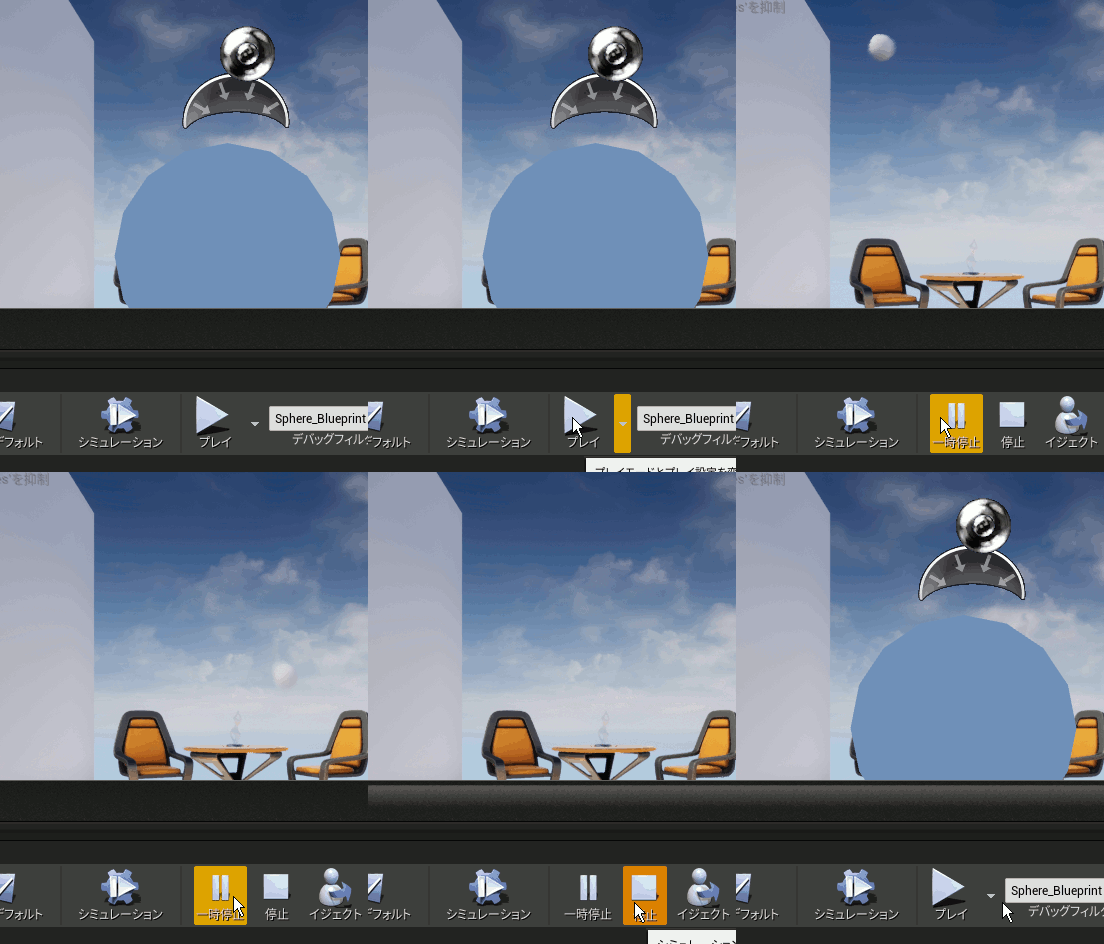
これで、起動直後に物体に力がかかる。
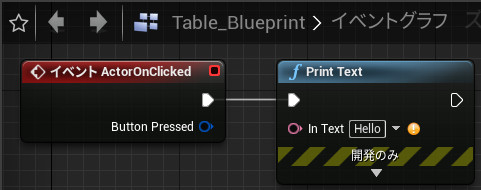
Unreal Engine 4 ブループリント(4)アクタのクリックを検出
アクタをクリックしたときに何か動作をする場合、「アクタがクリックされたときにアクタのClickイベントが呼ばれる」という設定をしなければならない。
① 「新規の空のブループリントクラス」から、Player Controllerを親クラスとするクラスを作成する(My_PlayerController)
② 「新規の空のブループリントクラス」から、Game Mode Baseを親クラスとするクラスを作成する(My_GameMode)
③ (My_GameMode)のPlayer Controller Classに(My_PlayerController)を設定する
④ アウトライナのGame Mode→ゲームモードオーバーライドに(My_GameMode)を設定する
⑤ (My_PlayerController)のマウスインターフェイスで"Show Mouse Cursor","Enable Click Events"をチェックする
この設定で、アクタのClickイベントが呼ばれるようになるので、アクタのOnClickedの処理を設定する。
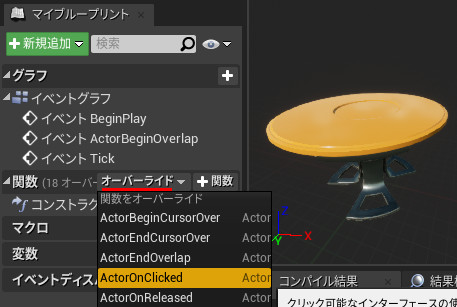
なお、調べるとアクタのオーバーライド可能な関数にActorOnClickedというのもあるのだが、違いがわからなかった。
ActorOnClickedはオーバーライド一覧で選択する。

