Vray for Blender でBumpmap
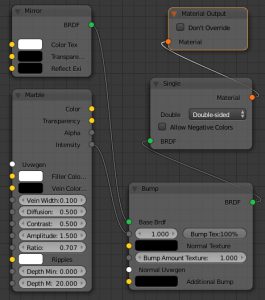
Vray for Blender でバンプマップを使う。当然だが、テクスチャを使うのでUV展開をしておく必要がある。
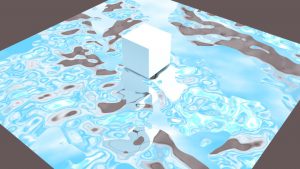
結果
以下、訳はgoogle 翻訳
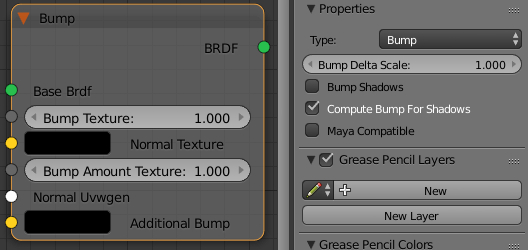
| Bump Delta Scale | scale for sampling the bitmap when using bump mapping. The exact value is calculated automatically by V-Ray, but can be scaled here. バンプマッピングを使用するときにビットマップをサンプリングするためのスケール。正確な値はV-Rayによって自動的に計算されますが、ここでスケーリングすることができます。 |
| Maya Compatible | when enabled V-Ray will render the bump mapping in such a way that it matches the result that can be achieved in Maya. 有効にすると、V-RayはバンプマッピングをMayaで達成できる結果と一致するようにレンダリングします。 |
| Bump Shadows | when this option is checked V-Ray will consider the bump maps when rendering shadows produced by objects with the bump material applied to them. このオプションをチェックすると、バンプマテリアルが適用されたオブジェクトによって生成されたシャドウをレンダリングするときに、バンプマップが考慮されます。 |
| Type | allows the user to specify whether a bump map or a normal map effect will be added to the base material. バンプマップまたは法線マップエフェクトをベースマテリアルに追加するかどうかをユーザーが指定できます。 |
| Base Brdf | allows you to select the base material to which the bump/normal effect will be added. バンプ/ノーマルエフェクトが追加されるベースマテリアルを選択することができます。 |
| Normal Uvwgen | connect a mapping node here. マッピングノードをここに接続します。 |
https://docs.chaosgroup.com/display/VFBlender/Bump
公式ではMaterialだが、現在(2018/07/08時点)ではBRDFのノードとなっている。
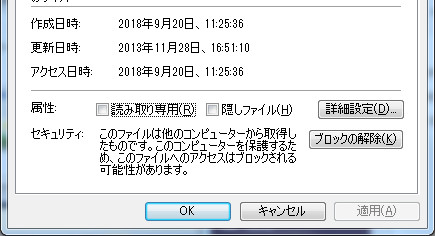
VC++でMSB3821 が発生したら「ブロックの解除」で解決する可能性
このエラーが発生した場合、エクスプローラから該当ファイルのプロパティを開く。「ブロックの解除(K)」を押してやると問題が解決する。複数のファイルがこれに該当している可能性がある場合、一度zip圧縮し展開すると一気に解除できるらしい。
WordPressにカスタムタクソノミーを追加する
「タクソノミー」は記事の内容の分類方法の事。Wordpressはデフォルトのタクソノミーとして「カテゴリー」「タグ」を用意している。自分で追加した分類を「カスタムタクソノミー」という。
functions.phpに以下を追加する。
ここではタクソノミーを「tweetcat」とし、表示名に「つぶやき種別」と入れている。
hierarchicalは必須ではないが、trueにすると階層構造にできる(カテゴリーと同じ使い方)。デフォルトではfalseになっている(タグと同じ使い方)
<?php
// // 新規カスタムタクソノミーを作成
function customtaxonomy_init() {
  register_taxonomy(
    'tweetcat',// 新規カスタムタクソノミー名(任意のユニークな名前)
    'post',// postを指定すると「投稿」する時に使用できる。(固定ページで使いたい時はpage)
    array(
      'label' => 'つぶやき種別', // 新規カスタムタクソノミー表示名
      'hierarchical' =>true
    )
  );
}
add_action( 'init' , 'customtaxonomy_init' );
?>
参考資料:
Vray for blender でfireを使う
Vray for blenderで炎のシミュレーションをする方法。
まず、blenderのレンダラでfire+smokeする時と同じように、ドメインを設定する。
そして次の作業を行う
①レンダラーをvrayへ変更
②V-Ray World Node Treeを表示
③Worldの設定へ行き、World Treeを追加。以下、ノード設定
④[Effects]->[Effects Container]を追加し、[World Output]の[Effects]へ接続
⑤[Effects]->[Fog]を追加し、[Effects Container]へ接続
⑥[Texture Utilities]->[Remap]を追加し、色を炎のように設定した後、[Remap(Color)]を[(Color)Fog]へ接続
⑦ ⑥と似たような[Remap]を追加 (Ctrl+C,Ctrl+V)し、[Remap.001(Color)]を[(Emission)Fog]へ接続
⑧ [Effects]->[Fog Gizmo]を追加し、[(Gizmo)Fog]へ接続
⑨[Textures]->[Voxel Data]を追加し、[Voxel Data(Density)]を[(Density)Fog]へ接続
⑩続けて、[Voxel Data(Flame)]を[(Input Value)Remap]へ接続,同様に[(InputValue)Remap.001]へ接続
⑪[Selectors]->[Object Select]を追加し、ドメインとなるキューブを設定
⑫[Object Select(Object)]を[(Object)Fog Gizmo]及び[(Domain)Voxel Data]へ接続
⑬必要に応じて、FogのEmissonを強くしたりと調整する
⑭レンダリング
| World Treeを追加する |  |
| V-Ray World Node Treeを表示 |  |
| World Node Treeの設定 | 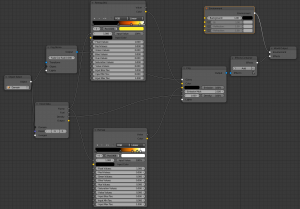 |
readmore.jsで記事を折りたたむ
jQueryのプラグインであるreadmore.jsで、「続きを読む」を実装する。
注意点は、どうもjqueryのバージョンが1.*.*系列でないと動かないらしい。少なくとも3.3.1では動作しなかった。
<head>
<script type='text/javascript' src='http://ajax.googleapis.com/ajax/libs/jquery/1.8.3/jquery.js'></script>
<script src="https://cdnjs.cloudflare.com/ajax/libs/Readmore.js/2.2.0/readmore.js"></script>
<script>
  $(document).ready(function() {
    $('.art').readmore({
      speed: 1000,
      collapsedHeight: 100,
      moreLink: '<a href="#">続きを見る</a>',
      lessLink: '<a href="#">閉じる</a>'
    });
  });
</script>
</head>
<div class="art">
<p>ここに隠したい文章を入れる。</p>
<p>この機能は頭を少し見せるので、collapsedHeightの数字でどれだけ隠すかを指定する必要がある。</p>
</div>
Blender [Shift+S] 3Dカーソルの操作
3Dカーソルを操作する方法のまとめ。
1. 任意の座標に移動
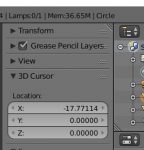
プロパティシェルフ→[3D Cursor]から座標入力
2. その他の移動先:
|
オブジェクト原点(origin)へ移動 |
Shift+S | Cursor to Selected | 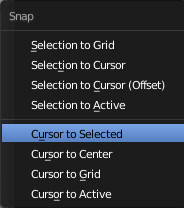 |
| 初期位置(0,0,0)へ移動 | Cursor to Center | ||
| 現在の座標に最も近い、小数点以下が0の座標へ移動 | Cursor to Grid | ||
| 現在選択中のオブジェクトの原点へ移動 | Cursor to Active |
Vray for Blender でdisplacement
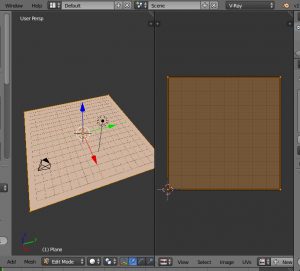
1.UV展開する(テクスチャを使うため)
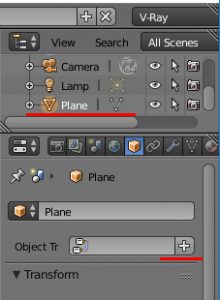
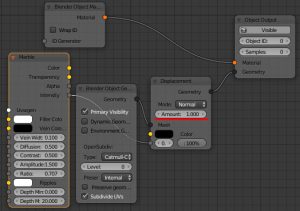
2.[Object] - [Object Tree] の「+」をクリックしてObject Node Treeを追加する
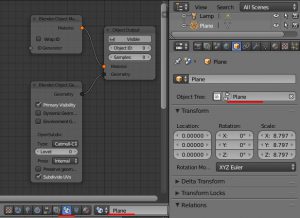
3.[V-Ray Object Node Tree] を表示する
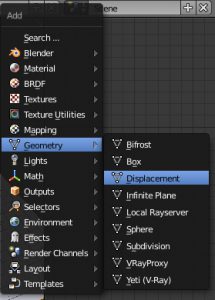
4.[Geometry] - [Displacement]ノードを追加する
5.テクスチャのintensityをDisplacementのfloatへ接続する。
必要時応じて[Amount]を大きくする
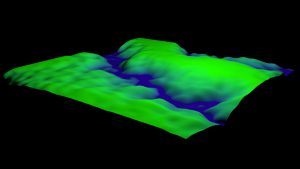
6.レンダリング
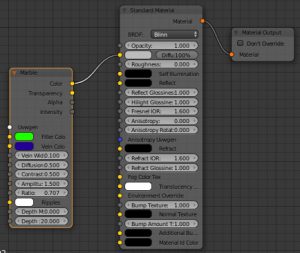
7.色はマテリアル設定で[Displacement]と同じテクスチャを指定している
ボタンを押したらそこに出るメニュー
右クリックメニューと同じ要領で、ボタンを押した場所にメニューを出すことを考える。

#include <windows.h>
#include <tchar.h>
#include "resource.h"
HMENU hmenu_dummy;
const UINT ID_MENU_1 = 100;
const UINT ID_MENU_2 = 101;


INT_PTR CALLBACK DlgWndProc(HWND hWnd, UINT msg, WPARAM wp, LPARAM lp){
  INT_PTR ret = FALSE;
  switch (msg)
  {
  case WM_DESTROY:
    DestroyMenu(hmenu_dummy);
    break;
  case WM_INITDIALOG://メニューの初期設定///////////////////////////
    hmenu_dummy = CreatePopupMenu(); //トップのダミーメニュー
    MENUITEMINFO mii;
    mii.cbSize     = sizeof(MENUITEMINFO);
    mii.fMask      = MIIM_ID | MIIM_TYPE;
    mii.fType      = MFT_STRING;
    mii.wID        = ID_MENU_1;
    mii.dwTypeData = _T("項目1");
    InsertMenuItem(hmenu_dummy, ID_MENU_1, FALSE, &mii);//メニューに項目追加
    mii.wID        = ID_MENU_2;
    mii.dwTypeData = _T("項目2");
    InsertMenuItem(hmenu_dummy, ID_MENU_2, FALSE, &mii);//メニューに項目追加

    break;
  case WM_COMMAND:
    switch(wp){
    case IDC_BUTTON_MENU://ボタンを押したとき//////////////////////
      {
        RECT brect;//ボタンの矩形を取得
        GetWindowRect(GetDlgItem(hWnd, IDC_BUTTON_MENU),&brect);
        TrackPopupMenu(//メニューを表示
          hmenu_dummy,
          TPM_LEFTALIGN, //↓に指定する座標はメニューの左上
          brect.left,brect.top + (brect.bottom-brect.top),
          0,
          hWnd,//親ウィンドウ
          nullptr
        );
      break;
      }
    case ID_MENU_1://メニュー1が押された////////////////////////
      MessageBox(hWnd,_T("メニュー1"),0,0);
      break;
    case ID_MENU_2://メニュー2が押された////////////////////////
      MessageBox(hWnd,_T("メニュー2"),0,0);
      break;
    }
    break;
  // ダイアログを閉じる
  case WM_CLOSE:
    EndDialog( hWnd , (INT_PTR)WM_CLOSE );
    ret =TRUE;
    break;
  }
  return ret;
}

///////////////////////////////////////////////
// エントリーポイント //////////////////////////
//////////////////////////////////////////////
int WINAPI WinMain(HINSTANCE hInstance, HINSTANCE hPrevInstance,
          PSTR lpCmdLine, int nCmdShow )
{

  INT_PTR d = DialogBox(hInstance,MAKEINTRESOURCE(IDD_DIALOG1),nullptr,(DLGPROC)DlgWndProc );
  PostQuitMessage(0);

  return 0;
}
C++CLI Dictionary 使い方
C++CLIでのDictionaryの使い方 一般的なものまとめ
初期化
System::Collections::Generic::Dictionary<String^,int>^ dic =
          gcnew System::Collections::Generic::Dictionary<String^,int>();
要素追加
dic->Add("零",0);
dic->Add("一",1);
dic->Add("二",2);
dic->Add("三",3);
dic->Add("四",4);
要素参照
int ret;
ret = dic["零"];
Console::Write( String::Format("零 : {0}\n",ret) );
//または
dic->TryGetValue("一",ret);
Console::Write( String::Format("一 : {0}\n",ret) );
要素削除
if (dic->Remove("二") == true) {
  Console::WriteLine("成功");
}
else {
  Console::WriteLine("失敗");
}
if (dic->Remove("八") == true) {
  Console::WriteLine("成功");
}
else {
  Console::WriteLine("失敗");
}
複製
System::Collections::Generic::Dictionary<String^, int>^ dup =
  gcnew System::Collections::Generic::Dictionary<String^, int>(dic);
検索
if (dic->ContainsKey("一")==true) {
  Console::WriteLine( dic["一"] );
}
if (dic->ContainsValue(1) == true) {
  Console::WriteLine("1 は存在する");
}
for each
キー一覧
for each( String^ key in dic->Keys )
{
  Console::Write( String::Format("{0}\n",key) );
}
値一覧
for each( int value in dic->Values )
{
  Console::Write( String::Format("{0}\n",value) );
}
キーと値の組み合わせの一覧
for each( System::Collections::Generic::KeyValuePair<String^,int> pair in dic)
{
  Console::Write( String::Format("{0} {1}\n",pair.Key,pair.Value) );
}
拡張子を変更する関数を自作
以下の関数ChangeExtendは拡張子を変更する。
拡張子を変えたい事態と言うのは時折生じる。例えばfilename.txtという入力に対し、filname.backupというファイル名を出力したいとか、ファイル名がfilename.docでも、中身はプレーンテキストなので.txtのほうが都合がいいなどだ。
この関数はファイル名の拡張子部分のみを指定した文字列に置き換える。ただし拡張子がない場合は指定した拡張子を付け加える。
#include <cassert>
#pragma warning( disable : 4996 )

//! @brief 入力したファイル名の拡張子を指定したものに変更する
//! @param [in,out] fname 少なくともファイル名を含むファイルパス
//! @param [in] ext 新しい拡張子。「.」を含んではならない
//! @warning ディレクトリ区切りは'\'とする
//! @return なし
void ChangeExtend(TCHAR* fname,TCHAR *ext){
  assert(fname != nullptr);
  assert(ext != nullptr);

  TCHAR* ldot=fname;

  //最後に出現したディレクトリ区切りを求める
  TCHAR* posdir = _tcsrchr(fname,_T('\\'));

  //最後に出現した.を求める
  ldot=_tcsrchr(fname,_T('.'));

  //C:\abc.def\\abc   など、最後の.より\の方が後に来る場合、拡張子なしと判断する
  if( posdir > ldot){
    ldot = nullptr;
  }

  if( ldot == nullptr){
    _tcscat(fname,_T("."));
  }
  else{
    _tcscpy(ldot,_T(".\0"));
  }

  _tcscat(fname,ext);
}

////////////////////////////////////////////////////
// テスト
int _tmain(int argc, _TCHAR* argv[])
{
  TCHAR fname[1024];

  _tcscpy(fname,_T("C:\\hello\\dir\\filename.doc"));
  ChangeExtend(fname,_T("txt"));

  _tprintf(fname);
  puts("");

  getchar();

  return 0;
}
| 入力 | 出力 |
| C:\hello\folder\ile | C:\hello\folder\file.txt |
| C:\hello\folder\file.doc | C:\hello\folder\file.txt |
| C:\hello\folder\.doc | C:\hello\folder\.txt |
| C:\hello\folder\ | C:\hello\folder\.txt |
| C:\hello\fol.der\file.doc | C:\hello\fol.der\file.txt |
| file.doc | file.txt |
