Bitnami MODx Stackを動かしてみる(2)テンプレートを作ってみる
テンプレートの作成
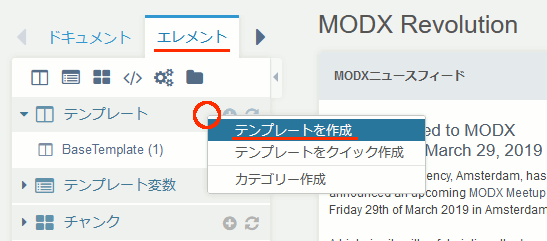
エレメント→テンプレートを右クリックし、「テンプレートを作成」を選択
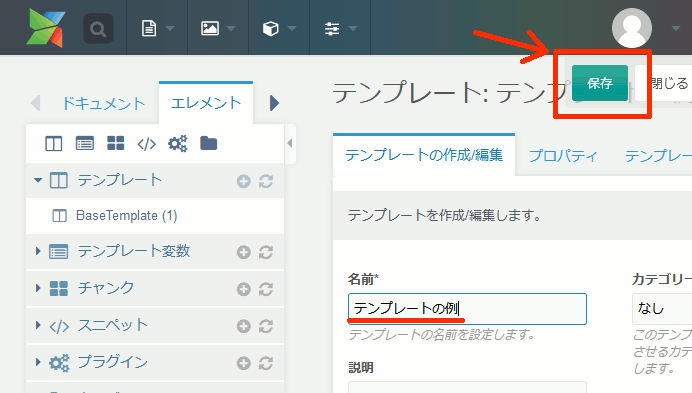
画面を下の方にスクロールするとテンプレートの入力欄がある
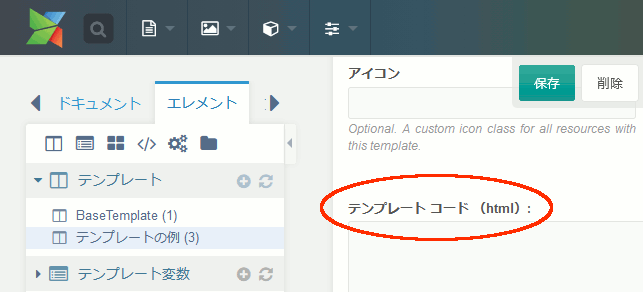
テンプレートを入力し、「保存」をクリックする
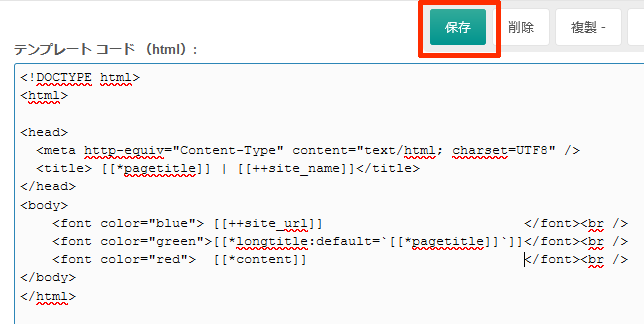
<!DOCTYPE html>
<html>

<head>
  <meta http-equiv="Content-Type" content="text/html; charset=UTF8" />
  <title> [[*pagetitle]] | [[++site_name]]</title>
</head>
<body>
    <font color="blue">[[++site_url]]</font><br />
    <font color="green">[[*longtitle:default=`[[*pagetitle]]`]]</font><br />
    <font color="red">  [[*content]] </font><br />
</body>
</html>
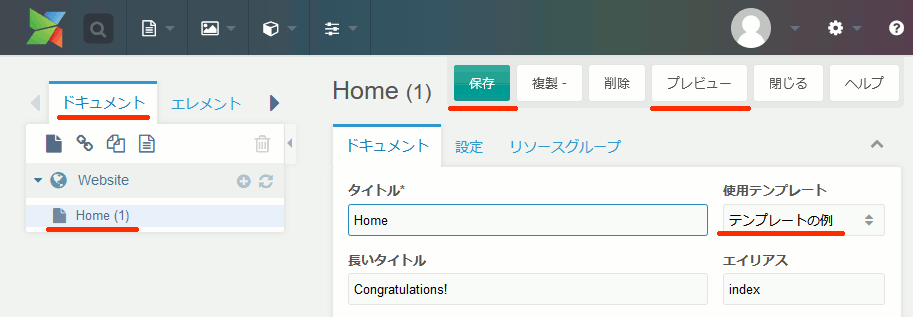
テンプレートの適用
「ドキュメント」からテンプレートを適用したいページをクリックし、「使用テンプレート」で作成したテンプレートを選択し、「保存」をクリック
保存後、「プレビュー」で結果を表示する
変数に関する資料
リソース変数やコンフィグ変数の指定方法が、バージョンの差なのかタイプの差なのか知らないが日本公式のものでは動かなかったので、以下を参考にする
https://docs.modx.com/current/en/building-sites/tag-syntax/common
Bitnami MODx Stackを動かしてみる(1) 仮想マシンの設定
概要
Bitnami MODx StackはCMSのMODxを使える状態で配布されている仮想マシンのイメージ。
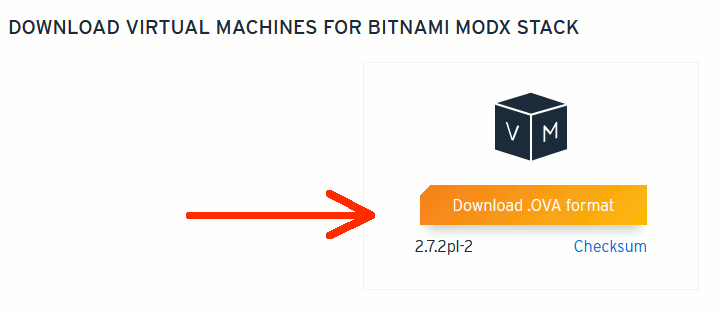
Step.1 以下から仮想マシンをダウンロードする
MODX Virtual Machines
https://bitnami.com/stack/modx/virtual-machine
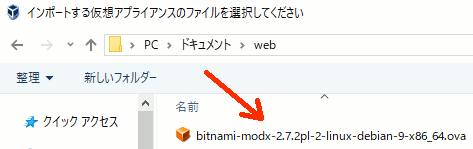
※現時点でのファイル名 bitnami-modx-2.7.2pl-2-linux-debian-9-x86_64.ova
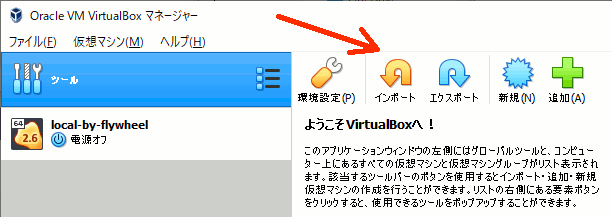
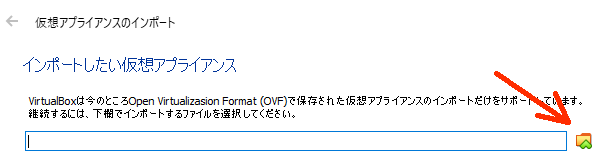
Step.2 VirtualBoxを起動し、.ovaをインポート
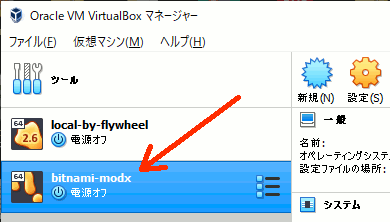
Step.3 仮想マシンを起動し、ログイン名 bitnami , パスワード bitnami でdebianにログイン
※この時上記ログインパスワードを強制的に変えさせられるかもしれないのでなにか適当に入力する
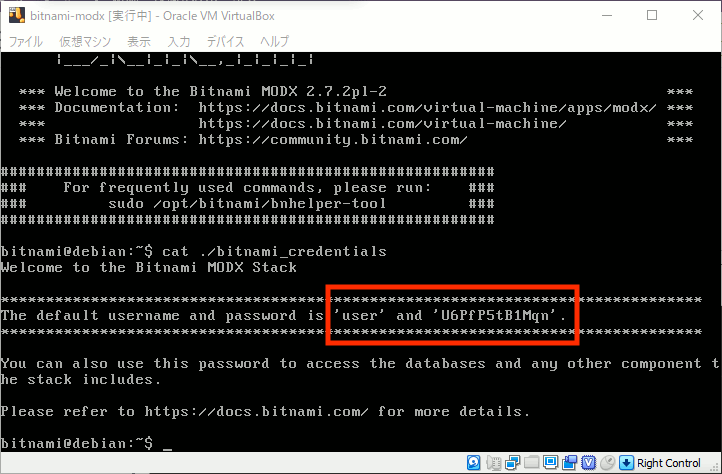
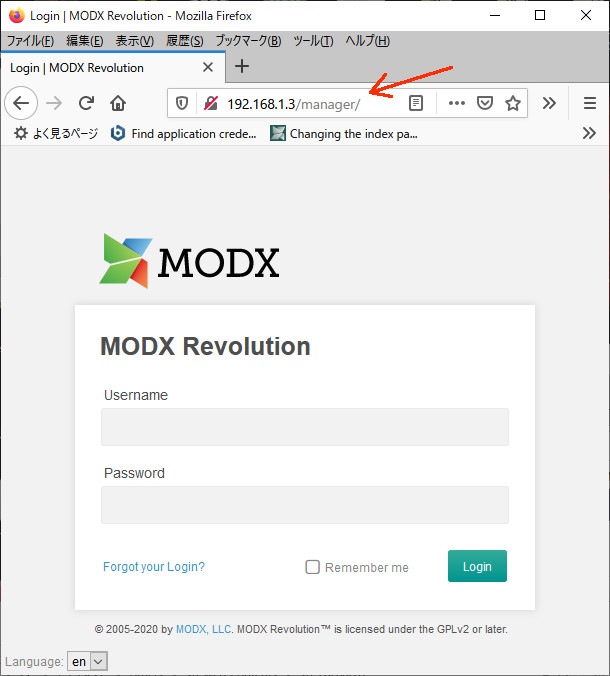
Step.4 ホストOSからMODxにログインする
ID/パスワードはdebianの起動時に出てくるが、
cat ./bitnami_credentials
としても確認できる
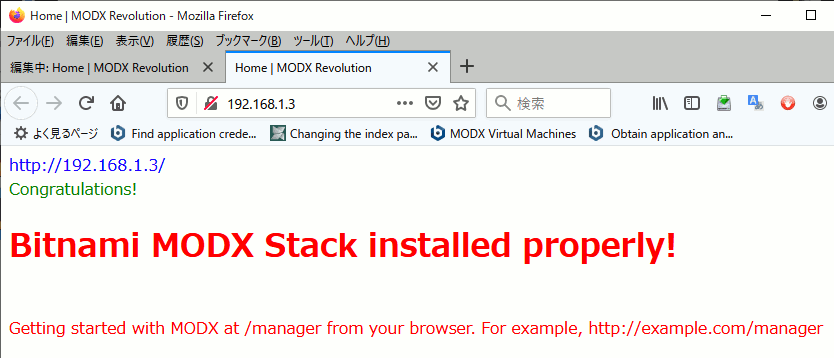
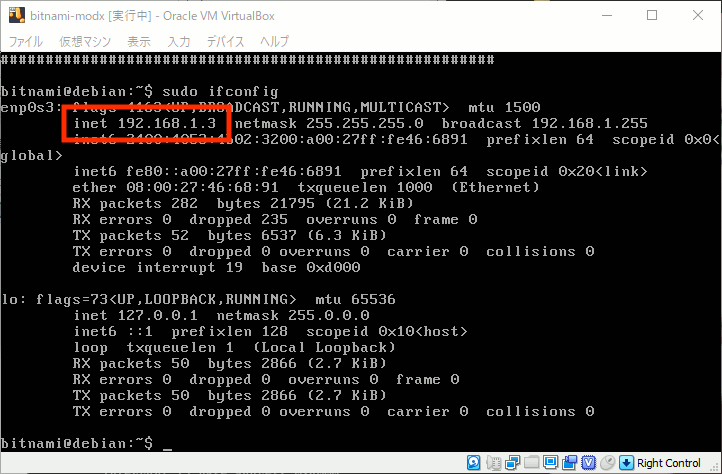
URLはIPアドレスをipconfigから確認できる。
例 http://192.168.1.3
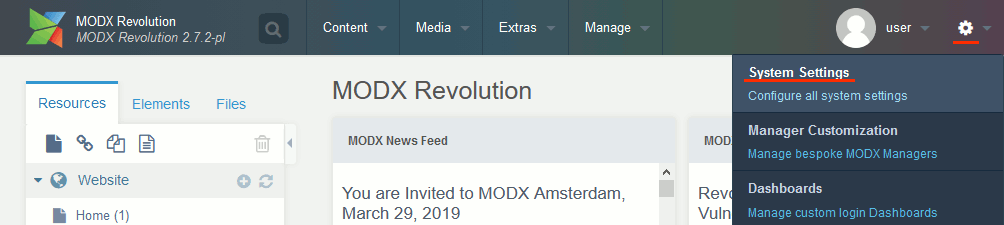
Step.5 一応日本語化する
もう少し詳細な説明
Step.1 以下から仮想マシンをダウンロードする
MODX Virtual Machines
https://bitnami.com/stack/modx/virtual-machine

Step.2 VirtualBoxを起動し、.ovaをインポート

Step.3 仮想マシンを起動し、debianにログイン
起動直後のログイン画面に
- サイトURL
- MODxへのログイン情報
- debianへのログイン情報
が表示されいてる

この画面が出てこない場合、ログイン情報は、以下のコマンドで確認できる
サイトURLはipconfigで確認する
Step.4 ホストOSからMODxにログインする

U6PfP5tB1Mqn等
Step.5 一応日本語化する
System Settingsを開く
「Filter by area…」にlanguageと入力し設定項目を絞り込む
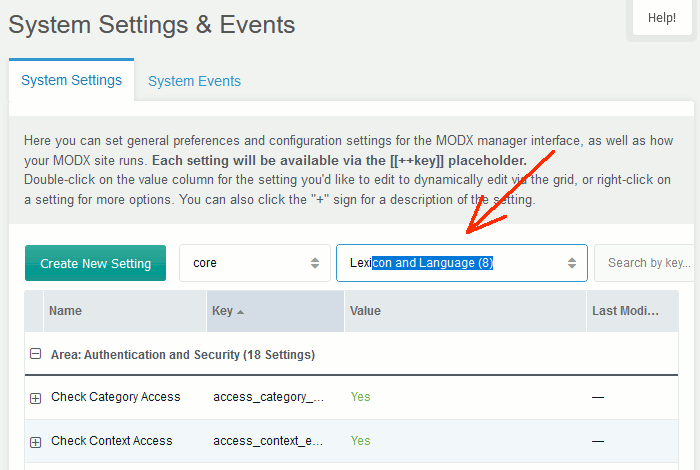
Manager Language の項目を ja に設定

設定を変えてもなぜか暫く変わらないので注意。あちこち移動しているといつの間にか変わる
なお日本語での言語の設定名は「管理画面の言語」
その他
続く...
参考
Find application credentials
https://docs.bitnami.com/bch/faq/get-started/find-credentials/
MODX Virtual Machines
https://bitnami.com/stack/modx/virtual-machine
Obtain application and server credentials
https://docs.bitnami.com/virtual-machine/apps/modx/get-started/first-steps/
stbライブラリでtruetypeフォントをラスタライズ(2)
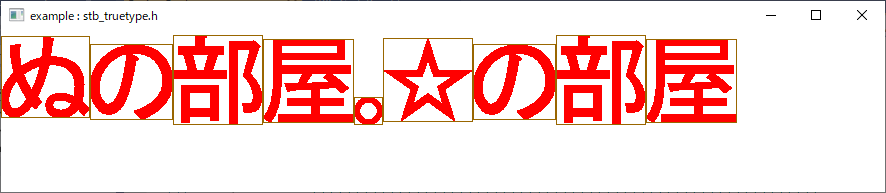
まず、前回とほぼ同じプログラムで、下記( ※ )部分を「、」などの文字に変更する。
//参考 //https://gist.github.com/cloudwu/766bccc60c254f9cc2abfa397bcff2ea #include<windows.h> #include <tchar.h> #include <cstdio> #define STB_TRUETYPE_IMPLEMENTATION #define STBTT_STATIC #include "stb_truetype.h" // utf8文字コードをコードポイントに変換 unsigned int utf8_decode(const char* o); // フォントで文字を描画した画像を作成 void drawfontchar(unsigned int f); unsigned char* pixels = nullptr; //画素の格納先 int iwidth; //画像サイズの格納先 int iheight; LRESULT CALLBACK WndProc(HWND hwnd, UINT msg, WPARAM wp, LPARAM lp) { HDC hdc; PAINTSTRUCT ps; switch (msg) { case WM_DESTROY: //画像の破棄 delete[] pixels; PostQuitMessage(0); return 0; case WM_PAINT://画面に表示 hdc = BeginPaint(hwnd, &ps); if (pixels != nullptr) { RECT rect; GetClientRect(hwnd, &rect); FillRect(hdc, &rect, (HBRUSH)GetStockObject(GRAY_BRUSH)); for (int y = 0; y < iheight; y++) { for (int x = 0; x < iwidth; x++) { unsigned char r = pixels[y * iwidth + x]; if (r == 0) SetPixel(hdc, x, y, RGB(255, 0, 0)); else SetPixel(hdc, x, y, RGB(0, 0, 0)); } } } EndPaint(hwnd, &ps); break; } return DefWindowProc(hwnd, msg, wp, lp); } int WINAPI WinMain(HINSTANCE hInstance, HINSTANCE hPrevInstance, PSTR lpCmdLine, int nCmdShow) { HWND hwnd; WNDCLASS winc; MSG msg; winc.style = CS_HREDRAW | CS_VREDRAW; winc.lpfnWndProc = WndProc; winc.cbClsExtra = winc.cbWndExtra = 0; winc.hInstance = hInstance; winc.hIcon = LoadIcon(NULL, IDI_APPLICATION); winc.hCursor = LoadCursor(NULL, IDC_ARROW); winc.hbrBackground = (HBRUSH)GetStockObject(WHITE_BRUSH); winc.lpszMenuName = NULL; winc.lpszClassName = TEXT("NEW_WINDOW"); if (!RegisterClass(&winc)) return 0;//指定した文字のunicodeのコードポイントを取得(※) unsigned int c = utf8_decode(u8"ぬ");//一文字書かれた画像を作成(pixelsに格納) drawfontchar(c); hwnd = CreateWindow( TEXT("NEW_WINDOW"), TEXT("example : stb_truetype.h"), WS_OVERLAPPEDWINDOW | WS_VISIBLE, CW_USEDEFAULT, CW_USEDEFAULT, 150, 150, NULL, NULL, hInstance, NULL ); if (hwnd == NULL) return 0; while (GetMessage(&msg, NULL, 0, 0)) DispatchMessage(&msg); return msg.wParam; } unsigned char ttf_buffer[1 << 25]; //一文字書かれた画像を作成 void drawfontchar(unsigned int codepoint) { const int HEIGHT = 100; stbtt_fontinfo font; //フォントファイルを開く FILE* pf_font = fopen(R"(C:\Windows\Fonts\msgothic.ttc)", "rb"); fread(ttf_buffer, 1, 1 << 25, pf_font); fclose(pf_font); stbtt_InitFont(&font, ttf_buffer, stbtt_GetFontOffsetForIndex(ttf_buffer, 0)); float scale = stbtt_ScaleForPixelHeight(&font, HEIGHT); int ascent, baseline, decent; stbtt_GetFontVMetrics(&font, &ascent, &decent, 0); baseline = (int)(ascent * scale); int height = (int)((ascent - decent) * scale); int x0, y0, x1, y1; stbtt_GetCodepointBitmapBox(&font, codepoint, scale, scale, &x0, &y0, &x1, &y1); //出力先のメモリ確保 iwidth = x1 - x0; iheight = y1 - y0; pixels = new unsigned char[iheight * iwidth]; stbtt_MakeCodepointBitmap( &font, //フォント情報 pixels, //描画先 iwidth, //描画先の幅 iheight,//描画先の高さ iwidth, //描画先の画像の一行のバイト数(?) scale, //X方向倍率 scale, //Y方向倍率 codepoint); } //utf8一文字をコードポイントに変換 unsigned int utf8_decode(const char* o) { const unsigned int MAXUNICODE = 0x10FFFF; static const unsigned int limits[] = { 0xFF, 0x7F, 0x7FF, 0xFFFF }; const unsigned char* s = (const unsigned char*)o; unsigned int c = s[0]; unsigned int res = 0; /* final result */ if (c < 0x80) /* ascii? */ res = c; else { int count = 0; /* to count number of continuation bytes */ while (c & 0x40) { /* still have continuation bytes? */ int cc = s[++count]; /* read next byte */ if ((cc & 0xC0) != 0x80) /* not a continuation byte? */ return -1; /* invalid byte sequence */ res = (res << 6) | (cc & 0x3F); /* add lower 6 bits from cont. byte */ c <<= 1; /* to test next bit */ } res |= ((c & 0x7F) << (count * 5)); /* add first byte */ if (count > 3 || res > MAXUNICODE || res <= limits[count]) return -1; /* invalid byte sequence */ s += count; /* skip continuation bytes read */ } return res; }
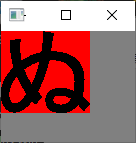
出力されるのは文字の部分だけなので、そのまま画像の幅で並べると以下のようになる。

高さの調節
まず、グローバル変数に以下を追加する
int _Baseline_;
int _Y0;
次に、drawfontchar関数に以下を追加する
//一文字書かれた画像を作成 void drawfontchar(unsigned int codepoint) { const int HEIGHT = 100; stbtt_fontinfo font; //フォントファイルを開く FILE* pf_font = fopen(R"(C:\Windows\Fonts\msgothic.ttc)", "rb"); fread(ttf_buffer, 1, 1 << 25, pf_font); fclose(pf_font); stbtt_InitFont(&font, ttf_buffer, stbtt_GetFontOffsetForIndex(ttf_buffer, 0)); float scale = stbtt_ScaleForPixelHeight(&font, HEIGHT); int ascent, baseline, decent; stbtt_GetFontVMetrics(&font, &ascent, &decent, 0); baseline = (int)(ascent * scale); int height = (int)((ascent - decent) * scale); int x0, y0, x1, y1; stbtt_GetCodepointBitmapBox(&font, codepoint, scale, scale, &x0, &y0, &x1, &y1);_Baseline_ = baseline; _Y0 = y0;//出力先のメモリ確保 iwidth = x1 - x0; iheight = y1 - y0; pixels = new unsigned char[iheight * iwidth]; stbtt_MakeCodepointBitmap( &font, //フォント情報 pixels, //描画先 iwidth, //描画先の幅 iheight,//描画先の高さ iwidth, //描画先の画像の一行のバイト数(?) scale, //X方向倍率 scale, //Y方向倍率 codepoint); }
さらに、表示時にY方向にオフセットを加える
LRESULT CALLBACK WndProc(HWND hwnd, UINT msg, WPARAM wp, LPARAM lp) {
  HDC hdc;
  PAINTSTRUCT ps;
  switch (msg) {
  case WM_DESTROY:
    //画像の破棄
    delete[] pixels;


    PostQuitMessage(0);
    return 0;
  case WM_PAINT://画面に表示
    hdc = BeginPaint(hwnd, &ps);
    if (pixels != nullptr) {
      RECT rect;
      GetClientRect(hwnd, &rect);
      FillRect(hdc, &rect, (HBRUSH)GetStockObject(GRAY_BRUSH));

      for (int y = 0; y < iheight; y++) {
        for (int x = 0; x < iwidth; x++) {
          unsigned char r = pixels[y * iwidth + x];
          if (r == 0)
            SetPixel(hdc, x, y + _Y0 + _Baseline_, RGB(255, 0, 0));
          else
            SetPixel(hdc, x, y + _Y0 + _Baseline_, RGB(0, 0, 0));
        }
      }
    }


    EndPaint(hwnd, &ps);
    break;
  }
  return DefWindowProc(hwnd, msg, wp, lp);
}
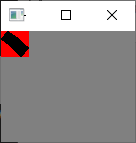
各文字ごとに、y0とbaselineで高さの調整を行った場合。
幅の調整
さらに、文字ごとに一定の間隔で並べると
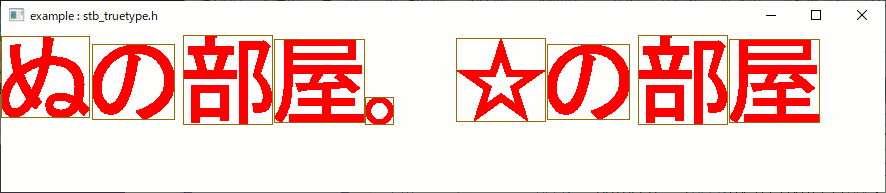
幅に関しては揃える基準が無いのでX方向のオフセットは定数にする。
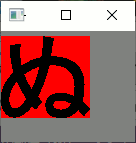
stbライブラリでtruetypeフォントをラスタライズ(1)
件のstbライブラリにあるstb_truetype.hでttfのラスタライズができる。public domainでttfが簡単に使えるなら試してみたい。
サンプル
//参考 //https://gist.github.com/cloudwu/766bccc60c254f9cc2abfa397bcff2ea #include<windows.h> #include <tchar.h> #include <cstdio> #define STB_TRUETYPE_IMPLEMENTATION #define STBTT_STATIC #include "stb_truetype.h" // utf8文字コードをコードポイントに変換 unsigned int utf8_decode(const char* o); // フォントで文字を描画した画像を作成 void drawfontchar(unsigned int f);unsigned char* pixels = nullptr; //画素の格納先 int iwidth; //画像サイズの格納先 int iheight;LRESULT CALLBACK WndProc(HWND hwnd, UINT msg, WPARAM wp, LPARAM lp) { HDC hdc; PAINTSTRUCT ps; switch (msg) { case WM_DESTROY://画像の破棄 delete [] pixels;PostQuitMessage(0); return 0; case WM_PAINT://画面に表示 hdc = BeginPaint(hwnd, &ps);if (pixels != nullptr) { for (int y = 0; y < iheight; y++) { for (int x = 0; x < iwidth; x++) { unsigned char r = pixels[y * iwidth + x]; if (r == 0) SetPixel(hdc, x, y, RGB(255, 255, 255)); else SetPixel(hdc, x, y, RGB(0, 0, 0)); } } }EndPaint(hwnd, &ps); break; } return DefWindowProc(hwnd, msg, wp, lp); } int WINAPI WinMain(HINSTANCE hInstance, HINSTANCE hPrevInstance, PSTR lpCmdLine, int nCmdShow) { HWND hwnd; WNDCLASS winc; MSG msg; winc.style = CS_HREDRAW | CS_VREDRAW; winc.lpfnWndProc = WndProc; winc.cbClsExtra = winc.cbWndExtra = 0; winc.hInstance = hInstance; winc.hIcon = LoadIcon(NULL, IDI_APPLICATION); winc.hCursor = LoadCursor(NULL, IDC_ARROW); winc.hbrBackground = (HBRUSH)GetStockObject(WHITE_BRUSH); winc.lpszMenuName = NULL; winc.lpszClassName = TEXT("NEW_WINDOW"); if (!RegisterClass(&winc)) return 0;//指定した文字のunicodeのコードポイントを取得 unsigned int c = utf8_decode(u8"ぬ"); //一文字書かれた画像を作成(pixelsに格納) drawfontchar(c);hwnd = CreateWindow( TEXT("NEW_WINDOW"), TEXT("example : stb_truetype.h"), WS_OVERLAPPEDWINDOW | WS_VISIBLE, CW_USEDEFAULT, CW_USEDEFAULT, 200, 100, NULL, NULL, hInstance, NULL ); if (hwnd == NULL) return 0; while (GetMessage(&msg, NULL, 0, 0)) DispatchMessage(&msg); return msg.wParam; } unsigned char ttf_buffer[1 << 25];//一文字書かれた画像を作成 void drawfontchar(unsigned int codepoint) { const int HEIGHT = 60; stbtt_fontinfo font; //フォントファイルを開く FILE* pf_font = fopen(R"(C:\fonts\GenShinGothic-Bold.ttf)", "rb"); fread(ttf_buffer, 1, 1 << 25, pf_font); stbtt_InitFont(&font, ttf_buffer, stbtt_GetFontOffsetForIndex(ttf_buffer, 0)); float scale = stbtt_ScaleForPixelHeight(&font, HEIGHT); int ascent, baseline, decent; stbtt_GetFontVMetrics(&font, &ascent, &decent, 0); baseline = (int)(ascent * scale); int height = (int)((ascent - decent) * scale); int x0, y0, x1, y1; stbtt_GetCodepointBitmapBox(&font, codepoint, scale, scale, &x0, &y0, &x1, &y1); //出力先のメモリ確保 iwidth = x1 - x0; iheight = y1 - y0; pixels = new unsigned char[iheight * iwidth]; stbtt_MakeCodepointBitmap( &font, //フォント情報 pixels, //描画先 iwidth, //描画先の幅 iheight,//描画先の高さ iwidth, //描画先の画像の一行のバイト数(?) scale, //X方向倍率 scale, //Y方向倍率 codepoint); }//utf8一文字をコードポイントに変換unsigned int utf8_decode(const char* o) { const unsigned int MAXUNICODE = 0x10FFFF; static const unsigned int limits[] = { 0xFF, 0x7F, 0x7FF, 0xFFFF }; const unsigned char* s = (const unsigned char*)o; unsigned int c = s[0]; unsigned int res = 0; /* final result */ if (c < 0x80) /* ascii? */ res = c; else { int count = 0; /* to count number of continuation bytes */ while (c & 0x40) { /* still have continuation bytes? */ int cc = s[++count]; /* read next byte */ if ((cc & 0xC0) != 0x80) /* not a continuation byte? */ return -1; /* invalid byte sequence */ res = (res << 6) | (cc & 0x3F); /* add lower 6 bits from cont. byte */ c <<= 1; /* to test next bit */ } res |= ((c & 0x7F) << (count * 5)); /* add first byte */ if (count > 3 || res > MAXUNICODE || res <= limits[count]) return -1; /* invalid byte sequence */ s += count; /* skip continuation bytes read */ } return res; }
実行結果

参考
元のプログラム
以下のサンプルコードに手を加え、win32apiで文字を一つ表示できるようにした。
https://gist.github.com/cloudwu/766bccc60c254f9cc2abfa397bcff2ea
使用フォント
源真ゴシック
stbライブラリで画像読み込み
サンプルコード
#include<windows.h> #include <tchar.h> #define STB_IMAGE_IMPLEMENTATION #include "stb_image.h"unsigned char* pixels = nullptr; //画素の格納先 int width; //画像サイズの格納先 int height; int bpp; //一画素のバイト数LRESULT CALLBACK WndProc(HWND hwnd, UINT msg, WPARAM wp, LPARAM lp) { HDC hdc; PAINTSTRUCT ps; switch (msg) { case WM_DESTROY://画像の破棄 stbi_image_free(pixels);PostQuitMessage(0); return 0; case WM_PAINT://画面に表示 hdc = BeginPaint(hwnd, &ps);if (pixels != nullptr){ for (int y = 0; y < height; y++) { for (int x = 0; x < width; x++) { unsigned char r = pixels[(y*width + x)*bpp + 0]; unsigned char g = pixels[(y*width + x)*bpp + 1]; unsigned char b = pixels[(y*width + x)*bpp + 2]; SetPixel(hdc,x, y, RGB(r, g, b)); } }}EndPaint(hwnd, &ps); break; } return DefWindowProc(hwnd, msg, wp, lp); } int WINAPI WinMain(HINSTANCE hInstance, HINSTANCE hPrevInstance, PSTR lpCmdLine, int nCmdShow) { HWND hwnd; WNDCLASS winc; MSG msg; winc.style = CS_HREDRAW | CS_VREDRAW; winc.lpfnWndProc = WndProc; winc.cbClsExtra = winc.cbWndExtra = 0; winc.hInstance = hInstance; winc.hIcon = LoadIcon(NULL, IDI_APPLICATION); winc.hCursor = LoadCursor(NULL, IDC_ARROW); winc.hbrBackground = (HBRUSH)GetStockObject(WHITE_BRUSH); winc.lpszMenuName = NULL; winc.lpszClassName = TEXT("NEW_WINDOW"); if (!RegisterClass(&winc)) return 0; hwnd = CreateWindow( TEXT("NEW_WINDOW"), TEXT("example : stb_image.h"), WS_OVERLAPPEDWINDOW | WS_VISIBLE, CW_USEDEFAULT, CW_USEDEFAULT, CW_USEDEFAULT, CW_USEDEFAULT, NULL, NULL, hInstance, NULL ); if (hwnd == NULL) return 0;//画像のロード pixels = stbi_load(R"(C:\mydata\test\beach-blur-clouds-dawn-462030.jpg)", &width, &height, &bpp, 0);//https://odashi.hatenablog.com/entry/20110911/1315730376 RECT rw, rc; ::GetWindowRect(hwnd, &rw); // ウィンドウ全体のサイズ ::GetClientRect(hwnd, &rc); // クライアント領域のサイズ // 希望するクライアント領域のサイズを持つウィンドウサイズを計算 int new_width = (rw.right - rw.left) - (rc.right - rc.left) + width; int new_height = (rw.bottom - rw.top) - (rc.bottom - rc.top) + height; SetWindowPos(hwnd, NULL, 0, 0, new_width, new_height, SWP_NOMOVE | SWP_NOZORDER);while (GetMessage(&msg, NULL, 0, 0)) DispatchMessage(&msg); return msg.wParam; }
実行結果

参考
画像
pexels
https://www.pexels.com/ja-jp/photo/hdr-462030/
クライアント領域のサイズからウィンドウ全体のサイズを設定する
更新しない備忘録改二
https://odashi.hatenablog.com/entry/20110911/1315730376
stbi_image使用法参考
でらうま倶楽部
VC++で空のプロジェクトから作成したコードでWinMainを使う

空のプロジェクトでWinMainできない
新しいプロジェクトの作成→『 空のプロジェクト 』でプロジェクトを作った後、WinMain関数をエントリポイントにコンパイルしようとすると、mainが見つからないというエラーになる。
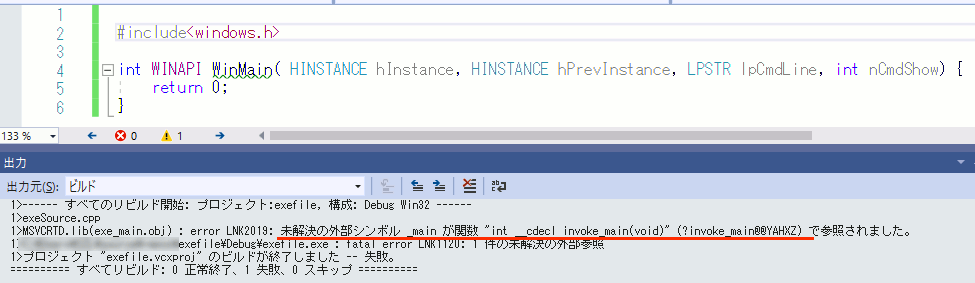
MSVCRTD.lib(exe_main.obj) : error LNK2019: 未解決の外部シンボル _main が関数 "int __cdecl invoke_main(void)" (?invoke_main@@YAHXZ) で参照されました。
対処法
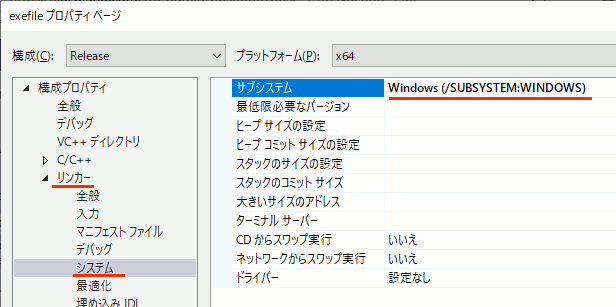
構成プロパティ→リンカー→システム→サブシステム→
に設定
Blender 2.8 pythonで矢印を作る
コード
import bpy import math from mathutils import Vector from math import radians from mathutils import Matrix #################################################################### #################################################################### #################################################################### #################################################################### # rotate # targetobjに現在のアクティブなオブジェクトを指定する def rotate_object(targetobj,rot_mat): # decompose world_matrix's components, and from them assemble 4x4 matrices orig_loc, orig_rot, orig_scale = targetobj.matrix_world.decompose() # orig_loc_mat = Matrix.Translation(orig_loc) orig_rot_mat = orig_rot.to_matrix().to_4x4() orig_scale_mat = (Matrix.Scale(orig_scale[0],4,(1,0,0)) @ Matrix.Scale(orig_scale[1],4,(0,1,0)) @ Matrix.Scale(orig_scale[2],4,(0,0,1))) # # assemble the new matrix targetobj.matrix_world = orig_loc_mat @ rot_mat @ orig_rot_mat @ orig_scale_mat #################################################################### #################################################################### #################################################################### #################################################################### ####################################################################
#オブジェクトobjectのvid番目の頂点座標をグローバル座標で返す def get_coord_as_global(object,vid): v_local = object.data.vertices[vid].co # local vertex coordinate v_global = object.matrix_world @ v_local # global vertex coordinates return v_global
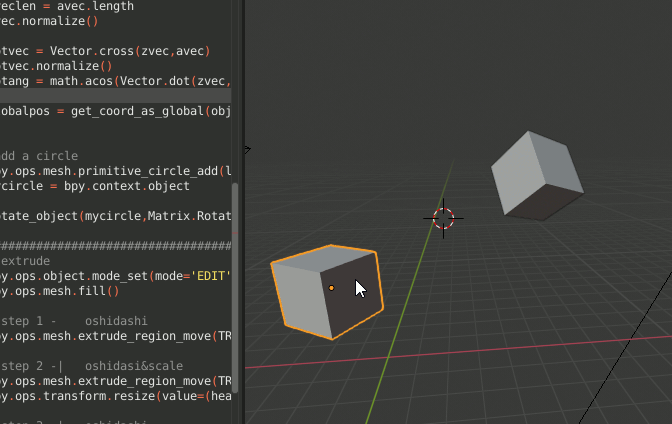
#objで指定したオブジェクトを元に矢印を作成 def create_arrow(obj): #parameters thickness_ratio = 0.03 head_ratio = 0.4 body_ratio = 1.0-head_ratio head_root_ratio = 2; zvec = Vector([ 0.0 , 0.0 , 1.0]) zvec.normalize() avec = get_coord_as_global(obj,1) - get_coord_as_global(obj,0) aveclen = avec.length avec.normalize() rotvec = Vector.cross(zvec,avec) rotvec.normalize() rotang = math.acos(Vector.dot(zvec,avec) ) globalpos = get_coord_as_global(obj,0) #add a circle bpy.ops.mesh.primitive_circle_add(location=globalpos, radius=aveclen*thickness_ratio) mycircle = bpy.context.object rotate_object(mycircle,Matrix.Rotation(rotang,4,rotvec)) ######################################### # extrude bpy.ops.object.mode_set(mode='EDIT') bpy.ops.mesh.fill() # step 1 - oshidashi bpy.ops.mesh.extrude_region_move(TRANSFORM_OT_translate={"value":avec*aveclen*body_ratio} ) # step 2 -| oshidasi&scale bpy.ops.mesh.extrude_region_move(TRANSFORM_OT_translate={"value":(0,0,0)} ) bpy.ops.transform.resize(value=(head_root_ratio,head_root_ratio,head_root_ratio) ) # step 3 -|= oshidashi bpy.ops.mesh.extrude_region_move(TRANSFORM_OT_translate={"value":avec*aveclen*head_ratio} ) # step 4 -|> bpy.ops.transform.resize(value=(0,0,0) ) bpy.ops.mesh.remove_doubles() bpy.ops.object.mode_set(mode='OBJECT') #現在選択中のオブジェクトを取得 obj = bpy.context.active_object
#objの第0頂点->第1頂点を示す矢印オブジェクトを新規作成 create_arrow(obj)
使い方
頂点が二つ以上あるオブジェクトを選択した状態でこのスクリプトを走らせると、第0頂点->第1頂点の矢印が新規オブジェクトとして生成される
説明
1.オブジェクトの2頂点を取得し、ベクトル化
    avec = get_coord_as_global(obj,1) - get_coord_as_global(obj,0)
    aveclen = avec.length
    avec.normalize()
※get_coord_as_globalは自作関数
2.ベクトル(0,0,1)と、先に求めたベクトルの外積で回転軸を、内積のacosで回転角を求める
    zvec = Vector([ 0.0 , 0.0 , 1.0])
    zvec.normalize()
    rotvec = Vector.cross(zvec,avec)
    rotvec.normalize()
    rotang = math.acos(Vector.dot(zvec,avec) )
3.第0頂点の位置にCircleを新規作成
    globalpos = get_coord_as_global(obj,0)

    #add a circle
    bpy.ops.mesh.primitive_circle_add(location=globalpos, radius=aveclen*thickness_ratio)
    mycircle = bpy.context.object
4.Circleを2で求めた角度と回転軸で回転
rotate_object(mycircle,Matrix.Rotation(rotang,4,rotvec))
※rotate_objectは自作関数
5.Editモードに入り、Circleをメッシュ化
    bpy.ops.object.mode_set(mode='EDIT')
    bpy.ops.mesh.fill()
5.Editモードに入り、Circleを押し出し
    # step 1 -    oshidashi
    bpy.ops.mesh.extrude_region_move(TRANSFORM_OT_translate={"value":avec*aveclen*body_ratio} )
6.押し出した頂点をそのまま方向(0,0,0)で押し出し、やや拡大
    # step 2 -|   oshidasi&scale
    bpy.ops.mesh.extrude_region_move(TRANSFORM_OT_translate={"value":(0,0,0)} )
    bpy.ops.transform.resize(value=(head_root_ratio,head_root_ratio,head_root_ratio) )
7.さらに押し出し
    # step 3 -|=  oshidashi
    bpy.ops.mesh.extrude_region_move(TRANSFORM_OT_translate={"value":avec*aveclen*head_ratio} )
8.押し出した頂点をmerge at centerする
    # step 4 -|>
    bpy.ops.transform.resize(value=(0,0,0) )

    bpy.ops.mesh.remove_doubles())
Blender 2.8 のPythonで Rotateする
Blender 2.8のPythonで、オブジェクトを回転しようとして以下のようなコードを適当にコピペしたところ、
import bpy

bpy.ops.transform.rotate(value=0.4,axis=(1.0,1.0,0.0))
TypeError: Converting py args to operator properties: : keyword "axis" unrecognized
Error: Python script failed, check the message in the system console
みたいな感じのエラーが出て修正できない。
https://devtalk.blender.org/t/bpy-ops-transform-rotate-option-axis/6235
によると、どうやらaxisはなくなったようで、しかもシンプルな方法がない(?)らしい。
上記記事では以下のようなrotate_object関数を自作して対応している。
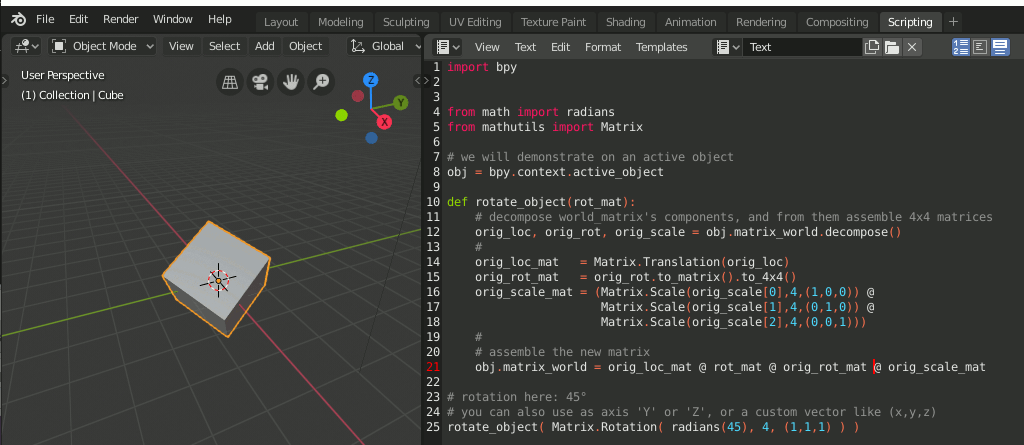
import bpy


from math import radians
from mathutils import Matrix

# objに現在のアクティブなオブジェクトを指定する
obj = bpy.context.active_object

def rotate_object(rot_mat):
    # decompose world_matrix's components, and from them assemble 4x4 matrices
    orig_loc, orig_rot, orig_scale = obj.matrix_world.decompose()
    #
    orig_loc_mat   = Matrix.Translation(orig_loc)
    orig_rot_mat   = orig_rot.to_matrix().to_4x4()
    orig_scale_mat = (Matrix.Scale(orig_scale[0],4,(1,0,0)) @
                      Matrix.Scale(orig_scale[1],4,(0,1,0)) @
                      Matrix.Scale(orig_scale[2],4,(0,0,1)))
    #
    # assemble the new matrix
    obj.matrix_world = orig_loc_mat @ rot_mat @ orig_rot_mat @ orig_scale_mat

# Matrix.Rotationで回転行列を作成
# Matrix.Rotation( ラジアンの回転角 , 4 , 回転軸 )
# 4 は4x4行列の意味
# 回転軸は(x,y,z)形式の他に 'X' や 'Y' や'Z' のように軸名を指定することもできる
rotate_object( Matrix.Rotation( radians(45), 4, (1,1,1) ) )
実行例
比較
Blender 2.8で以下を実行
rotate_object( Matrix.Rotation( 0.349, 4, (1.0,1.0,0.0) ) )
Blende 2.79で以下を実行
bpy.ops.transform.rotate(value=0.349,axis=(1.0,1.0,0.0))


同じ結果が出力できた
チュートリアル Daily Blender Tip 217 – Make a Low-Poly Tree in One Minuteを試す
とても単純だけれど形状が面白いので紹介。
1.幹の作成
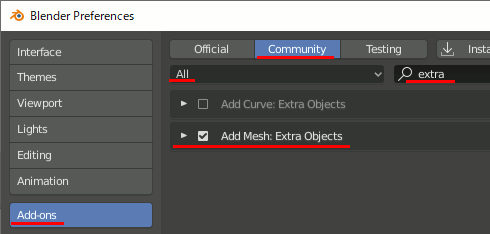
Extra Object add-onを有効にする
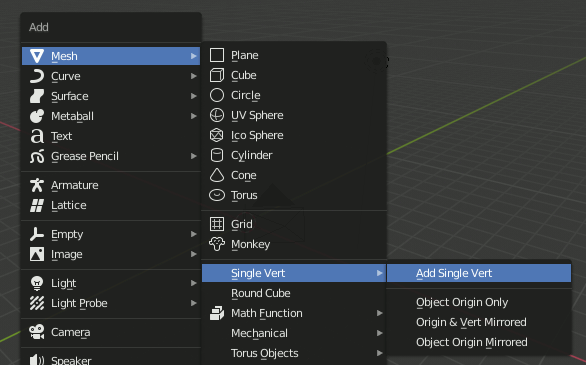
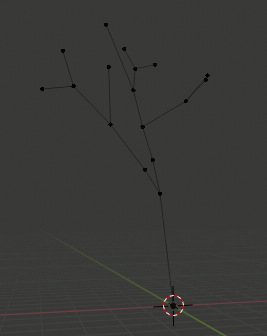
[Shift+A]→[Mesh]→[Single Vert]→Add Single Vertを追加し、
[E][G]で押し出しながら木の形を作る
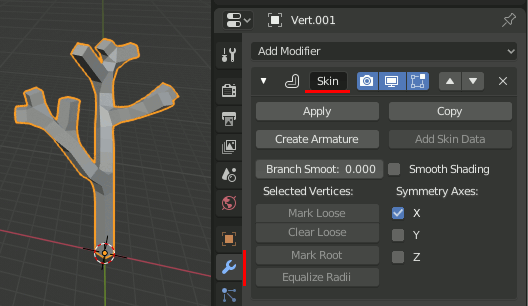
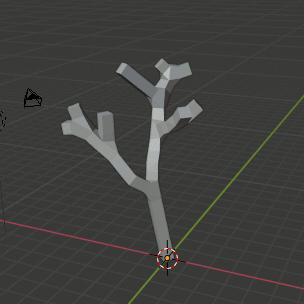
Skinモディファイアを適用する
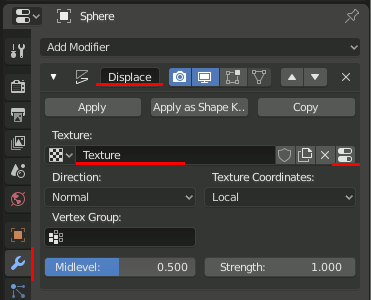
2.葉の作成
[Shift+A]→[Mesh]→UV Sphereで球を追加し、[Ctrl+J]で全て一つのオブジェクトにする
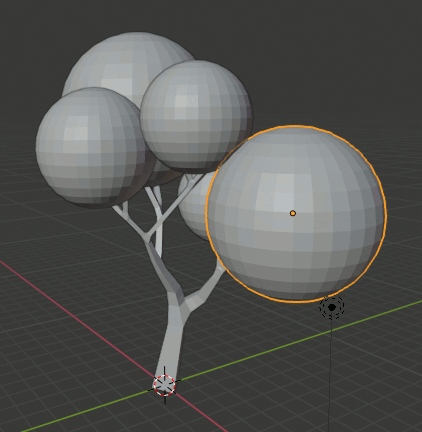
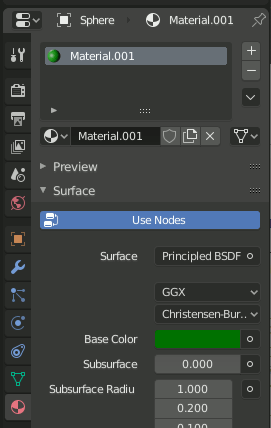
葉と幹にMaterialを追加し、それぞれ色を設定する
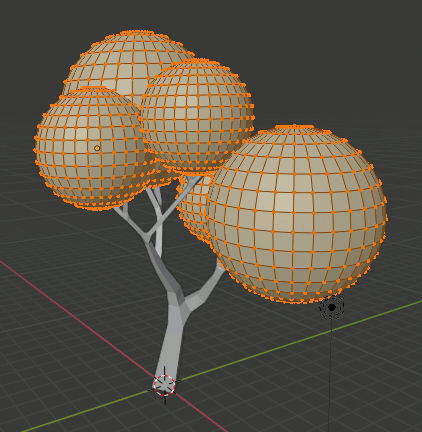
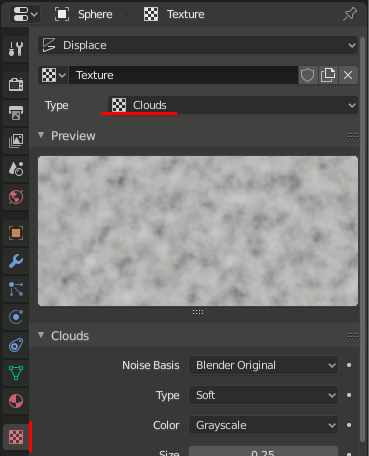
葉にDisplaceモディファイアを追加し、Cloudsテクスチャを割り当てる
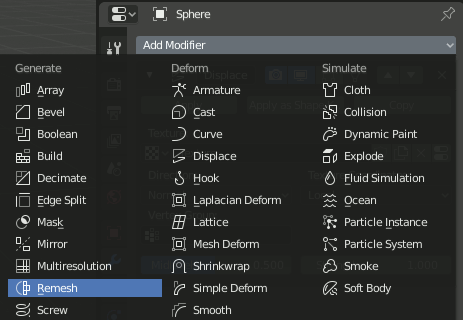
Remeshモディファイアを追加し、ModeをBlockにする

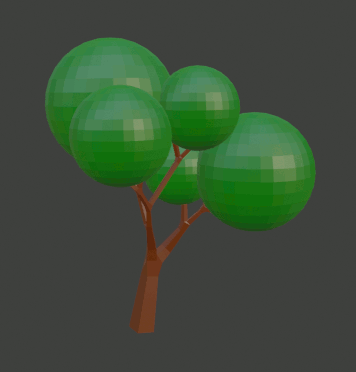
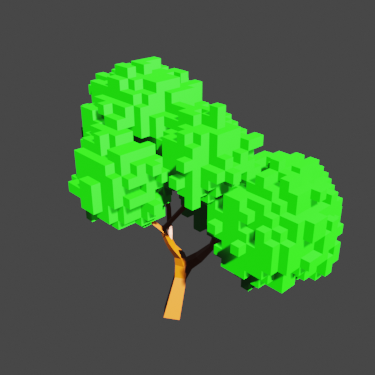
結果
RemeshのOctree Depthを変更するとブロックの細かさが変わる

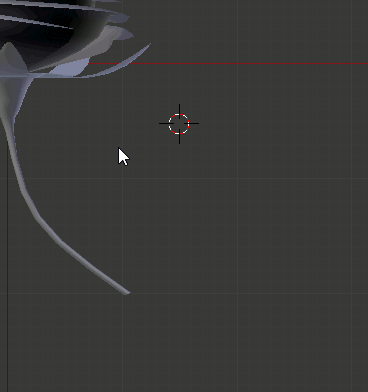
Fast Technique to Model a Rose flower in Blenderのチュートリアルを試す(3)
4:00~
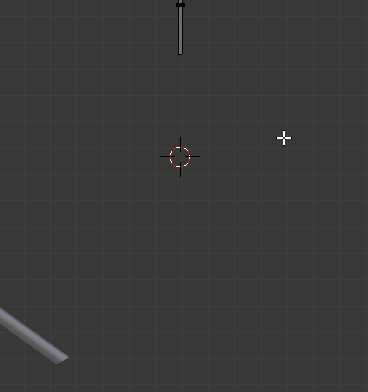
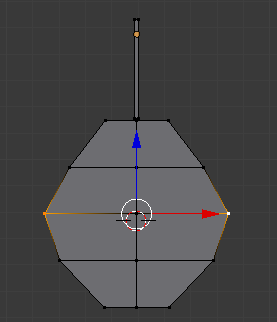
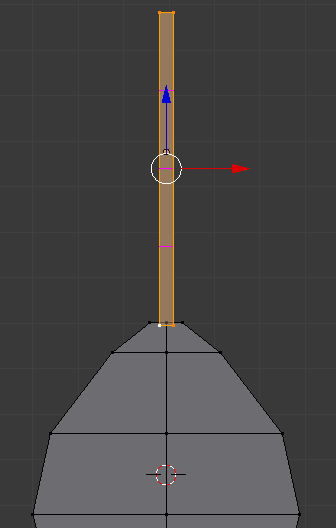
1.茎を作成
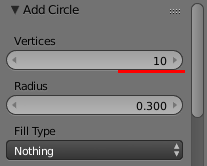
[Shift+A]→[Mesh]→Circle で円を追加

CircleのVerticesを10にする。Radiusに関しては、花の直径が最初に描いた線に依存するので、適切な値を指定する
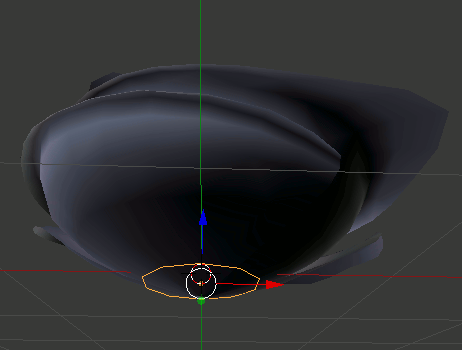
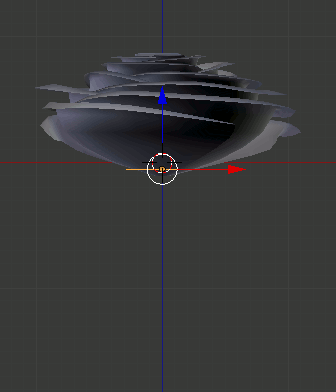
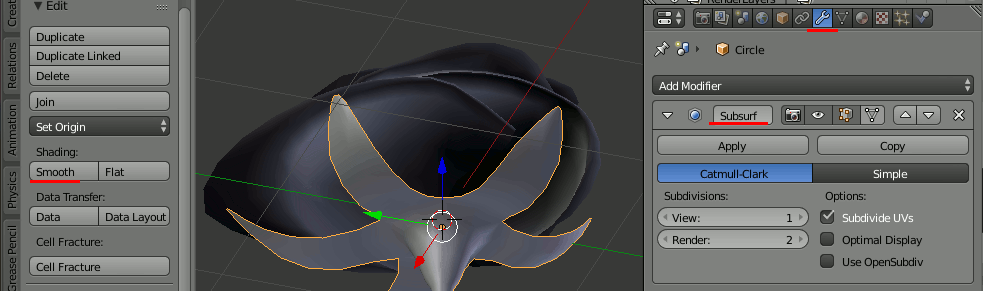
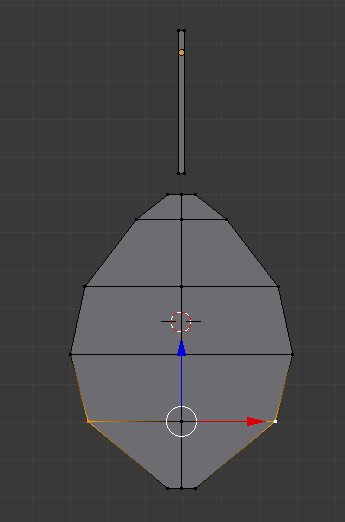
茎の根元のエッジを押しだし、萼を五つ作る


Subdivision SurfaceモディファイアとSmoothシェーディングを適用する
2.葉を作成
[1]を押してXZ平面表示に、[5]で平行投影にする
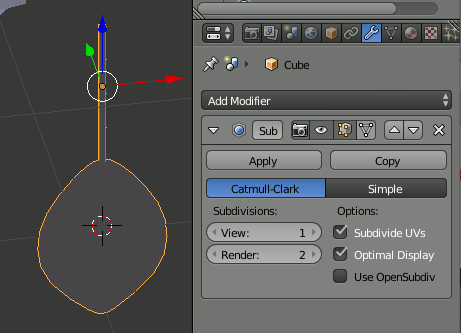
[Shift+A]→[Mesh]→CubeでCubeを作成
直方体状に編集し、上下の面を削除する
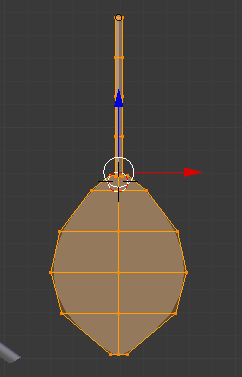
CubeのEditモードのまま、[Shift+A]→[Mesh]→Plane でPlaneを追加
X軸に90度回転し、横に三分割、縦に二分割する
さらに以下の形に編集。茎の部分との太さを調整する。また茎はCtrl+RでLoopCutで三分割する
Subdivison Surfaceモディファイアを設定する
Editモードで、originが茎の根元にくるように移動する
葉を移動し、茎につなげる。[Shift+D]で複製し、反対側にも付ける。
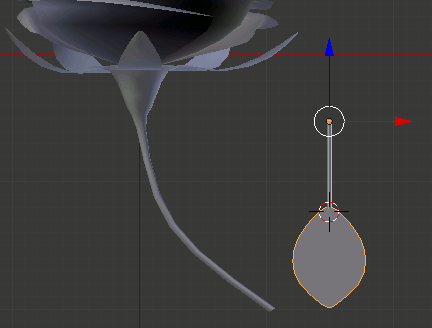
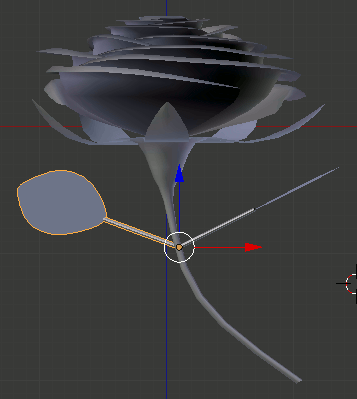
Propotional Editingを使って葉の形を整える


また、Environment Lightingを有効にする
ライトをAreaにし、以下のように設定。


