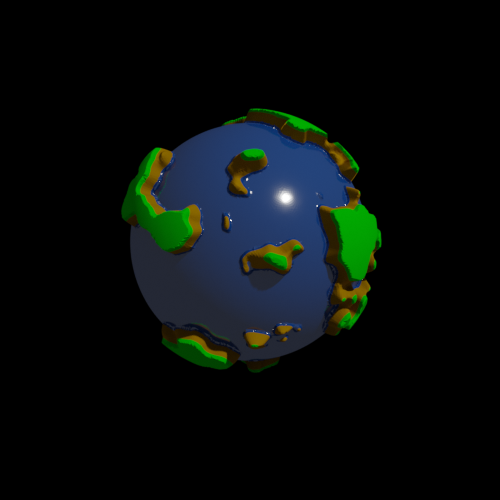
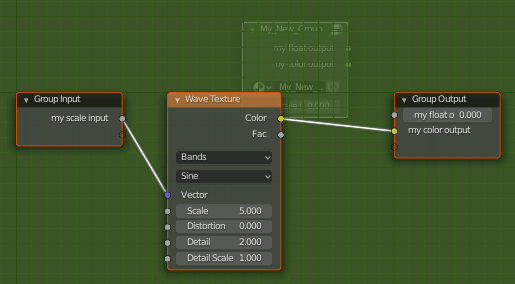
Blender python でCyclesにNode Groupを追加
ソースコード
import bpy


tree = bpy.data.materials['Material'].node_tree

def create_nodegroup():

    # create node group
    my_new_Group = bpy.data.node_groups.new('My_New_Group', 'ShaderNodeTree')

    # input
    mngInputs = my_new_Group.nodes.new('NodeGroupInput')
    mngInputs.location = (0,0)
    my_new_Group.inputs.new('NodeSocketFloat','my scale input')

    # output
    mngOutputs = my_new_Group.nodes.new('NodeGroupOutput')
    mngOutputs.location = (500,0)
    my_new_Group.outputs.new('NodeSocketFloat','my float output')
    my_new_Group.outputs.new('NodeSocketColor','my color output')


    # node in nodegroup
    texnode = my_new_Group.nodes.new('ShaderNodeTexWave')
    texnode.location = (200,0)

    # connect nodes
    my_new_Group.links.new(mngInputs.outputs[0],texnode.inputs[0])
    my_new_Group.links.new(texnode.outputs['Color'],mngOutputs.inputs['my color output'])

    return my_new_Group

################################################################
###################### Add New Node Group ######################
################################################################
groupnode = tree.nodes.new(type='ShaderNodeGroup')
groupnode.node_tree = create_nodegroup()
結果
なおNode Groupから出るには[Tab]キーを押す
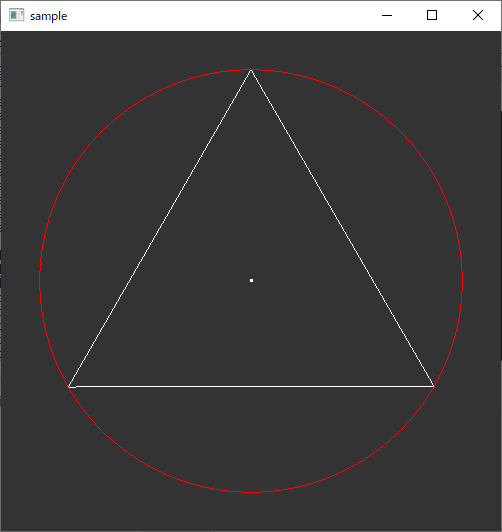
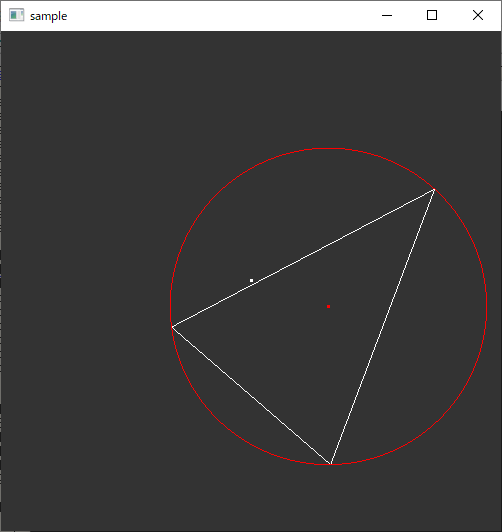
二次元の三角形の内外判定
http://www.thothchildren.com/chapter/5b267a436298160664e80763
上記サイトはC言語のサンプルが載っている今時珍しいサイトでお世話になっているのだが一カ所致命的なミスがある。コメントしたいがログイン式になっていてできないので代わりにここに書いておきたい。
以下、上記サイトのベクトルの係数による解法の修正版
template<typename real_t>
inline bool isInTheTriangle(
  real_t px,  real_t py,
  real_t p0x, real_t p0y,
  real_t p1x, real_t p1y,
  real_t p2x, real_t p2y
) {
  real_t Area = 0.5 * (-p1y * p2x + p0y * (-p1x + p2x) + p0x * (p1y - p2y) + p1x * p2y);

  real_t s = 1.0 / (2.0 * Area) * (p0y * p2x - p0x * p2y + (p2y - p0y) * px + (p0x - p2x) * py);
  real_t t = 1.0 / (2.0 * Area) * (p0x * p1y - p0y * p1x + (p0y - p1y) * px + (p1x - p0x) * py);

  if (
    (0 < s) && (s < 1) &&
    (0 < t) && (t < 1) &&
    (0 < (1 - s - t)) &&
    ((1 - s - t) < 1)
    ) {
    return true;
  }
  else {
    return false;
  }
}
ついでにテンプレート化も施した。
C言語の比較演算子は左結合で、左から右に向かって零,非零の値に変換していく。従って 0 < a < b という形の比較ができない。必ず (0<a)&&(a<b)と書かなければいけない。めんどくさいがそうなのだ。
ちなみに外積を使ったやり方の方は問題ない。
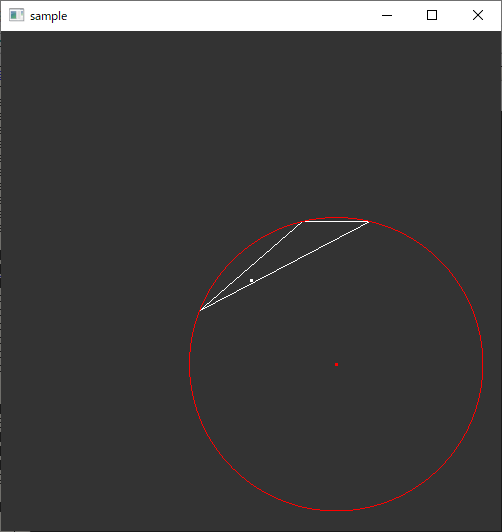
三角形の外接円を求める(二次元)
ソースコード
//! @brief 外接円を求める
//! @param [out] x 外接円の中心のx座標
//! @param [out] y 外接円の中心のy座標
//! @param [out] r 外接円の半径
//! @param [in] x1 三角形の第一頂点のx座標
//! @param [in] y1 三角形の第一頂点のy座標
//! @param [in] x2 三角形の第二頂点のx座標
//! @param [in] y2 三角形の第二頂点のy座標
//! @param [in] x3 三角形の第三頂点のx座標
//! @param [in] y3 三角形の第三頂点のy座標
//! @return なし
inline void Circumscribed_Circle(
  double* x,
  double* y,
  double* r,
  const double x1,
  const double y1,
  const double x2,
  const double y2,
  const double x3,
  const double y3
) {

  double xT =
    (y3 - y1) * (x2 * x2 - x1 * x1 + y2 * y2 - y1 * y1) +
    (y1 - y2) * (x3 * x3 - x1 * x1 + y3 * y3 - y1 * y1);
  double yT =
    (x1 - x3) * (x2 * x2 - x1 * x1 + y2 * y2 - y1 * y1) +
    (x2 - x1) * (x3 * x3 - x1 * x1 + y3 * y3 - y1 * y1);

  double c = 2 * ((x2 - x1) * (y3 - y1) - (y2 - y1) * (x3 - x1));

  *x = xT / c;
  *y = yT / c;

  *r = sqrt( (*x - x1) * (*x - x1) + (*y - y1) * (*y - y1) );
}
実行例
Blender PythonからVray for Blenderのノードを操作
ツリー作成
今私が使っているバージョンでは、Blenderを起動直後、オブジェクトにマテリアルが割り当てられている状態で他のレンダラ(Cycles)等からV-Rayに変更すると、最初の一つにはツリーが作成されない。
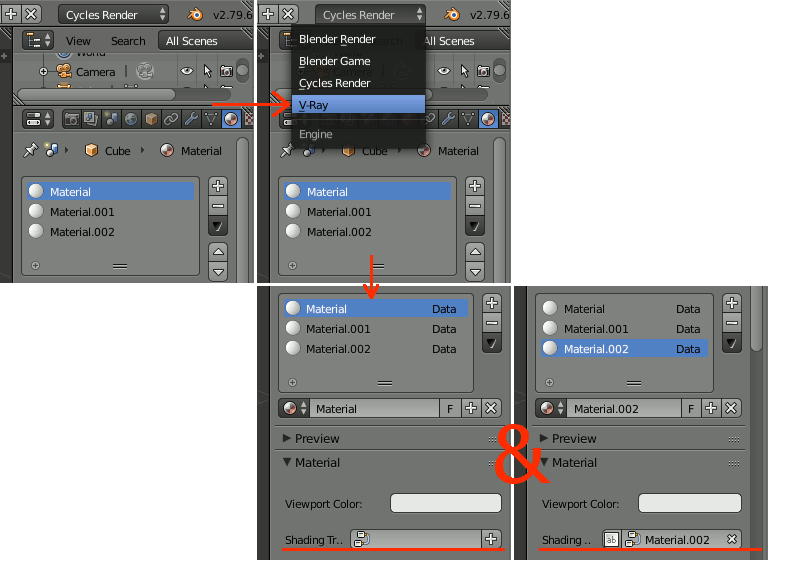
以下のスクリプトで、ツリーを作成できる
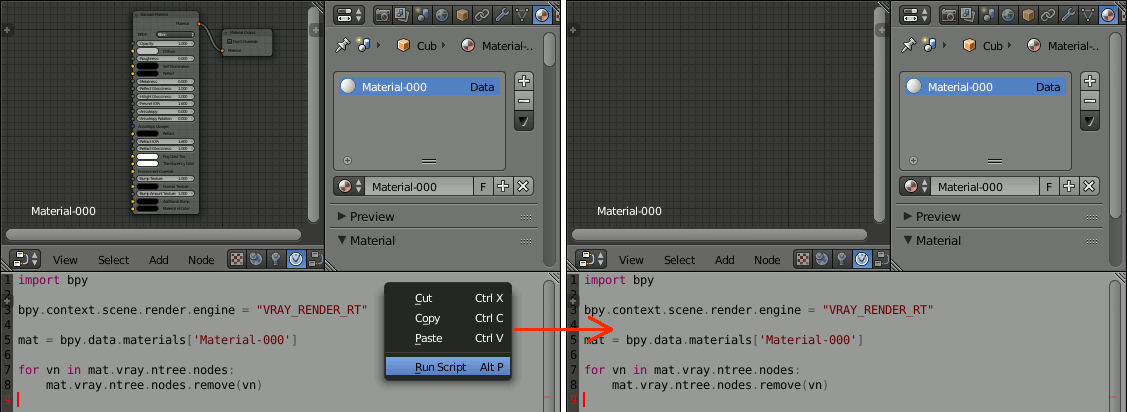
import bpy

from vb30.nodes import tree_defaults

bpy.context.scene.render.engine = "VRAY_RENDER_RT"

mat = bpy.data.materials['Material-000']

tree_defaults.AddMaterialNodeTree(mat)
mat.vray.ntree.name = mat.name + '-vray'
全ノードを削除
以下で、ツリー内の全ノードを削除できる
import bpy

bpy.context.scene.render.engine = "VRAY_RENDER_RT"

mat = bpy.data.materials['Material-000']

for vn in mat.vray.ntree.nodes:
    mat.vray.ntree.nodes.remove(vn)
ノードを追加
import bpy

bpy.context.scene.render.engine = "VRAY_RENDER_RT"

mat = bpy.data.materials['Material-000']

vray_nodetree = mat.vray.ntree

voutput = vray_nodetree.nodes.new(type='VRayNodeOutputMaterial')
voutput.location.x = 0
voutput.location.y = 0

vsingle = vray_nodetree.nodes.new(type='VRayNodeMtlSingleBRDF')
vsingle.location.x = voutput.location.x - voutput.width - 20
vsingle.location.y = 0

vraymat = vray_nodetree.nodes.new(type='VRayNodeBRDFVRayMtl')
vraymat.location.x = vsingle.location.x - vsingle.width - 20
vraymat.location.y = 0

ノードをリンク
import bpy

bpy.context.scene.render.engine = "VRAY_RENDER_RT"

mat = bpy.data.materials['Material-000']

vray_nodetree = mat.vray.ntree

##########################
# Add nodes
##########################

voutput = vray_nodetree.nodes.new(type='VRayNodeOutputMaterial')
voutput.location.x = 0
voutput.location.y = 0

vsingle = vray_nodetree.nodes.new(type='VRayNodeMtlSingleBRDF')
vsingle.location.x = voutput.location.x - voutput.width - 20
vsingle.location.y = 0

vraymat = vray_nodetree.nodes.new(type='VRayNodeBRDFVRayMtl')
vraymat.location.x = vsingle.location.x - vsingle.width - 20
vraymat.location.y = 0


##########################
# Add links
##########################

vray_nodetree.links.new(
    vraymat.outputs['BRDF'] ,
    vsingle.inputs['BRDF']
    )


vray_nodetree.links.new(
    vsingle.outputs['Material'] ,
    voutput.inputs['Material']
    )
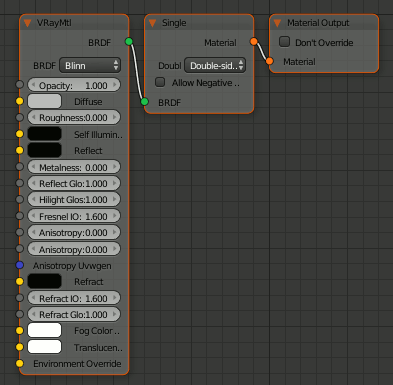
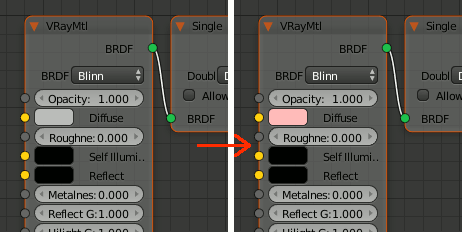
ノードの値を変更
import bpy

bpy.context.scene.render.engine = "VRAY_RENDER_RT"

mat = bpy.data.materials['Material-000']

vray_nodetree = mat.vray.ntree

vray_nodetree.nodes['VRayMtl'].inputs['Diffuse'].value.r = 1.0
Blender Pythonからマテリアルのノードへアクセス(2)
ノードを追加
import bpy

nodetree = bpy.context.active_object.material_slots["Material-red"].material.node_tree

nodes = nodetree.nodes

nodes.new('ShaderNodeBsdfDiffuse')
ノードを削除
import bpy

nodetree = bpy.context.active_object.material_slots["Material-red"].material.node_tree

nodes = nodetree.nodes

nodes.remove(  nodes['Diffuse BSDF']  )
ノード同士を接続
import bpy

nodetree = bpy.context.active_object.material_slots["Material-red"].material.node_tree

nodes = nodetree.nodes

diffuse = nodes['Diffuse BSDF']
MaterialOutput = nodes['Material Output']

nodetree.links.new(diffuse.outputs[0],MaterialOutput.inputs[0])
ノードのラベルを変更
import bpy

nodetree = bpy.context.active_object.material_slots["Material-red"].material.node_tree

nodes = nodetree.nodes

diffuse = nodes['Diffuse BSDF']

diffuse.label = "Diffuse BSDF -added"
Blender Pythonからマテリアルのノードへアクセス(1)
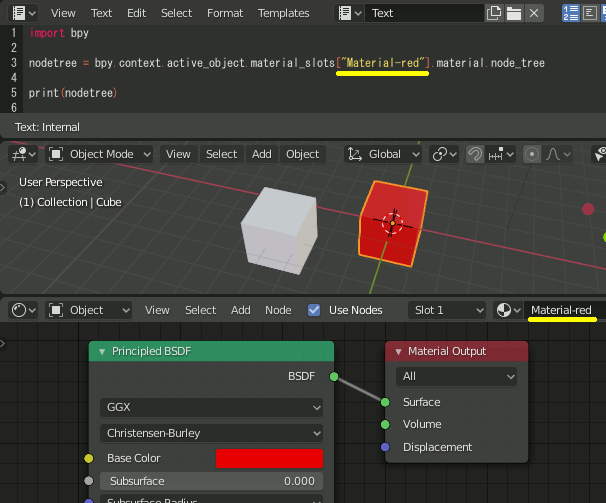
マテリアルからノードツリーを取得
nodetree = bpy.context.active_object.material_slots["Material-red"].material.node_tree

print(nodetree)
あるいは、以下でも可
出力結果:
ノードへアクセス
全てのノードを表示
nodetree = bpy.context.active_object.material_slots["Material-red"].material.node_tree

nodes = nodetree.nodes

for n in nodes:
    print(n)
出力結果:
<bpy_struct, ShaderNodeBsdfPrincipled("Principled BSDF")>
ノードの入力を列挙
nodetree = bpy.context.active_object.material_slots["Material-red"].material.node_tree

nodes = nodetree.nodes

for i in nodes["Material Output"].inputs :
    print(i)
または:
または:
出力結果:
<bpy_struct, NodeSocketShader("Volume")>
<bpy_struct, NodeSocketVector("Displacement")>
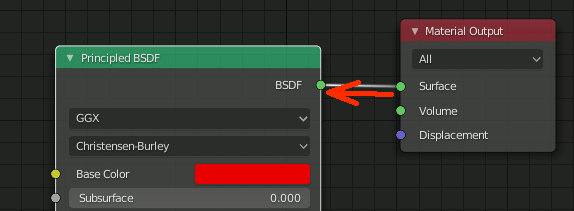
ノードの入力元を取得
nodetree = bpy.context.active_object.material_slots["Material-red"].material.node_tree

nodes = nodetree.nodes

print(nodes["Material Output"].inputs[0].links[0].from_node )
出力結果:
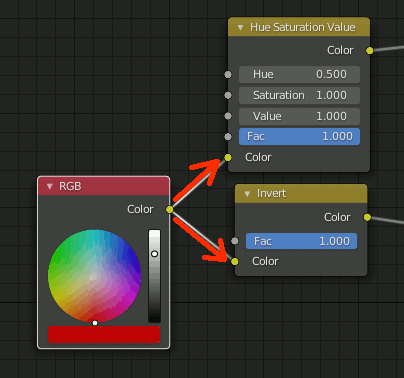
ノードの出力先を列挙
nodetree = bpy.context.active_object.material_slots["Material-red"].material.node_tree

nodes = nodetree.nodes

for n in nodes["RGB"].outputs[0].links :
    print(n.to_node)
または:
print(nodes["RGB"].outputs[0].links[1].to_node )
出力結果:
<bpy_struct, ShaderNodeInvert("Invert")>
ノードの値を取得
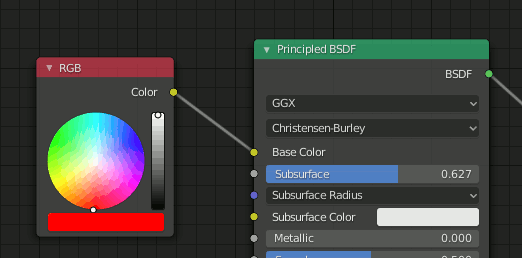
nodetree = bpy.context.active_object.material_slots["Material-red"].material.node_tree

nodes = nodetree.nodes

print(nodes["RGB"].outputs[0].default_value[0])
print(nodes["RGB"].outputs[0].default_value[1])
print(nodes["RGB"].outputs[0].default_value[2])
出力結果
0.0012105016503483057
0.0
import bpy

nodetree = bpy.context.active_object.material_slots["Material-red"].material.node_tree

nodes = nodetree.nodes

print("Base Color ", nodes["Principled BSDF"].inputs["Base Color"].default_value[0])
print("Base Color ", nodes["Principled BSDF"].inputs["Base Color"].default_value[1])
print("Base Color ", nodes["Principled BSDF"].inputs["Base Color"].default_value[2])
print("Subsurface ", nodes["Principled BSDF"].inputs["Subsurface"].default_value)
出力結果
Base Color 0.0012105016503483057
Base Color 0.0
Subsurface 0.6272727251052856
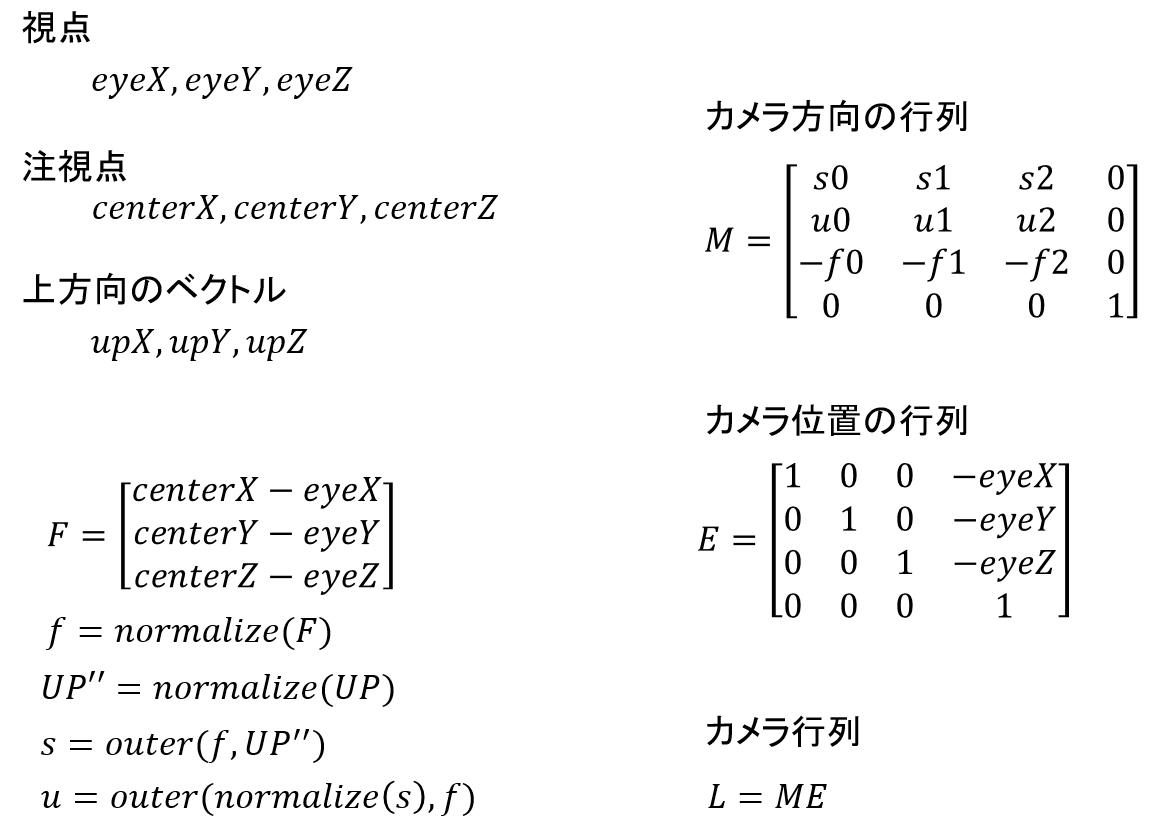
gluLookAtの自前実装
以下の式をそのまま実装する。
https://www.khronos.org/registry/OpenGL-Refpages/gl2.1/xhtml/gluLookAt.xml
プログラム本体
#include <gl/GLU.h>

#pragma comment(lib,"glu32.lib")

#pragma warning(disable:4996)
//! @brief IxJ行列の i,j の要素にアクセスする
 //! @param [in] i 行番号
 //! @param [in] j 列番号
 //! @param [in] I 行数
inline int matijI(const int i, const int j, const int I) {
  return i + I * j;
}
//! @brief IxJ行列 × JxK行列 の乗算関数
//https://suzulang.com/cpp-multmatrix44/
//! @param [out] C Cik 計算結果格納先
//! @param [in] A Aijの行列
//! @param [in] B Bjkの行列
//! @param [in] I Aの行列の行数
//! @param [in] J Aの行列の列数
//! @param [in] K Bの行列の列数
//! @return C
template<
  typename real_tC,
  typename real_tA,
  typename real_tB>
real_tC* mult_matrixIJK(real_tC* C, const real_tA* A, const real_tB* B, const int I, const int J, const int K) {

  for (int i = 0; i < I; i++)
    for (int k = 0; k < K; k++) {
      C[matijI(i, k, I)] = 0.0;
      for (int j = 0; j < J; j++) {
        C[matijI(i, k, I)] += A[matijI(i, j, I)] * B[matijI(j, k, J)];
      }
    }

  return C;
}
//! @brief 4x4行列の行列の積を計算する
//! @param [out] C 結果の格納先
//! @param [in] A 行列A
//! @param [in] B 行列B
//! @return Cへのポインタ
template<
  typename real_tC,
  typename real_tA,
  typename real_tB>
real_tC* mult_matrix44(
    real_tC* C,
    const real_tA* A,
    const real_tB* B){
  return mult_matrixIJK(C, A, B, 4, 4, 4);
}
//! @brief 移動行列を作成する
//! @param [out] m 結果の格納先
//! @param [in] x ベクトルのx成分
//! @param [in] y ベクトルのy成分
//! @param [in] z ベクトルのz成分
//! @return なし
template<typename real_t>
void mytranslate(
  real_t* m,
  real_t x,
  real_t y,
  real_t z
) {
  m[0] = 1.0;
  m[1] = 0.0;
  m[2] = 0.0;
  m[3] = 0.0;

  m[4] = 0.0;
  m[5] = 1.0;
  m[6] = 0.0;
  m[7] = 0.0;

  m[8] = 0.0;
  m[9] = 0.0;
  m[10] = 1.0;
  m[11] = 0.0;

  m[12] = x;
  m[13] = y;
  m[14] = z;
  m[15] = 1.0;

}
//! @brief 単位行列を作成する
//! @param [out] m 結果の格納先
//! @return なし
template<typename real_t>
inline void loadidentity3(real_t* m){
  m[0] = 1.0;
  m[1] = 0.0;
  m[2] = 0.0;
  m[3] = 0.0;

  m[4] = 0.0;
  m[5] = 1.0;
  m[6] = 0.0;
  m[7] = 0.0;

  m[8] = 0.0;
  m[9] = 0.0;
  m[10] = 1.0;
  m[11] = 0.0;

  m[12] = 0;
  m[13] = 0;
  m[14] = 0;
  m[15] = 1.0;
}
//! @brief 配列にNANが入っているか確認
//! @param [in] m 評価する配列
//! @param [in] count 行列の要素数
template<typename real_t>
bool chek_array_nan(const real_t* m, const size_t count) {
  for (size_t i = 0; i < count; i++) {
    if (isnan(m[i]) == true)
      return true;
  }
  return false;
}
template<typename real_t>
inline void Outer3(real_t* const dvec, real_t const* const svec1, real_t const* const svec2) {

  const real_t& x1 = svec1[0];
  const real_t& y1 = svec1[1];
  const real_t& z1 = svec1[2];
  const real_t& x2 = svec2[0];
  const real_t& y2 = svec2[1];
  const real_t& z2 = svec2[2];

  dvec[0] = static_cast<real_t>(y1 * z2 - z1 * y2);
  dvec[1] = static_cast<real_t>(z1 * x2 - x1 * z2);
  dvec[2] = static_cast<real_t>(x1 * y2 - y1 * x2);
}
template<typename real_t>
real_t Inner3(real_t const* const vec1, real_t const* const vec2) {
  const int X = 0;
  const int Y = 1;
  const int Z = 2;
  return ((vec1[X]) * (vec2[X]) + (vec1[Y]) * (vec2[Y]) + (vec1[Z]) * (vec2[Z]));
}
template<typename real_t>
real_t Length3(const real_t* const vec) {
  const int X = 0;
  const int Y = 1;
  const int Z = 2;
  return sqrt(vec[X] * vec[X] + vec[Y] * vec[Y] + vec[Z] * vec[Z]);
}
template<typename real_t>
bool Normalize3(real_t * const pV)
{

  const int X = 0;
  const int Y = 1;
  const int Z = 2;

  real_t len;
  real_t& x = pV[X];
  real_t& y = pV[Y];
  real_t& z = pV[Z];

  len = static_cast<real_t>(sqrt(x * x + y * y + z * z));

  if (len < static_cast<real_t>(1e-6)) return false;

  len = static_cast<real_t>(1.0) / len;
  x *= len;
  y *= len;
  z *= len;

  return true;
}
//! @brief gluLookAtの自前実装版
//! @param [out] M 結果の格納先
//! @param [out] eyeX カメラ位置
//! @param [out] eyeY カメラ位置
//! @param [out] eyeZ カメラ位置
//! @param [out] centerX
//! @param [out] centerY
//! @param [out] centerZ
//! @param [out] upX
//! @param [out] upY
//! @param [out] upZ
//! @return なし
void myglulookat(
  GLdouble* M,
  GLdouble eyeX,
  GLdouble eyeY,
  GLdouble eyeZ,
  GLdouble centerX,
  GLdouble centerY,
  GLdouble centerZ,
  GLdouble upX,
  GLdouble upY,
  GLdouble upZ)
{
  GLdouble f[3] = {
    centerX - eyeX,
    centerY - eyeY,
    centerZ - eyeZ
  };
  Normalize3(f);

  GLdouble UP[3] = {upX,upY,upZ};
  Normalize3(UP);

  GLdouble s[3];
  Outer3(s, f, UP);

  Normalize3(s);
  GLdouble u[3];
  Outer3(u, s, f);

  GLdouble M0[16];
  M0[ 0] = s[0];
  M0[ 1] = u[0];
  M0[ 2] = -f[0];
  M0[ 3] = 0;

  M0[ 4] = s[1];
  M0[ 5] = u[1];
  M0[ 6] = -f[1];
  M0[ 7] = 0;

  M0[ 8] = s[2];
  M0[ 9] = u[2];
  M0[10] = -f[2];
  M0[11] = 0;

  M0[12] = 0;
  M0[13] = 0;
  M0[14] = 0;
  M0[15] = 1;


  /////////////////////////////
  /////////////////////////////
  GLdouble E[16];

  mytranslate(E, -eyeX, -eyeY, -eyeZ);

  mult_matrix44(M, M0, E);

  if (chek_array_nan(M, 16) == true)
    loadidentity3(M);

}
テスト用コード
void test() {
  glMatrixMode(GL_PROJECTION);
  glLoadIdentity();
  glMatrixMode(GL_MODELVIEW);
  glLoadIdentity();

  GLdouble ex = (rand() % 1000) / 1000.0 - 0.5;
  GLdouble ey = (rand() % 1000) / 1000.0 - 0.5;
  GLdouble ez = (rand() % 1000) / 1000.0 - 0.5;
  GLdouble cx = (rand() % 1000) / 1000.0 - 0.5;
  GLdouble cy = (rand() % 1000) / 1000.0 - 0.5;
  GLdouble cz = (rand() % 1000) / 1000.0 - 0.5;
  GLdouble ux = (rand() % 1000) / 1000.0 - 0.5;
  GLdouble uy = (rand() % 1000) / 1000.0 - 0.5;
  GLdouble uz = (rand() % 1000) / 1000.0 - 0.5;
  GLdouble M0[16];
  gluLookAt(ex, ey, ez, cx, cy, cz, ux, uy, uz);
  glGetDoublev(GL_MODELVIEW_MATRIX, M0);
  GLdouble M1[16];
  myglulookat(
    M1,
    ex, ey, ez,
    cx, cy, cz,
    ux, uy, uz);
  puts("------------------------");
  for (size_t i = 0; i < 16; i++) {
    printf("[%d] %lf\n", i, M0[i] - M1[i]);
  }

}
実行結果
[0] -0.000000
[1] 0.000000
[2] -0.000000
[3] 0.000000
[4] -0.000000
[5] 0.000000
[6] -0.000000
[7] 0.000000
[8] -0.000000
[9] -0.000000
[10] 0.000000
[11] 0.000000
[12] 0.000000
[13] 0.000000
[14] -0.000000
[15] 0.000000
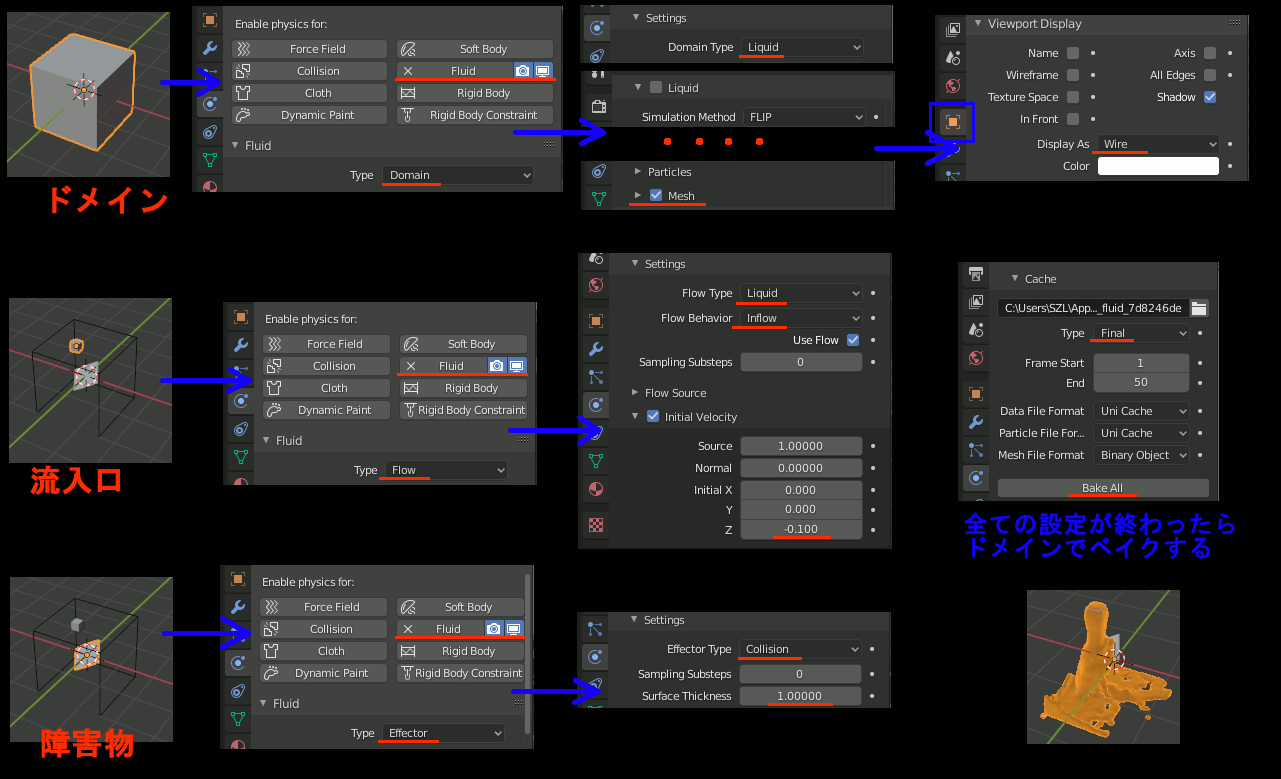
Blender 流体シミュレーションをとりあえず動かす最短の設定
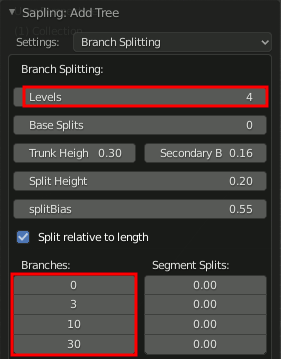
Blender Sapling ,Splittingについて
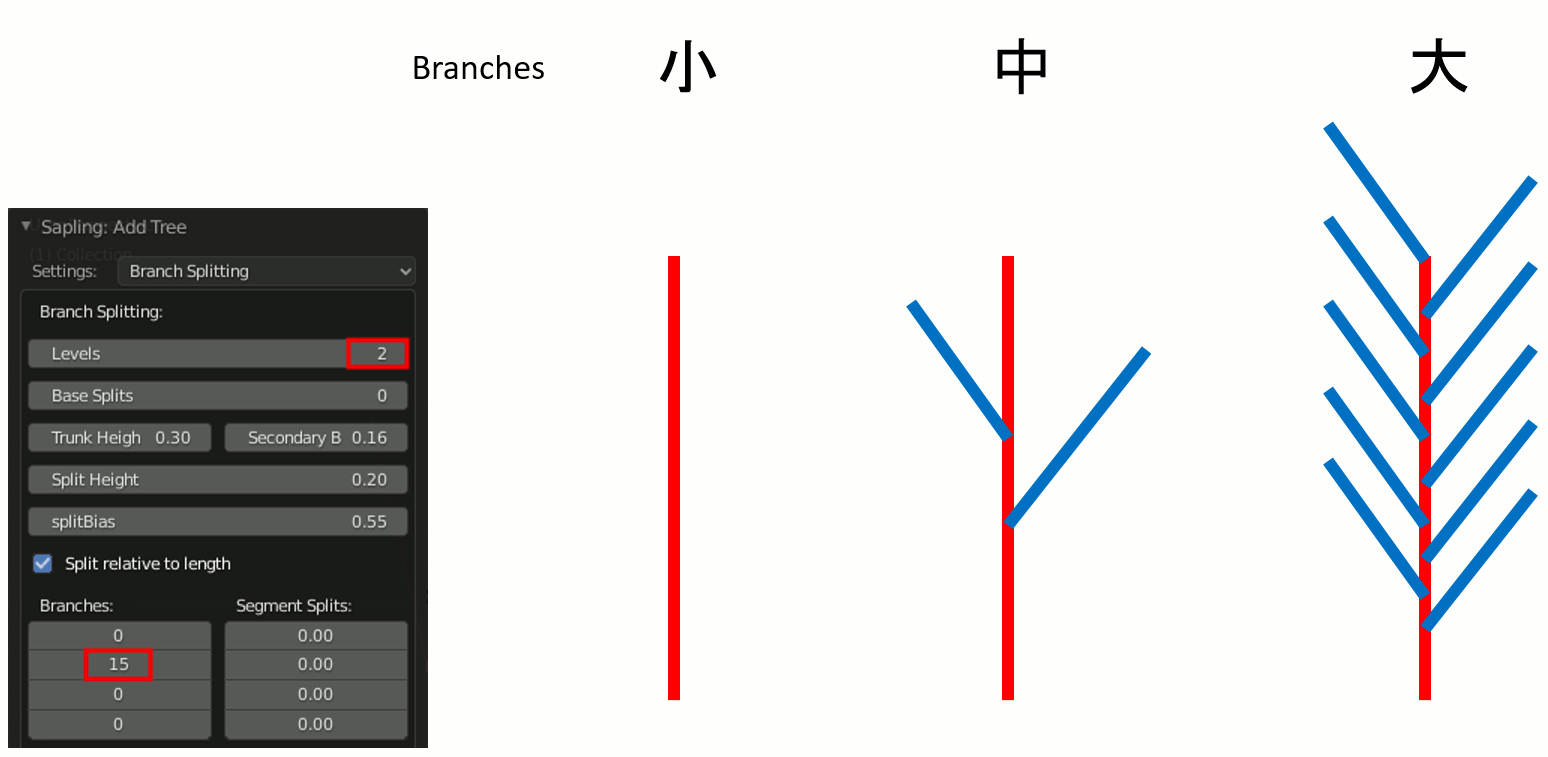
Sapling Tree Gen の Branch Splitting。挙動がわかりづらかったので整理。
Levels,Branches
Levels ... 何レベルまで使用するかを指定
Branches ... 各レベルの枝がどれぐらい多いかを指定
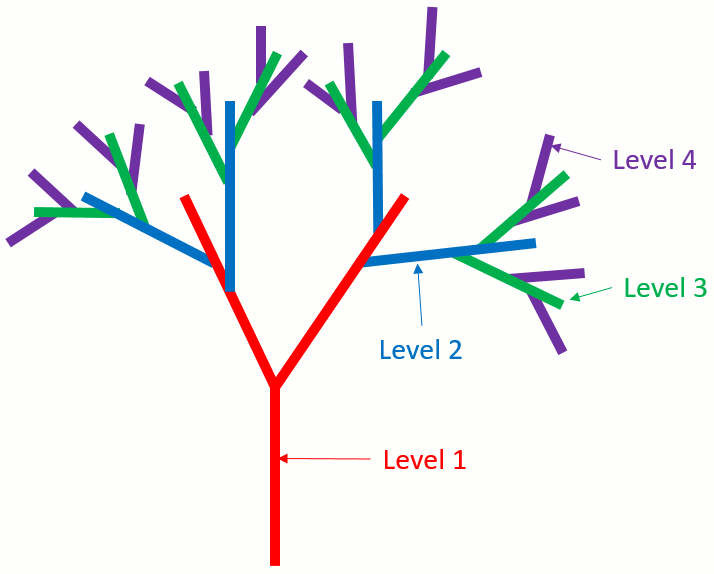
例えばLevels=2の場合、図中青の枝までが出現する。
Branchesの指定で、青の枝がどれぐらい多いかを指定する
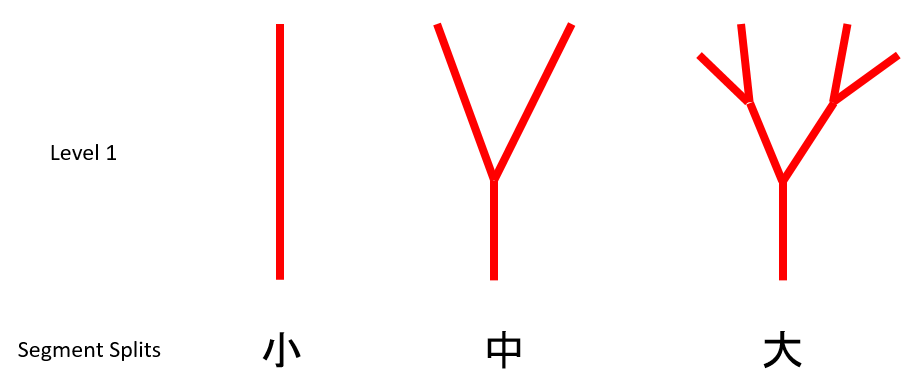
Segment Splits
そのレベルを何分割するかを指定する。
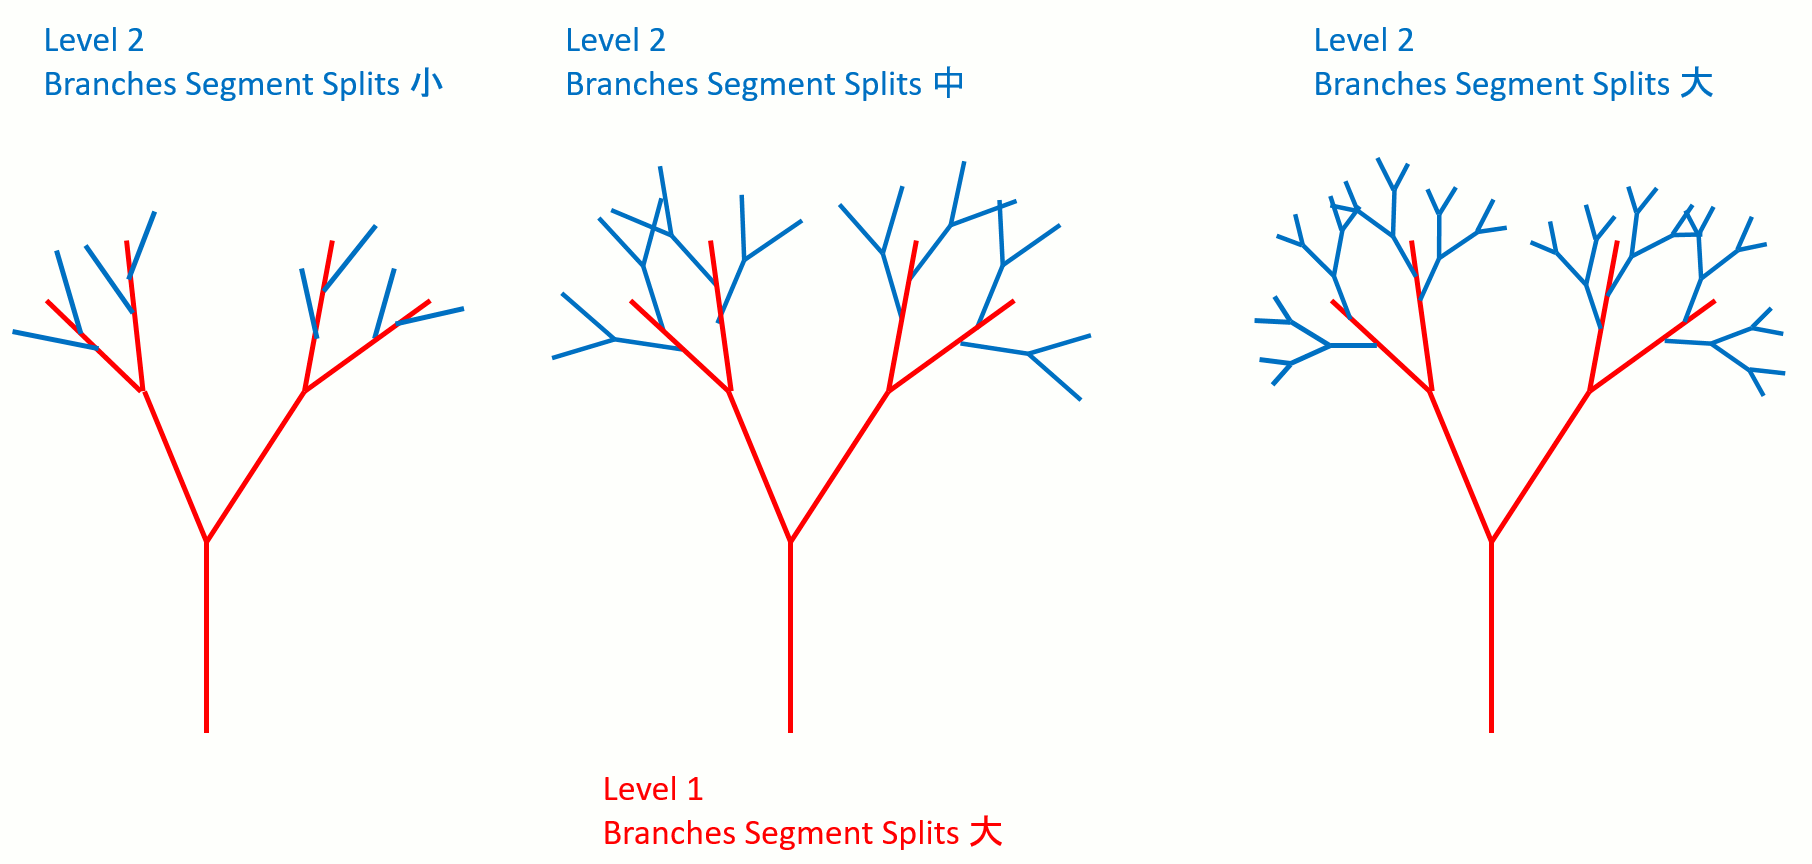
Base Split
Base splitはレベル1を何分割するかを指定する。

Leaves
葉は一番大きなレベルに出現する。

Blender CyclesでDisplacement
モディファイアを使わず、CyclesでレンダリングするときにのみDisplacementを適用する話。
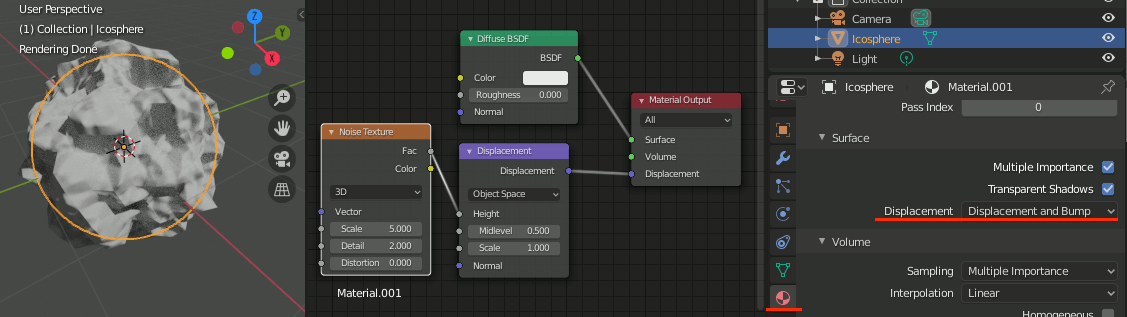
Material PropertiesのSurface内、Displacementの設定を
Displacement Only または Displacement and Bump に設定する
使用例