GLSLを試す (9) Geometry Shader(4)- 三角形一枚から三角形一枚
前回までは頂点を入力にしていたが、三角形を入力する場合はGL_GEOMETRY_INPUT_TYPEにGL_TRIANGLESを指定、GL_GEOMETRY_OUTPUT_TYPEにはGL_TRIANGLE_STRIPを指定する。
https://suzulang.com/glsl-9-geometry-shader-1
C++側 ジオメトリシェーダの設定
//! @brief プログラムのリンクを行う(geometryシェーダ使用時)。
//! @details ジオメトリシェーダがある場合はglLinkProgramの前に設定を行わなければいけない。
//! 別に関数を用意した方がわかりやすいのでここではこれを使う
GLSLCompileCond link_program_with_geometry(
    GLuint* ProgramID,
    GLuint vertexShaderID,
    GLuint geometryShaderID,
    GLuint fragmentShaderID,
    std::string* error = nullptr) {

    GLint Result = GL_FALSE;
    int InfoLogLength;

    ////////////////////////////////////////
    // プログラムをリンクします。
    *ProgramID = glCreateProgram();

    glAttachShader(*ProgramID, vertexShaderID);
    glAttachShader(*ProgramID, geometryShaderID);
    glAttachShader(*ProgramID, fragmentShaderID);


    ////////////////////////////////////////
    // ジオメトリシェーダを使うときの設定をここでする
    // この作業は glAttachShaderとglLinkProgramの間に入れる
    glProgramParameteri(*ProgramID, GL_GEOMETRY_VERTICES_OUT, 3);//ジオメトリシェーダからの最大出力頂点数
    //glProgramParameteri(*ProgramID, GL_GEOMETRY_INPUT_TYPE, GL_POINTS);
    //glProgramParameteri(*ProgramID, GL_GEOMETRY_OUTPUT_TYPE, GL_POINTS);
    glProgramParameteri(*ProgramID, GL_GEOMETRY_INPUT_TYPE, GL_TRIANGLES);//ジオメトリシェーダには三角形が入力される
    glProgramParameteri(*ProgramID, GL_GEOMETRY_OUTPUT_TYPE, GL_TRIANGLE_STRIP);//ジオメトリシェーダからは三角形が出力される

    glLinkProgram(*ProgramID);

    ////////////////////////////////////////
    // プログラムをチェックします。
    glGetProgramiv(*ProgramID, GL_LINK_STATUS, &Result);
    glGetProgramiv(*ProgramID, GL_INFO_LOG_LENGTH, &InfoLogLength);
    std::vector<char> ProgramErrorMessage((std::max)(InfoLogLength, int(1)));
    glGetProgramInfoLog(*ProgramID, InfoLogLength, NULL, &ProgramErrorMessage[0]);

    if (error) {
        *error = &ProgramErrorMessage[0];

        return GLSLCompileCond::LINK_ERROR;
    }

    return GLSLCompileCond::SUCCESS;
}
//描画関数
void disp(void) {

    glViewport(0, 0, width, height);

    glClearColor(0.2, 0.2, 0.2, 1);
    glClear(GL_COLOR_BUFFER_BIT | GL_DEPTH_BUFFER_BIT);

    glUseProgram(programID);
    GLuint loc_ModelViewMatrix = glGetUniformLocation(programID, "ModelViewMatrix");
    GLuint loc_ProjectionMatrix = glGetUniformLocation(programID, "ProjectionMatrix");


    glUniformMatrix4fv(loc_ModelViewMatrix, 1, GL_FALSE, mmodel);
    glUniformMatrix4fv(loc_ProjectionMatrix, 1, GL_FALSE, mproj);

    {
        glEnable(GL_VERTEX_PROGRAM_POINT_SIZE);

        auto bindbufP = EnableAndBindFArrayBuffer(0, buf_points, 3, GL_FLOAT);
        auto bindbufC = EnableAndBindFArrayBuffer(1, buf_colors, 3, GL_FLOAT);

        //glDrawArrays(GL_POINTS, 0, 3);
        glDrawArrays(GL_TRIANGLES, 0, 3);

    }
    glFlush();
}
ジオメトリシェーダ
ジオメトリシェーダだけをこのように変更する
#version 460

layout (triangles) in; //入力は三角形
layout (triangle_strip) out; //出力も三角形

layout (max_vertices = 3) out;

//geometry shaderへの入力は配列で受け取らなければいけない
//ただし名前はvertex shader側のoutと一致させる
in vec4 vertexColor[];

// 出力は普通。名前はfragment shader側のinと一致させる
out vec4 vColor;

void main()
{
    gl_Position = gl_in[0].gl_Position;
    vColor = vertexColor[0];
    EmitVertex();
    gl_Position = gl_in[1].gl_Position;
    vColor = vertexColor[1]*0.1;
    EmitVertex();
    gl_Position = gl_in[2].gl_Position;
    vColor = vertexColor[2]*0.1;
    EmitVertex();
    EndPrimitive();
}
GLSLを試す (9) Geometry Shader(3)- 頂点一つから三角形を生成
C++側(シェーダの設定)
前回のプログラムからプログラムのリンクの部分だけを以下のように書き換える。
https://suzulang.com/glsl-9-geometry-shader-1
//! @brief プログラムのリンクを行う(geometryシェーダ使用時)。
//! @details ジオメトリシェーダがある場合はglLinkProgramの前に設定を行わなければいけない。
//! 別に関数を用意した方がわかりやすいのでここではこれを使う
GLSLCompileCond link_program_with_geometry(
    GLuint* ProgramID,
    GLuint vertexShaderID,
    GLuint geometryShaderID,
    GLuint fragmentShaderID,
    std::string* error = nullptr) {

    GLint Result = GL_FALSE;
    int InfoLogLength;

    ////////////////////////////////////////
    // プログラムをリンクします。
    *ProgramID = glCreateProgram();

    glAttachShader(*ProgramID, vertexShaderID);
    glAttachShader(*ProgramID, geometryShaderID);
    glAttachShader(*ProgramID, fragmentShaderID);


    ////////////////////////////////////////
    // ジオメトリシェーダを使うときの設定をここでする
    // この作業は glAttachShaderとglLinkProgramの間に入れる
    glProgramParameteri(*ProgramID, GL_GEOMETRY_VERTICES_OUT, 3);//ジオメトリシェーダからの最大出力頂点数
    glProgramParameteri(*ProgramID, GL_GEOMETRY_INPUT_TYPE, GL_POINTS);//ジオメトリシェーダには頂点が入力される
    //glProgramParameteri(*ProgramID, GL_GEOMETRY_OUTPUT_TYPE, GL_POINTS);
    glProgramParameteri(*ProgramID, GL_GEOMETRY_OUTPUT_TYPE, GL_TRIANGLE_STRIP);

    glLinkProgram(*ProgramID);

    ////////////////////////////////////////
    // プログラムをチェックします。
    glGetProgramiv(*ProgramID, GL_LINK_STATUS, &Result);
    glGetProgramiv(*ProgramID, GL_INFO_LOG_LENGTH, &InfoLogLength);
    std::vector<char> ProgramErrorMessage((std::max)(InfoLogLength, int(1)));
    glGetProgramInfoLog(*ProgramID, InfoLogLength, NULL, &ProgramErrorMessage[0]);

    if (error) {
        *error = &ProgramErrorMessage[0];

        return GLSLCompileCond::LINK_ERROR;
    }

    return GLSLCompileCond::SUCCESS;
}
Geometry Shader
#version 460

layout (points) in; //入力は頂点単位
layout (triangle_strip) out; //出力も頂点単位

layout (max_vertices = 3) out;

//geometry shaderへの入力は配列で受け取らなければいけない
//ただし名前はvertex shader側のoutと一致させる
in vec4 vertexColor[];

// 出力は普通。名前はfragment shader側のinと一致させる
out vec4 vColor;

void main()
{
    // 第一頂点
    gl_Position = gl_in[0].gl_Position;
    vColor = vertexColor[0];
    EmitVertex();
    // 第二頂点
    gl_Position = gl_in[0].gl_Position;
    gl_Position.x += 0.2;
    vColor = vertexColor[0]*0.5;
    EmitVertex();
    // 第三頂点
    gl_Position = gl_in[0].gl_Position;
    gl_Position.x += 0.2;
    gl_Position.y += 0.2;
    vColor = vertexColor[0]*0.2;
    EmitVertex();
    EndPrimitive();
}
GLSLを試す (9) Geometry Shader(2)- 頂点を増やす
前回のプログラム
https://suzulang.com/glsl-9-geometry-shader-1
C++側、vertex shader,fragment shaderはそのまま、geometry shaderだけを書き換える。
#version 460

layout (points) in; //入力は頂点単位元々
layout (points) out; //出力も頂点単位

layout (max_vertices = 3) out;

//geometry shaderへの入力は配列で受け取らなければいけない
//ただし名前はvertex shader側のoutと一致させる
in vec4 vertexColor[];

// 出力は普通。名前はfragment shader側のinと一致させる
out vec4 vColor;

void main()
{

    // 元々入ってきた頂点
    gl_Position = gl_in[0].gl_Position;
    gl_PointSize=20.0;
    vColor = vertexColor[0];
    EmitVertex(); // 頂点をラスタライザへ送る

    // ジオメトリシェーダで生成する頂点
    gl_Position = gl_in[0].gl_Position; // 元々の頂点の座標を取得
    gl_Position.x += 0.2;               // 少し右へずらす
    gl_PointSize=10.0;                  // 頂点サイズも変える
    vColor = vertexColor[0];            // 色は同じものを使う
    EmitVertex();                       // 頂点をラスタライザへ送る

    EndPrimitive();
}
GLSLを試す (9) Geometry Shader(1)
1頂点入力、1頂点出力のジオメトリシェーダを作って動作確認を行う。
シェーダのコンパイル等は依然作ったprepare_shader.hppを転用する。ただしサンプルとしてはlink_programを使うと読みにくくなるので、ジオメトリシェーダサンプル用に書き直す。
https://suzulang.com/glsl-shader-my-functions-on-cpp
各シェーダ
default.vert
#version 460 core

layout (location = 0) in vec3 coord;
layout (location = 1) in vec3 incolor;

out vec4 vertexColor;

uniform mat4 ModelViewMatrix;
uniform mat4 ProjectionMatrix;

void main()
{
  gl_Position = ProjectionMatrix * ModelViewMatrix * vec4(coord, 1.0);
  vertexColor = vec4(incolor, 1.0);
  gl_PointSize=30.0;
}
default.geom
#version 460

layout (points) in; //入力は頂点単位
layout (points) out; //出力も頂点単位
layout (max_vertices = 1) out; // 最大出力頂点数

//geometry shaderへの入力は配列で受け取らなければいけない
//ただし名前はvertex shader側のoutと一致させる
in vec4 vertexColor[];

// 出力は普通。名前はfragment shader側のinと一致させる
out vec4 vColor;

void main()
{
    // gl_inにデータが入っている。今回は頂点ごとの処理なので要素数1.
    // つまりgl_in[0]のみが有効

    gl_Position = gl_in[0].gl_Position;
    gl_PointSize=30.0;
    vColor = vertexColor[0];
    EmitVertex(); // ラスタライザに頂点を送る
    EndPrimitive();//プリミティブの区切り。GL_LINE_STRIPなどを複数実行するときは複数回呼び出す
}
default.frag
#version 460 core

in vec4 vColor;

out vec4 FragColor;

void main()
{
  FragColor = vColor;
}
C++側
#include <iostream>

#include <Windows.h>
#include "prepare_shader.hpp"
#include <gl/GL.h>
#include <gl/GLU.h>
#include <gl/freeglut.h>

#pragma comment(lib,"glew32.lib")

//ウィンドウの幅と高さ
int width, height;

GLuint buf_points;
GLuint buf_colors;

GLfloat mproj[16];
GLfloat mmodel[16];
GLuint programID;
const char* vtxfile = "default.vert";
const char* fragfile = "default.frag";
const char* geomfile = "default.geom";
//! @brief プログラムのリンクを行う(geometryシェーダ使用時)。
//! @details ジオメトリシェーダがある場合はglLinkProgramの前に設定を行わなければいけない。
//! 別に関数を用意した方がわかりやすいのでここではこれを使う
GLSLCompileCond link_program_with_geometry(
    GLuint* ProgramID,
    GLuint vertexShaderID,
    GLuint geometryShaderID,
    GLuint fragmentShaderID,
    std::string* error = nullptr) {

    GLint Result = GL_FALSE;
    int InfoLogLength;

    ////////////////////////////////////////
    // プログラムをリンクします。
    *ProgramID = glCreateProgram();

    glAttachShader(*ProgramID, vertexShaderID);
    glAttachShader(*ProgramID, geometryShaderID);
    glAttachShader(*ProgramID, fragmentShaderID);


    ////////////////////////////////////////
    // ジオメトリシェーダを使うときの設定をここでする
    // この作業は glAttachShaderとglLinkProgramの間に入れる
    glProgramParameteri(*ProgramID, GL_GEOMETRY_VERTICES_OUT, 3);//ジオメトリシェーダからの最大出力頂点数
    glProgramParameteri(*ProgramID, GL_GEOMETRY_INPUT_TYPE, GL_POINTS);//ジオメトリシェーダには頂点が入力される
    glProgramParameteri(*ProgramID, GL_GEOMETRY_OUTPUT_TYPE, GL_POINTS);//ジオメトリシェーダからは頂点が出力される

    glLinkProgram(*ProgramID);

    ////////////////////////////////////////
    // プログラムをチェックします。
    glGetProgramiv(*ProgramID, GL_LINK_STATUS, &Result);
    glGetProgramiv(*ProgramID, GL_INFO_LOG_LENGTH, &InfoLogLength);
    std::vector<char> ProgramErrorMessage((std::max)(InfoLogLength, int(1)));
    glGetProgramInfoLog(*ProgramID, InfoLogLength, NULL, &ProgramErrorMessage[0]);

    if (error) {
        *error = &ProgramErrorMessage[0];

        return GLSLCompileCond::LINK_ERROR;
    }

    return GLSLCompileCond::SUCCESS;
}
void init() {

    std::vector<GLfloat> colors;
    std::vector<GLfloat> points;

    GLfloat v = 0.5;

    push_3(colors, 1, 0, 0);
    push_3(points, v, 0, 0);

    push_3(colors, 0, 1, 0);
    push_3(points, 0, v, 0);

    push_3(colors, 0, 0, 1);
    push_3(points, 0, 0, 0);

    prepare_buffer(&buf_points, points.data(), points.size() * sizeof(GLfloat), GL_STATIC_DRAW);
    prepare_buffer(&buf_colors, colors.data(), colors.size() * sizeof(GLfloat), GL_STATIC_DRAW);

    GLuint vtxShader;
    GLuint flagShader;
    GLuint geomShader;

    std::string verr;
    std::string ferr;
    std::string gerr;
    prepare_shader_byfile(&vtxShader, GL_VERTEX_SHADER, vtxfile, &verr);
    prepare_shader_byfile(&flagShader, GL_FRAGMENT_SHADER, fragfile, &ferr);
    prepare_shader_byfile(&geomShader, GL_GEOMETRY_SHADER, geomfile, &gerr);//ジオメトリシェーダのコンパイル

    std::cout << verr << std::endl;
    std::cout << ferr << std::endl;
    std::cout << gerr << std::endl;

    std::string linkerr;
    link_program_with_geometry(
        &programID,
        vtxShader,
        flagShader,
        geomShader,
        &linkerr
    );
    std::cout << linkerr << std::endl;


    loadidentity44(mproj);
    loadidentity44(mmodel);
}
//描画関数
void disp(void) {

    glViewport(0, 0, width, height);

    glClearColor(0.2, 0.2, 0.2, 1);
    glClear(GL_COLOR_BUFFER_BIT | GL_DEPTH_BUFFER_BIT);

    glUseProgram(programID);
    GLuint loc_ModelViewMatrix = glGetUniformLocation(programID, "ModelViewMatrix");
    GLuint loc_ProjectionMatrix = glGetUniformLocation(programID, "ProjectionMatrix");


    glUniformMatrix4fv(loc_ModelViewMatrix, 1, GL_FALSE, mmodel);
    glUniformMatrix4fv(loc_ProjectionMatrix, 1, GL_FALSE, mproj);

    {
        glEnable(GL_VERTEX_PROGRAM_POINT_SIZE);

        auto bindbufP = EnableAndBindFArrayBuffer(0, buf_points, 3, GL_FLOAT);
        auto bindbufC = EnableAndBindFArrayBuffer(1, buf_colors, 3, GL_FLOAT);

        glDrawArrays(GL_POINTS, 0,3);

    }
    glFlush();
}

//ウィンドウサイズの変化時に呼び出される
void reshape(int w, int h) {
    width = w; height = h;

    disp();
}

//エントリポイント
int main(int argc, char** argv)
{
    glutInit(&argc, argv);
    glutInitWindowPosition(100, 50);
    glutInitWindowSize(500, 500);
    glutInitDisplayMode(GLUT_SINGLE | GLUT_RGBA);

    glutCreateWindow("sample");
    glutDisplayFunc(disp);
    glutReshapeFunc(reshape);

    glewInit();

    init();

    glutMainLoop();

    return 0;
}
GLSLのシェーダ関係の処理を関数化(C++)
GLSLを使おうとすると何かとコードが長くなる。状況に合わせて細かい調整ができるところが魅力なのだが練習やテストで毎回書くのは大変なので使いまわせそうなところだけでも関数化しておきたい。
prepare_shader.hpp
#pragma once

#include <string>
#include <vector>
#include <fstream>
#include <sstream>
#include <algorithm>
#include <functional>

#include <gl/glew.h>
#pragma comment(lib,"glew32.lib")
enum class GLSLCompileCond {
    SUCCESS = 0,
    FILE_OPEN_ERROR = 1,
    COMPILE_ERROR = 2,
    LINK_ERROR = 3
};
//! @brief シェーダをソースコードからコンパイルする
//! @param [out] ShaderID 作成したシェーダのID
//! @param [in] shader_type GL_VERTEX_SHADER , GL_FRAGMENT_SHADER , GL_GEOMETRY_SHADER のいずれか
//! @param [in] sourcecode シェーダのソースコード
//! @param [out] error エラー出力先。エラーの内容を確認しないならnullptrを指定
GLSLCompileCond prepare_shader_bytext(
    GLuint* ShaderID,
    const GLenum shader_type,
    const char* sourcecode,
    std::string* error = nullptr) {

    //////////////////////////////////////////////
      // シェーダを作ります
      // (作るといっても宣言みたいなもの)
    *ShaderID = glCreateShader(shader_type);

    glShaderSource(*ShaderID, 1, &sourcecode, NULL);
    glCompileShader(*ShaderID);

    ////////////////////////////////////////////
    // エラーチェック
    GLint Result = GL_FALSE;
    int InfoLogLength;

    // 頂点シェーダをチェックします。
    glGetShaderiv(*ShaderID, GL_COMPILE_STATUS, &Result);
    glGetShaderiv(*ShaderID, GL_INFO_LOG_LENGTH, &InfoLogLength);
    if (Result == GL_FALSE) {
        if (error) {
            std::vector<char> ShaderErrorMessage(InfoLogLength);
            glGetShaderInfoLog(*ShaderID, InfoLogLength, NULL, &ShaderErrorMessage[0]);
            *error = &ShaderErrorMessage[0];
        }
        return GLSLCompileCond::COMPILE_ERROR;
    }

    return GLSLCompileCond::SUCCESS;
}
//! @brief ファイルからシェーダを読み込む
//! @param [out] ShaderID シェーダの出力先
//! @param [in] shader_type GL_VERTEX_SHADER , GL_FRAGMENT_SHADER , GL_GEOMETRY_SHADERのいずれか
//! @param [in] shader_file_path シェーダファイルのパス
//! @param [out] エラーメッセージ出力先
GLSLCompileCond prepare_shader_byfile(
    GLuint* ShaderID,
    const GLenum shader_type,
    const char* shader_file_path,
    std::string* error = nullptr) {


    ////////////////////////////////////////////
    // ファイルから頂点シェーダを読み込みます。
    // 注意 ここはSTLのifstreamとかstringstreamの使い方の話で、
    // OpenGL命令は一つも無い。
    std::string ShaderCodeText;
    std::ifstream fileinput(shader_file_path, std::ios::in);
    if (fileinput.is_open())
    {
        std::stringstream sstr;
        sstr << fileinput.rdbuf();
        ShaderCodeText = sstr.str();
        fileinput.close();
    }
    else {
        if(error)
            *error = "file open failed";
        return GLSLCompileCond::FILE_OPEN_ERROR;
    }
    ////////////////////////////////////////////
    // 頂点シェーダをコンパイルします。
    return prepare_shader_bytext(ShaderID,shader_type,ShaderCodeText.c_str(),error);

}
//! @brief シェーダをリンクする
//! @param [out] ProgramID プログラムIDの保存先
//! @param [in] ShaderIDs シェーダ一覧
//! @param [in] geometryprogramparameter ジオメトリシェーダの設定をする関数
//! @param [out] error エラーメッセージ出力先
//! @return エラー状態
GLSLCompileCond link_program(
    GLuint* ProgramID,
    const std::vector<GLuint> ShaderIDs,
    std::function<void(GLuint)> geometryprogramparameter,
    std::string* error = nullptr) {

    GLint Result = GL_FALSE;
    int InfoLogLength;

    ////////////////////////////////////////
    // プログラムをリンクします。
    *ProgramID = glCreateProgram();

    for (GLuint shader : ShaderIDs) {
        glAttachShader(*ProgramID, shader);
    }

    if(geometryprogramparameter)
        geometryprogramparameter(*ProgramID);

    glLinkProgram(*ProgramID);

    ////////////////////////////////////////
    // プログラムをチェックします。
    glGetProgramiv(*ProgramID, GL_LINK_STATUS, &Result);
    glGetProgramiv(*ProgramID, GL_INFO_LOG_LENGTH, &InfoLogLength);
    std::vector<char> ProgramErrorMessage((std::max)(InfoLogLength, int(1)));
    glGetProgramInfoLog(*ProgramID, InfoLogLength, NULL, &ProgramErrorMessage[0]);

    if (error) {
        *error = &ProgramErrorMessage[0];

        return GLSLCompileCond::LINK_ERROR;
    }

    return GLSLCompileCond::SUCCESS;
}
//! @brief データを転送
//! @param [in,out] buffer_name バッファ名へのポインタ
//! @param [in] data バッファの配列の先頭アドレス
//! @param [in] databytes データの大きさ
//! @param [in] usage GL_STATIC_DRAWまたはGL_DYNAMIC_DRAW
bool prepare_buffer(
    GLuint *buffer_name,
    const void* data,
    const size_t databytes,
    const GLenum usage
    ) {

    if (*buffer_name == 0) {
        glGenBuffers(1, buffer_name);
    }
    else {
        glDeleteBuffers(1, buffer_name);
        *buffer_name = 0;
        glGenBuffers(1, buffer_name);
    }
    if (*buffer_name != 0) {
        glBindBuffer(GL_ARRAY_BUFFER, *buffer_name);
        glBufferData(
            GL_ARRAY_BUFFER,
            databytes,
            data,
            usage);
        return true;
    }
    return false;

}
class EnableAndBindFArrayBuffer {
    GLuint m_layout;
public:
    //! @brief バッファを有効にする
    //! @param [in] layout
    //! @param [in] buffername
    //! @param [in] element_count
    //! @param [in] datatype
    //! @param [in] normalized
    //! @param [in] stride
    //! @param [in] offset
    EnableAndBindFArrayBuffer(
        const GLuint layout,
        const GLuint buffername,
        const GLuint element_count,
        const GLenum datatype,
        const GLboolean normalized = false,
        const GLsizei stride = 0,
        const void* offset = nullptr
    ) {
        glEnableVertexAttribArray(layout);
        glBindBuffer(GL_ARRAY_BUFFER, buffername);
        glVertexAttribPointer(
            layout,
            element_count,
            datatype,
            normalized,
            stride,
            offset
        );
        m_layout = layout;
    }

    //! @brief デストラクタで終了処理
    ~EnableAndBindFArrayBuffer() {
        glDisableVertexAttribArray(m_layout);
    }
};
//! @brief コンテナにデータをpush_backする(4要素)
template<typename Container>
void push_4(
    Container& container,
    const typename Container::value_type a,
    const typename Container::value_type b,
    const typename Container::value_type c,
    const typename Container::value_type d) {
    container.push_back(a);
    container.push_back(b);
    container.push_back(c);
    container.push_back(d);
}

//! @brief コンテナにデータをpush_backする(3要素)
template<typename Container>
void push_3(
    Container& container,
    const typename Container::value_type a,
    const typename Container::value_type b,
    const typename Container::value_type c) {
    container.push_back(a);
    container.push_back(b);
    container.push_back(c);
}

//! @brief コンテナにデータをpush_backする(2要素)
template<typename Container>
void push_2(
    Container& container,
    const typename Container::value_type a,
    const typename Container::value_type b
    ) {
    container.push_back(a);
    container.push_back(b);
}
//! @brief 単位行列
//! @param [out] p 4x4行列
template<typename T>
void loadidentity44(T& p) {
    p[0] = 1;
    p[1] = 0;
    p[2] = 0;
    p[3] = 0;

    p[4] = 0;
    p[5] = 1;
    p[6] = 0;
    p[7] = 0;

    p[8] = 0;
    p[9] = 0;
    p[10] = 1;
    p[11] = 0;

    p[12] = 0;
    p[13] = 0;
    p[14] = 0;
    p[15] = 1;
}
使い方
main.cpp
#include <iostream>

#include <Windows.h>
#include "prepare_shader.hpp"
#include <gl/GL.h>
#include <gl/GLU.h>
#include <gl/freeglut.h>

#pragma comment(lib,"glew32.lib")

//ウィンドウの幅と高さ
int width, height;

GLuint buf_points;
GLuint buf_colors;

GLfloat mproj[16];
GLfloat mmodel[16];
GLuint programID;
const char* vtxfile = "default.vert";
const char* fragfile = "default.frag";
// シェーダとデータの設定
void init() {

    std::vector<GLfloat> colors;
    std::vector<GLfloat> points;

    GLfloat v = 0.8;

    push_3(colors, 0, 0, 1);//色 RGB
    push_3(points, 0, 0, 0);//座標 XYZ

    push_3(colors, 0, 1, 0);
    push_3(points, 0, v, 0);

    push_3(colors, 1, 0, 0);
    push_3(points, v, 0, 0);

    prepare_buffer(&buf_points, points.data(), points.size() * sizeof(GLfloat), GL_STATIC_DRAW);
    prepare_buffer(&buf_colors, colors.data(), colors.size() * sizeof(GLfloat), GL_STATIC_DRAW);

    GLuint vtxShader;
    GLuint flagShader;

    std::string verr;
    std::string ferr;
    prepare_shader_byfile(&vtxShader, GL_VERTEX_SHADER, vtxfile, &verr);
    prepare_shader_byfile(&flagShader, GL_FRAGMENT_SHADER, fragfile, &ferr);

    std::cout << verr << std::endl;
    std::cout << ferr << std::endl;

    std::string linkerr;
    link_program(&programID, { vtxShader ,flagShader }, nullptr, &linkerr);

    loadidentity44(mproj);
    loadidentity44(mmodel);
}
//描画関数
void disp(void) {

    glViewport(0, 0, width, height);

    glClearColor(0.2, 0.2, 0.2, 1);
    glClear(GL_COLOR_BUFFER_BIT | GL_DEPTH_BUFFER_BIT);

    glUseProgram(programID);
    GLuint loc_ModelViewMatrix = glGetUniformLocation(programID, "ModelViewMatrix");
    GLuint loc_ProjectionMatrix = glGetUniformLocation(programID, "ProjectionMatrix");


    glUniformMatrix4fv(loc_ModelViewMatrix, 1, GL_FALSE, mmodel);
    glUniformMatrix4fv(loc_ProjectionMatrix, 1, GL_FALSE, mproj);

    {
        glEnable(GL_VERTEX_PROGRAM_POINT_SIZE);

        auto bindbufP = EnableAndBindFArrayBuffer(0, buf_points, 3, GL_FLOAT);
        auto bindbufC = EnableAndBindFArrayBuffer(1, buf_colors, 3, GL_FLOAT);

        glDrawArrays(GL_POINTS, 0,3);

    }
    glFlush();
}
//ウィンドウサイズの変化時に呼び出される
void reshape(int w, int h) {
    width = w; height = h;

    disp();
}

//エントリポイント
int main(int argc, char** argv)
{
    glutInit(&argc, argv);
    glutInitWindowPosition(100, 50);
    glutInitWindowSize(500, 500);
    glutInitDisplayMode(GLUT_SINGLE | GLUT_RGBA);

    glutCreateWindow("sample");
    glutDisplayFunc(disp);
    glutReshapeFunc(reshape);

    glewInit();

    init();

    glutMainLoop();

    return 0;
}
default.vert
#version 460 core

layout (location = 0) in vec3 coord;
layout (location = 1) in vec3 incolor;

out vec4 vColor;

uniform mat4 ModelViewMatrix;
uniform mat4 ProjectionMatrix;

void main()
{
  gl_Position = ProjectionMatrix * ModelViewMatrix * vec4(coord, 1.0);
  vColor = vec4(incolor, 1.0);
  gl_PointSize=30.0;
}
default.frag
#version 460 core

in vec4 vColor;

out vec4 FragColor;

void main()
{
  FragColor = vColor;
}
std::vectorもstd::arrayもローカル変数の型として同じように扱うためにresizeの呼び出しを切り替える
問題
以下のようなcopy関数を作りたい場合、テンプレート引数Tがarrayの時はresizeできない一方で、vectorの時はresizeしなければならない。
これを同じように扱えるようにしたい。具体的にはresize関数の有無で処理を分けたい。
#include <iostream>

#include <vector>
#include <array>
template<typename T>
T copy(T& data) {

  T tmp;

  // vectorの時はresizeしないと要素数 0 で落ちる
  // arrayの時はresizeが存在しないのでコンパイルできない
  //tmp.resize(3);

  tmp[0] = data[0];
  tmp[1] = data[1];
  tmp[2] = data[2];

  return tmp;
}
int main()
{

  std::vector<float> vec{ 1.0f,1.0f,1.0f };
  std::array<float, 3> ary{ 2.0f,2.0f,2.0f };

  auto dup_vec = copy(vec); //これをしたい時はresizeを有効に
  auto dup_ary = copy(ary); //これをしたい時はresizeを無効に

  printf("%lf %lf %lf\n", dup_vec[0], dup_vec[1], dup_vec[2]);
  printf("%lf %lf %lf\n", dup_ary[0], dup_ary[1], dup_ary[2]);

  getchar();

}
解決
やっていることはメンバ関数resizeの存在の判定をして構造体を切り替えているだけ。
has_resize.hpp
#include <type_traits>

namespace szl {

  struct has_resize_impl {
    // Tにresizeメンバ関数がある場合はこちらが有効(実体化はしない)
    // 戻り値がstd::true_typeの関数宣言
    template<typename T>
    static auto check_has_resize (T& o)
      ->decltype(
        o.resize(0),
        std::true_type()
      );
    // Tにresizeがない場合はこちらが有効(実体化はしない)
    // 戻り値がstd::false_typeの関数宣言
    static auto check_has_resize(...)
      ->decltype(
        std::false_type()
      );
  };

  //プライマリテンプレート
  template<typename T>
  struct _myresize_;
  //! @brief resizeがある場合呼び出される
  template<>
  struct _myresize_<std::true_type> {
    template<typename T>
    static void resize_func(T& t, const size_t size) {
      if (size > t.size()) {
        t.resize(size);
      }
    }
  };
  //!j @brief resizeがない場合に呼び出される。何もしない。
  template<>
  struct _myresize_<std::false_type> {
    template<typename T>
    static void resize_func(T& t, const size_t size) {
    }
  };
  //! @brief resize関数があるオブジェクトに対してのみresizeを実行する
  //! @param [in,out] obj 配列型のオブジェクト
  //! @param [in]
  template<typename T>
  void resize_if_needed(T& obj, const size_t size) {

    // resizeを持つオブジェクトなら std::true_type
    // resizeを持たないオブジェクトなら std::false_type
    using type = decltype(has_resize_impl::check_has_resize(obj));

    // resizeあり/なしバージョンの関数を呼び出す
    _myresize_<type>::resize_func(obj, size);
  }
}
copy_generalの実装と使い方
#include <iostream>

#include <vector>
#include <array>

#include"has_resize.hpp"
template<typename T>
T copy_general(T& data) {

  T tmp;

  //型に応じてresizeをする関数としない関数を切り替える
  szl::resize_if_needed(tmp, 3);

  tmp[0] = data[0];
  tmp[1] = data[1];
  tmp[2] = data[2];

  return tmp;
}
int main()
{

  std::vector<float> vec{ 1.0f,1.0f,1.0f };
  std::array<float, 3> ary{ 2.0f,2.0f,2.0f };

  auto dup_vec = copy_general(vec);
  auto dup_ary = copy_general(ary);

  printf("%lf %lf %lf\n", dup_vec[0], dup_vec[1], dup_vec[2]);
  printf("%lf %lf %lf\n", dup_ary[0], dup_ary[1], dup_ary[2]);

  getchar();

}
JP Procedural Stylized Rocks Tutorial [Blender 2.8] を試す(2)
作業
1. 3D View上での表示を変更する。
2.変形
Editモードに入り、ループカット(Ctrl+R)で切れ目を入れ、Z方向に4だけ移動する。底面を選択し縮小した後、Editモードを抜ける。
3.モディファイアを適用する領域を設定
VertexGroupの作成
[a]で全ての頂点を選択し、[+]ボタンでVertexGroupを作成し名前を「Deform」として[Assign]する。

モディファイアにVertexGroupを指定
4.モディファイアを適用しない領域を指定
現在、"Deform"グループには全ての頂点が登録されているので、「グループから除外したい頂点を選択し」[Remove]ボタンを押す。
5.他のオブジェクトにモディファイアをコピー
モディファイアが多いので他のオブジェクトを用意しモディファイア群だけを複製する。
「①新しいモデル」「②Rockのモディファイア群を設定したモデル」の順番に選択し、[Ctrl+L]→Modifiresを選択しコピーする。
JP Procedural Stylized Rocks Tutorial [Blender 2.8] を試す(1)
なおここではBlender 2.90で試す。
手順
Step.0 [Edit]モードへ行き、初期のCubeを5倍にする。
以降、以下のようにモディファイア(とObject Data Properties)を編集していく。
Step.1 Subdivision Surfaceモディファイア
Step.2 Displaceモディファイア(一つ目)

BaseDisplacementNoiseテクスチャを以下のように設定
Step.3 Displaceモディファイア(二つ目)
SecondaryDisplacementNoiseテクスチャを設定。殆どBaseDisplacementNoiseと同じで、sizeを3.0に変更する
Step.4 Decimateモディファイア(一つ目)
Step.5 Decimateモディファイア(二つ目)
Step.6 ObjectDataProperties

Step.7 Smoothモディファイア
Step.8 Bevelモディファイア
Step.9 WeightNormal
これは追加するだけで、パラメータの変更はしない。
Step.10 Triangulate
続き
形状はこれで(ほぼ)完了。めずらしくチュートリアルに極めて近い物ができた。次回は残っているライティングとかもやってみる。
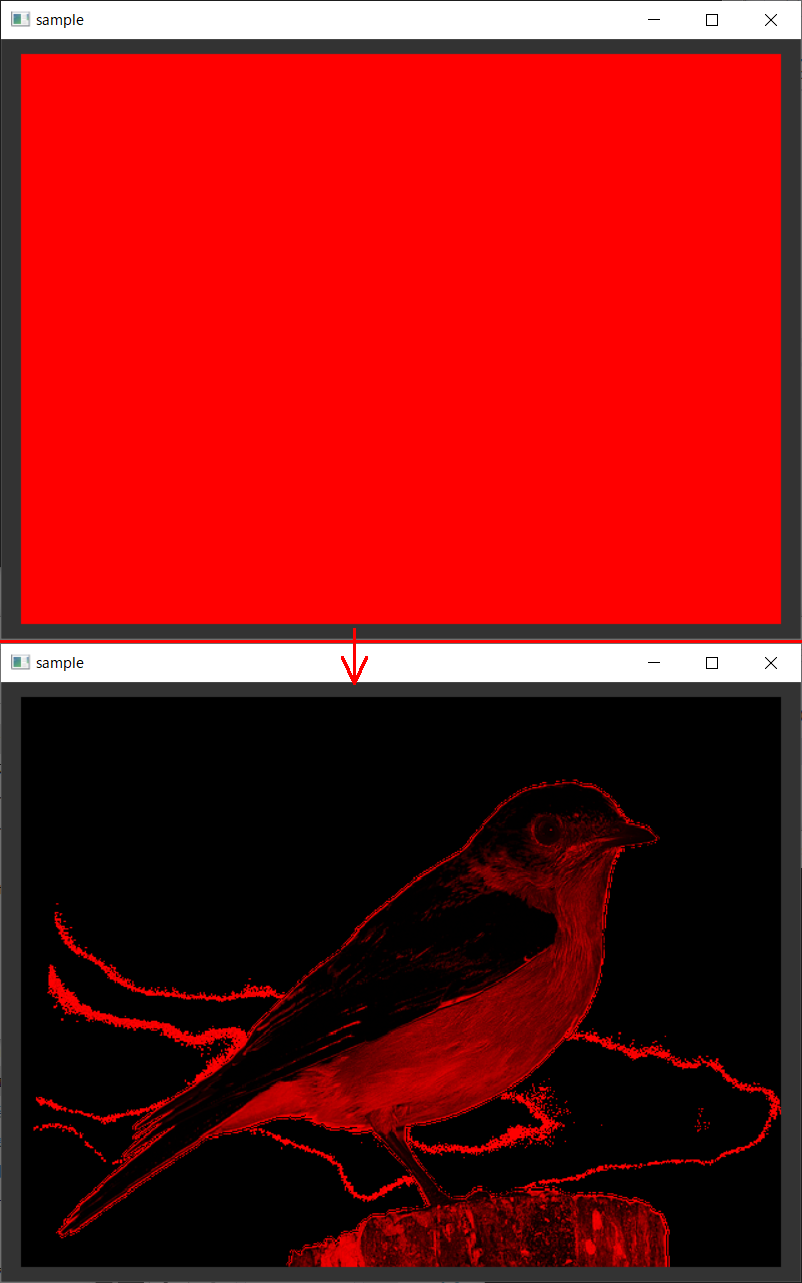
glActiveTextureでテクスチャの下地の色をテクスチャで設定
glColor3dで下地の色を設定
テクスチャはポリゴンに貼るが、そのポリゴンの色が何色かで張り付けた結果に違いが出る。
以下は、テクスチャを一枚用意し、それをglColor3dでポリゴンの色を指定した上に張り付けた結果。
//描画関数
void disp(void) {

    glViewport(0, 0, winwidth, winheight);

    glClearColor(0.2, 0.2, 0.2, 1);
    glClear(GL_COLOR_BUFFER_BIT | GL_DEPTH_BUFFER_BIT);

    glEnable(GL_CULL_FACE);
    double v = 0.95;
    //下地の色を設定
    glColor3d(1, 0, 0);
    //テクスチャを有効化
    glBindTexture(GL_TEXTURE_2D, texname);
    glEnable(GL_TEXTURE_2D);
    glBegin(GL_QUADS);

    glTexCoord2d(0, 1);
    glVertex2d(-v, -v);

    glTexCoord2d(1, 1);
    glVertex2d(v, -v);

    glTexCoord2d(1, 0);
    glVertex2d(v, v);

    glTexCoord2d(0, 0);
    glVertex2d(-v, v);

    glEnd();
    glFlush();
}

glActiveTexture
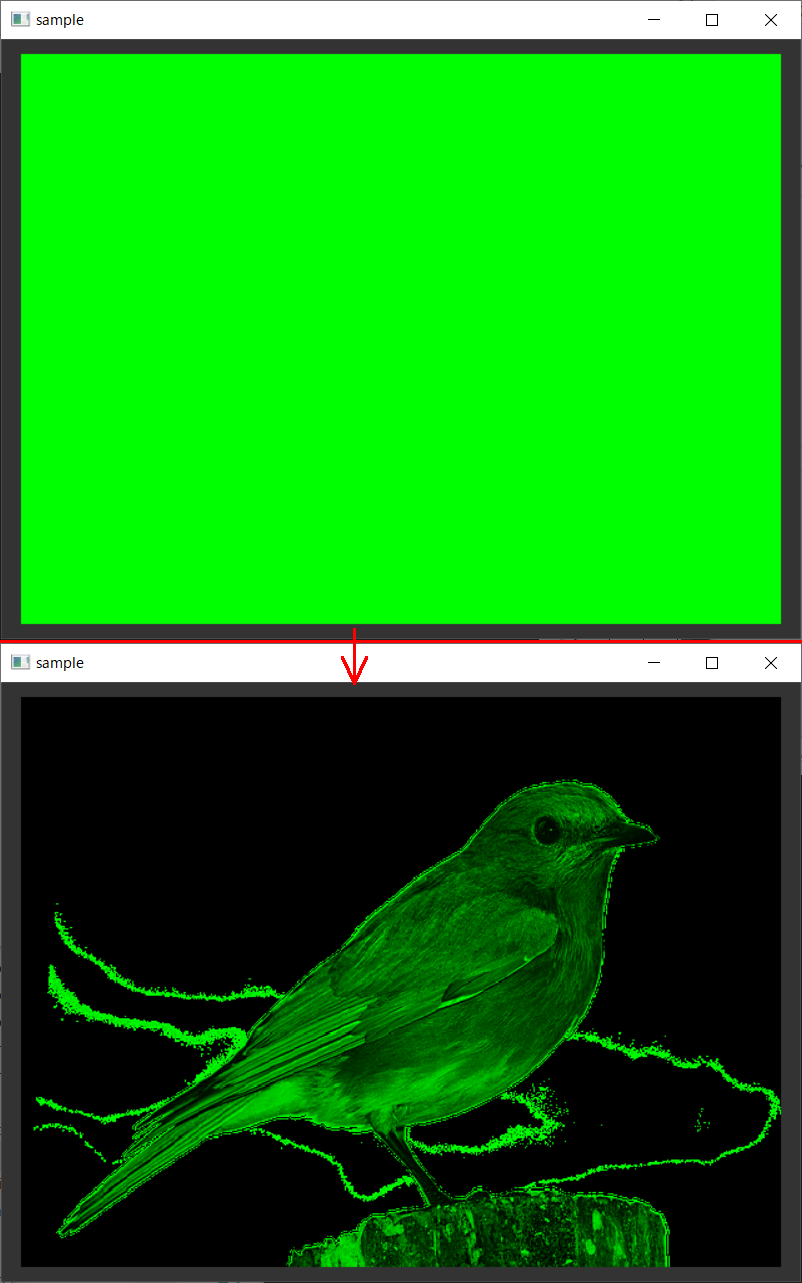
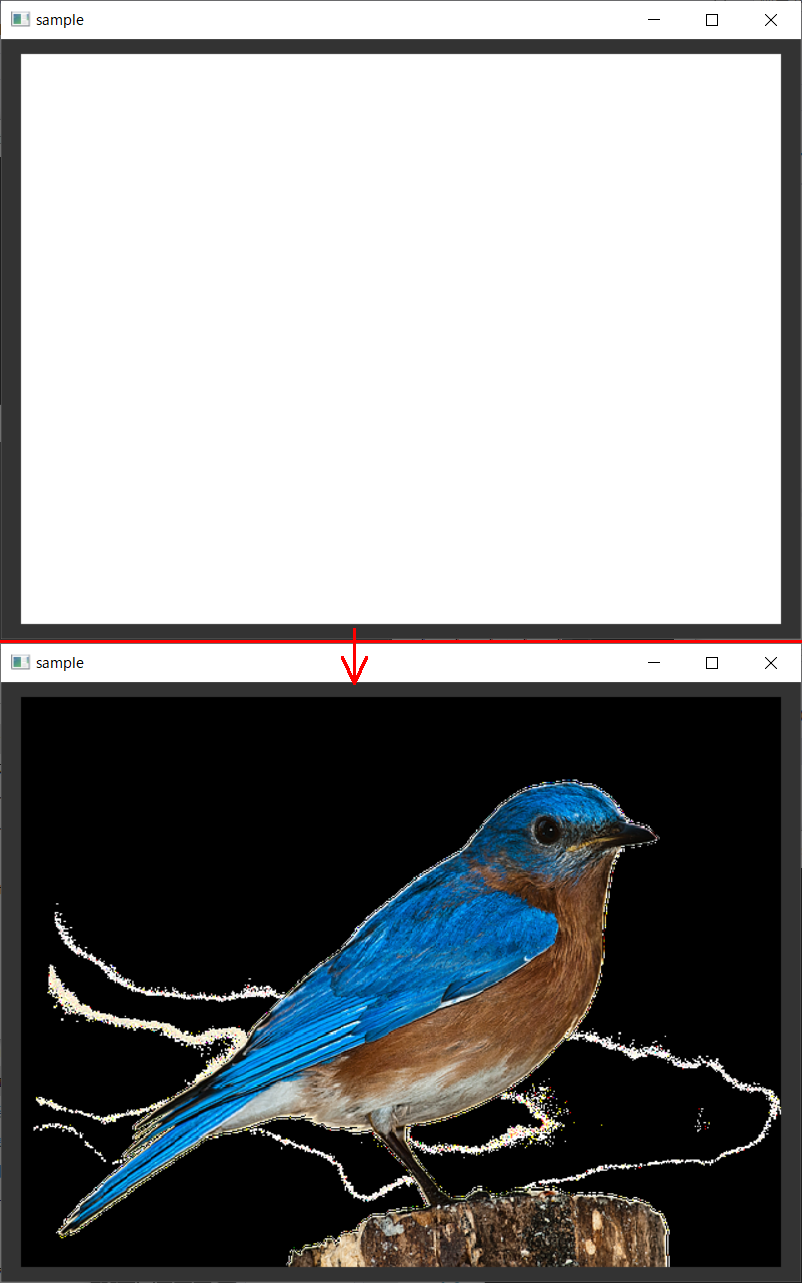
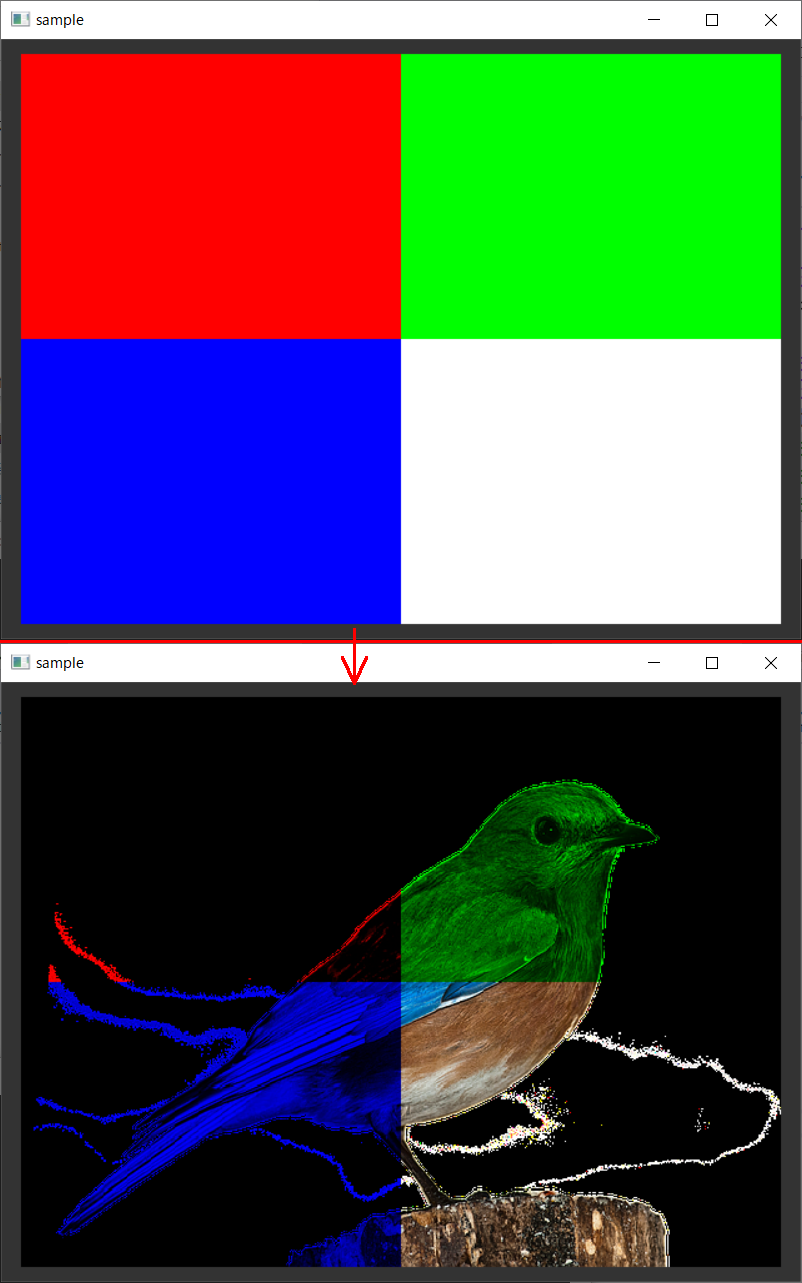
glActiveTextureを使うと、下地の色用のテクスチャと、張り付けたい画像のテクスチャを同時に指定できる。「同時に指定できる」とはつまり、普通glBindTextureを一度実行したらほかのテクスチャは無効になるが、glActiveTextureを使えば二つのglBindTextureを有効にできるという意味。
OpenGLにはテクスチャスロットのような概念がある。
glActiveTexture(GL_TEXTURE0);
で、「これからスロット名"GL_TEXTURE0"の設定をする」という意味になる。
そして、一つのスロットで一度に使えるテクスチャは一枚だけで、これは「最後にglBindTextureで指定したテクスチャ」だが、一度に複数のスロットを使えるので、各スロットで glEnable(GL_TEXTURE_2D)でそのスロットを有効にしてやれば、テクスチャを複数使うことができる。
#include <iostream>

#include <Windows.h>
#include <gl/glew.h>// glActiveTextureに必要
#include <gl/GL.h>
#include <gl/GLU.h>
#include <gl/freeglut.h>

#pragma comment(lib,"glew32.lib")

#define STB_IMAGE_IMPLEMENTATION
#include "stb_image.h"

// freeglut:
// http://freeglut.sourceforge.net/

//ウィンドウの幅と高さ
int winwidth, winheight;


GLuint texname_img;
GLuint texname_block;
//下地用のテクスチャ
void init_tex_block() {

    unsigned char pixels[] = {
        255,  0,  0,
          0,255,  0,
          0,  0,255,
        255,255,255
    };

    glGenTextures(1, &texname_block);
    glActiveTexture(GL_TEXTURE0);
    glBindTexture(GL_TEXTURE_2D, texname_block);
    glPixelStorei(GL_UNPACK_ALIGNMENT, 1);
    glTexParameteri(GL_TEXTURE_2D, GL_TEXTURE_MAG_FILTER, GL_NEAREST);
    glTexParameteri(GL_TEXTURE_2D, GL_TEXTURE_MIN_FILTER, GL_NEAREST);

    glTexImage2D(
        GL_TEXTURE_2D, 0, GL_RGB, 2, 2,
        0, GL_RGB, GL_UNSIGNED_BYTE, pixels
    );
}
//画像読み込み,テクスチャとしてロード
//pngの読み込みに STBライブラリを使用
//https://suzulang.com/stb-library-image-read/
//https://github.com/nothings/stb
void init_tex_img()
{
    unsigned char* pixels;
    int bpp;
    int imgwidth;
    int imgheight;

    // ファイルを読み込み、画像データを取り出す
    //   最後の引数でピクセルあたりのバイト数を強制できる
    pixels = stbi_load(R"(C:\Users\szl\Desktop\bird-1232416_640.png)", &imgwidth, &imgheight, &bpp, 0);

    glGenTextures(1, &texname_img);
    glActiveTexture(GL_TEXTURE1);
    glBindTexture(GL_TEXTURE_2D, texname_img);
    glPixelStorei(GL_UNPACK_ALIGNMENT, 4);
    glTexParameteri(GL_TEXTURE_2D, GL_TEXTURE_MAG_FILTER, GL_NEAREST);
    glTexParameteri(GL_TEXTURE_2D, GL_TEXTURE_MIN_FILTER, GL_NEAREST);

    glTexImage2D(
        GL_TEXTURE_2D, 0, GL_RGBA, imgwidth, imgheight,
        0, GL_RGBA, GL_UNSIGNED_BYTE, pixels
    );


    // メモリ上の画像データを破棄
    stbi_image_free(pixels);


}
//描画関数
void disp(void) {

    glViewport(0, 0, winwidth, winheight);

    glClearColor(0.2, 0.2, 0.2, 1);
    glClear(GL_COLOR_BUFFER_BIT | GL_DEPTH_BUFFER_BIT);

    glEnable(GL_CULL_FACE);
    double v = 0.95;
    glActiveTexture(GL_TEXTURE0);
    glEnable(GL_TEXTURE_2D);
    glBindTexture(GL_TEXTURE_2D,texname_block);
    glActiveTexture(GL_TEXTURE1);
    glEnable(GL_TEXTURE_2D);
    glBindTexture(GL_TEXTURE_2D, texname_img);
    glBegin(GL_QUADS);
    glMultiTexCoord2f(GL_TEXTURE0, 0, 1);
    glMultiTexCoord2f(GL_TEXTURE1, 0, 1);
    glVertex2d(-v, -v);

    glMultiTexCoord2f(GL_TEXTURE0, 1, 1);
    glMultiTexCoord2f(GL_TEXTURE1, 1, 1);
    glVertex2d(v, -v);

    glMultiTexCoord2f(GL_TEXTURE0, 1, 0);
    glMultiTexCoord2f(GL_TEXTURE1, 1, 0);
    glVertex2d(v, v);

    glMultiTexCoord2f(GL_TEXTURE0, 0, 0);
    glMultiTexCoord2f(GL_TEXTURE1, 0, 0);
    glVertex2d(-v, v);

    glEnd();

    glActiveTexture(GL_TEXTURE1);
    glDisable(GL_TEXTURE_2D);
    glActiveTexture(GL_TEXTURE0);
    glDisable(GL_TEXTURE_2D);


    glFlush();
}

//ウィンドウサイズの変化時に呼び出される
void reshape(int w, int h) {
    winwidth = w;
    winheight = h;

    disp();
}


//エントリポイント
int main(int argc, char** argv)
{
    glutInit(&argc, argv);
    glutInitWindowPosition(100, 50);
    glutInitWindowSize(640, 480);
    glutInitDisplayMode(GLUT_SINGLE | GLUT_RGBA);
    glutCreateWindow("sample");
    glutDisplayFunc(disp);
    glutReshapeFunc(reshape);

    glewInit();

    init_tex_img();
    init_tex_block();

    glutMainLoop();

    return 0;
}
OpenGLで裏面と表面で別の色を指定する
glMaterialfvで着色する場合、第一引数にGL_FRONTかGL_BACKを指定して切り替える
glColor3fで着色する場合、カリングを使い裏面のみ描画、表面のみ描画を切り替えて二回レンダリングする。
ポリゴン描画関数本体
  //ポリゴンを描画
  void render() {
    float v = 0.7;
    glBegin(GL_QUADS);

    glVertex3f(-v, -v, 0.0);

    glVertex3f(v, -v, 0.0);

    glVertex3f(v, v, 0.0);

    glVertex3f(-v, v, 0.0);
    glEnd();

  }
glColor3*で描画
  void draw_by_color() {
    glEnable(GL_CULL_FACE);//カリングを有効化

    glCullFace(GL_FRONT);
    glColor4f(1, 0, 0, 1);
    render();

    glCullFace(GL_BACK);
    glColor4f(0, 1, 0, 1);
    render();

  }
glMaterialfvで描画
void draw_by_material() {
  glEnable(GL_LIGHTING);
  glEnable(GL_LIGHT0);

  GLfloat white[4]{ 1,1,1,1 };
  GLfloat red[4]{ 1,0,0,1 };
  GLfloat green[4]{ 0,1,0,1 };

  GLfloat pos[4]{ 0,0,0,1 };

  glLightModeli(GL_LIGHT_MODEL_TWO_SIDE, 1);//両面に光を当てる
  glLightfv(GL_LIGHT0, GL_POSITION, pos);//ライト位置設定
  glLightfv(GL_LIGHT0, GL_AMBIENT, white);//環境光色設定

  glMaterialfv(GL_FRONT, GL_AMBIENT, red);//表面の材質
  glMaterialfv(GL_BACK, GL_AMBIENT, green);//裏面の材質

  render();//オブジェクトのレンダリング

  glDisable(GL_LIGHTING);
  glDisable(GL_LIGHT0);
}
描画関数呼び出し
  void draw()
  {

    /////////////////////
    // 描画
    glViewport(0, 0, width, height);

    glClearColor(0.3, 0.3, 0.3, 1);
    glClear(GL_COLOR_BUFFER_BIT);


    Sleep(1);
    angle++;

    glPushMatrix();
    glRotated(angle, 1, 0, 0);

    //draw_by_color();//この二つの関数切り替え
    draw_by_material();

    glPopMatrix();
    //
    /////////////////////

    glFlush();
    glfwSwapBuffers(_window);

  }