C++でモデルを表示するためのコードをBlender Pythonから出力する。
試験的なプログラムを書くだけでいちいちモデルを読み込むライブラリを使うのが面倒なので、Blender PythonでC++OpenGLのコードをprintする。まだやってなかったっけという感じなんだがやっていたら申し訳ない。
import bpy
import sys

def as_cpp_array(outputto):
    obj = bpy.context.active_object

    mesh = obj.data

    pvecname = "points"   # 頂点データの配列の変数名
    vnvecname = "vnorms"  # 頂点法線の配列の変数名
    fvecname = "faces"    # 面データの配列の変数名
    fnvecname = "fnorms"  # 面法線の配列の変数名

    print("/////////////////////////////////////")

    if not pvecname is None:
        print("//std::vector<std::array<float, 3> > ",pvecname,";",file=outputto)

    if not vnvecname  is None:
        print("//std::vector<std::array<float, 3> > ",vnvecname,";",file=outputto)

    if not fvecname  is None:
        print("//std::vector<std::array<int, 3> > ",fvecname,";",file=outputto)

    if not fnvecname  is None:
        print("//std::vector<std::array<float, 3> > ",fnvecname,";",file=outputto)


    if not pvecname is None:
        for v in mesh.vertices:
            print(
                pvecname +
                ".push_back({",
                v.co.x,",",
                v.co.y,",",
                v.co.z,
                "});",
                file=outputto
                )

    if not vnvecname is None:
        for v in mesh.vertices:
            print(
                vnvecname +
                ".push_back({",
                v.normal.x,",",
                v.normal.y,",",
                v.normal.z,
                "});",
                file=outputto
                )


    if not fvecname is None:
        for f in mesh.polygons:
            print(
                fvecname +
                ".push_back({",
                f.vertices[0],",",
                f.vertices[1],",",
                f.vertices[2],
                "});",
                file=outputto
                )

    if not fnvecname is None:
        for f in mesh.polygons:
            print(
                fnvecname +
                ".push_back({",
                f.normal.x,",",
                f.normal.y,",",
                f.normal.z,
                "});",
                file=outputto
                )


as_cpp_array(sys.stdout)
これをactive_objectに対して走らせると、例えば以下のような結果が得られる。
/////////////////////////////////////
//std::vector<std::array<float, 3> > points ;
//std::vector<std::array<float, 3> > vnorms ;
//std::vector<std::array<int, 3> > faces ;
//std::vector<std::array<float, 3> > fnorms ;
points.push_back({ 0.0 , 0.0 , -0.57135009765625 });
points.push_back({ 0.4134289026260376 , -0.3003701865673065 , -0.25551632046699524 });
points.push_back({ -0.15791259706020355 , -0.4860132336616516 , -0.25551632046699524 });
points.push_back({ -0.5110297799110413 , 0.0 , -0.25551632046699524 });
points.push_back({ -0.15791259706020355 , 0.4860132336616516 , -0.25551632046699524 });
points.push_back({ 0.4134289026260376 , 0.3003701865673065 , -0.25551632046699524 });
points.push_back({ 0.15791259706020355 , -0.4860132336616516 , 0.25551632046699524 });
points.push_back({ -0.4134289026260376 , -0.3003701865673065 , 0.25551632046699524 });
points.push_back({ -0.4134289026260376 , 0.3003701865673065 , 0.25551632046699524 });
points.push_back({ 0.15791259706020355 , 0.4860132336616516 , 0.25551632046699524 });
points.push_back({ 0.5110297799110413 , 0.0 , 0.25551632046699524 });
points.push_back({ 0.0 , 0.0 , 0.57135009765625 });
vnorms.push_back({ 0.0 , 0.0 , -1.0 });
vnorms.push_back({ 0.7235938310623169 , -0.5257118344306946 , -0.44718772172927856 });
vnorms.push_back({ -0.2763756215572357 , -0.8506424427032471 , -0.44718772172927856 });
vnorms.push_back({ -0.8944059610366821 , 0.0 , -0.44718772172927856 });
vnorms.push_back({ -0.2763756215572357 , 0.8506424427032471 , -0.44718772172927856 });
vnorms.push_back({ 0.7235938310623169 , 0.5257118344306946 , -0.44718772172927856 });
vnorms.push_back({ 0.2763756215572357 , -0.8506424427032471 , 0.44718772172927856 });
vnorms.push_back({ -0.7235938310623169 , -0.5257118344306946 , 0.44718772172927856 });
vnorms.push_back({ -0.7235938310623169 , 0.5257118344306946 , 0.44718772172927856 });
vnorms.push_back({ 0.2763756215572357 , 0.8506424427032471 , 0.44718772172927856 });
vnorms.push_back({ 0.8944059610366821 , 0.0 , 0.44718772172927856 });
vnorms.push_back({ 0.0 , 0.0 , 1.0 });
faces.push_back({ 0 , 1 , 2 });
faces.push_back({ 1 , 0 , 5 });
faces.push_back({ 0 , 2 , 3 });
faces.push_back({ 0 , 3 , 4 });
faces.push_back({ 0 , 4 , 5 });
faces.push_back({ 1 , 5 , 10 });
faces.push_back({ 2 , 1 , 6 });
faces.push_back({ 3 , 2 , 7 });
faces.push_back({ 4 , 3 , 8 });
faces.push_back({ 5 , 4 , 9 });
faces.push_back({ 1 , 10 , 6 });
faces.push_back({ 2 , 6 , 7 });
faces.push_back({ 3 , 7 , 8 });
faces.push_back({ 4 , 8 , 9 });
faces.push_back({ 5 , 9 , 10 });
faces.push_back({ 6 , 10 , 11 });
faces.push_back({ 7 , 6 , 11 });
faces.push_back({ 8 , 7 , 11 });
faces.push_back({ 9 , 8 , 11 });
faces.push_back({ 10 , 9 , 11 });
fnorms.push_back({ 0.18759654462337494 , -0.5773536562919617 , -0.7946510910987854 });
fnorms.push_back({ 0.6070646643638611 , 0.0 , -0.7946524620056152 });
fnorms.push_back({ -0.4911220967769623 , -0.35682904720306396 , -0.7946522235870361 });
fnorms.push_back({ -0.4911220967769623 , 0.35682904720306396 , -0.7946522235870361 });
fnorms.push_back({ 0.18759654462337494 , 0.5773536562919617 , -0.7946510910987854 });
fnorms.push_back({ 0.9822461009025574 , 0.0 , -0.18759679794311523 });
fnorms.push_back({ 0.3035355508327484 , -0.9341715574264526 , -0.1875891536474228 });
fnorms.push_back({ -0.7946491241455078 , -0.5773593187332153 , -0.1875869631767273 });
fnorms.push_back({ -0.7946491241455078 , 0.5773593187332153 , -0.1875869780778885 });
fnorms.push_back({ 0.3035355508327484 , 0.9341715574264526 , -0.1875891238451004 });
fnorms.push_back({ 0.7946491241455078 , -0.5773593187332153 , 0.1875869780778885 });
fnorms.push_back({ -0.3035355508327484 , -0.9341715574264526 , 0.1875891238451004 });
fnorms.push_back({ -0.9822461009025574 , 0.0 , 0.18759679794311523 });
fnorms.push_back({ -0.3035355508327484 , 0.9341715574264526 , 0.1875891536474228 });
fnorms.push_back({ 0.7946491241455078 , 0.5773593187332153 , 0.1875869631767273 });
fnorms.push_back({ 0.4911220967769623 , -0.35682904720306396 , 0.7946522235870361 });
fnorms.push_back({ -0.18759654462337494 , -0.5773536562919617 , 0.7946510910987854 });
fnorms.push_back({ -0.6070646643638611 , 0.0 , 0.7946524620056152 });
fnorms.push_back({ -0.18759654462337494 , 0.5773536562919617 , 0.7946510910987854 });
fnorms.push_back({ 0.4911220967769623 , 0.35682904720306396 , 0.7946522235870361 });
これをC++で書いたOpenGLの表示コードに貼り付ける。
#include <iostream>
#include <cstdlib>

#include <Windows.h>
#include <gl/GL.h>
#include <gl/glfw/glfw3.h>

#pragma comment(lib,"opengl32.lib")
#pragma comment(lib,"glfw3.lib")

#include <gl/GLU.h>
#pragma comment(lib,"glu32.lib")

#include<vector>
#include<array>
struct d3item {
  std::vector<std::array<float, 3> >  points;
  std::vector<std::array<float, 3> >  vnorms;
  std::vector<std::array<int, 3> >  faces;
  std::vector<std::array<float, 3> >  fnorms;

public:
  void init() {

    points.push_back({ 0.0 , 0.0 , -0.57135009765625 });
    points.push_back({ 0.4134289026260376 , -0.3003701865673065 , -0.25551632046699524 });
    points.push_back({ -0.15791259706020355 , -0.4860132336616516 , -0.25551632046699524 });
    points.push_back({ -0.5110297799110413 , 0.0 , -0.25551632046699524 });
    points.push_back({ -0.15791259706020355 , 0.4860132336616516 , -0.25551632046699524 });
    points.push_back({ 0.4134289026260376 , 0.3003701865673065 , -0.25551632046699524 });
    points.push_back({ 0.15791259706020355 , -0.4860132336616516 , 0.25551632046699524 });
    points.push_back({ -0.4134289026260376 , -0.3003701865673065 , 0.25551632046699524 });
    points.push_back({ -0.4134289026260376 , 0.3003701865673065 , 0.25551632046699524 });
    points.push_back({ 0.15791259706020355 , 0.4860132336616516 , 0.25551632046699524 });
    points.push_back({ 0.5110297799110413 , 0.0 , 0.25551632046699524 });
    points.push_back({ 0.0 , 0.0 , 0.57135009765625 });
    vnorms.push_back({ 0.0 , 0.0 , -1.0 });
    vnorms.push_back({ 0.7235938310623169 , -0.5257118344306946 , -0.44718772172927856 });
    vnorms.push_back({ -0.2763756215572357 , -0.8506424427032471 , -0.44718772172927856 });
    vnorms.push_back({ -0.8944059610366821 , 0.0 , -0.44718772172927856 });
    vnorms.push_back({ -0.2763756215572357 , 0.8506424427032471 , -0.44718772172927856 });
    vnorms.push_back({ 0.7235938310623169 , 0.5257118344306946 , -0.44718772172927856 });
    vnorms.push_back({ 0.2763756215572357 , -0.8506424427032471 , 0.44718772172927856 });
    vnorms.push_back({ -0.7235938310623169 , -0.5257118344306946 , 0.44718772172927856 });
    vnorms.push_back({ -0.7235938310623169 , 0.5257118344306946 , 0.44718772172927856 });
    vnorms.push_back({ 0.2763756215572357 , 0.8506424427032471 , 0.44718772172927856 });
    vnorms.push_back({ 0.8944059610366821 , 0.0 , 0.44718772172927856 });
    vnorms.push_back({ 0.0 , 0.0 , 1.0 });
    faces.push_back({ 0 , 1 , 2 });
    faces.push_back({ 1 , 0 , 5 });
    faces.push_back({ 0 , 2 , 3 });
    faces.push_back({ 0 , 3 , 4 });
    faces.push_back({ 0 , 4 , 5 });
    faces.push_back({ 1 , 5 , 10 });
    faces.push_back({ 2 , 1 , 6 });
    faces.push_back({ 3 , 2 , 7 });
    faces.push_back({ 4 , 3 , 8 });
    faces.push_back({ 5 , 4 , 9 });
    faces.push_back({ 1 , 10 , 6 });
    faces.push_back({ 2 , 6 , 7 });
    faces.push_back({ 3 , 7 , 8 });
    faces.push_back({ 4 , 8 , 9 });
    faces.push_back({ 5 , 9 , 10 });
    faces.push_back({ 6 , 10 , 11 });
    faces.push_back({ 7 , 6 , 11 });
    faces.push_back({ 8 , 7 , 11 });
    faces.push_back({ 9 , 8 , 11 });
    faces.push_back({ 10 , 9 , 11 });
    fnorms.push_back({ 0.18759654462337494 , -0.5773536562919617 , -0.7946510910987854 });
    fnorms.push_back({ 0.6070646643638611 , 0.0 , -0.7946524620056152 });
    fnorms.push_back({ -0.4911220967769623 , -0.35682904720306396 , -0.7946522235870361 });
    fnorms.push_back({ -0.4911220967769623 , 0.35682904720306396 , -0.7946522235870361 });
    fnorms.push_back({ 0.18759654462337494 , 0.5773536562919617 , -0.7946510910987854 });
    fnorms.push_back({ 0.9822461009025574 , 0.0 , -0.18759679794311523 });
    fnorms.push_back({ 0.3035355508327484 , -0.9341715574264526 , -0.1875891536474228 });
    fnorms.push_back({ -0.7946491241455078 , -0.5773593187332153 , -0.1875869631767273 });
    fnorms.push_back({ -0.7946491241455078 , 0.5773593187332153 , -0.1875869780778885 });
    fnorms.push_back({ 0.3035355508327484 , 0.9341715574264526 , -0.1875891238451004 });
    fnorms.push_back({ 0.7946491241455078 , -0.5773593187332153 , 0.1875869780778885 });
    fnorms.push_back({ -0.3035355508327484 , -0.9341715574264526 , 0.1875891238451004 });
    fnorms.push_back({ -0.9822461009025574 , 0.0 , 0.18759679794311523 });
    fnorms.push_back({ -0.3035355508327484 , 0.9341715574264526 , 0.1875891536474228 });
    fnorms.push_back({ 0.7946491241455078 , 0.5773593187332153 , 0.1875869631767273 });
    fnorms.push_back({ 0.4911220967769623 , -0.35682904720306396 , 0.7946522235870361 });
    fnorms.push_back({ -0.18759654462337494 , -0.5773536562919617 , 0.7946510910987854 });
    fnorms.push_back({ -0.6070646643638611 , 0.0 , 0.7946524620056152 });
    fnorms.push_back({ -0.18759654462337494 , 0.5773536562919617 , 0.7946510910987854 });
    fnorms.push_back({ 0.4911220967769623 , 0.35682904720306396 , 0.7946522235870361 });
  }
  void draw() {

    auto color = std::array<float, 4>{1.0, 0, 0, 1};
    glMaterialfv(GL_FRONT_AND_BACK, GL_DIFFUSE, color.data());
    glColor3d(1, 1, 1);
    glBegin(GL_TRIANGLES);
    for (size_t f = 0; f < faces.size(); f++) {

      //面法線
      glNormal3fv(fnorms[f].data());

      size_t p0 = faces[f][0];
      size_t p1 = faces[f][1];
      size_t p2 = faces[f][2];

      //頂点法線
      //glNormal3fv(vnorms[p0].data());
      glVertex3fv(points[p0].data());

      //頂点法線
      //glNormal3fv(vnorms[p1].data());
      glVertex3fv(points[p1].data());

      //頂点法線
      //glNormal3fv(vnorms[p2].data());
      glVertex3fv(points[p2].data());
    }
    glEnd();

  }
};
int main()
{
  ////////////////////////////////////////////////////////////////////////////////
  // GLFW の初期化
  if (glfwInit() == GL_FALSE) {
    // 初期化に失敗したら終了
    return 1;
  }

  ////////////////////////////////////////////////////////////////////////////////
  // ウィンドウを作成
  GLFWwindow* window = glfwCreateWindow(
    400,           //width
    400,           //height
    "window title",//title
    NULL,          //monitor
    NULL           //share
  );

  ////////////////////////////////////////////////////////////////////////////////
  // ウィンドウを作成できなければ終了
  if (window == nullptr) {
    glfwTerminate();
    return 1;
  }

  d3item item;
  item.init();

  glfwMakeContextCurrent(window);

  while (glfwWindowShouldClose(window) == GL_FALSE) {

    int width, height;
    glfwGetFramebufferSize(window, &width, &height);

    const GLfloat lightPos[] = { -3 , 0 , 0 , 1 };
    const GLfloat lightCol[] = { 1 , 1 , 1 , 1 };
    glEnable(GL_LIGHTING);
    glEnable(GL_LIGHT0);
    glLightfv(GL_LIGHT0, GL_DIFFUSE, lightCol);
    glLightfv(GL_LIGHT0, GL_POSITION, lightPos);

    glEnable(GL_DEPTH_TEST);

    glClearColor(0, 0, 0, 1);
    glClear(GL_COLOR_BUFFER_BIT | GL_DEPTH_BUFFER_BIT);
    /////////////////////
    // 描画
    glViewport(0, 0, width, height);

    glMatrixMode(GL_PROJECTION);
    glPushMatrix();
    glLoadIdentity();
    gluPerspective(45, width / (double)height, 0.01, 10);
    {
      glMatrixMode(GL_MODELVIEW);
      glPushMatrix();
      glLoadIdentity();

      static int angle = 0;

      glTranslated(0, 0, -2);
      glRotated(angle++, 1, 1, 1);

      item.draw();

      glPopMatrix();
    }
    glMatrixMode(GL_PROJECTION);
    glPopMatrix();

    //
    /////////////////////

    //glFlush();

    glfwSwapBuffers(window);


    // イベント取得
    glfwWaitEvents();

  }

  glfwTerminate();

}
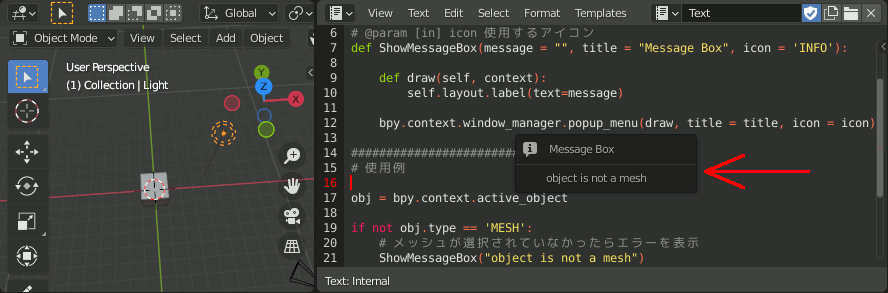
Blender Python スクリプトでエラーが発生したときにGUIのメッセージを表示する
特にアドオン化したときは、コンソールにメッセージが出るのはユーザーフレンドリーではない。
以下のようにメッセージボックス表示関数を作れる。
見るからにポップアップウィンドウ表示用関数を使った方法なので、応用が利きそうではある。
import bpy
# @brief GUIでメッセージを表示する
# @param [in] message メッセージ本文
# @param [in] tilte メッセージボックスのタイトル
# @param [in] icon 使用するアイコン
def ShowMessageBox(message = "", title = "Message Box", icon = 'INFO'):

    def draw(self, context):
        self.layout.label(text=message)

    bpy.context.window_manager.popup_menu(draw, title = title, icon = icon)
################################
# 使用例

obj = bpy.context.active_object

if not obj.type == 'MESH':
    # メッシュが選択されていなかったらエラーを表示
    ShowMessageBox("object is not a mesh")
実行するとマウスの位置にメッセージボックスが表示される。
アイコンについて
アイコンは、以下に使用できる一覧があるが、メッセージボックスとして使うのはせいぜい'NONE', 'QUESTION', 'ERROR', 'CANCEL','INFO'くらいだと思う。
参考
基本的に以下そのまま。
Blender Pythonでオブジェクトの面ごとに違うマテリアルを設定する
メッシュの面はmesh.polygonsに入っている。マテリアルは各面のmaterial_indexにindexの形で指定できるが、マテリアルのインデクスの取得はbpy.data.materials.findで行う。
import bpy

# カラーテーブルを作っておく
ctable = []
ctable.append( (0,0,1,1) )
ctable.append( (0,1,0,1) )
ctable.append( (0,1,1,1) )
ctable.append( (1,0,0,1) )
ctable.append( (1,0,1,1) )
ctable.append( (1,1,0,1) )

obj = bpy.context.active_object
mesh = obj.data

i = 0
for face in mesh.polygons:  # 全ての面について処理する

    # マテリアルの存在確認
    mat_name = "mat" + str(i)
    material = bpy.data.materials.get(mat_name)

    # マテリアルがなければ作成する
    if material is None:
        material = bpy.data.materials.new(mat_name)

        # マテリアルをオブジェクトに設定する
        obj.data.materials.append(material)
        material.use_nodes = True

    # 色を設定
    pBSDF = material.node_tree.nodes["Principled BSDF"]
    pBSDF.inputs[0].default_value = ctable[i]

    # マテリアルのIndexを取得する
    matindex = bpy.data.materials.find(mat_name)

    # 面に使用するマテリアルを設定する
    face.material_index = matindex

    i += 1

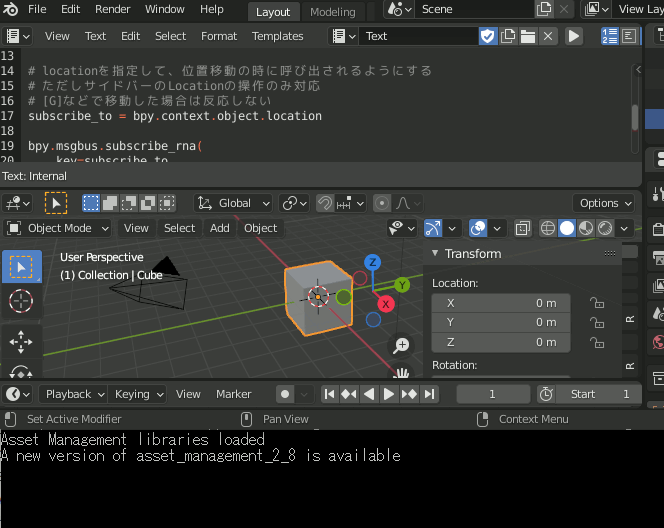
Blender のMessage Busに関数を設定して画面操作時にpython関数を走らせる
参考:
https://docs.blender.org/api/current/bpy.msgbus.html
まず、Locationから位置変更した場合にメッセージを表示させる
基本コード(Location)
import bpy

#https://docs.blender.org/api/current/bpy.msgbus.html

# Any Python object can act as the subscription's owner.
owner = object()


# この関数が呼び出される
def msgbus_callback(*args):

    print("Something changed!", args)

# locationを指定して、位置移動の時に呼び出されるようにする
# ただしサイドバーのLocationの操作のみ対応
# [G]などで移動した場合は反応しない
subscribe_to = bpy.context.object.location

bpy.msgbus.subscribe_rna(
    key=subscribe_to,
    owner=owner,
    args=("hello",), # タプルなので引数一つの場合は(a,)のような形にしないといけない
    notify=msgbus_callback,
)
回転の場合
さて回転の場合なのだが、
などとやってもエラーになる。
意訳 bpy.context.objectにrotationなんてない
ではどうするかというと、次のようにしてbpy.context.objectでつかえそうなものを調べる
import bpy


li = dir( bpy.context.object )

for i in li:
    print(i)
以下出力。大量に出てくるが、locationのほかに、rotation_eulerなどを見つけられる。
__doc__
__module__
__slots__
active_material
active_material_index
active_shape_key
...
lineart
local_view_get
local_view_set
location
lock_location
lock_rotation
...
rotation_axis_angle
rotation_euler
rotation_mode
rotation_quaternion
scale
select_get
select_set
...
user_remap
users
users_collection
users_scene
vertex_groups
visible_get
visible_in_viewport_get
というわけで回転時に動かすにはbpy.context.object.rotation_eulerを指定する。
import bpy

#https://docs.blender.org/api/current/bpy.msgbus.html

# Any Python object can act as the subscription's owner.
owner = object()


# この関数が呼び出される
def msgbus_callback(*args):

    print("Something changed!", args)
# rotation_eulerを指定して、回転の時に呼び出されるようにする
# ただしサイドバーのRotationの操作のみ対応
# [R]などで移動した場合は反応しない
subscribe_to = bpy.context.object.rotation_euler
bpy.msgbus.subscribe_rna(
    key=subscribe_to,
    owner=owner,
    args=("rotation-euler",), # タプルなので引数一つの場合は(a,)のような形にしないといけない
    notify=msgbus_callback,
)
Blender PythonでEmpty Arrowを二点座標指定して追加
from → to を指すempty arrowを追加する。以下では、現在のアクティブオブジェクトのoriginから3D cursorへ矢印を作成する
import bpy
import math
import numpy
import mathutils

# @brief オブジェクトを指定座標へ向けるための回転軸と回転角を計算する
# @param [in] オブジェクト
# @param [in] 向ける方向(座標)
# @return 回転軸,回転角(ラジアン)
def calc_lookat_param(obj,lookat):

    # オブジェクトのローカルのZ軸のベクトルを取得
    mat = obj.matrix_world
    localZ = mathutils.Vector((mat[0][2],mat[1][2],mat[2][2]))

    print(localZ)

    va = mathutils.Vector(lookat) - obj.location
    vb = mathutils.Vector(localZ)

    va.normalize()
    vb.normalize()

    # 外積
    axis = mathutils.Vector.cross(va,vb)
    axis.normalize()

    # 内積
    th = mathutils.Vector.dot(va,vb)

    # 角度算出
    rad = -math.acos( numpy.clip(th,-1.0,1.0) )

    return axis , rad


# @brief 任意軸回転
# @param [in,out] obj 回転するオブジェクト
# @param [in] axis 回転軸
# @param [in] radian 回転角をラジアンで指定
# @return なし
# @sa https://www.study.suzulang.com/bpy-calculation/bpy-arbitrary-axis-rotation
def rotate_object(obj,axis,radian):


    rot_mat= mathutils.Matrix.Rotation( radian, 4, axis )

    # decompose world_matrix's components, and from them assemble 4x4 matrices
    orig_loc, orig_rot, orig_scale = obj.matrix_world.decompose()
    #
    orig_loc_mat   = mathutils.Matrix.Translation(orig_loc)
    orig_rot_mat   = orig_rot.to_matrix().to_4x4()
    orig_scale_mat = (mathutils.Matrix.Scale(orig_scale[0],4,(1,0,0)) @
                      mathutils.Matrix.Scale(orig_scale[1],4,(0,1,0)) @
                      mathutils.Matrix.Scale(orig_scale[2],4,(0,0,1)))
    #
    # assemble the new matrix
    obj.matrix_world = orig_loc_mat @ rot_mat @ orig_rot_mat @ orig_scale_mat
# @brief _fromから_toを指すEmptyArrowを作成
# @param [in] 矢印の根元の座標
# @param [in] 矢印の先端の座標
# @return 作成したオブジェクト
def make_empty_arrow(_from,_to):


    # 新しいEmpty ObjectのArrowを作成
    bpy.ops.object.empty_add(type="SINGLE_ARROW",location=_from)
    aobj = bpy.context.object

    # 方向を一致させるためのパラメータ取得
    axis , rad = calc_lookat_param(aobj,_to)

    # 回転
    rotate_object(aobj,axis,rad)

    # _from → _to の距離を計算
    objlen = ( _from - _to ).length

    # 矢印の長さ==スケール
    aobj.scale[0] = objlen
    aobj.scale[1] = objlen
    aobj.scale[2] = objlen

    return aobj
# 使用例
obj = bpy.context.active_object

arrow = make_empty_arrow(
    obj.location,
    bpy.context.scene.cursor.location
)

print(arrow.name)

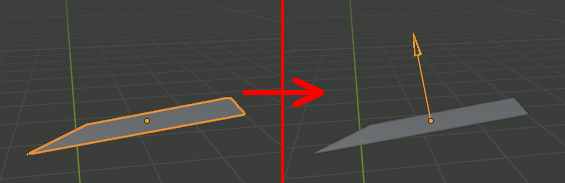
Blender Pythonでポリゴンの法線をグローバル座標系で取得して表示する
import bpy
import bmesh
import mathutils
import numpy
import math
# @brief オブジェクトの指定したpolygonの法線を取得
# @param [in] obj オブジェクト
# @param [in] polyIndex ポリゴン番号
# @return 法線(グローバル座標系)
def got_polygon_normal(obj,polyIndex):
    # オブジェクトの行列を取得
    local44 = obj.matrix_world

    ll_inv = local44.inverted()
    ll_inv_norm = ll_inv.transposed().to_3x3()


    vn = obj.data.polygons[polyIndex].normal

    return ll_inv_norm @ vn
# @brief 任意軸回転
# @sa https://www.study.suzulang.com/bpy/bpy-arbitrary-axis-rotation
# @param [in,out] obj 回転するオブジェクト
# @param [in] axis 回転軸
# @param [in] radian 回転角をラジアンで指定
# @return なし
def rotate_object(obj,axis,radian):

    rot_mat= mathutils.Matrix.Rotation( radian, 4, axis )

    # decompose world_matrix's components, and from them assemble 4x4 matrices
    orig_loc, orig_rot, orig_scale = obj.matrix_world.decompose()
    #
    orig_loc_mat   = mathutils.Matrix.Translation(orig_loc)
    orig_rot_mat   = orig_rot.to_matrix().to_4x4()
    orig_scale_mat = (mathutils.Matrix.Scale(orig_scale[0],4,(1,0,0)) @
                      mathutils.Matrix.Scale(orig_scale[1],4,(0,1,0)) @
                      mathutils.Matrix.Scale(orig_scale[2],4,(0,0,1)))
    #
    # assemble the new matrix
    obj.matrix_world = orig_loc_mat @ rot_mat @ orig_rot_mat @ orig_scale_mat
# @brief (0,0,1)のベクトルを法線方向に回転するための回転軸と回転角度を求める
# @param [in] the_normal 今回使用する法線
# @return 回転軸,回転角(ラジアン)
def calc_to_normal(the_normal):

    Zvec = mathutils.Vector((0,0,1))
    vn = the_normal

    onorm = mathutils.Vector(vn)
    onorm.normalize()


    # 外積
    axis = mathutils.Vector.cross(Zvec,onorm)
    axis.normalize()

    # 内積
    th = mathutils.Vector.dot(Zvec,onorm)

    # 角度算出
    rad = math.acos( numpy.clip(th,-1.0,1.0) )

    return axis , rad
# @brief オブジェクトの0番目のポリゴンの法線を計算し、empty arrowで表示する
# @param [in] target 目的のオブジェクト
def disp_polygon_normal(target):

    tnormal = got_polygon_normal(target,0)

    axis , rad = calc_to_normal(tnormal)


    bpy.ops.object.empty_add(type="SINGLE_ARROW")
    arrow = bpy.context.active_object

    rotate_object(arrow,axis,rad)

    arrow.location = target.location
# 実行例
target = bpy.context.active_object
disp_polygon_normal(target)
参考
再考 Blender 2.8 pythonで矢印を作る
以前のコードが汎用性に欠けるというか使いにくかったのでもう一度書き直した。
import bpy
import math
import mathutils
####################################################################
####################################################################
####################################################################
####################################################################
# @brief 任意軸回転
# @sa https://www.study.suzulang.com/bpy/bpy-arbitrary-axis-rotation
# @param [in,out] obj 回転するオブジェクト
# @param [in] axis 回転軸
# @param [in] radian 回転角をラジアンで指定
# @return なし
def rotate_object(obj,axis,radian):

    rot_mat= mathutils.Matrix.Rotation( radian, 4, axis )

    # decompose world_matrix's components, and from them assemble 4x4 matrices
    orig_loc, orig_rot, orig_scale = obj.matrix_world.decompose()
    #
    orig_loc_mat   = mathutils.Matrix.Translation(orig_loc)
    orig_rot_mat   = orig_rot.to_matrix().to_4x4()
    orig_scale_mat = (mathutils.Matrix.Scale(orig_scale[0],4,(1,0,0)) @
                      mathutils.Matrix.Scale(orig_scale[1],4,(0,1,0)) @
                      mathutils.Matrix.Scale(orig_scale[2],4,(0,0,1)))
    #
    # assemble the new matrix
    obj.matrix_world = orig_loc_mat @ rot_mat @ orig_rot_mat @ orig_scale_mat
####################################################################
####################################################################
####################################################################
####################################################################
####################################################################
# @brief 指定した位置に矢印を作成
# @param [in] tail 矢印の根本
# @param [in] head 矢印の頭
# @param [in] body_radius 矢印根元の半径
# @return 作成した矢印のオブジェクト
def create_arrow(tail,head,body_radius):


    ###########################################
    ###########################################
    # tail->head の長さと方向を計算
    avec = head - tail
    aveclen = avec.length
    avec.normalize()

    ###########################################
    ###########################################
    # 回転軸と回転量
    zvec = mathutils.Vector([ 0.0 , 0.0 , 1.0])
    zvec.normalize()

    rotvec = mathutils.Vector.cross(zvec,avec)
    rotvec.normalize()
    rotang = math.acos(mathutils.Vector.dot(zvec,avec) )

    ###########################################
    ###########################################
    # 各パラメータ計算

    # bodyとheadの長さの比率
    head_ratio = 0.3

    # 頭部長さ変更
    head_length = aveclen * head_ratio

    # 頭部が長くなりすぎないように調整
    if head_length > 0.3*4:
        head_length = 0.3*4

    body_length = aveclen - head_length

    # 矢印の頭部分の付け根の大きさ(本体に対する倍率)
    head_root_ratio = 2.0

    ###########################################
    ###########################################
    # サークル追加
    # 半径は body_radius
    bpy.ops.mesh.primitive_circle_add(
        location=tail,
        radius=body_radius
        )

    myarrow = bpy.context.object

    # 作成したサークルを回転して目標へ向ける
    rotate_object(myarrow,rotvec,rotang)

    #######################
    # サークルを面にする
    bpy.ops.object.mode_set(mode='EDIT')
    bpy.ops.mesh.fill()

    #######################
    # step 1 -    押し出し
    # 押し出し量は 矢印全体の長さ×比率
    bpy.ops.mesh.extrude_region_move(
        TRANSFORM_OT_translate={"value":avec*body_length } )

    #######################
    # step 2 -|   矢印頭部部分付け根拡大
    bpy.ops.mesh.extrude_region_move(
        TRANSFORM_OT_translate={"value":(0,0,0)} )
    bpy.ops.transform.resize(
        value=(
            head_root_ratio,
            head_root_ratio,
            head_root_ratio) )

    #######################
    # step 3 -|=  矢印頭部部分押し出し
    bpy.ops.mesh.extrude_region_move(
        TRANSFORM_OT_translate={"value":avec*head_length} )

    #######################
    # step 4 -|>  矢印を閉じる
    bpy.ops.transform.resize(value=(0,0,0) )

    bpy.ops.mesh.remove_doubles()

    bpy.ops.object.mode_set(mode='OBJECT')

    return myarrow
################################

#実行例
t = mathutils.Vector((1,2,1))#始点
h = mathutils.Vector((-1,2,3))#先端

arrow = create_arrow(t,h,0.1)

arrow.name = "my-arrow"
print (arrow)
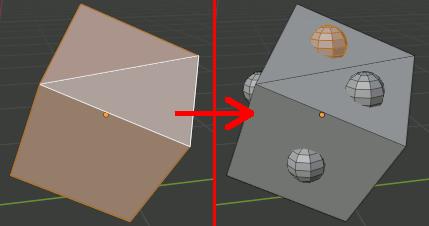
Blender Python でポリゴンの重心を求める
import bpy
import mathutils
# @brief モデルのポリゴンの重心をリストで返す
# @param [in] obj オブジェクト
# @return 重心座標のリスト
def face_gravities(obj):

    mesh = obj.data
    vcoords = mesh.vertices

    # オブジェクトの行列を取得
    local44 = obj.matrix_world;

    ret = []

    # 全てのポリゴンに対するループ
    for poly in mesh.polygons:

        grav = mathutils.Vector((0,0,0))
        for v in poly.vertices:

            # v はpolyの各頂点のID
            grav += vcoords[ v ].co

        # 頂点座標の合計を頂点数で割る
        grav /= len(poly.vertices)

        # グローバル座標に変換してリストへ追加
        ret.append( local44 @ grav )

    return ret
# 使用例
gravs = face_gravities( bpy.context.active_object )

# 計算した座標へ球を設置
for g in gravs:
    bpy.ops.mesh.primitive_uv_sphere_add(
        radius=0.1,
        segments=8,
        ring_count=8,
        enter_editmode=False,
        location=g
        )
Blender Pythonでオブジェクトのローカル座標系を求める
オブジェクトのローカル座標系となるXYZの各ベクトルを求める
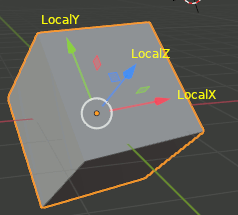
import bpy
import mathutils


def get_local_axis(obj):

    # オブジェクトのローカルのZ軸のベクトルを取得
    mat = obj.matrix_world

    localX = mathutils.Vector((mat[0][0],mat[1][0],mat[2][0]))
    localY = mathutils.Vector((mat[0][1],mat[1][1],mat[2][1]))
    localZ = mathutils.Vector((mat[0][2],mat[1][2],mat[2][2]))


    return localX,localY,localZ;


#
obj = bpy.context.active_object

local = get_local_axis(obj)

print( local[0] )
print( local[1] )
print( local[2] )


bpy.context.scene.cursor.location = local[2]*3
出力
<Vector (-0.1714, 0.6507, 0.7397)>
<Vector (0.1549, -0.7237, 0.6725)>
Pythonのmath domain error (定義域エラー)はnumpy.clipで回避
Pythonでmath.acos(theta)を使うとthetaのとれる範囲が-1.0~1.0までなのでmath domain errorが発生することがある。
math domain error
import math

rad = math.acos( 0.9 )
rad = math.acos( 1.0 )
rad = math.acos( 1.1 ) # ValueError: math domain error
numpy.clipで入力値を調整
import math
import numpy

angle = 1.1

rad = math.acos( numpy.clip(angle,-1.0,1.0) )# acosへの入力を-1.0~1.0に修正

print(rad) # 0.0