CUDAで複数の.cuファイルを使用する
CUDAのヘッダファイルの拡張子がcuhだと知り、では関数宣言を.cuhに書き、定義を.cuに書けば分割コンパイル的(?)なことができるのではないかと思ったのだが、リンクエラーが出たので対処法を調べた。
color_inverse関数(自作関数 , .cuhで宣言、.cuに定義)が見つからない
今回使ったのは以下。
・mytest.h ... CPU側から呼び出すときにincludeするヘッダファイル。
・mytest.cu ... CPU側から呼び出される処理。__global__関数も入っている。
・function.cu ... __device__関数のみが入っている。mytest.cuから呼び出される
・function.cuh ... function.cuの関数の宣言が入る。
CUDA側
設定
CUDA C/C++ → Common → Generate Relocatable Device Codeを はい (-rdc=true) に設定

mytest.h
#ifdef __DLL_EXPORT_DO
#define DLL_PORT extern "C" _declspec(dllexport)
#else
#define DLL_PORT extern "C" _declspec(dllimport)
#endif

struct data_t {
  int width;
  int height;
  unsigned char* rgbdata;
};

DLL_PORT void func_inverse(data_t* data);
mytest.cu
#include "cuda_runtime.h"
#include "device_launch_parameters.h"

#include <stdio.h>

#include "mytest.h"

// cudaのヘッダファイルは.cuhらしい
#include "function.cuh"

struct gpudata {
  int width;
  int height;
  unsigned char* c;
};

__global__ void thread_inverse(gpudata data) {
  //このスレッドが担当する画素の位置を二次元座標で求める
  size_t xpos = blockIdx.x * blockDim.x + threadIdx.x;
  size_t ypos = blockIdx.y * blockDim.y + threadIdx.y;

  if (xpos < data.width && ypos < data.height) {
    size_t pos = (ypos * data.width + xpos) * 3;

    unsigned char* c = data.c + pos;
    // この関数はfunction.cuで定義されている
    color_inverse(c, xpos, ypos);
  }

}


void func_inverse(data_t* data) {

  // 16*16 == 256 < 512
  int blockw = 16;
  int blockh = 16;
  dim3 block(blockw, blockh);

  int gridw = data->width / blockw + 1;
  int gridh = data->height / blockh + 1;

  dim3 grid(gridw,gridh);


  unsigned char* c_gpu;
  cudaMalloc((void**)&c_gpu, data->width*data->height*3);//GPU側にメモリを確保
  cudaMemcpy(
    c_gpu,
    data->rgbdata,
    data->width* data->height*3,
    cudaMemcpyHostToDevice);//GPU側から実行結果を取得

  gpudata gpud;
  gpud.width = data->width;
  gpud.height = data->height;
  gpud.c = c_gpu;
  thread_inverse<<<grid,block>>> (gpud);//GPU側の関数を呼出

  cudaMemcpy(
    data->rgbdata,
    c_gpu,
    data->width * data->height * 3,
    cudaMemcpyDeviceToHost);//GPU側から実行結果を取得

  cudaFree(c_gpu);//GPU側のメモリを解放
}
function.cuh
#include "cuda_runtime.h"

__device__
void color_inverse(unsigned char* c, int width, int height);
function.cu
#include "cuda_runtime.h"
#include "device_launch_parameters.h"

#include "function.cuh"

__device__
void color_inverse(unsigned char* c, int width, int height) {
  c[0] = 255 - c[0];
  c[1] = 255 - c[1];
  c[2] = 255 - c[2];
}
C++側
#include <iostream>

#pragma warning(disable:4996)

#include "../CudaRuntime1/mytest.h"

#pragma comment(lib,"CudaRuntime1.lib")

void pnmP3_Write(const char* const fname, const int vmax, const int width, const int height, const unsigned char* const p);
int main()
{
  data_t dat;

  dat.width = 100;
  dat.height = 50;

  unsigned char *c = new unsigned char[dat.width * dat.height * 3];

  for (size_t i = 0; i < dat.width * dat.height; i++) {
    c[i * 3 + 0] = 0;
    c[i * 3 + 1] = 0;
    c[i * 3 + 2] = 255;
  }

  dat.rgbdata = c;

  func_inverse(&dat);

  pnmP3_Write("test.ppm", 255, dat.width, dat.height, dat.rgbdata);

}
/////////////////////////////////////////////
//画像ファイル書き出し/////////////////////////
//! @brief PPM(RGB各1byte,カラー,テキスト)を書き込む
//! @param [in] fname ファイル名
//! @param [in] vmax 全てのRGBの中の最大値
//! @param [in] width 画像の幅
//! @param [in] height 画像の高さ
//! @param [in] p 画像のメモリへのアドレス
//! @details RGBRGBRGB....のメモリを渡すと、RGBテキストでファイル名fnameで書き込む
void pnmP3_Write(const char* const fname, const int vmax, const int width, const int height, const unsigned char* const p) { // PPM ASCII

  FILE* fp = fopen(fname, "wb");
  fprintf(fp, "P3\n%d %d\n%d\n", width, height, vmax);

  size_t k = 0;
  for (size_t i = 0; i < (size_t)height; i++) {
    for (size_t j = 0; j < (size_t)width; j++) {
      fprintf(fp, "%d %d %d ", p[k * 3 + 0], p[k * 3 + 1], p[k * 3 + 2]);
      k++;
    }
    fprintf(fp, "\n");
  }

  fclose(fp);
}
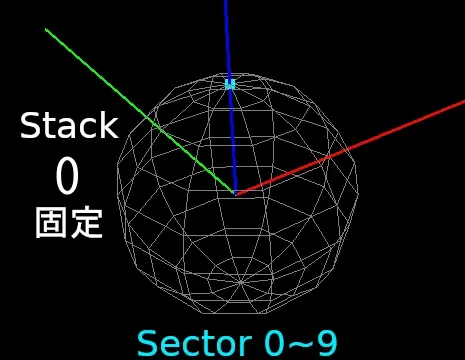
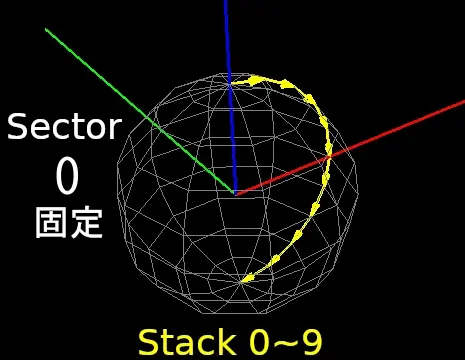
UV Sphereを描画(2)-頂点配列を作ってから表示
UV球の頂点配列を作成する。
UV球は物凄く簡単に言うとStack×Sectorのグリッドを丸めた物なので、二次元画像のようにWidth×Heightの配列として表現可能。
ただし例えば10の要素数の場合、0~10が必要になるのでループ回数は+1する事になる。
さらにこの作成方法では重複する頂点が出てくるので、それを嫌う場合はもう少し工夫が必要になる。
struct UVSphere {
  std::vector<glm::vec3> points;
  int stackCount;
  int SectorCount;
};
// 球の頂点配列を作成
UVSphere create_uv_sphere(const int stackCount, const int SectorCount, const float r) {

  std::vector<glm::vec3> points;
  for (int stackStep = 0; stackStep < stackCount+1; stackStep++) {

    for (int sectorStep = 0; sectorStep < SectorCount+1; sectorStep++) {

      points.push_back(getPoint(sectorStep, SectorCount, stackStep, stackCount, r));

    }

  }
  return UVSphere{ points, stackCount, SectorCount };
}
// 頂点配列から球を描画
void draw_uv_sphere(const UVSphere& uvq) {

  int Width = uvq.SectorCount+1;
  int Height = uvq.stackCount+1;

  for (int y = 0; y < Height - 1; y++) {
    for (int x = 0; x < Width - 1; x++) {
      int x2 = x + 1;
      int y2 = y + 1;

      int i1 = y * Width + x;
      int i2 = y2 * Width + x;
      int i3 = y2 * Width + x2;
      int i4 = y * Width + x2;

      glm::vec3 k1 = uvq.points[i1];
      glm::vec3 k2 = uvq.points[i2];
      glm::vec3 k3 = uvq.points[i3];
      glm::vec3 k4 = uvq.points[i4];

      // 四角形で描画
      glBegin(GL_LINE_LOOP);
      glVertex3fv(glm::value_ptr(k1));
      glVertex3fv(glm::value_ptr(k2));
      glVertex3fv(glm::value_ptr(k3));
      glVertex3fv(glm::value_ptr(k4));
      glEnd();

    }
  }
}
UV Sphereを描画(1)
UV球は球を緯度、経度で表現したような球のことを言う。
参考文献に合わせてStep,Sectorで表現すると以下のような関係になる
glm::vec3 getPoint(
  const int sectorstep, const int sectorCount,
  const int stackstep, const int stackCount,
  const float r) {


  float theta = 2 * 3.14159 * (float(sectorstep) / sectorCount);
  float phi = 3.14159 / 2.f - 3.14159 * (float(stackstep) / stackCount);

  float x = (r * cos(phi)) * cos(theta);
  float y = (r * cos(phi)) * sin(theta);
  float z = r * sin(phi);
  return glm::vec3(x, y, z);
}
// 球を描画
void draw_uv_sphere(const int stackCount, const int SectorCount,const float r) {

  for (int stackStep = 0; stackStep < stackCount; stackStep++) {


    for (int sectorStep = 0; sectorStep < SectorCount; sectorStep++) {

      glm::vec3 k1 = getPoint(sectorStep, SectorCount, stackStep, stackCount, r);
      glm::vec3 k2 = getPoint(sectorStep, SectorCount, stackStep + 1, stackCount, r);
      glm::vec3 k3 = getPoint(sectorStep + 1, SectorCount, stackStep + 1, stackCount, r);
      glm::vec3 k4 = getPoint(sectorStep + 1, SectorCount, stackStep, stackCount, r);

      // 四角形で描画
      glBegin(GL_LINE_LOOP);
      glVertex3fv(glm::value_ptr(k1));
      glVertex3fv(glm::value_ptr(k2));
      glVertex3fv(glm::value_ptr(k3));
      glVertex3fv(glm::value_ptr(k4));
      glEnd();

      /*
      k1       k1+1 (k4)
      +-------+
      |      /|
      |     / |
      |    /  |
      |   /   |
      |  /    |
      | /     |
      |/      |
      +-------+
      k2        k2+1 (k3)

      */


    }

  }

}
参考文献
http://www.songho.ca/opengl/gl_sphere.html
bitnamiのdebianでキーボードを日本語配列に設定する
bitnamiをコンソールからいじりたいが英字配列キーボードになっている。これを日本語配列にする。
loadkeysを使えば一時的にレイアウトを変更できる。ただし最初は入っていないのでaptでインストール必要がある。
loadkeysインストール , 設定
sudo apt install console-data
インストール中に設定を求められる。各項目の番号を入力していくとインストールが終わった段階で日本語キーボードになっている。
その後の設定
次回以降は以下のコマンドで日本語配列に変更する。
その他の方法
dpkg-reconfigureを使えば恒久的に変える事ができるらしい。ただしこちらの環境では次回起動時には戻っていた。
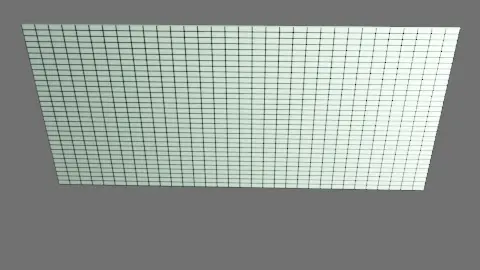
OpenGLでグリッドを描く
ただXY平面を表現するだけだと目的に合わないので角度を自由に設定できるようにする。
コード(本体)
// グリッド一つ分
class cell {
  glm::vec3 _min;  //始点
  glm::vec3 _vecx; //方向1
  glm::vec3 _vecy; //方向2

public:
  cell(glm::vec3 _min_, glm::vec3 _vec_x, glm::vec3 _vec_y) {
    _min = _min_;
    _vecx = _vec_x;
    _vecy = _vec_y;
  }
  const glm::vec3& cmin()const {
    return _min;
  }
  const glm::vec3& cvecx()const {
    return _vecx;
  }
  const glm::vec3& cvecy()const {
    return _vecy;
  }

  // セルの中心
  glm::vec3 center()const {
    return _min + _vecx / 2.f + _vecy / 2.f;
  }
};
class grid {
  std::vector<cell> _cells;
  int _xcount;
  int _ycount;
  float _xwidth;
  float _ywidth;
  glm::vec3 _center;

public:

  size_t cellCount()const {
    return _cells.size();
  }
  cell& operator[](const size_t index) {
    return _cells[index];
  }
  const cell& operator[](const size_t index)const {
    return _cells[index];
  }
  grid() {}

  grid(const grid& g) {
    _cells = g._cells;
    _xcount = g._xcount;
    _ycount = g._ycount;
    _xwidth = g._xwidth;
    _ywidth = g._ywidth;
    _center = g._center;
  }
  grid& operator=(const grid& g) {
    _cells = g._cells;
    _xcount = g._xcount;
    _ycount = g._ycount;
    _xwidth = g._xwidth;
    _ywidth = g._ywidth;
    _center = g._center;
  }
  grid& operator=(grid&& g) {
    _cells = std::move(g._cells);
    _xcount = g._xcount;
    _ycount = g._ycount;
    _xwidth = g._xwidth;
    _ywidth = g._ywidth;
    _center = g._center;
    return *this;
  }

  // 平面一つ分。xcount × ycountのcellからなる
  grid(
    const glm::vec3 vecX,
    const glm::vec3 vecY,
    const glm::vec3 center,
    const float width,
    const float height,
    const int xcount,
    const int ycount) {

    _xcount = xcount;
    _ycount = ycount;
    _xwidth = width;
    _ywidth = height;

    _center = center;

    glm::vec3 NVecX = glm::normalize(vecX);
    glm::vec3 NVecY = glm::normalize(vecY);

    ////////////////////
    _cells.clear();

    // セル一個の縦方向、横方向のベクトル。長さはセル一個分
    const glm::vec3 CellVX = NVecX * (_xwidth / xcount);
    const glm::vec3 CellVY = NVecY * (_ywidth / ycount);

    // 面の始点
    const glm::vec3 Start = _center - NVecX * _xwidth / 2.f - NVecY * _ywidth / 2.f;

    for (size_t y = 0; y < ycount; y++) {
      for (size_t x = 0; x < xcount; x++) {

        // 各セルの始点
        glm::vec3 from =
          Start +
          CellVX * (float)x + CellVY * (float)y;

        // セルを記録
        _cells.push_back(
          cell(
            from,
            CellVX,
            CellVY
          )
        );

      }
    }

  }


  /*
  p0    p3
  +---------+
  |     |
  |     |
  |     |
  |     |
  +---------+
  p1    p2
  */
  glm::vec3 p0(const size_t index)const {
    return _cells[index].cmin();
  }
  glm::vec3 p1(const size_t index)const {

    return
      _cells[index].cmin() +
      _cells[index].cvecx();
  }
  glm::vec3 p2(const size_t index) const {
    return
      _cells[index].cmin() +
      _cells[index].cvecx() +
      _cells[index].cvecy();
  }
  glm::vec3 p3(const size_t index) const {
    return
      _cells[index].cmin() +
      _cells[index].cvecy();
  }

};
表示用関数
//! @brief グリッドを表示
//! @param [in] g グリッドオブジェクト
//! @param [in] dispcenter セルの中央を表示するか
void drawGrid(const grid& g, const bool dispcenter) {

  glLineWidth(1);
  glColor3d(1, 1, 1);
  for (size_t i = 0; i < g.cellCount(); i++) {
    glBegin(GL_LINE_LOOP);
    glVertex3fv(glm::value_ptr(g.p0(i)));
    glVertex3fv(glm::value_ptr(g.p1(i)));
    glVertex3fv(glm::value_ptr(g.p2(i)));
    glVertex3fv(glm::value_ptr(g.p3(i)));

    glEnd();
  }

  if (dispcenter) {
    glPointSize(1);
    glColor3d(1, 1, 1);
    glBegin(GL_POINTS);
    for (size_t i = 0; i < g.cellCount(); i++) {
      glVertex3fv(
        glm::value_ptr(g[i].center()));
    }
    glEnd();
  }
}
使用方法
grid g(
  glm::vec3(1,0,0),
  glm::vec3(0,1,0),
  glm::vec3(0,0,0),
  4.f,4.f,
  10,10
);

drawGrid(g, false);
zlibを使って伸長 (inflate使用)
続き。inflateを使って伸長する。
#pragma warning(disable:4996)

#include <vector>

// 圧縮に必要
#include <zlib.h>

#include <cassert>
#include <array>

// 圧縮に必要
#if _DEBUG
#pragma comment(lib,"zlibstaticd.lib")
#else
#pragma comment(lib,"zlibstatic.lib")
#endif

constexpr int BUFFER_SIZE = 1000;


struct buffer_t {
  size_t size;
  std::array<Byte, BUFFER_SIZE> buffer;

  buffer_t(
    const size_t _size,
    const std::array<Byte, BUFFER_SIZE>& data
  ) :
    size(_size),
    buffer(data) {}
};

//! @brief ファイルからデータを読み込む
//! @param [in] filename ファイル名
//! @param [out] ファイルを読み込んだ、固定長のバッファの一覧
//! @return ファイル一個分のデータ
void read_buffer(const char* filename, std::vector< buffer_t >& datalist) {
  // データの準備
  std::array<unsigned char, BUFFER_SIZE> buffer;
  FILE* fp = fopen(filename, "rb");

  do {
    size_t readsize = fread(buffer.data(), 1, buffer.size(), fp);

    // データと読み込んだサイズを保存
    datalist.emplace_back( readsize, buffer );


  } while (feof(fp) == 0);

  fclose(fp);

}
bool my_uncompress(
  const std::vector< buffer_t >& zippedBuffer,
  std::vector< buffer_t >& data_list) {

  z_stream strm;
  strm.zalloc = Z_NULL;
  strm.zfree = Z_NULL;
  strm.opaque = Z_NULL;
  strm.avail_in = 0;
  strm.next_in = Z_NULL;


  //初期化
  int ret = inflateInit(&strm);

  if (ret != Z_OK) {
    return false;
  }

  for (size_t i = 0; i < zippedBuffer.size(); i++) {

    // これから伸長するデータ。
    const buffer_t& inbuffer = zippedBuffer[i];

    strm.next_in = (Bytef*)inbuffer.buffer.data();
    strm.avail_in = (uInt)inbuffer.size;

    assert(strm.avail_in != 0);

    std::array<Byte, BUFFER_SIZE> tmpbuffer;

    do {
      strm.next_out = (Bytef*)tmpbuffer.data();// 伸長結果の書き込み先の指定
      strm.avail_out = BUFFER_SIZE;           // 書き込み先のバッファサイズ
      ret = inflate(&strm, Z_NO_FLUSH);       // 伸長
      assert((ret != Z_NEED_DICT) &&
        (ret != Z_STREAM_ERROR) &&
        (ret != Z_DATA_ERROR) &&
        (ret != Z_MEM_ERROR));

      uInt have = BUFFER_SIZE - strm.avail_out;// 展開されたデータのサイズ
      // 結果の出力先に積んでいく
      data_list.emplace_back(have, tmpbuffer);


    } while (strm.avail_out == 0);
  } while (ret != Z_STREAM_END);

  // 終了字呼び出す
  inflateEnd(&strm);

  return true;
}
int main()
{
  // freadで読み込むデータ一覧。
  // バッファが小さく一つの配列に収まらない状況を再現するため、
  // 小さめの領域のリストとして全てのデータを読み込む
  std::vector< buffer_t > zippedBuffer;

  // 圧縮済みデータを用意
  read_buffer("C:\\data\\cmp.data", zippedBuffer);

  std::vector< buffer_t > data_list;
  // 伸長実行
  my_uncompress(zippedBuffer, data_list);


  // ファイル書き出し
  FILE* fp = fopen("C:\\data\\uncmp.data", "wb");
  for (size_t i = 0; i < data_list.size(); i++) {
    const buffer_t& data = data_list[i];
    fwrite(data.buffer.data(), 1, data.size, fp);
  }
  fclose(fp);


}
zlibを使って圧縮 (deflate使用)
巨大なデータを細切れに読み込んで少しずつ圧縮していく使い方をする。
#pragma warning(disable:4996)

#include <vector>

// 圧縮に必要
#include <zlib.h>

#include <cassert>
#include <array>

// 圧縮に必要
#if _DEBUG
#pragma comment(lib,"zlibstaticd.lib")
#else
#pragma comment(lib,"zlibstatic.lib")
#endif

constexpr int BUFFER_SIZE = 1000;

//! @brief 入出力バッファを格納するデータ型。
struct buffer_t {
  size_t size;                           //!< 有効なデータが入っているサイズ
  std::array<Byte, BUFFER_SIZE> buffer; //! @brief 確保したバッファ

  buffer_t(
    const size_t _size,
    const std::array<Byte, BUFFER_SIZE>& data
  ) :
    size(_size),
    buffer(data) {}
};

//! @brief ファイルからデータを読み込む
//! @param [in] filename ファイル名
//! @param [out] ファイルを読み込んだ、固定長のバッファの一覧
//! @return ファイル一個分のデータ
void read_buffer(const char* filename, std::vector< buffer_t >& datalist) {
  // データの準備
  std::array<unsigned char, BUFFER_SIZE> buffer;
  FILE* fp = fopen(filename, "rb");

  do {
    size_t readsize = fread(buffer.data(), 1, buffer.size(), fp);

    // データと読み込んだサイズを保存
    datalist.emplace_back( readsize, buffer );


  } while (feof(fp) == 0);

  fclose(fp);

}
bool my_compress(
  std::vector<buffer_t>& zippedBuffer,
  const std::vector< buffer_t >& data_list) {

  // 構造体の初期化
  z_stream strm;
  strm.zalloc = Z_NULL;
  strm.zfree = Z_NULL;
  strm.opaque = Z_NULL;


  //初期化
  int ret = deflateInit(&strm, Z_DEFAULT_COMPRESSION);

  if (ret != Z_OK) {
    return false;
  }

  int flush = Z_NO_FLUSH;

  for (size_t i = 0; i < data_list.size(); i++) {

    // これから圧縮するデータ。
    const buffer_t& inbuffer = data_list[i];

    // バッファが小さい場合、読み込みを分割せざるを得ない。
    // zlibではデータを複数回に分けて入力し、
    // すべて出そろった段階で処理を行えるような構造になっている。
    // ここにfreadを書くのもわかりにくいので今回は data_listとしてデータ一覧を用意する


    strm.next_in = (Bytef*)inbuffer.buffer.data(); //圧縮前データ
    strm.avail_in = (uInt)inbuffer.size;        // 圧縮前データのバイト数

    // 全てのデータが処理されたら、一番最後にZ_FINISH設定
    // つまり最後の一回だけ特別な処理をする。
    if (i == data_list.size() - 1) {
      flush = Z_FINISH;
    }
    else {
      flush = Z_NO_FLUSH;
    }

    // 圧縮関数に渡して処理されたデータを受け取るためのバッファ
    std::array<Byte, BUFFER_SIZE> tmpbuffer;

    do {
      strm.avail_out = BUFFER_SIZE;// 出力先バッファのサイズ
      strm.next_out = tmpbuffer.data(); // 出力先バッファ

      ret = deflate(&strm, flush);  /* no bad return value */
      assert(ret != Z_STREAM_ERROR);  /* state not clobbered */

      // バッファが全部使われた場合、avail_outは0となる
      // 従って BUFFER_SIZE - 0 で have==BUFFER_SIZE となる。

      //圧縮したデータサイズを取得
      unsigned have = BUFFER_SIZE - strm.avail_out;

      // 結果の出力先に積んでいく
      zippedBuffer.emplace_back(have,tmpbuffer);

    } while (strm.avail_out == 0);

  }

  // 終了時呼び出す。
  deflateEnd(&strm);

  return true;
}
int main()
{
  // 結果の出力先
  // 固定長バッファの配列。
  // 結果のサイズを一括で確保しない方針の実装。
  std::vector<buffer_t> zippedBuffer;

  // 圧縮データ一覧を用意

  // freadで読み込むデータ一覧。
  // バッファが小さく一つの配列に収まらない状況を再現するため、
  // 小さめの領域のリストとして全てのデータを読み込む
  std::vector< buffer_t > data_list;

  // 元データ読込
  read_buffer("C:/data/.cipd_client.exe", data_list);

  // 圧縮実行
  my_compress(zippedBuffer, data_list);

  // ファイル書き出し
  FILE* fp = fopen("C:\\data\\cmp.data", "wb");
  for (size_t i = 0; i < zippedBuffer.size(); i++) {

    fwrite(
      zippedBuffer[i].buffer.data(), // バッファの先頭
      1,               // 1要素のサイズ
      zippedBuffer[i].size,      // 要素数
      fp);
  }
  fclose(fp);


}
本当は伸長もやりたかったが圧縮に結構体力を使ったので次回にする。
zlibで単一のデータを圧縮( compress関数 )
以前libpng等で使ったzlibでデータを圧縮してみる。
圧縮時、まずcompressBound に元データのサイズを渡し、最低限その戻り値のバイト数分だけメモリを確保する。
圧縮はcompress関数で行い、結果は第一引数で指定したメモリに書き込まれ、書き込まれたサイズは第二引数destLenに返る。
注意点として、この関数で圧縮されたデータには元データのサイズ情報が入っていない。本来ファイル出力するのであればその情報を何らかの形で入れておくべきだが今回は画面表示して伸長プログラム側に直打ちすることにする。
圧縮側 compress 関数使用
int compress(
    Bytef* dest,          // 結果の格納先のバッファ
    uLongf* destLen,      // 入力:バッファサイズ ,出力:結果データサイズ
    const Bytef* source, // 元データ
    uLong sourceLen      // 元データのサイズ
);
#pragma warning(disable:4996)

#include <vector>
#include <filesystem>

// 圧縮に必要
#include <zlib.h>

// 圧縮に必要
#if _DEBUG
#pragma comment(lib,"zlibstaticd.lib")
#else
#pragma comment(lib,"zlibstatic.lib")
#endif
//! @brief 圧縮のテスト
//! @param [in] source 圧縮したいデータ
//! @return 圧縮後のデータ
std::vector< Bytef > compress_test(std::vector<unsigned char>& source) {

  //圧縮前のデータと
  //そのデータのサイズを準備
  unsigned char* src = source.data();
  unsigned int sourceLen = source.size();


  // compressBoundの戻り値だけメモリを確保
  uLong destLen = compressBound(sourceLen);

  std::vector< Bytef > dest;
  dest.resize(destLen);

  // compressで圧縮。
  // destLenは呼び出し時に確保したメモリ量を指定すると
  // 圧縮後の長さが帰ってくる
  int ret = compress(dest.data(), &destLen, src, sourceLen);

  if (ret != Z_OK) {
    return std::vector< Bytef >();
  }

  // 圧縮後のデータの長さがdestLenなので
  // 配列をdestLenに切り詰める
  dest.erase(dest.begin() + destLen, dest.end());


  return dest;
}
std::vector<unsigned char> read_buffer(const char* filename);

int main()
{

  // 圧縮テスト

  std::vector<unsigned char> buffer = read_buffer("C:/data/.cipd_client.exe");

  std::vector< Bytef > cmpressed = compress_test(buffer);

  // ファイル書き出し
  FILE* fp = fopen("C:\\data\\cmp.data", "wb");
  fwrite(cmpressed.data(), 1, cmpressed.size(), fp);
  fclose(fp);

  // 注意 圧縮後データには「元のファイルサイズ」が含まれない
  // これは、伸長時、結果を格納する領域のサイズを知ることができないことを意味する。
  // 従って本来、ファイル出力時には、別途元のサイズを記録しておく必要がある。
  // 今回はプログラムを複雑にしないため、画面表示してその値を手動で記録しておく。
  printf("for decompress : %d bytes\n", buffer.size());


}


//! @brief ファイルからデータを読み込む
//! @param [in] filename ファイル名
//! @return ファイル一個分のデータ
std::vector<unsigned char> read_buffer(const char* filename) {
  // データの準備
  namespace fs = std::filesystem;
  std::vector<unsigned char> buffer;
  uintmax_t size = fs::file_size(filename);
  FILE* fp = fopen(filename, "rb");
  buffer.resize(size);
  fread(buffer.data(), size, 1, fp);
  fclose(fp);

  return buffer;
}
伸長側 uncompress 関数使用
int uncompress (
    Bytef* dest,           // 伸長後のデータ格納先
    uLongf* destLen,       // 入力時:格納先のメモリサイズ 出力時:結果のメモリサイズ
    const Bytef* source,  // 圧縮されたデータ
    uLong sourceLen       // 圧縮されたデータのバイト数
);
#pragma warning(disable:4996)

#include <vector>
#include <filesystem>

// 圧縮に必要
#include <zlib.h>

// 圧縮に必要
#if _DEBUG
#pragma comment(lib,"zlibstaticd.lib")
#else
#pragma comment(lib,"zlibstatic.lib")
#endif
//! @brief 圧縮されたデータを伸長する
//! @param [in] compressed 圧縮されたデータ
//! @param [in] original_size 伸長後のデータサイズ
//! @return 伸長後のデータ
std::vector< Bytef > uncompress_test(const std::vector<unsigned char>& compressed,const unsigned int original_size) {

  // 元のデータのサイズだけメモリ確保
  std::vector< Bytef > dest;
  dest.resize(original_size);

  //伸長
  uLongf destLen = original_size;
  int ret = uncompress(
    dest.data(), // 伸長したデータの格納先
    &destLen,  // 格納先のメモリサイズ
    compressed.data(), // 圧縮データ
    compressed.size()  // 圧縮データのサイズ
  );

  if (ret != Z_OK)
    return std::vector< Bytef >();

  return dest;

}
std::vector<unsigned char> read_buffer(const char* filename);

int main()
{

  std::vector<unsigned char> buffer = read_buffer("C:/data/cmp.data");

  // この数字は圧縮時に取得したものを指定する
  int original_filesize = 18199552;

  std::vector< Bytef > uncompressed = uncompress_test(buffer, original_filesize);

  // ファイル書き出し
  FILE* fp = fopen("C:\\data\\uncmp.data", "wb");
  fwrite(uncompressed.data(), 1, uncompressed.size(), fp);
  fclose(fp);


}


//! @brief ファイルからデータを読み込む
//! @param [in] filename ファイル名
//! @return ファイル一個分のデータ
std::vector<unsigned char> read_buffer(const char* filename) {
  // データの準備
  namespace fs = std::filesystem;
  std::vector<unsigned char> buffer;
  uintmax_t size = fs::file_size(filename);
  FILE* fp = fopen(filename, "rb");
  buffer.resize(size);
  fread(buffer.data(), size, 1, fp);
  fclose(fp);

  return buffer;
}
動作確認

.cipd_client.exeをcompressし、cmp.dataを作成した。
cmp.dataをuncompressし、uncmp.dataを作成した。
ちゃんと伸長できているか確認するため、コマンドプロンプトからcompコマンドでバイナリ比較する。
glfw + ImGuiの使い方メモ。マウスのコールバック関数と処理がかぶらないようにする
ImGui、他のマウスイベントと重複して困ったので回避策。
マウスのコールバック関数が呼ばれている最中、ImGuiIO::WantCaptureMouseを調べtrueであればマウスがImGuiのウィンドウの内部にあることがわかる。
#include <cstdlib>
#include <iostream>

#include <Windows.h>
#include <gl/GL.h>
#include <GLFW/glfw3.h>
#include "imgui/imgui.h"
#include "imgui/imgui_impl_glfw.h"
#include "imgui/imgui_impl_opengl3.h"
#pragma comment(lib,"opengl32.lib")
#pragma comment(lib,"glfw3.lib")

#pragma warning(disable:4996)

// マウスクリックを処理するコールバック関数
void mouse_button_callback(GLFWwindow* pwin, int button, int action, int mods) {

  ImGuiIO& io = ImGui::GetIO();
  // マウスがImGuiのウィンドウ内にあるときは
  // この中を通らない
  if (io.WantCaptureMouse == false) {

    if (button == GLFW_MOUSE_BUTTON_LEFT && action == GLFW_PRESS) {
      printf("L - down\n");
    }
    if (button == GLFW_MOUSE_BUTTON_RIGHT && action == GLFW_PRESS) {
      printf("R - down\n");
    }
    if (button == GLFW_MOUSE_BUTTON_MIDDLE && action == GLFW_PRESS) {
      printf("M - down\n");
    }

  }

}

// 背景色
float bg_color[3];

// マウス移動を処理するコールバック関数
void cursor_position_callback(GLFWwindow* window, double xpos, double ypos)
{
  int display_w, display_h;
  glfwGetFramebufferSize(window, &display_w, &display_h);


  ImGuiIO& io = ImGui::GetIO();
  // マウスがImGuiのウィンドウ内にあるときは
  // この中を通らない
  if (io.WantCaptureMouse == false) {

    //背景色
    bg_color[0] = xpos / display_w;
    bg_color[1] = ypos / display_h;
    bg_color[2] = bg_color[0] * bg_color[1];

  }

}


int main() {

  if (!glfwInit()) {
    return -1;
  }

  const char* glsl_version = "#version 130";
  glfwWindowHint(GLFW_CONTEXT_VERSION_MAJOR, 3);
  glfwWindowHint(GLFW_CONTEXT_VERSION_MINOR, 0);

  GLFWwindow* window = glfwCreateWindow(640, 480, "test", NULL, NULL);

  if (!window) {
    glfwTerminate();
    return -1;
  }

  glfwMakeContextCurrent(window);
  glfwSwapInterval(1);

  // 自分の作業用の目的
  glfwSetMouseButtonCallback(window, mouse_button_callback);
  glfwSetCursorPosCallback(window, cursor_position_callback);
  ///////////////
  ///////////////
  ///////////////
  IMGUI_CHECKVERSION();
  ImGui::CreateContext();
  ImGuiIO& io = ImGui::GetIO(); (void)io;

  ImGui::StyleColorsDark();

  ImGui_ImplGlfw_InitForOpenGL(window, true);
  ImGui_ImplOpenGL3_Init(glsl_version);
  float x = 0.f, y = 0.f;

  char buffer[1024];
  strcpy(buffer, "here");
  bool pushed;

  while (!glfwWindowShouldClose(window)) {


    glfwPollEvents();
    ///////////////
    ///////////////
    ///////////////
    // GUIを準備
    ImGui_ImplOpenGL3_NewFrame();
    ImGui_ImplGlfw_NewFrame();
    ImGui::NewFrame();

    ImGui::SetNextWindowPos(ImVec2(30, 30));
    ImGui::SetNextWindowSize(ImVec2(200, 250));
    ImGui::Begin("Title");

    ImGui::Text("input your message.");
    // ボタンを押されたフレームでpushedがtrueになる
    pushed = ImGui::Button("push", ImVec2{ 0,0 });
    ImGui::SameLine();
    ImGui::InputText("", buffer, sizeof(buffer));

    if (pushed) {
      printf("%s\n", buffer);
    }

    ImGui::End();
    ///////////////
    ///////////////
    ///////////////
    int display_w, display_h;
    glfwGetFramebufferSize(window, &display_w, &display_h);
    glClearColor(bg_color[0], bg_color[1], bg_color[2], 0.0f);
    glClear(GL_COLOR_BUFFER_BIT | GL_DEPTH_BUFFER_BIT);
    glViewport(0, 0, display_w, display_h);


    //////////////
    glColor3d(0.0, 0.0, 0.7);
    glBegin(GL_TRIANGLES);
    glVertex2d(-0.7,  0.7);
    glVertex2d(-0.7, -0.7);
    glVertex2d( 0.7, -0.0);
    glEnd();
    ///////////////
    ///////////////
    ///////////////
    // GUIをレンダリング
    ImGui::Render();
    ImGui_ImplOpenGL3_RenderDrawData(ImGui::GetDrawData());
    ///////////////
    ///////////////
    ///////////////

    glfwSwapBuffers(window);
  }

  ///////////////
  ///////////////
  ///////////////
  // Cleanup
  ImGui_ImplOpenGL3_Shutdown();
  ImGui_ImplGlfw_Shutdown();
  ImGui::DestroyContext();

  glfwDestroyWindow(window);
  glfwTerminate();
  return 0;
}
C言語でデバッグ用の文をリリース時には無効化するマクロ
標準でないのか疑問だったがちょっと(30秒くらい)検索して出てこなかったので誰かの役に立つかもしれない。
以下のDEBUG_INFOマクロは、指定した文を#if 1の時だけ実行する。
#if 0の時は/**/に置き換わる。なお/**/はスペース一個に置き換わる。
以下は初心者にありがちなfloatをループカウンタにする例。
値の推移を表示させたいがリリース時にはいらない時に使う。
基本形
#include <stdio.h>

// デバッグの時は #if 1 , そうでないときは0を指定
#if 0
#define DEBUG_INFO(a) a
#else
#define DEBUG_INFO(a) /**/
#endif


int main()
{

  int i = 0;

  float x;
  for (x = 0.1f; x <= 1.0f; x += 0.1f) {

    DEBUG_INFO(printf("%.10lf\n", x);)

    i++;
  }
  DEBUG_INFO(printf("%.10lf\n", x);)


  printf("%d\n", i);


}
上手くいかないケース
しかしこのマクロではうまく動いてくれない場合がある。
DEBUG_INFOの中に,(カンマ)があると、関数形式マクロと認識されてしまい、(多分)第二引数だけを指定した状態になり、しかし置換は第一引数に対して行われ、つまり第一引数は存在しないので、結果yが定義されていないというエラーが生じる(のだと思う)。
#include <stdio.h>

// デバッグの時は #if 1 , そうでないときは0を指定
#if 1
#define DEBUG_INFO(a) a
#else
#define DEBUG_INFO(a) /**/
#endif


int function(
  int x
  DEBUG_INFO(, int y)// エラー 'y':定義されていない識別子です。
) {

  return
    x
    DEBUG_INFO(*y);

}


int main()
{
  int a = 10, b = 12;
  int i = function(a DEBUG_INFO(,b));

    printf("%d\n", i);

}
2.応用形
C++11以降可変長引数マクロが使えるらしいので、それを使って以下のように書き換える。
#if 1
#define DEBUG_INFO(...) __VA_ARGS__
#else
#define DEBUG_INFO(a) /**/
#endif
可変長引数マクロは、... (ドット三つ)で可変長であることを表現し、展開時 __VA_ARGS__ が...に指定した内容に置き換わる。
#include <iostream>

// デバッグの時は #if 1 , そうでないときは0を指定
#if 1
#define DEBUG_INFO(...) __VA_ARGS__
#else
#define DEBUG_INFO(a) /**/
#endif


int function(
  int x
  DEBUG_INFO(, int y)
) {

  return
    x
    DEBUG_INFO(*y);

}


int main()
{
  int a = 10, b = 12;
  int i = function(a DEBUG_INFO(,b));

  printf("%d\n", i);

}
あとがき
標準にないのかこれ。今暇なくて真面目に探せない。