Rustやってみる(2)cargoコマンド
Cargo
CargoはRustのビルドシステム及びパッケージマネージャ。
新規プロジェクト作成
ビルド
cargo buildはカレントディレクトリにsrcディレクトリがあることを想定する。
デバッグビルド
リリースビルド
パッケージを使う
Rustではパッケージのことを「クレート」というらしい。Cargo.tomlの[dependencies]にモジュール名とバージョンを記述する。
[package]
name = "myproj"
version = "0.1.0"
edition = "2021"
[dependencies]
regex = "1.6.0"
use regex::Regex;

fn main() {
    let re = Regex::new(r"^\d{4}-\d{2}-\d{2}$").unwrap();
    println!("Did our date match? {}", re.is_match("2014-01-01"));
}
cargo buildすると勝手にcrates.ioからクレートを取得するので上記の記述以外にすることはない。
デバッグ(VSCode)
VSCodeでデバッグできるのだが、私の環境では、クレートを使っているとVSCode関連で失敗する。
細かく検証していないが上記regexを使った場合VSCodeからは実行すらできない。PowerShellからは動く。
たため、接続できませんでした。" }
どれだけ検索しても対策が見つからなかったがcodelldbのバージョンによっては起こる?らしい。
Rustやってみる(1)環境構築
プログラミング言語Rustをやってみる。
Windowsでは、
https://learn.microsoft.com/ja-jp/windows/dev-environment/rust/setup
のいうとおりにやればビルドできるようになる。以下要約。
インストール
1.VC++をインストール(必須環境)
2.Rustをインストール(本体)
https://www.rust-lang.org/tools/install
3.VSCodeをインストール(エディタ・開発環境)
https://code.visualstudio.com/
4.VSCodeの拡張機能をインストール
rust-analyzer
CodeLLDB
プロジェクト生成
プロジェクト生成にはGUIがないのでコマンドラインからcargoコマンドを叩く。
まずはプロジェクトを作成するディレクトリへ行き、
cargoコマンドでプロジェクトを作成する。「cargo new プロジェクト名」
プロジェクトを開く
作成したプロジェクトのディレクトリを引数にVSCodeを起動するか、VSCodeを開きディレクトリをドラッグ&ドロップする。
コマンドラインから開く場合(VSCodeのパスが通っている場合)
code first_rust_project
VSCodeにD&Dしてもいい

内容確認
src\main.rs ... ソースコード本体
Cargo.toml ... プロジェクトの設定ファイル
実行
VSCodeで、 [実行]>[デバッグの開始] 。
初回のみエラーメッセージのようなものが出るが、「OK」「はい」として、launch.jsonが出たら何もせず閉じてもう一度デバッグの開始。
以下引用:
CodeLLDB 拡張機能とデバッガーで初めてアプリを実行すると、"起動構成が提供されていないため、デバッグを開始できません" というダイアログ ボックスが表示されます。 [OK] をクリックすると、"このワークスペースで Cargo.toml が検出されました。 ターゲットの起動構成を生成しますか?" という 2 番目のダイアログ ボックスが表示されます。 [はい] をクリックします。 次に、launch.json ファイルを閉じて、もう一度デバッグを開始します。
gl_PointSize を使って頂点ごとにサイズ指定。カメラに迫る点群を疑似的に表現する
近い点をより大きく描画することで頂点がカメラに近づく表現をする。
#pragma warning(disable:4996)

#pragma comment(lib,"glew32.lib")


#include <gl/glew.h>
#include <GL/glut.h>

#include <fstream>
#include <sstream>
#include <vector>
#include <algorithm>
#include <array>

typedef std::array<GLfloat,3> point_t; //モデルの座標用 x y z
typedef std::array<GLfloat,4> color_t;//テクスチャ座標用 r g b a

//////////////////////////////////////////
//////////////////////////////////////////
//////////////////////////////////////////
const char* vshader_program = R"(
#version 460 core

layout(location = 0) in vec3 vtx;
layout(location = 1) in vec4 color;

out vec4 vColor;

uniform mat4 ModelViewMatrix;
uniform mat4 ProjectionMatrix;

// カメラ座標
uniform vec4 campos;

void main()
{
  gl_Position = ProjectionMatrix * ModelViewMatrix * vec4(vtx, 1.0);

  // 近いものほど大きく見せる
  float size = 50 / distance(campos,gl_Position);

  vColor = color;
  gl_PointSize = size; // 頂点のサイズ(ピクセル)
}

)";
//////////////////////////////////////////
//////////////////////////////////////////
//////////////////////////////////////////
const char* fshader_program = R"(
#version 460 core

out vec4 FragColor;

in vec4 vColor;

void main()
{
  FragColor = vColor;

}
)";
/////////////////////////////////
//バッファとデータ
GLuint vertexbufferName;
GLuint colorbufferName;
const GLuint v_count=100;

GLuint VertexShaderID;
void prepare_vertex_shader();

GLuint FragmentShaderID;
void prepare_fragment_shader();

GLuint ProgramID;
void link_program();


void init(void);
void display(void);

void timer(int value) {
  // 再描画
  glutPostRedisplay();

  // 100ミリ秒後にtimer関数を引数0で自分自身を呼び出す
  glutTimerFunc(100, timer, 0);
}

int main(int argc, char* argv[])
{
  glutInit(&argc, argv);
  glutInitDisplayMode(GLUT_RGBA);
  glutCreateWindow(argv[0]);
  glutDisplayFunc(display);
  glutReshapeWindow(300, 300);
  glewInit(); // glewの初期化
  init();
  glutTimerFunc(100, timer, 0);
  glutMainLoop();
  return 0;
}

void prepare_buffers();

void init(void)
{

  //頂点データと色情報の作成
  prepare_buffers();

  //頂点シェーダの準備
  prepare_vertex_shader();

  //フラグメントシェーダの準備
  prepare_fragment_shader();

  //プログラムのリンク
  link_program();

}


//////////////////////////////////////////////////
void prepare_buffers() {
  //////////////////////////////////////////
  //////////////////////////////////////////
  std::vector< point_t > vertex;
  std::vector< color_t > color;

  float scale=50000.0f;
  for (size_t i = 0; i < v_count; i++){
    float x = (rand() % (int)scale) * (1.0f / scale) - 0.5;
    float y = (rand() % (int)scale) * (1.0f / scale) - 0.5;
    float z = (rand() % (int)scale) * (1.0f / scale) - 0.5;
    vertex.emplace_back(point_t{ x*1.5f,y*1.5f,z*50 });

    float r = (rand() % (int)scale) * (1.0f / scale);
    float g = (rand() % (int)scale) * (1.0f / scale);
    float b = (rand() % (int)scale) * (1.0f / scale);
    color.emplace_back(color_t{ r,g,b,1 });
  }

  //////////////////////////////////////////
  //////////////////////////////////////////

  glGenBuffers(1, &vertexbufferName);
  glBindBuffer(GL_ARRAY_BUFFER, vertexbufferName);
  glBufferData(GL_ARRAY_BUFFER, 3 * v_count * sizeof(GLfloat), vertex.data(), GL_STATIC_DRAW);

  glGenBuffers(1, &colorbufferName);
  glBindBuffer(GL_ARRAY_BUFFER, colorbufferName);
  glBufferData(GL_ARRAY_BUFFER, 4 * v_count * sizeof(GLfloat), color.data(), GL_STATIC_DRAW);

}
void prepare_vertex_shader() {

  //////////////////////////////////////////////
    // シェーダを作ります
    // (作るといっても宣言みたいなもの)
  VertexShaderID = glCreateShader(GL_VERTEX_SHADER);

  ////////////////////////////////////////////
  // ファイルから頂点シェーダを読み込みます。
  // 注意 ここはSTLのifstreamとかstringstreamの使い方の話で、
  // OpenGL命令は一つも無い。
  std::string VertexShaderCode = vshader_program;
  ////////////////////////////////////////////
  // 頂点シェーダをコンパイルします。
  //printf("Compiling shader : %s\n", vertex_file_path);
  char const* VertexSourcePointer = VertexShaderCode.c_str();
  glShaderSource(VertexShaderID, 1, &VertexSourcePointer, NULL);
  glCompileShader(VertexShaderID);

  ////////////////////////////////////////////
  // エラーチェック
  GLint Result = GL_FALSE;
  int InfoLogLength;

  // 頂点シェーダをチェックします。
  glGetShaderiv(VertexShaderID, GL_COMPILE_STATUS, &Result);
  glGetShaderiv(VertexShaderID, GL_INFO_LOG_LENGTH, &InfoLogLength);
  if (Result == FALSE) {
    std::vector<char> VertexShaderErrorMessage(InfoLogLength);
    glGetShaderInfoLog(VertexShaderID, InfoLogLength, NULL, &VertexShaderErrorMessage[0]);
    fprintf(stdout, "%s\n", &VertexShaderErrorMessage[0]);
  }

}
void prepare_fragment_shader() {

  /////////////////////////////////////////////
  // シェーダを作ります。
  FragmentShaderID = glCreateShader(GL_FRAGMENT_SHADER);

  /////////////////////////////////////////////
  // ファイルからフラグメントシェーダを読み込みます。
  std::string FragmentShaderCode = fshader_program;
  /////////////////////////////////////////////
  // フラグメントシェーダをコンパイルします。
  //printf("Compiling shader : %s\n", fragment_file_path);
  char const* FragmentSourcePointer = FragmentShaderCode.c_str();
  glShaderSource(FragmentShaderID, 1, &FragmentSourcePointer, NULL);
  glCompileShader(FragmentShaderID);

  GLint Result = GL_FALSE;
  int InfoLogLength;

  /////////////////////////////////////////////
  // フラグメントシェーダをチェックします。
  glGetShaderiv(FragmentShaderID, GL_COMPILE_STATUS, &Result);
  glGetShaderiv(FragmentShaderID, GL_INFO_LOG_LENGTH, &InfoLogLength);
  if (Result == GL_FALSE) {
    std::vector<char> FragmentShaderErrorMessage(InfoLogLength);
    glGetShaderInfoLog(FragmentShaderID, InfoLogLength, NULL, &FragmentShaderErrorMessage[0]);
    fprintf(stdout, "%s\n", &FragmentShaderErrorMessage[0]);
  }
}
void link_program() {

  GLint Result = GL_FALSE;
  int InfoLogLength;

  ////////////////////////////////////////
  // プログラムをリンクします。
  fprintf(stdout, "Linking program\n");
  ProgramID = glCreateProgram();
  glAttachShader(ProgramID, VertexShaderID);
  glAttachShader(ProgramID, FragmentShaderID);
  glLinkProgram(ProgramID);

  ////////////////////////////////////////
  // プログラムをチェックします。
  glGetProgramiv(ProgramID, GL_LINK_STATUS, &Result);
  glGetProgramiv(ProgramID, GL_INFO_LOG_LENGTH, &InfoLogLength);
  std::vector<char> ProgramErrorMessage((std::max)(InfoLogLength, int(1)));
  glGetProgramInfoLog(ProgramID, InfoLogLength, NULL, &ProgramErrorMessage[0]);
  fprintf(stdout, "%s\n", &ProgramErrorMessage[0]);

}
void display(void)
{

  glClearColor(0, 0, 0, 1);
  glClear(GL_COLOR_BUFFER_BIT | GL_DEPTH_BUFFER_BIT);

  glEnable(GL_DEPTH_TEST);

  glLoadIdentity();
  //glTranslated(0.5, 0.0, 0.0);//平行移動

  glUseProgram(ProgramID);

  GLfloat mfproj[16];
  GLfloat mftran[16];

  mfproj[0] = 2.26961231;
  mfproj[1] = 0.0;
  mfproj[2] = 0.0;
  mfproj[3] = 0.0;
  mfproj[4] = 0.0;
  mfproj[5] = 2.41421366;
  mfproj[6] = 0.0;
  mfproj[7] = 0.0;
  mfproj[8] = 0.0;
  mfproj[9] = 0.0;
  mfproj[10] = -1.00020003;
  mfproj[11] = -1.00000000;
  mfproj[12] = 0.0;
  mfproj[13] = 0.0;
  mfproj[14] = -0.0200020000;
  mfproj[15] = 0.0;


  static float z = -10.0;

  z += 0.2;
  mftran[0] = 1.0;
  mftran[1] = 0.0;
  mftran[2] = 0.0;
  mftran[3] = 0.0;
  mftran[4] = 0.0;
  mftran[5] = 1.0;
  mftran[6] = 0.0;
  mftran[7] = 0.0;
  mftran[8] = 0.0;
  mftran[9] = 0.0;
  mftran[10] = 1.0;
  mftran[11] = 0.0;
  mftran[12] = 0.0;//x
  mftran[13] = 0.0;//y
  mftran[14] = z;//z
  mftran[15] = 1.0;
  GLint proj = glGetUniformLocation(ProgramID, "ProjectionMatrix");
  GLint modl = glGetUniformLocation(ProgramID, "ModelViewMatrix");
  glUniformMatrix4fv(proj, 1, GL_FALSE, mfproj);
  glUniformMatrix4fv(modl, 1, GL_FALSE, mftran);

  GLint campos = glGetUniformLocation(ProgramID, "campos");
  GLfloat fcp[4] = { 0,0,z };
  glUniform3fv(campos,1, fcp);


  //gl_PointSizeを有効にする
  glEnable(GL_VERTEX_PROGRAM_POINT_SIZE);

  // 頂点バッファ
  glEnableVertexAttribArray(0);
  glBindBuffer(GL_ARRAY_BUFFER, vertexbufferName);
  glVertexAttribPointer(
    0,                  // 属性0
    3,                  // 1要素の要素数 x y z
    GL_FLOAT,           // タイプ
    GL_FALSE,           // 正規化しない(データが整数型の時)
    0,                  // ストライド
    (void*)0            // 配列バッファオフセット
  );

  // カラーバッファ
  glEnableVertexAttribArray(1);
  glBindBuffer(GL_ARRAY_BUFFER, colorbufferName);
  glVertexAttribPointer(
    1,                  // 属性1
    4,                  // 1要素の要素数 r g b a
    GL_FLOAT,           // タイプ
    GL_FALSE,           // 正規化しない(データが整数型の時)
    0,                  // ストライド
    (void*)0            // 配列バッファオフセット
  );

  // 5頂点を描く
  glDrawArrays(GL_POINTS, 0, v_count);

  glDisableVertexAttribArray(0);
  glDisableVertexAttribArray(1);
  glDisableVertexAttribArray(2);

  ////////////////////////////////////////
  ////////////////////////////////////////
  glFlush();


}
自作ポリゴンデータフォーマットを考えた
色々実験したいときに複雑なフォーマットだと読み込むのがいちいち大変なのでファイル形式を考えた。特徴は入力コードのコピペ量が少ないところ。
ファイル形式
ファイル内のすべての行は「,」で区切られた4つの要素からなる
※ただし#が先頭の場合はスキップ
・ti 三角形の頂点index
・tn 三角形の面法線
・tc 三角形の色
・pp 頂点座標
・pc 頂点色
・pn 頂点法線
ti, 4 , 2 , 0 , 0
tn, 0.0 , 0.0 , 1.0 , 0
ti, 2 , 7 , 3 , 0
tn, 0.0 , -1.0 , 0.0 , 0
ti, 6 , 5 , 7 , 0
tn, -1.0 , 0.0 , 0.0 , 0
ti, 1 , 7 , 5 , 0
tn, 0.0 , 0.0 , -1.0 , 0
ti, 0 , 3 , 1 , 0
tn, 1.0 , 0.0 , -0.0 , 0
ti, 4 , 1 , 5 , 0
tn, 0.0 , 1.0 , -0.0 , 0
ti, 4 , 6 , 2 , 0
tn, 0.0 , -0.0 , 1.0 , 0
ti, 2 , 6 , 7 , 0
tn, 0.0 , -1.0 , 0.0 , 0
ti, 6 , 4 , 5 , 0
tn, -1.0 , 0.0 , 0.0 , 0
ti, 1 , 3 , 7 , 0
tn, 0.0 , 0.0 , -1.0 , 0
ti, 0 , 2 , 3 , 0
tn, 1.0 , 0.0 , 0.0 , 0
ti, 4 , 0 , 1 , 0
tn, 0.0 , 1.0 , -0.0 , 0
pp, 1.0 , 1.0 , 1.0 0
pn, 0.5773503184318542 , 0.5773503184318542 , 0.5773503184318542 , 0
pp, 1.0 , 1.0 , -1.0 0
pn, 0.5773503184318542 , 0.5773503184318542 , -0.5773503184318542 , 0
pp, 1.0 , -1.0 , 1.0 0
pn, 0.5773503184318542 , -0.5773503184318542 , 0.5773503184318542 , 0
pp, 1.0 , -1.0 , -1.0 0
pn, 0.5773503184318542 , -0.5773503184318542 , -0.5773503184318542 , 0
pp, -1.0 , 1.0 , 1.0 0
pn, -0.5773503184318542 , 0.5773503184318542 , 0.5773503184318542 , 0
pp, -1.0 , 1.0 , -1.0 0
pn, -0.5773503184318542 , 0.5773503184318542 , -0.5773503184318542 , 0
pp, -1.0 , -1.0 , 1.0 0
pn, -0.5773503184318542 , -0.5773503184318542 , 0.5773503184318542 , 0
pp, -1.0 , -1.0 , -1.0 0
pn, -0.5773503184318542 , -0.5773503184318542 , -0.5773503184318542 , 0
ファイル生成
import bpy
import sys


def my_triangulation(target = bpy.context.object) :

    # なにも選択されていなければ終了
    if target == None:
        return False

    # メッシュだけを対象とする
    if target.type == 'MESH' :

        # EDITモードへ移行するために現在のモードを保存して奥
        current = bpy.context.object.mode

        # Editモードへ移行
        bpy.ops.object.mode_set(mode = 'EDIT')

        # 三角形分割実行
        bpy.ops.mesh.quads_convert_to_tris()

        # モードをリストア。これをしないとEDITモードのままで終わる。
        bpy.ops.object.mode_set(mode = current)

    else:
        return False

    return True


############################################
############################################

def to_simple_polygon_file(outputto) :
    obj = bpy.context.active_object

    mesh = obj.data

    pvecname = "points"   # 頂点データの配列の変数名
    vnvecname = "vnorms"  # 頂点法線の配列の変数名
    fvecname = "faces"    # 面データの配列の変数名
    fnvecname = "fnorms"  # 面法線の配列の変数名

    print("/////////////////////////////////////")

    print("#szlm,-,-,-,-", file = outputto)


    for f in mesh.polygons:
        if not fvecname is None :
            print(
                "ti,",
                f.vertices[0], ",",
                f.vertices[1], ",",
                f.vertices[2],
                0,
                file = outputto
            )

        if not fnvecname is None :
            print(
                "tn,",
                f.normal.x, ",",
                f.normal.y, ",",
                f.normal.z,
                0,
                file = outputto
            )

    for v in mesh.vertices:
        if not pvecname is None :
            print(
                "pp,",
                v.co.x, ",",
                v.co.y, ",",
                v.co.z,
                0,
                file = outputto
            )

        if not vnvecname is None :
            print(
                "pn,",
                v.normal.x, ",",
                v.normal.y, ",",
                v.normal.z,
                0,
                file = outputto
            )


# 三角形分割
ret = my_triangulation()

o = open('c:/data/myfile3.txt', 'w')
to_simple_polygon_file(o)
o.close()
#as_cpp_array(sys.stdout)
読み込み
#pragma once

#pragma warning(disable:4996)

#include <vector>
#include <array>
#include <type_traits>
#include <string>

/*
#szlm,-,-,-,-
ti,1,2,3,-
tc,0.1,0.1,0.1,-
tn,0.1,0.1,0.1,-
pp,0.1,0.1,0.1,-
pc,0.1,0.1,0.1,-
pn,0.1,0.1,0.1,-
*/

struct szlm {
  std::vector<std::array<int, 4>> ti;
  std::vector<std::array<float, 4>>
    tc // triangle color
    ,tn// triangle normal
    ,pp// point position
    ,pc// point color
    ,pn// point normal
    ;
};
//! @brief 簡易的メッシュフォーマットの読み込み
//! @param [in] file ファイル名
//! @param [out] mesh メッシュを保存する構造体
bool read_mesh(const char* file, szlm* mesh) {
  FILE* fp = fopen(file, "r");
  if (fp == NULL)
    return false;

  constexpr size_t DIM = 4;

  const size_t BUFFERSIZE = 2048;
  char b[BUFFERSIZE];
  //,で分割
  auto split = [](char* buffer, std::vector<std::string>& split)->void {
    const char* sp = ",";
    char* tok = strtok(buffer, sp);
    while (tok != NULL) {
      split.push_back(tok);
      tok = strtok(NULL, sp);  /* 2回目以降 */
    }
  };
  //配列へ入力

  while (fgets(b, BUFFERSIZE, fp) != NULL) {
    std::array<int, DIM> ii;
    std::array<float, DIM> ff;
    std::fill_n(ii.begin(), DIM, -1);
    std::fill_n(ff.begin(), DIM, INFINITY);
    std::vector<std::string> line;
    split(b, line);//入力行を,で分割
    for (size_t i = 1; i < (std::min)(DIM, line.size()); i++) {
      ii[i - 1] = atoi(line[i].c_str());
      ff[i - 1] = atof(line[i].c_str());
    }

    if (b[0] == '#')continue;
    else if (strncmp(b, "ti", 2) == 0)mesh->ti.push_back({ ii[0],ii[1],ii[2],ii[3] });// triangle pointindex
    else if (strncmp(b, "tc", 2) == 0)mesh->tc.push_back({ ff[0],ff[1],ff[2],ff[3] });// triangle color
    else if (strncmp(b, "tn", 2) == 0)mesh->tn.push_back({ ff[0],ff[1],ff[2],ff[3] });// triangle normal
    else if (strncmp(b, "pp", 2) == 0)mesh->pp.push_back({ ff[0],ff[1],ff[2],ff[3] });// point position
    else if (strncmp(b, "pc", 2) == 0)mesh->pc.push_back({ ff[0],ff[1],ff[2],ff[3] });// point color
    else if (strncmp(b, "pn", 2) == 0)mesh->pn.push_back({ ff[0],ff[1],ff[2],ff[3] });// point normal
  }
  fclose(fp);

  return false;
}
表示
void disp(const szlm& mesh) {

    glPolygonMode(GL_FRONT_AND_BACK, GL_LINE);
    glBegin(GL_TRIANGLES);
    for (size_t i = 0; i < mesh.ti.size(); i++) {
        int v0 = mesh.ti[i][0];
        int v1 = mesh.ti[i][1];
        int v2 = mesh.ti[i][2];

        glNormal3fv(mesh.tn[i].data());
        glVertex3fv(mesh.pp[v0].data());
        glVertex3fv(mesh.pp[v1].data());
        glVertex3fv(mesh.pp[v2].data());

    }
    glEnd();

}


int main()
{

    struct szlm mesh;
    read_mesh("C:\\data\\myfile3.txt", &mesh);

    /* ... */


    disp(mesh);
}
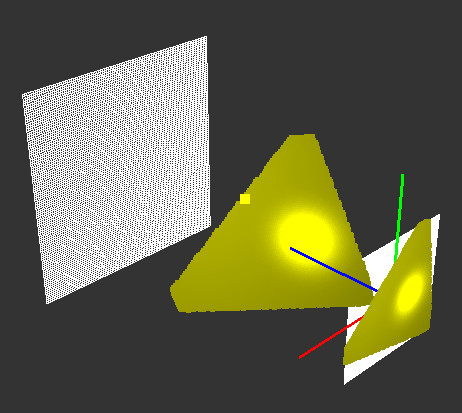
レイキャストを実装してみる(5) 複数のオブジェクト
オブジェクトをobject_3dから継承させ、intersectをoverrideする。それ以外はほぼ変わらない

raycast.hpp
#pragma once

#include "Grid.hpp"

#include <array>
#include <vector>
#include <memory>

//////////////////////////////////////////////
//////////////////////////////////////////////
// 三次元オブジェクトのスーパークラス
class object_3d {
protected:
  glm::vec3 _color;
public:

  object_3d(const glm::vec3& color_) :_color(color_) {}
  object_3d() {}

  virtual bool intersect(
    glm::vec3* pos_,
    glm::vec3* color_,
    glm::vec3* normal_,
    float* distance_,
    const std::array<glm::vec3, 2>& ray_)const = 0;

  const glm::vec3& color()const { return _color; }
  glm::vec3& color() { return _color; }

};
// 球オブジェクト
class object_sphere:public object_3d {
  glm::vec3 _center;
  float _r;
public:
  object_sphere(glm::vec3 center_, glm::vec3 color_,float radius_) :
    _center(center_),_r(radius_), object_3d(color_) {}
  object_sphere() {}

  virtual bool intersect(
    glm::vec3* pos_,
    glm::vec3* color_,
    glm::vec3* normal_,
    float* distance_,
    const std::array<glm::vec3, 2>& ray_)const override;

};
// 三角形オブジェクト
class object_triangle :public object_3d {
  std::array<glm::vec3,3> _points;
public:
  object_triangle(
    std::array<glm::vec3, 3> points_, glm::vec3 color_) :
    _points(points_), object_3d(color_){}
  object_triangle() {}

  bool intersect(
    glm::vec3* pos_,
    glm::vec3* color_,
    glm::vec3* normal_,
    float* distance_,
    const std::array<glm::vec3, 2>& ray_)const override;


};
//////////////////////////////////////////////
//////////////////////////////////////////////
// ポイントライト
class light_point {
  glm::vec3 _position;
  glm::vec3 _diffuse_color;
  glm::vec3 _ambient_color;
  glm::vec3 _specular_color;
public:

  light_point(
    const glm::vec3& position_,
    const glm::vec3& diffuse_color_,
    const glm::vec3& ambient_color_,
    const glm::vec3& specular_color_
  ) :
    _position(position_),
    _diffuse_color(diffuse_color_),
    _ambient_color(ambient_color_),
    _specular_color(specular_color_)
  {}
  light_point() {}

  glm::vec3 calc_vector_point_to_light(const glm::vec3& point_)const {
    // from -> _position
    return glm::normalize(_position - point_);
  }

  const glm::vec3& position()const {return _position;}
  glm::vec3& position() { return _position; }

  const glm::vec3& diffuse_color()const {return _diffuse_color;}
  glm::vec3& diffuse_color() { return _diffuse_color; }

  const glm::vec3& ambient_color()const { return _ambient_color; }
  glm::vec3& ambient_color() { return _ambient_color; }

  const glm::vec3& specular_color()const { return _specular_color; }
  glm::vec3& specular_color() { return _specular_color; }

};

struct hit_pixel_t {
  glm::vec3 _position;
  glm::vec3 _color;
  hit_pixel_t(const glm::vec3& position_, const glm::vec3& color_) :
    _position(position_), _color(color_) {}

};


// レイキャスト用のクラス
class my_raycast {
  grid g[2];
  float _startZ;
  float _endZ;
  int _pxwidth;
  int _pxheight;
public:

  glm::vec3 get_eye_position()const {
    float a = g[0].ywidth() / 2.0;
    float b = g[1].ywidth() / 2.0;
    float d = glm::length(g[1].center() - g[0].center());
    float c = a * d / (b - a);


    // 始点 → 終点
    glm::vec3 veceye = g[1].center() - g[0].center();
    veceye = glm::normalize(veceye);
    return g[0].center()  - veceye * c;
  }

  my_raycast() {}

  int width()const { return _pxwidth; }
  int height()const { return _pxheight; }

  // レイの開始点となるグリッド、終点となるグリッドを作成する
  void set(const float startZ_, const float endZ_, const int pxwidth_, const int pxheight_);

  //グリッド取得
  const grid& get_grid(const size_t index)const {
    return g[index];
  }

  //グリッドから作成するレイの数を取得
  int ray_count() {
    return g[0].cellCount();
  }

  //グリッドから作成するレイを取得
  std::array<glm::vec3, 2> get_ray(const size_t index)const;

  //始点グリッド、終点グリッドの中間の位置を取得(表示用)
  float lookatZ()const {
    return (_startZ + _endZ) / 2.f;
  }


  //////////////////////////////////////////////
  //////////////////////////////////////////////

private:

  // オブジェクト一覧
  std::vector< std::shared_ptr<object_3d> > _objlist;


  std::vector< hit_pixel_t > _hits;
public:
  void raycast();
  std::vector< hit_pixel_t >& get_intersects() {return _hits;}

  void set_object(const object_sphere& obj_);
  void set_object(const object_triangle& obj_);

  //////////////////////////////
private:
  light_point _light;
public:
  void set_light(const light_point& light_);

  const light_point& get_light()const { return _light; }
};

// objectNormal 面法線
// lightDirection そのポイント→光源へのベクトル
// lightColor ライトの色
inline glm::vec3 calc_diffuse(
  const glm::vec3& lightDiffuse,
  const glm::vec3& MaterialDiffuse,
  const glm::vec3& lightIncidence,
  const glm::vec3& objectNormal)
{
  // 拡散反射は「そのポイント→光源」と面法線の内積を取る

  float sDotN = glm::max(glm::dot(-lightIncidence, objectNormal), 0.f);

  return lightDiffuse * MaterialDiffuse *sDotN;
}

inline glm::vec3 calc_ambient(
  const glm::vec3& LightAmbient,
  const glm::vec3& MaterialAmbient)
{
  return LightAmbient * MaterialAmbient;
}

// https://araramistudio.jimdo.com/2017/10/02/%E3%83%97%E3%83%AD%E3%82%B0%E3%83%A9%E3%83%9F%E3%83%B3%E3%82%B0-directx-11%E3%81%A7%E9%8F%A1%E9%9D%A2%E5%8F%8D%E5%B0%84-specular-reflection/
// https://amengol.github.io/game_physics/using-glm-reflect-to-react/
// https://learnopengl.com/Lighting/Basic-Lighting

inline glm::vec3 calc_specular(
  const glm::vec3& eyePosition,
  const glm::vec3& lightSpecularColor,
  const glm::vec3& materialSpecularColor,
  const glm::vec3& lightIncidence, // 入射
  const float materialShininess,
  const glm::vec3& objectNormal,
  const glm::vec3& objectPosition
)
{

  glm::vec3 VertexToEye = glm::normalize(eyePosition - objectPosition);


  glm::vec3 LightReflect = glm::normalize(glm::reflect(lightIncidence, objectNormal));

  float SpecularFactor = glm::pow(glm::max(glm::dot(VertexToEye, LightReflect),0.f), materialShininess);

  glm::vec3 SpecularColor(0, 0, 0);
  SpecularColor = SpecularFactor * lightSpecularColor * materialSpecularColor;

  return SpecularColor;

}
raycast.cpp
#include "raycast.hpp"

#include <glm/gtx/intersect.hpp>
#include <glm/gtx/normal.hpp >

#include <memory>

bool object_sphere::intersect(
  glm::vec3* pos_,
  glm::vec3* color_,
  glm::vec3* normal_,
  float* distance_,
  const std::array<glm::vec3, 2>& ray_) const{

  glm::vec3 nray = glm::normalize(ray_[1] - ray_[0]);

  float distance;

  bool valid = glm::intersectRaySphere(ray_[0], nray, _center, _r*_r, distance);

  //レイが衝突した点の座標
  *pos_ = ray_[0] + nray * distance;

  //色の設定
  *color_ = _color;


  //面法線
  // 球中心 → 衝突点
  *normal_ = glm::normalize(*pos_ - _center);

  *distance_ = distance;

  return valid;
}


bool object_triangle::intersect(
  glm::vec3* pos_,
  glm::vec3* color_,
  glm::vec3* normal_,
  float* distance_,
  const std::array<glm::vec3, 2>& ray_)const {

  glm::vec3 nray = glm::normalize(ray_[1] - ray_[0]);

  float distance;

  glm::vec2 bary;

  bool valid = glm::intersectRayTriangle(
    ray_[0],
    nray,
    _points[0],
    _points[1],
    _points[2],
    bary,
    distance
  );

  //レイが衝突した点の座標
  *pos_ = ray_[0] + nray * distance;


  //色の設定
  *color_ = _color;

  //面法線
  *normal_ = glm::triangleNormal(
    _points[0],
    _points[1],
    _points[2]
    ); // normalize済


  *distance_ = distance;
  return valid;

}


void my_raycast::set(const float startZ_, const float endZ_, const int pxwidth_, const int pxheight_) {
  _startZ = startZ_;
  _endZ = endZ_;

  _pxwidth = pxwidth_;
  _pxheight = pxheight_;

  glm::vec3 vecx(1, 0, 0);
  glm::vec3 vecy(0, 1, 0);

  g[0] = grid(
    vecx,
    vecy,
    glm::vec3(0, 0, _startZ),
    1.f, 1.f,
    pxwidth_, pxheight_
  );
  g[1] = grid(
    vecx,
    vecy,
    glm::vec3(0, 0, _endZ),
    2.f, 2.f,
    pxwidth_, pxheight_
  );

}


std::array<glm::vec3, 2> my_raycast::get_ray(const size_t index)const {
  return
    std::array<glm::vec3, 2>{
    g[0][index].center(),
      g[1][index].center()
  };

}

void my_raycast::set_object(const object_sphere& obj_) {
  _objlist.push_back(std::make_shared<object_sphere>(obj_));
}
void my_raycast::set_object(const object_triangle& obj_) {
  _objlist.push_back(std::make_shared<object_triangle>(obj_));
}

void my_raycast::set_light(const light_point& light_) {
  _light = light_;
}

void my_raycast::raycast() {

  // 結果の初期化
  float inf = std::numeric_limits<float>::infinity();
  _hits.clear();
  _hits.resize(_pxwidth * _pxheight,
    hit_pixel_t(
      glm::vec3(inf, inf, inf),
      glm::vec3(0, 0, 0)
    )
  );

  for (size_t i = 0; i < _pxwidth * _pxheight; i++) {

    auto ray = get_ray(i);

    glm::vec3 p; // レイがヒットした座標
    glm::vec3 c; // レイがヒットした位置の色
    glm::vec3 n; // レイがヒットした位置の法線

    float distance = (std::numeric_limits<float>::max)();
    bool hit = false;
    for (auto _obj : _objlist) {
      float _tmpdist;
      glm::vec3 tmp_p;
      glm::vec3 tmp_c;
      glm::vec3 tmp_n;
      if (_obj->intersect(&tmp_p, &tmp_c, &tmp_n, &_tmpdist, ray) == true) {
        if (_tmpdist < distance) {
          p = tmp_p;
          c = tmp_c;
          n = tmp_n;
        }
        hit = true;
      };
      if (hit) {
        _hits[i]._position = p;

        // ライトの入射ベクトル
        glm::vec3 lightIncidence = -_light.calc_vector_point_to_light(p);

        glm::vec3 diffuse = calc_diffuse(_light.diffuse_color(), c, lightIncidence, n);

        glm::vec3 specular = calc_specular(
          get_eye_position(),
          _light.specular_color(),
          c,
          lightIncidence,
          80, n, p);

        glm::vec3 ambient = calc_ambient(
          _light.ambient_color(), c
        );

        _hits[i]._color = ambient + diffuse + specular;
      }
    }
  }
}
main.cpp
#include <iostream>
#include <array>

#include<GL/freeglut.h>
#include<gl/GL.h>

#include "raycast.hpp"

#include<glm/gtc/type_ptr.hpp>

#include<glm/gtc/matrix_transform.hpp>

my_raycast mydata;


//! @brief グリッドを表示
//! @param [in] g グリッドオブジェクト
//! @param [in] dispcenter セルの中央を表示するか
void drawGrid(const grid& g, const bool dispcenter) {

  glLineWidth(1);
  glColor3d(1, 1, 1);
  for (size_t i = 0; i < g.cellCount(); i++) {
    glBegin(GL_LINE_LOOP);
    glVertex3fv(glm::value_ptr(g.p0(i)));
    glVertex3fv(glm::value_ptr(g.p1(i)));
    glVertex3fv(glm::value_ptr(g.p2(i)));
    glVertex3fv(glm::value_ptr(g.p3(i)));

    glEnd();
  }

  if (dispcenter) {
    glPointSize(1);
    glColor3d(1, 1, 1);
    glBegin(GL_POINTS);
    for (size_t i = 0; i < g.cellCount(); i++) {
      glVertex3fv(
        glm::value_ptr(g[i].center()));
    }
    glEnd();
  }
}


void drawXYZ() {
  glLineWidth(3);
  glBegin(GL_LINES);
  glColor3f(1, 0, 0);
  glVertex3f(0, 0, 0);
  glVertex3f(1, 0, 0);

  glColor3f(0, 1, 0);
  glVertex3f(0, 0, 0);
  glVertex3f(0, 1, 0);

  glColor3f(0, 0, 1);
  glVertex3f(0, 0, 0);
  glVertex3f(0, 0, 1);
  glEnd();
  glLineWidth(1);
}

void drawRays() {
  glBegin(GL_LINES);
  for (size_t i = 0; i < mydata.ray_count(); i++) {
    auto ray = mydata.get_ray(i);
    glColor3f(1.0, 1.0, 1.0);
    glVertex3fv(glm::value_ptr(ray[0]));
    glColor3f(0.0, 0.0, 1.0);
    glVertex3fv(glm::value_ptr(ray[1]));
  }
  glEnd();
}


//ウィンドウの幅と高さ
int width, height;

//描画関数
void disp(void) {

  glViewport(0, 0, width, height);

  glClearColor(0.2, 0.2, 0.2, 1);
  glClear(GL_COLOR_BUFFER_BIT | GL_DEPTH_BUFFER_BIT);

  glMatrixMode(GL_PROJECTION);
  glLoadIdentity();
  glm::mat4 proj = glm::perspectiveFov(glm::radians(45.f), (float)width, (float)height, 0.1f, 50.f);
  glLoadMatrixf(glm::value_ptr(proj));

  glMatrixMode(GL_MODELVIEW);
  glLoadIdentity();

  //////////////////////////////////////////
  //////////////////////////////////////////
  // カメラの設定
  float z = mydata.lookatZ();
  glm::mat4 look = glm::lookAt(
    glm::vec3(5, 4, z-5 ),// eye
    glm::vec3(0, 0, z ), // lookat
    glm::vec3(0,1, 0)   // up
  );
  glLoadMatrixf(glm::value_ptr(look));
  //////////////////////////////////////////
  // グリッドを表示
  drawGrid(mydata.get_grid(0), false);//from
  drawGrid(mydata.get_grid(1), false);//to
  //////////////////////////////////////////
  // 作成したレイを表示
  //drawRays();
  //////////////////////////////////////////
  glPointSize(3);
  glBegin(GL_POINTS);
  for (size_t i = 0; i < mydata.get_intersects().size(); i++) {

    glColor3fv(
      glm::value_ptr(
        mydata.get_intersects()[i]._color
      )
    );

    glVertex3fv(
      glm::value_ptr(mydata.get_intersects()[i]._position)
    );
  }
  glEnd();
  glPointSize(1);

  drawXYZ();

  glPointSize(3);
  glBegin(GL_POINTS);
  for (size_t i = 0; i < mydata.get_intersects().size(); i++) {
    if (isinf(mydata.get_intersects()[i]._position.x) == false) {
      glColor3fv(
        glm::value_ptr(
          mydata.get_intersects()[i]._color
        )
      );
      glVertex3fv(
        glm::value_ptr(
          mydata.get_grid(0)[i].center()
        )
      );
    }
  }
  glEnd();
  glPointSize(1);

  glColor3d(1, 1, 0);
  glPointSize(10);
  glBegin(GL_POINTS);
  glVertex3fv(glm::value_ptr(mydata.get_light().position()));
  glEnd();
  glPointSize(1);
  glColor3d(1, 0, 0);


  glColor3d(0, 0, 1);
  glPointSize(35);
  glBegin(GL_POINTS);
  glm::vec3 eyepos = mydata.get_eye_position();
  glVertex3fv(glm::value_ptr(eyepos));
  glEnd();
  glPointSize(1);


  glFlush();
}

//ウィンドウサイズの変化時に呼び出される
void reshape(int w, int h) {
  width = w; height = h;

  disp();
}

//エントリポイント
int main(int argc, char** argv)
{
  glutInit(&argc, argv);
  glutInitWindowPosition(100, 50);
  glutInitWindowSize(500, 500);
  glutInitDisplayMode(GLUT_SINGLE | GLUT_RGBA);


  mydata.set(0.f, 3.f,100,100);
  ///////////////////////////////////
  mydata.set_object( // 球の登録
    object_sphere(
      glm::vec3(0.0, 0.0, 2), // 球の中心
      glm::vec3(1.0, 0, 0),   // 球の色
      0.5
    )
  );

  mydata.set_object( // 三角形の登録
    object_triangle(
      std::array< glm::vec3, 3>{
        glm::vec3(0.916876, -0.840909, 1.58713),
          glm::vec3(-0.633301, -0.922765, 0.585358),
          glm::vec3(-0.513684, 0.453145, 1.330333)
      },
      glm::vec3(1, 1, 0)
      )
  );
  mydata.set_light(
    light_point(
      glm::vec3(1.0, 1.0, 0.5), // ライトの位置
      glm::vec3(0.5, 0.5, 0.5), // diffuse色
      glm::vec3(0.2, 0.2, 0.2), // ambient色
      glm::vec3(1.0, 1.0, 1.0)  // specular色
    )
  );
  mydata.raycast();


  glutCreateWindow("sample");
  glutDisplayFunc(disp);
  glutReshapeFunc(reshape);
  glutMainLoop();

  return 0;
}
レイキャストを実装してみる(4) 三角形との交差
球の代わりに三角形を使ってみる。
raycast.hpp
#pragma once

#include "Grid.hpp"

#include <array>

//////////////////////////////////////////////
//////////////////////////////////////////////
// 球オブジェクト
class object_sphere {
  glm::vec3 _center;
  glm::vec3 _color;
  float _r;
public:
  object_sphere(glm::vec3 center_, glm::vec3 color_,float radius_) :
    _center(center_), _color(color_),_r(radius_) {}
  object_sphere() {}

  //! @brief レイと球の交点を求める
  //! @param [out] pos_ 交点の座標
  //! @param [out] color_ 球オブジェクトの色
  //! @param [out] normal_ 交点の面の法線
  //! @param [in] ray_ レイ
  //! @retval true 交差している
  //! @retval false 交差していない
  bool intersect(
    glm::vec3* pos_,
    glm::vec3* color_,
    glm::vec3* normal_,
    const std::array<glm::vec3, 2>& ray_)const;

  const glm::vec3& color()const { return _color; }
  glm::vec3& color() { return _color; }

};
//////////////////////////////////////////////
//////////////////////////////////////////////
// 三角形オブジェクト
class object_triangle {
  std::array<glm::vec3, 3> _points;
  glm::vec3 _color;
public:
  object_triangle(
    std::array<glm::vec3, 3> points_, glm::vec3 color_) :
    _points(points_), _color(color_) {}
  object_triangle() {}

  bool intersect(
    glm::vec3* pos_,
    glm::vec3* color_,
    glm::vec3* normal_,
    const std::array<glm::vec3, 2>& ray_)const;

  const glm::vec3& color()const { return _color; }
  glm::vec3& color() { return _color; }

};
//////////////////////////////////////////////
//////////////////////////////////////////////
// ポイントライト
class light_point {
  glm::vec3 _position;
  glm::vec3 _diffuse_color;
  glm::vec3 _ambient_color;
  glm::vec3 _specular_color;
public:

  light_point(
    const glm::vec3& position_,
    const glm::vec3& diffuse_color_,
    const glm::vec3& ambient_color_,
    const glm::vec3& specular_color_
  ) :
    _position(position_),
    _diffuse_color(diffuse_color_),
    _ambient_color(ambient_color_),
    _specular_color(specular_color_)
  {}
  light_point() {}

  glm::vec3 calc_vector_point_to_light(const glm::vec3& point_)const {
    // from -> _position
    return glm::normalize(_position - point_);
  }

  const glm::vec3& position()const {return _position;}
  glm::vec3& position() { return _position; }

  const glm::vec3& diffuse_color()const {return _diffuse_color;}
  glm::vec3& diffuse_color() { return _diffuse_color; }

  const glm::vec3& ambient_color()const { return _ambient_color; }
  glm::vec3& ambient_color() { return _ambient_color; }

  const glm::vec3& specular_color()const { return _specular_color; }
  glm::vec3& specular_color() { return _specular_color; }

};

struct hit_pixel_t {
  glm::vec3 _position;
  glm::vec3 _color;
  hit_pixel_t(const glm::vec3& position_, const glm::vec3& color_) :
    _position(position_), _color(color_) {}

};


// レイキャスト用のクラス
class my_raycast {
  grid g[2];
  float _startZ;
  float _endZ;
  int _pxwidth;
  int _pxheight;
public:

  //! @brief 視点を取得
  //! @details 普通は視点、near , farからレイを作成すると思うが、今回は
  //! グリッドを二枚作ることでnear,farを決定しているので、視点を計算で求める必要がある。
  //! 視点はspecular計算の時に必要となる。
  glm::vec3 get_eye_position()const {
    float a = g[0].ywidth() / 2.0;
    float b = g[1].ywidth() / 2.0;
    float d = glm::length(g[1].center() - g[0].center());
    float c = a * d / (b - a);


    // 始点 → 終点
    glm::vec3 veceye = g[1].center() - g[0].center();
    veceye = glm::normalize(veceye);
    return g[0].center()  - veceye * c;
  }

  my_raycast() {}

  //! @brief 結果のピクセル数(幅)を取得
  int width()const { return _pxwidth; }
  //! @brief 結果のピクセル数(高さ)を取得
  int height()const { return _pxheight; }

  //! @brief レイの開始点となるグリッド、終点となるグリッドを作成する
  //! @param [in] startZ_   始点のグリッドのZ座標
  //! @param [in] endZ_   終点のグリッドのZ座標
  //! @param [in] pxwidth_  ピクセル数 X
  //! @param [in] pxheight_ ピクセル数 Y
  void set(const float startZ_, const float endZ_, const int pxwidth_, const int pxheight_);

  //グリッド取得
  const grid& get_grid(const size_t index)const {
    return g[index];
  }

  //グリッドから作成するレイの数を取得
  int ray_count() {
    return g[0].cellCount();
  }

  //グリッドから作成するレイを取得
  std::array<glm::vec3, 2> get_ray(const size_t index)const;

  //始点グリッド、終点グリッドの中間の位置を取得(表示用)
  float lookatZ()const {
    return (_startZ + _endZ) / 2.f;
  }


  //////////////////////////////////////////////
  //////////////////////////////////////////////

private:
  // object_sphere _obj;
  object_triangle _obj;

  std::vector< hit_pixel_t > _hits;
public:
  void raycast();
  std::vector< hit_pixel_t >& get_intersects() {return _hits;}

  //void set_object(const object_sphere& obj_);
  void set_object(const object_triangle& obj_);

  //////////////////////////////
private:
  light_point _light;
public:
  void set_light(const light_point& light_);

  const light_point& get_light()const { return _light; }
};

//! @brief diffuse計算
//! @param [in] lightDiffuse ライトの色
//! @param [in] materialDiffuse オブジェクトの色
//! @param [in] lightIncidence ライトの入射ベクトル
//! @param [in] objectNormal 面法線
//! @return diffuse色
inline glm::vec3 calc_diffuse(
  const glm::vec3& lightDiffuse,
  const glm::vec3& materialDiffuse,
  const glm::vec3& lightIncidence,
  const glm::vec3& objectNormal)
{
  // 拡散反射は「そのポイント→光源」と面法線の内積を取る

  float sDotN = glm::max(glm::dot(-lightIncidence, objectNormal), 0.f);

  return lightDiffuse * materialDiffuse *sDotN;
}

//! @brief ambient計算
//! @param [in] lightAmbient ライトの色
//! @param [in] materialAmbient オブジェクトの色
//! @return ambient色
inline glm::vec3 calc_ambient(
  const glm::vec3& lightAmbient,
  const glm::vec3& materialAmbient)
{
  return lightAmbient * materialAmbient;
}

//! @brief specular計算
//! @param [in] eyePosition 視点の座標
//! @param [in] lightSpecularColor ライトの色
//! @param [in] materialSpecularColor オブジェクトの色
//! @param [in] lightIncidence ライトの入射ベクトル
//! @param [in] materialShininess 光沢度
//! @param [in] objectNormal レイがヒットした位置の面法線
//! @param [in] objectPosition レイがヒットした座標
//! @return specular色
inline glm::vec3 calc_specular(
  const glm::vec3& eyePosition,
  const glm::vec3& lightSpecularColor,
  const glm::vec3& materialSpecularColor,
  const glm::vec3& lightIncidence, // 入射
  const float materialShininess,
  const glm::vec3& objectNormal,
  const glm::vec3& objectPosition
)
{

  // 参考文献:
  // https://araramistudio.jimdo.com/2017/10/02/%E3%83%97%E3%83%AD%E3%82%B0%E3%83%A9%E3%83%9F%E3%83%B3%E3%82%B0-directx-11%E3%81%A7%E9%8F%A1%E9%9D%A2%E5%8F%8D%E5%B0%84-specular-reflection/
  // https://amengol.github.io/game_physics/using-glm-reflect-to-react/
  // https://learnopengl.com/Lighting/Basic-Lighting

  // レイとの交点→カメラ位置 のベクトル
  glm::vec3 VertexToEyeVec = glm::normalize(eyePosition - objectPosition);

  // ライトの入射に対する反射ベクトル
  glm::vec3 LightReflect = glm::normalize(glm::reflect(lightIncidence, objectNormal));

  float SpecularFactor = glm::pow(glm::max(glm::dot(VertexToEyeVec, LightReflect),0.f), materialShininess);

  glm::vec3 SpecularColor(0, 0, 0);
  SpecularColor = SpecularFactor * lightSpecularColor * materialSpecularColor;

  return SpecularColor;

}
raycast.cpp
#include "raycast.hpp"

#include <glm/gtx/intersect.hpp>


#include <glm/gtx/normal.hpp>

bool object_sphere::intersect(
  glm::vec3* pos_,
  glm::vec3* color_,
  glm::vec3* normal_,
  const std::array<glm::vec3, 2>& ray_) const{

  // レイから正規化ベクトルを作成
  glm::vec3 nray = glm::normalize(ray_[1] - ray_[0]);

  // レイの始点から交点までの距離
  float distance;
  bool valid = glm::intersectRaySphere(ray_[0], nray, _center, _r*_r, distance);

  //レイが衝突した点の座標
  *pos_ = ray_[0] + nray * distance;

  //色の設定
  *color_ = _color;


  //面法線
  // 球中心 → 衝突点
  *normal_ = glm::normalize(*pos_ - _center);

  // 交差していればtrue
  return valid;
}
/////////////////////////////////
// 三角形とレイの交差
bool object_triangle::intersect(
  glm::vec3* pos_,
  glm::vec3* color_,
  glm::vec3* normal_,
  const std::array<glm::vec3, 2>& ray_)const {

  glm::vec3 nray = glm::normalize(ray_[1] - ray_[0]);

  float distance;

  glm::vec2 bary;

  bool valid = glm::intersectRayTriangle(
    ray_[0],
    nray,
    _points[0],
    _points[1],
    _points[2],
    bary,
    distance
  );

  //レイが衝突した点の座標
  *pos_ = ray_[0] + nray * distance;


  //色の設定
  *color_ = _color;

  //面法線
  *normal_ = glm::triangleNormal(
    _points[0],
    _points[1],
    _points[2]
  ); // normalize済

  return valid;

}
void my_raycast::set(const float startZ_, const float endZ_, const int pxwidth_, const int pxheight_) {
  _startZ = startZ_;
  _endZ = endZ_;

  _pxwidth = pxwidth_;
  _pxheight = pxheight_;

  glm::vec3 vecx(1, 0, 0);
  glm::vec3 vecy(0, 1, 0);

  g[0] = grid(
    vecx,
    vecy,
    glm::vec3(0, 0, _startZ),
    1.f, 1.f,
    pxwidth_, pxheight_
  );
  g[1] = grid(
    vecx,
    vecy,
    glm::vec3(0, 0, _endZ),
    2.f, 2.f,
    pxwidth_, pxheight_
  );

}

//! @brief レイの取得
//! @param [in] index レイの番号 最大 pxwidth_ × pxheight_
std::array<glm::vec3, 2> my_raycast::get_ray(const size_t index)const {
  return
    std::array<glm::vec3, 2>{
    g[0][index].center(),
      g[1][index].center()
  };

}

//void my_raycast::set_object(const object_sphere& obj_) {
//  _obj = obj_;
//}
void my_raycast::set_object(const object_triangle& obj_) {
  _obj = obj_;
}

void my_raycast::set_light(const light_point& light_) {
  _light = light_;
}

void my_raycast::raycast() {

  float inf = std::numeric_limits<float>::infinity();
  // 結果の初期化
  _hits.clear();
  _hits.resize(
    _pxwidth * _pxheight,
    hit_pixel_t(
      glm::vec3(inf, inf, inf),
      glm::vec3(0, 0, 0)
    )
  );

  //
  for (size_t y = 0; y < _pxheight; y++) {
    for (size_t x = 0; x < _pxwidth; x++) {
      size_t index = y * _pxwidth + x;
      auto ray = get_ray(index);

      glm::vec3 p; // レイがヒットした座標
      glm::vec3 c; // レイがヒットした位置の色
      glm::vec3 n; // レイがヒットした位置の法線
      if (_obj.intersect(&p, &c,&n, ray) == true) {

        _hits[index]._position = p;

        // ライトの入射ベクトル
        glm::vec3 lightIncidence = -_light.calc_vector_point_to_light(p);

        // diffuse色の計算
        glm::vec3 diffuse = calc_diffuse(_light.diffuse_color(),c, lightIncidence, n);

        // ambient色の計算
        glm::vec3 ambient = calc_ambient(
          _light.ambient_color(), c
        );

        // specular色の計算
        glm::vec3 specular = calc_specular(
          get_eye_position(),
          _light.specular_color(),
          c,
          lightIncidence,
          80, n, p);


        _hits[index]._color = ambient + diffuse + specular;

      }

    }
  }
}
main.cpp
#include <iostream>
#include <array>

#include<GL/freeglut.h>
#include<gl/GL.h>

#include "raycast.hpp"

#include<glm/gtc/type_ptr.hpp>

#include<glm/gtc/matrix_transform.hpp>

my_raycast mydata;


//! @brief グリッドを表示
//! @param [in] g グリッドオブジェクト
//! @param [in] dispcenter セルの中央を表示するか
void drawGrid(const grid& g, const bool dispcenter) {

  glLineWidth(1);
  glColor3d(1, 1, 1);
  for (size_t i = 0; i < g.cellCount(); i++) {
    glBegin(GL_LINE_LOOP);
    glVertex3fv(glm::value_ptr(g.p0(i)));
    glVertex3fv(glm::value_ptr(g.p1(i)));
    glVertex3fv(glm::value_ptr(g.p2(i)));
    glVertex3fv(glm::value_ptr(g.p3(i)));

    glEnd();
  }

  if (dispcenter) {
    glPointSize(1);
    glColor3d(1, 1, 1);
    glBegin(GL_POINTS);
    for (size_t i = 0; i < g.cellCount(); i++) {
      glVertex3fv(
        glm::value_ptr(g[i].center()));
    }
    glEnd();
  }
}


void drawXYZ() {
  glLineWidth(3);
  glBegin(GL_LINES);
  glColor3f(1, 0, 0);
  glVertex3f(0, 0, 0);
  glVertex3f(1, 0, 0);

  glColor3f(0, 1, 0);
  glVertex3f(0, 0, 0);
  glVertex3f(0, 1, 0);

  glColor3f(0, 0, 1);
  glVertex3f(0, 0, 0);
  glVertex3f(0, 0, 1);
  glEnd();
  glLineWidth(1);
}

void drawRays() {
  glBegin(GL_LINES);
  for (size_t i = 0; i < mydata.ray_count(); i++) {
    auto ray = mydata.get_ray(i);
    glColor3f(1.0, 1.0, 1.0);
    glVertex3fv(glm::value_ptr(ray[0]));
    glColor3f(0.0, 0.0, 1.0);
    glVertex3fv(glm::value_ptr(ray[1]));
  }
  glEnd();
}


//ウィンドウの幅と高さ
int width, height;

//描画関数
void disp(void) {

  glViewport(0, 0, width, height);

  glClearColor(0.2, 0.2, 0.2, 1);
  glClear(GL_COLOR_BUFFER_BIT | GL_DEPTH_BUFFER_BIT);

  glMatrixMode(GL_PROJECTION);
  glLoadIdentity();
  glm::mat4 proj = glm::perspectiveFov(glm::radians(45.f), (float)width, (float)height, 0.1f, 50.f);
  glLoadMatrixf(glm::value_ptr(proj));

  glMatrixMode(GL_MODELVIEW);
  glLoadIdentity();

  //////////////////////////////////////////
  //////////////////////////////////////////
  // カメラの設定
  float z = mydata.lookatZ();
  glm::mat4 look = glm::lookAt(
    glm::vec3(5, 4, z-5 ),// eye
    glm::vec3(0, 0, z ), // lookat
    glm::vec3(0,1, 0)   // up
  );
  glLoadMatrixf(glm::value_ptr(look));
  //////////////////////////////////////////
  // グリッドを表示
  drawGrid(mydata.get_grid(0), false);//from
  drawGrid(mydata.get_grid(1), false);//to
  //////////////////////////////////////////
  // 作成したレイを表示
  //drawRays();
  //////////////////////////////////////////
  // レイと球の衝突位置を三次元空間に可視化
  glPointSize(5);
  glBegin(GL_POINTS);
  for (size_t i = 0; i < mydata.get_intersects().size(); i++) {
    glColor3fv(
      glm::value_ptr(mydata.get_intersects()[i]._color)
    );
    glVertex3fv(
      glm::value_ptr(mydata.get_intersects()[i]._position)
    );
  }
  glEnd();
  glPointSize(1);

  drawXYZ();

  // レイと球の衝突位置を二次元に可視化
  glPointSize(5);
  glBegin(GL_POINTS);
  for (size_t i = 0; i < mydata.get_intersects().size(); i++) {

    if (isinf(mydata.get_intersects()[i]._position.x) == false) {
      glColor3fv(
        glm::value_ptr(mydata.get_intersects()[i]._color)
      );
      glVertex3fv(
        glm::value_ptr(mydata.get_grid(0)[i].center())
      );
    }
  }
  glEnd();
  glPointSize(1);

  //ライトの位置表示
  glColor3d(1, 1, 0);
  glPointSize(10);
  glBegin(GL_POINTS);
  glVertex3fv(glm::value_ptr(mydata.get_light().position()));
  glEnd();
  glPointSize(1);
  glColor3d(1, 0, 0);

  //視点表示
  glColor3d(0, 0, 1);
  glPointSize(35);
  glBegin(GL_POINTS);
  glm::vec3 eyepos = mydata.get_eye_position();
  glVertex3fv(glm::value_ptr(eyepos));
  glEnd();
  glPointSize(1);


  glFlush();
}

//ウィンドウサイズの変化時に呼び出される
void reshape(int w, int h) {
  width = w; height = h;

  disp();
}

//エントリポイント
int main(int argc, char** argv)
{
  glutInit(&argc, argv);
  glutInitWindowPosition(100, 50);
  glutInitWindowSize(500, 500);
  glutInitDisplayMode(GLUT_SINGLE | GLUT_RGBA);


  mydata.set(0.f, 3.f,100,100);
  ///////////////////////////////////
  //球の設定
  /*
  mydata.set_object(
    object_sphere(
      glm::vec3(0.0, 0.0, 2.0), // 球の中心
      glm::vec3(1.0, 0.0, 0.0),   // 球の色
      0.5
    )
  );
  */
  //////////////////////////////////
  //三角形の設定
  mydata.set_object(
    object_triangle(
      std::array< glm::vec3, 3>{
      glm::vec3(0.916876, -0.440909, 1.58713),//第一頂点
      glm::vec3(-0.633301, -0.622765, 0.585358),//第二頂点
      glm::vec3(-0.513684, 0.853145, 1.330333)//第三頂点
  },
      glm::vec3(1, 1, 0)
      )
  );
  ///////////////////////////////////

  mydata.set_light(
    light_point(
      glm::vec3(1.0, 1.0, 0.5), // ライトの位置
      glm::vec3(0.5, 0.5, 0.5), // diffuse色
      glm::vec3(0.2, 0.2, 0.2), // ambient色
      glm::vec3(1.0, 1.0, 1.0)  // specular色
    )
  );
  mydata.raycast();


  glutCreateWindow("sample");
  glutDisplayFunc(disp);
  glutReshapeFunc(reshape);
  glutMainLoop();

  return 0;
}
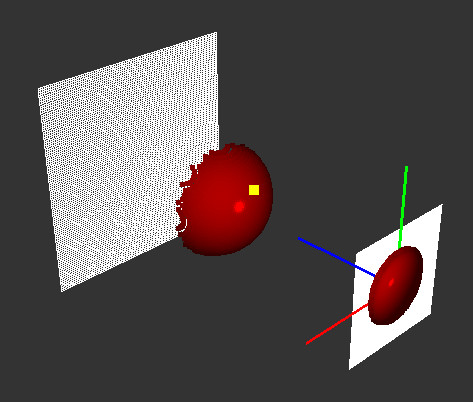
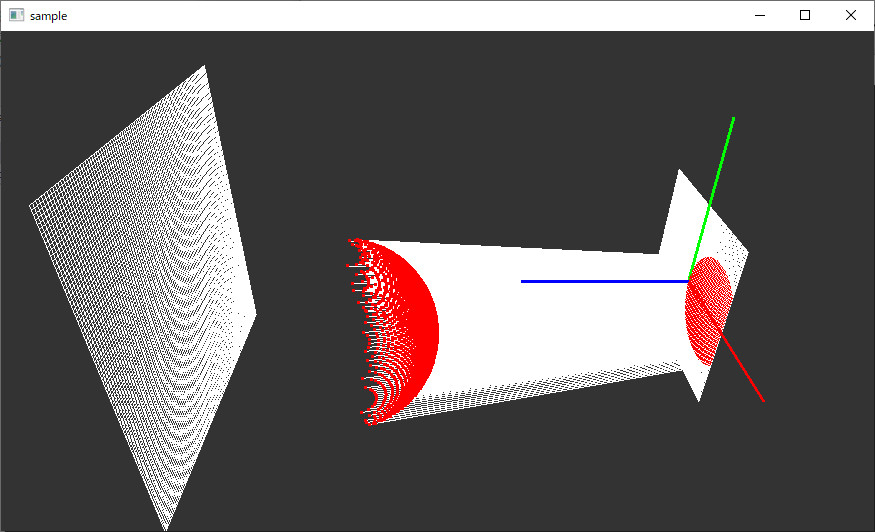
レイキャストを実装してみる(3) ADSシェーダを実装
光源を追加し、Ambient,Diffuse,Specularを計算する
raycast.hpp
#pragma once

#include "Grid.hpp"

#include <array>

//////////////////////////////////////////////
//////////////////////////////////////////////
// 球オブジェクト
class object_sphere {
  glm::vec3 _center;
  glm::vec3 _color;
  float _r;
public:
  object_sphere(glm::vec3 center_, glm::vec3 color_,float radius_) :
    _center(center_), _color(color_),_r(radius_) {}
  object_sphere() {}

  //! @brief レイと球の交点を求める
  //! @param [out] pos_ 交点の座標
  //! @param [out] color_ 球オブジェクトの色
  //! @param [out] normal_ 交点の面の法線
  //! @param [in] ray_ レイ
  //! @retval true 交差している
  //! @retval false 交差していない
  bool intersect(
    glm::vec3* pos_,
    glm::vec3* color_,
    glm::vec3* normal_,
    const std::array<glm::vec3, 2>& ray_)const;

  const glm::vec3& color()const { return _color; }
  glm::vec3& color() { return _color; }

};
//////////////////////////////////////////////
//////////////////////////////////////////////
// ポイントライト
class light_point {
  glm::vec3 _position;
  glm::vec3 _diffuse_color;
  glm::vec3 _ambient_color;
  glm::vec3 _specular_color;
public:

  light_point(
    const glm::vec3& position_,
    const glm::vec3& diffuse_color_,
    const glm::vec3& ambient_color_,
    const glm::vec3& specular_color_
  ) :
    _position(position_),
    _diffuse_color(diffuse_color_),
    _ambient_color(ambient_color_),
    _specular_color(specular_color_)
  {}
  light_point() {}

  glm::vec3 calc_vector_point_to_light(const glm::vec3& point_)const {
    // from -> _position
    return glm::normalize(_position - point_);
  }

  const glm::vec3& position()const {return _position;}
  glm::vec3& position() { return _position; }

  const glm::vec3& diffuse_color()const {return _diffuse_color;}
  glm::vec3& diffuse_color() { return _diffuse_color; }

  const glm::vec3& ambient_color()const { return _ambient_color; }
  glm::vec3& ambient_color() { return _ambient_color; }

  const glm::vec3& specular_color()const { return _specular_color; }
  glm::vec3& specular_color() { return _specular_color; }

};
struct hit_pixel_t {
  glm::vec3 _position;
  glm::vec3 _color;
  hit_pixel_t(const glm::vec3& position_, const glm::vec3& color_) :
    _position(position_), _color(color_) {}

};


// レイキャスト用のクラス
class my_raycast {
  grid g[2];
  float _startZ;
  float _endZ;
  int _pxwidth;
  int _pxheight;
public:

  //! @brief 視点を取得
  //! @details 普通は視点、near , farからレイを作成すると思うが、今回は
  //! グリッドを二枚作ることでnear,farを決定しているので、視点を計算で求める必要がある。
  //! 視点はspecular計算の時に必要となる。
  glm::vec3 get_eye_position()const {
    float a = g[0].ywidth() / 2.0;
    float b = g[1].ywidth() / 2.0;
    float d = glm::length(g[1].center() - g[0].center());
    float c = a * d / (b - a);


    // 始点 → 終点
    glm::vec3 veceye = g[1].center() - g[0].center();
    veceye = glm::normalize(veceye);
    return g[0].center()  - veceye * c;
  }

  my_raycast() {}

  //! @brief 結果のピクセル数(幅)を取得
  int width()const { return _pxwidth; }
  //! @brief 結果のピクセル数(高さ)を取得
  int height()const { return _pxheight; }

  //! @brief レイの開始点となるグリッド、終点となるグリッドを作成する
  //! @param [in] startZ_   始点のグリッドのZ座標
  //! @param [in] endZ_   終点のグリッドのZ座標
  //! @param [in] pxwidth_  ピクセル数 X
  //! @param [in] pxheight_ ピクセル数 Y
  void set(const float startZ_, const float endZ_, const int pxwidth_, const int pxheight_);

  //グリッド取得
  const grid& get_grid(const size_t index)const {
    return g[index];
  }

  //グリッドから作成するレイの数を取得
  int ray_count() {
    return g[0].cellCount();
  }

  //グリッドから作成するレイを取得
  std::array<glm::vec3, 2> get_ray(const size_t index)const;

  //始点グリッド、終点グリッドの中間の位置を取得(表示用)
  float lookatZ()const {
    return (_startZ + _endZ) / 2.f;
  }


  //////////////////////////////////////////////
  //////////////////////////////////////////////

private:
  object_sphere _obj;
  std::vector< hit_pixel_t > _hits;
public:
  void raycast();
  std::vector< hit_pixel_t >& get_intersects() {return _hits;}
  void set_object(const object_sphere& obj_);
  //////////////////////////////
private:
  light_point _light;
public:
  void set_light(const light_point& light_);

  const light_point& get_light()const { return _light; }
};
//! @brief diffuse計算
//! @param [in] lightDiffuse ライトの色
//! @param [in] materialDiffuse オブジェクトの色
//! @param [in] lightIncidence ライトの入射ベクトル
//! @param [in] objectNormal 面法線
//! @return diffuse色
inline glm::vec3 calc_diffuse(
  const glm::vec3& lightDiffuse,
  const glm::vec3& materialDiffuse,
  const glm::vec3& lightIncidence,
  const glm::vec3& objectNormal)
{
  // 拡散反射は「そのポイント→光源」と面法線の内積を取る

  float sDotN = glm::max(glm::dot(-lightIncidence, objectNormal), 0.f);

  return lightDiffuse * materialDiffuse *sDotN;
}
//! @brief ambient計算
//! @param [in] lightAmbient ライトの色
//! @param [in] materialAmbient オブジェクトの色
//! @return ambient色
inline glm::vec3 calc_ambient(
  const glm::vec3& lightAmbient,
  const glm::vec3& materialAmbient)
{
  return lightAmbient * materialAmbient;
}
//! @brief specular計算
//! @param [in] eyePosition 視点の座標
//! @param [in] lightSpecularColor ライトの色
//! @param [in] materialSpecularColor オブジェクトの色
//! @param [in] lightIncidence ライトの入射ベクトル
//! @param [in] materialShininess 光沢度
//! @param [in] objectNormal レイがヒットした位置の面法線
//! @param [in] objectPosition レイがヒットした座標
//! @return specular色
inline glm::vec3 calc_specular(
  const glm::vec3& eyePosition,
  const glm::vec3& lightSpecularColor,
  const glm::vec3& materialSpecularColor,
  const glm::vec3& lightIncidence, // 入射
  const float materialShininess,
  const glm::vec3& objectNormal,
  const glm::vec3& objectPosition
)
{

  // 参考文献:
  // https://araramistudio.jimdo.com/2017/10/02/%E3%83%97%E3%83%AD%E3%82%B0%E3%83%A9%E3%83%9F%E3%83%B3%E3%82%B0-directx-11%E3%81%A7%E9%8F%A1%E9%9D%A2%E5%8F%8D%E5%B0%84-specular-reflection/
  // https://amengol.github.io/game_physics/using-glm-reflect-to-react/
  // https://learnopengl.com/Lighting/Basic-Lighting

  // レイとの交点→カメラ位置 のベクトル
  glm::vec3 VertexToEyeVec = glm::normalize(eyePosition - objectPosition);

  // ライトの入射に対する反射ベクトル
  glm::vec3 LightReflect = glm::normalize(glm::reflect(lightIncidence, objectNormal));

  float SpecularFactor = glm::pow(glm::max(glm::dot(VertexToEyeVec, LightReflect),0.f), materialShininess);

  glm::vec3 SpecularColor(0, 0, 0);
  SpecularColor = SpecularFactor * lightSpecularColor * materialSpecularColor;

  return SpecularColor;

}
raycast.cpp
#include "raycast.hpp"

#include <glm/gtx/intersect.hpp>

bool object_sphere::intersect(
  glm::vec3* pos_,
  glm::vec3* color_,
  glm::vec3* normal_,
  const std::array<glm::vec3, 2>& ray_) const{

  // レイから正規化ベクトルを作成
  glm::vec3 nray = glm::normalize(ray_[1] - ray_[0]);

  // レイの始点から交点までの距離
  float distance;
  bool valid = glm::intersectRaySphere(ray_[0], nray, _center, _r*_r, distance);

  //レイが衝突した点の座標
  *pos_ = ray_[0] + nray * distance;

  //色の設定
  *color_ = _color;


  //面法線
  // 球中心 → 衝突点
  *normal_ = glm::normalize(*pos_ - _center);

  // 交差していればtrue
  return valid;
}


void my_raycast::set(const float startZ_, const float endZ_, const int pxwidth_, const int pxheight_) {
  _startZ = startZ_;
  _endZ = endZ_;

  _pxwidth = pxwidth_;
  _pxheight = pxheight_;

  glm::vec3 vecx(1, 0, 0);
  glm::vec3 vecy(0, 1, 0);

  g[0] = grid(
    vecx,
    vecy,
    glm::vec3(0, 0, _startZ),
    1.f, 1.f,
    pxwidth_, pxheight_
  );
  g[1] = grid(
    vecx,
    vecy,
    glm::vec3(0, 0, _endZ),
    2.f, 2.f,
    pxwidth_, pxheight_
  );

}

//! @brief レイの取得
//! @param [in] index レイの番号 最大 pxwidth_ × pxheight_
std::array<glm::vec3, 2> my_raycast::get_ray(const size_t index)const {
  return
    std::array<glm::vec3, 2>{
    g[0][index].center(),
      g[1][index].center()
  };

}

void my_raycast::set_object(const object_sphere& obj_) {
  _obj = obj_;
}

void my_raycast::set_light(const light_point& light_) {
  _light = light_;
}
void my_raycast::raycast() {

  float inf = std::numeric_limits<float>::infinity();
  // 結果の初期化
  _hits.clear();
  _hits.resize(
    _pxwidth * _pxheight,
    hit_pixel_t(
      glm::vec3(inf, inf, inf),
      glm::vec3(0, 0, 0)
    )
  );

  //
  for (size_t y = 0; y < _pxheight; y++) {
    for (size_t x = 0; x < _pxwidth; x++) {
      size_t index = y * _pxwidth + x;
      auto ray = get_ray(index);

      glm::vec3 p; // レイがヒットした座標
      glm::vec3 c; // レイがヒットした位置の色
      glm::vec3 n; // レイがヒットした位置の法線
      if (_obj.intersect(&p, &c,&n, ray) == true) {

        _hits[index]._position = p;

        // ライトの入射ベクトル
        glm::vec3 lightIncidence = -_light.calc_vector_point_to_light(p);

        // diffuse色の計算
        glm::vec3 diffuse = calc_diffuse(_light.diffuse_color(),c, lightIncidence, n);

        // ambient色の計算
        glm::vec3 ambient = calc_ambient(_light.ambient_color(), c);

        // specular色の計算
        glm::vec3 specular = calc_specular(
          get_eye_position(),
          _light.specular_color(),
          c,
          lightIncidence,
          80, n, p);


        _hits[index]._color = ambient + diffuse + specular;// 最終的な結果

      }

    }
  }
}
呼び出し
#include <iostream>
#include <array>

#include<GL/freeglut.h>
#include<gl/GL.h>

#include "raycast.hpp"

#include<glm/gtc/type_ptr.hpp>

#include<glm/gtc/matrix_transform.hpp>

my_raycast mydata;


//! @brief グリッドを表示
//! @param [in] g グリッドオブジェクト
//! @param [in] dispcenter セルの中央を表示するか
void drawGrid(const grid& g, const bool dispcenter) {

  glLineWidth(1);
  glColor3d(1, 1, 1);
  for (size_t i = 0; i < g.cellCount(); i++) {
    glBegin(GL_LINE_LOOP);
    glVertex3fv(glm::value_ptr(g.p0(i)));
    glVertex3fv(glm::value_ptr(g.p1(i)));
    glVertex3fv(glm::value_ptr(g.p2(i)));
    glVertex3fv(glm::value_ptr(g.p3(i)));

    glEnd();
  }

  if (dispcenter) {
    glPointSize(1);
    glColor3d(1, 1, 1);
    glBegin(GL_POINTS);
    for (size_t i = 0; i < g.cellCount(); i++) {
      glVertex3fv(
        glm::value_ptr(g[i].center()));
    }
    glEnd();
  }
}


void drawXYZ() {
  glLineWidth(3);
  glBegin(GL_LINES);
  glColor3f(1, 0, 0);
  glVertex3f(0, 0, 0);
  glVertex3f(1, 0, 0);

  glColor3f(0, 1, 0);
  glVertex3f(0, 0, 0);
  glVertex3f(0, 1, 0);

  glColor3f(0, 0, 1);
  glVertex3f(0, 0, 0);
  glVertex3f(0, 0, 1);
  glEnd();
  glLineWidth(1);
}

void drawRays() {
  glBegin(GL_LINES);
  for (size_t i = 0; i < mydata.ray_count(); i++) {
    auto ray = mydata.get_ray(i);
    glColor3f(1.0, 1.0, 1.0);
    glVertex3fv(glm::value_ptr(ray[0]));
    glColor3f(0.0, 0.0, 1.0);
    glVertex3fv(glm::value_ptr(ray[1]));
  }
  glEnd();
}


//ウィンドウの幅と高さ
int width, height;

//描画関数
void disp(void) {

  glViewport(0, 0, width, height);

  glClearColor(0.2, 0.2, 0.2, 1);
  glClear(GL_COLOR_BUFFER_BIT | GL_DEPTH_BUFFER_BIT);

  glMatrixMode(GL_PROJECTION);
  glLoadIdentity();
  glm::mat4 proj = glm::perspectiveFov(glm::radians(45.f), (float)width, (float)height, 0.1f, 50.f);
  glLoadMatrixf(glm::value_ptr(proj));

  glMatrixMode(GL_MODELVIEW);
  glLoadIdentity();

  //////////////////////////////////////////
  //////////////////////////////////////////
  // カメラの設定
  float z = mydata.lookatZ();
  glm::mat4 look = glm::lookAt(
    glm::vec3(5, 4, z-5 ),// eye
    glm::vec3(0, 0, z ), // lookat
    glm::vec3(0,1, 0)   // up
  );
  glLoadMatrixf(glm::value_ptr(look));
  //////////////////////////////////////////
  // グリッドを表示
  drawGrid(mydata.get_grid(0), false);//from
  drawGrid(mydata.get_grid(1), false);//to
  //////////////////////////////////////////
  // 作成したレイを表示
  //drawRays();
  //////////////////////////////////////////
  // レイと球の衝突位置を三次元空間に可視化
  glPointSize(5);
  glBegin(GL_POINTS);
  for (size_t i = 0; i < mydata.get_intersects().size(); i++) {
    glColor3fv(
      glm::value_ptr(mydata.get_intersects()[i]._color)
    );
    glVertex3fv(
      glm::value_ptr(mydata.get_intersects()[i]._position)
    );
  }
  glEnd();
  glPointSize(1);

  drawXYZ();

  // レイと球の衝突位置を二次元に可視化
  glPointSize(5);
  glBegin(GL_POINTS);
  for (size_t i = 0; i < mydata.get_intersects().size(); i++) {

    if (isinf(mydata.get_intersects()[i]._position.x) == false) {
      glColor3fv(
        glm::value_ptr(mydata.get_intersects()[i]._color)
      );
      glVertex3fv(
        glm::value_ptr(mydata.get_grid(0)[i].center())
      );
    }
  }
  glEnd();
  glPointSize(1);

  //ライトの位置表示
  glColor3d(1, 1, 0);
  glPointSize(10);
  glBegin(GL_POINTS);
  glVertex3fv(glm::value_ptr(mydata.get_light().position()));
  glEnd();
  glPointSize(1);
  glColor3d(1, 0, 0);

  //視点表示
  glColor3d(0, 0, 1);
  glPointSize(35);
  glBegin(GL_POINTS);
  glm::vec3 eyepos = mydata.get_eye_position();
  glVertex3fv(glm::value_ptr(eyepos));
  glEnd();
  glPointSize(1);


  glFlush();
}

//ウィンドウサイズの変化時に呼び出される
void reshape(int w, int h) {
  width = w; height = h;

  disp();
}

//エントリポイント
int main(int argc, char** argv)
{
  glutInit(&argc, argv);
  glutInitWindowPosition(100, 50);
  glutInitWindowSize(500, 500);
  glutInitDisplayMode(GLUT_SINGLE | GLUT_RGBA);


  mydata.set(0.f, 3.f,100,100);
  ///////////////////////////////////
  mydata.set_object(
    object_sphere(
      glm::vec3(0.0, 0.0, 2.0), // 球の中心
      glm::vec3(1.0, 0.0, 0.0), // 球の色
      0.5
    )
  );
  mydata.set_light(
    light_point(
      glm::vec3(1.0, 1.0, 0.5), // ライトの位置
      glm::vec3(0.5, 0.5, 0.5), // diffuse色
      glm::vec3(0.2, 0.2, 0.2), // ambient色
      glm::vec3(1.0, 1.0, 1.0)  // specular色
    )
  );
  mydata.raycast();


  glutCreateWindow("sample");
  glutDisplayFunc(disp);
  glutReshapeFunc(reshape);
  glutMainLoop();

  return 0;
}
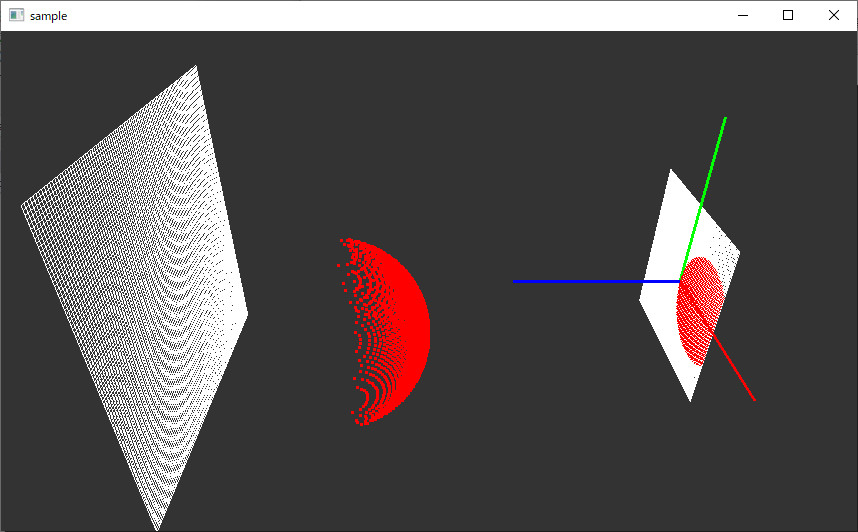
レイキャストを実装してみる(2) レイと球の交差
前回作成したレイと球を交差させて、その状態を可視化する。
raycast.hpp
#pragma once

#include "Grid.hpp"

#include <array>
//////////////////////////////////////////////
//////////////////////////////////////////////
// 球オブジェクト
class object_sphere {
  glm::vec3 _center;
  glm::vec3 _color;
  float _r;
public:
  object_sphere(glm::vec3 center_, glm::vec3 color_, float radius_) :
    _center(center_), _color(color_), _r(radius_) {}
  object_sphere() {}

  bool intersect(glm::vec3* pos_, glm::vec3* color_, const std::array<glm::vec3, 2>& ray_)const;
};
//////////////////////////////////////////////
//////////////////////////////////////////////
// 画像として塗りつぶすピクセル
struct hit_pixel_t {
  glm::vec3 _position; // 交点の座標
  glm::vec3 _color;  // 交点の色
  hit_pixel_t(const glm::vec3& position_, const glm::vec3& color_) :
    _position(position_), _color(color_) {}

};
// レイキャスト用のクラス
class my_raycast {
  grid g[2];
  float _startZ;
  float _endZ;
  int _pxwidth;
  int _pxheight;
public:
  my_raycast() {}

  int width()const { return _pxwidth; }
  int height()const { return _pxheight; }

  // レイの開始点となるグリッド、終点となるグリッドを作成する
  void set(const float startZ_, const float endZ_, const int pxwidth_, const int pxheight_);

  //グリッド取得
  const grid& get_grid(const size_t index)const {
    return g[index];
  }

  //グリッドから作成するレイの数を取得
  int ray_count() {
    return g[0].cellCount();
  }

  //グリッドから作成するレイを取得
  std::array<glm::vec3, 2> get_ray(const size_t index)const;

  //始点グリッド、終点グリッドの中間の位置を取得(表示用)
  float lookatZ()const {
    return (_startZ + _endZ) / 2.f;
  }
  //////////////////////////////////////////////
  //////////////////////////////////////////////

private:
  object_sphere _obj;//球オブジェクト
  std::vector< hit_pixel_t > _hits;//レイキャストの結果
public:
  void raycast();//レイキャスト
  std::vector< hit_pixel_t >& get_intersects() {return _hits;}
  void set_object(const object_sphere& obj_);
};
raycast.cpp
レイキャストの部分はglm::intersectRaySphereを使う。
#include "raycast.hpp"

#include <glm/gtx/intersect.hpp>
bool object_sphere::intersect(glm::vec3* pos_, glm::vec3* color_, const std::array<glm::vec3, 2>& ray_) const {

  glm::vec3 nray = glm::normalize(ray_[1] - ray_[0]);

  float distance;

  bool valid = glm::intersectRaySphere(ray_[0], nray, _center, _r * _r, distance);

  *pos_ = ray_[0] + nray * distance;

  *color_ = _color;
  return valid;
}
void my_raycast::set(const float startZ_, const float endZ_, const int pxwidth_, const int pxheight_) {
  _startZ = startZ_;
  _endZ = endZ_;

  _pxwidth = pxwidth_;
  _pxheight = pxheight_;

  glm::vec3 vecx(1, 0, 0);
  glm::vec3 vecy(0, 1, 0);

  g[0] = grid(
    vecx,
    vecy,
    glm::vec3(0, 0, _startZ),
    1.f, 1.f,
    pxwidth_, pxheight_
  );
  g[1] = grid(
    vecx,
    vecy,
    glm::vec3(0, 0, _endZ),
    2.f, 2.f,
    pxwidth_, pxheight_
  );

}


std::array<glm::vec3, 2> my_raycast::get_ray(const size_t index)const {
  return
    std::array<glm::vec3, 2>{
    g[0][index].center(),
      g[1][index].center()
  };

}

void my_raycast::set_object(const object_sphere& obj_) {
  _obj = obj_;
}
void my_raycast::raycast() {

  //結果の初期化
  float inf = std::numeric_limits<float>::infinity();
  _hits.resize(_pxheight * _pxwidth,
    hit_pixel_t(
      glm::vec3(inf, inf, inf),//球とレイの交点を無効な値に設定
      glm::vec3(0, 0, 0)//色を黒に
    )
  );

  for (size_t y = 0; y < _pxheight; y++) {
    for (size_t x = 0; x < _pxwidth; x++) {
      size_t index = y * _pxwidth + x;
      auto ray = get_ray(index);//レイ取得

      glm::vec3 p;
      glm::vec3 c;
      if (_obj.intersect(&p,&c, ray) == true) {//球との交点を算出
        _hits[index]._position = p;//交差していたらその座標を保存
        _hits[index]._color = c;
      }

    }
  }
}
main.cpp
#include <iostream>
#include <array>

#include<GL/freeglut.h>
#include<gl/GL.h>

#include "raycast.hpp"

#include<glm/gtc/type_ptr.hpp>

#include<glm/gtc/matrix_transform.hpp>

my_raycast mydata;


//! @brief グリッドを表示
//! @param [in] g グリッドオブジェクト
//! @param [in] dispcenter セルの中央を表示するか
void drawGrid(const grid& g, const bool dispcenter) {

  glLineWidth(1);
  glColor3d(1, 1, 1);
  for (size_t i = 0; i < g.cellCount(); i++) {
    glBegin(GL_LINE_LOOP);
    glVertex3fv(glm::value_ptr(g.p0(i)));
    glVertex3fv(glm::value_ptr(g.p1(i)));
    glVertex3fv(glm::value_ptr(g.p2(i)));
    glVertex3fv(glm::value_ptr(g.p3(i)));

    glEnd();
  }

  if (dispcenter) {
    glPointSize(1);
    glColor3d(1, 1, 1);
    glBegin(GL_POINTS);
    for (size_t i = 0; i < g.cellCount(); i++) {
      glVertex3fv(
        glm::value_ptr(g[i].center()));
    }
    glEnd();
  }
}


void drawXYZ() {
  glLineWidth(3);
  glBegin(GL_LINES);
  glColor3f(1, 0, 0);
  glVertex3f(0, 0, 0);
  glVertex3f(1, 0, 0);

  glColor3f(0, 1, 0);
  glVertex3f(0, 0, 0);
  glVertex3f(0, 1, 0);

  glColor3f(0, 0, 1);
  glVertex3f(0, 0, 0);
  glVertex3f(0, 0, 1);
  glEnd();
  glLineWidth(1);
}

void drawRays() {
  glBegin(GL_LINES);
  for (size_t i = 0; i < mydata.ray_count(); i++) {
    auto ray = mydata.get_ray(i);
    glColor3f(1.0, 1.0, 1.0);
    glVertex3fv(glm::value_ptr(ray[0]));
    glColor3f(0.0, 0.0, 1.0);
    glVertex3fv(glm::value_ptr(ray[1]));
  }
  glEnd();
}


//ウィンドウの幅と高さ
int width, height;

//描画関数
void disp(void) {

  glViewport(0, 0, width, height);

  glClearColor(0.2, 0.2, 0.2, 1);
  glClear(GL_COLOR_BUFFER_BIT | GL_DEPTH_BUFFER_BIT);

  glMatrixMode(GL_PROJECTION);
  glLoadIdentity();
  glm::mat4 proj = glm::perspectiveFov(glm::radians(45.f), (float)width, (float)height, 0.1f, 50.f);
  glLoadMatrixf(glm::value_ptr(proj));

  glMatrixMode(GL_MODELVIEW);
  glLoadIdentity();

  //////////////////////////////////////////
  //////////////////////////////////////////
  // カメラの設定
  float z = mydata.lookatZ();
  glm::mat4 look = glm::lookAt(
    glm::vec3(3, 2, z ),// eye
    glm::vec3(0, 0, z ), // lookat
    glm::vec3(0,1, 0)   // up
  );
  glLoadMatrixf(glm::value_ptr(look));
  //////////////////////////////////////////
  // グリッドを表示
  drawGrid(mydata.get_grid(0), false);//from
  drawGrid(mydata.get_grid(1), false);//to
  //////////////////////////////////////////
  // 作成したレイを表示
  //drawRays();
  //////////////////////////////////////////
  // 始点から衝突した点までの線分を表示
#if 0
  glLineWidth(1);
  glBegin(GL_LINES);
  for (size_t i = 0; i < mydata.get_intersects().size(); i++) {
    //for (size_t x = 0; x < mydata.get_intersects()[y].size(); x++) {
      glVertex3fv(
        glm::value_ptr(
          mydata.get_grid(0)[i].center()
        )
      );
      glVertex3fv(
        glm::value_ptr(
          mydata.get_intersects()[i]._position
        )
      );
    //}
  }
  glEnd();

#endif
  /////////////////////////////////////////////
  // 三次元上にレイと球の交差点表示
  glPointSize(3);
  glBegin(GL_POINTS);
  for (size_t i = 0; i < mydata.get_intersects().size(); i++) {

    glColor3fv(
      glm::value_ptr(
        mydata.get_intersects()[i]._color
      )
    );
    glVertex3fv(
      glm::value_ptr(
        mydata.get_intersects()[i]._position
      )
    );
  }
  glEnd();
  glPointSize(1);
drawXYZ();
  // グリッドの上にレイと球の交差点表示
  glColor3d(1, 1, 1);
  glBegin(GL_POINTS);
  for (size_t i = 0; i < mydata.get_intersects().size(); i++) {
    if (isinf(mydata.get_intersects()[i]._position.x) == false) {
      glColor3fv(
        glm::value_ptr(
          mydata.get_intersects()[i]._color
        )
      );
      glVertex3fv(
        glm::value_ptr(
          mydata.get_grid(0)[i].center()
        )
      );
    }
  }
  glEnd();
  glFlush();
}

//ウィンドウサイズの変化時に呼び出される
void reshape(int w, int h) {
  width = w; height = h;

  disp();
}

//エントリポイント
int main(int argc, char** argv)
{
  glutInit(&argc, argv);
  glutInitWindowPosition(100, 50);
  glutInitWindowSize(500, 500);
  glutInitDisplayMode(GLUT_SINGLE | GLUT_RGBA);


  mydata.set(
    0.f,//始点のZ座標
    3.f,//終点のZ座標
    100,//X方向の解像度
    100 //Y方向の解像度
  );
  ///////////////////////////////////
  mydata.set_object(
    object_sphere(
      glm::vec3(0.5, 0, 2),//球の中心座標
      glm::vec3(1, 0, 0),//球の色
      0.5//球の半径
    )
  );
  mydata.raycast();//レイキャスト


  glutCreateWindow("sample");
  glutDisplayFunc(disp);
  glutReshapeFunc(reshape);
  glutMainLoop();

  return 0;
}
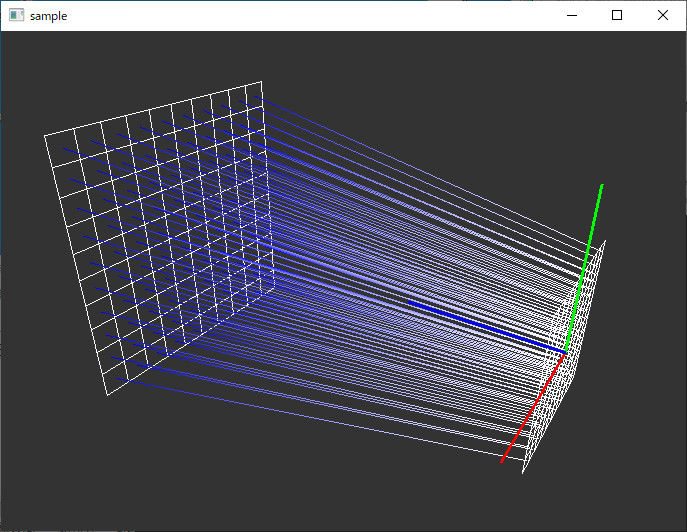
レイキャストを実装してみる(1) レイの生成
自分でレイキャストを実装してみる。なおレイキャストは視点からレイを飛ばし、オブジェクトに衝突した時点の色でピクセルを塗る方法で、オブジェクトに衝突したらそこから反射したレイをさらに飛ばすを繰り返すのはレイトレーシングという。
レイの生成
レイの生成は真面目にやると数式ばかりになって初学者にとってはつまらないだけなので、グリッドを使って直感的な方法で実現してみる。
1.Grid.hpp
#pragma once

#include<glm/glm.hpp>
#include<glm/gtc/type_ptr.hpp>

#include<vector>

// グリッド一つ分
class cell {
  glm::vec3 _min;  //始点
  glm::vec3 _vecx; //方向1
  glm::vec3 _vecy; //方向2

public:
  cell(glm::vec3 _min_, glm::vec3 _vec_x, glm::vec3 _vec_y) {
    _min = _min_;
    _vecx = _vec_x;
    _vecy = _vec_y;
  }
  const glm::vec3& cmin()const {
    return _min;
  }
  const glm::vec3& cvecx()const {
    return _vecx;
  }
  const glm::vec3& cvecy()const {
    return _vecy;
  }

  // セルの中心
  glm::vec3 center()const {
    return _min + _vecx / 2.f + _vecy / 2.f;
  }
};


class grid {
  std::vector<cell> _cells;
  int _xcount;
  int _ycount;
  float _xwidth;
  float _ywidth;
  glm::vec3 _center;

public:

  float xwidth()const { return _xwidth; }
  float ywidth()const { return _ywidth; }
  const glm::vec3& center()const { return _center; }

  size_t cellCount()const {
    return _cells.size();
  }
  cell& operator[](const size_t index) {
    return _cells[index];
  }
  const cell& operator[](const size_t index)const {
    return _cells[index];
  }
  grid() {}

  grid(const grid& g) {
    _cells = g._cells;
    _xcount = g._xcount;
    _ycount = g._ycount;
    _xwidth = g._xwidth;
    _ywidth = g._ywidth;
    _center = g._center;
  }
  grid& operator=(const grid& g) {
    _cells = g._cells;
    _xcount = g._xcount;
    _ycount = g._ycount;
    _xwidth = g._xwidth;
    _ywidth = g._ywidth;
    _center = g._center;
  }
  grid& operator=(grid&& g) {
    _cells = std::move(g._cells);
    _xcount = g._xcount;
    _ycount = g._ycount;
    _xwidth = g._xwidth;
    _ywidth = g._ywidth;
    _center = g._center;
    return *this;
  }

  // 平面一つ分。xcount × ycountのcellからなる
  grid(
    const glm::vec3 vecX,
    const glm::vec3 vecY,
    const glm::vec3 center,
    const float width,
    const float height,
    const int xcount,
    const int ycount) {

    _xcount = xcount;
    _ycount = ycount;
    _xwidth = width;
    _ywidth = height;

    _center = center;

    glm::vec3 NVecX = glm::normalize(vecX);
    glm::vec3 NVecY = glm::normalize(vecY);

    ////////////////////
    _cells.clear();

    // セル一個の縦方向、横方向のベクトル。長さはセル一個分
    const glm::vec3 CellVX = NVecX * (_xwidth / xcount);
    const glm::vec3 CellVY = NVecY * (_ywidth / ycount);

    // 面の始点
    const glm::vec3 Start = _center - NVecX * _xwidth / 2.f - NVecY * _ywidth / 2.f;

    for (size_t y = 0; y < ycount; y++) {
      for (size_t x = 0; x < xcount; x++) {

        // 各セルの始点
        glm::vec3 from =
          Start +
          CellVX * (float)x + CellVY * (float)y;

        // セルを記録
        _cells.push_back(
          cell(
            from,
            CellVX,
            CellVY
          )
        );

      }
    }

  }


  /*
  p0        p3
  +---------+
  |         |
  |         |
  |         |
  |         |
  +---------+
  p1        p2
  */
  glm::vec3 p0(const size_t index)const {
    return _cells[index].cmin();
  }
  glm::vec3 p1(const size_t index)const {

    return
      _cells[index].cmin() +
      _cells[index].cvecx();
  }
  glm::vec3 p2(const size_t index) const {
    return
      _cells[index].cmin() +
      _cells[index].cvecx() +
      _cells[index].cvecy();
  }
  glm::vec3 p3(const size_t index) const {
    return
      _cells[index].cmin() +
      _cells[index].cvecy();
  }

};
2.my_raycast.hpp
#pragma once

#include "Grid.hpp"

#include <array>

// レイキャスト用のクラス
class my_raycast {
  grid g[2];
  float _startZ;
  float _endZ;
  int _pxwidth;
  int _pxheight;
public:
  my_raycast() {}

  int width()const { return _pxwidth; }
  int height()const { return _pxheight; }

  // レイの開始点となるグリッド、終点となるグリッドを作成する
  void set(const float startZ_, const float endZ_, const int pxwidth_, const int pxheight_);

  //グリッド取得
  const grid& get_grid(const size_t index)const {
    return g[index];
  }

  //グリッドから作成するレイの数を取得
  int ray_count() {
    return g[0].cellCount();
  }

  //グリッドから作成するレイを取得
  std::array<glm::vec3, 2> get_ray(const size_t index)const;

  //始点グリッド、終点グリッドの中間の位置を取得(表示用)
  float lookatZ()const {
    return (_startZ + _endZ) / 2.f;
  }

};
3.my_raycast.cpp
#include "raycast.hpp"

void my_raycast::set(const float startZ_, const float endZ_, const int pxwidth_, const int pxheight_) {
  _startZ = startZ_;
  _endZ = endZ_;

  _pxwidth = pxwidth_;
  _pxheight = pxheight_;

  glm::vec3 vecx(1, 0, 0);
  glm::vec3 vecy(0, 1, 0);

  g[0] = grid(
    vecx,
    vecy,
    glm::vec3(0, 0, _startZ),
    1.f, 1.f,
    pxwidth_, pxheight_
  );
  g[1] = grid(
    vecx,
    vecy,
    glm::vec3(0, 0, _endZ),
    2.f, 2.f,
    pxwidth_, pxheight_
  );

}


std::array<glm::vec3, 2> my_raycast::get_ray(const size_t index)const {
  return
    std::array<glm::vec3, 2>{
    g[0][index].center(),
      g[1][index].center()
  };

}
表示
#include <iostream>
#include <array>

#include<GL/freeglut.h>
#include<gl/GL.h>

#include "raycast.hpp"

#include<glm/gtc/type_ptr.hpp>

#include<glm/gtc/matrix_transform.hpp>

//! @brief グリッドの可視化
//! @param [in] g グリッドオブジェクト
//! @param [in] dispcenter セルの中央を表示するか
void drawGrid(const grid& g, const bool dispcenter) {

  glLineWidth(1);
  glColor3d(1, 1, 1);
  for (size_t i = 0; i < g.cellCount(); i++) {
    glBegin(GL_LINE_LOOP);
    glVertex3fv(glm::value_ptr(g.p0(i)));
    glVertex3fv(glm::value_ptr(g.p1(i)));
    glVertex3fv(glm::value_ptr(g.p2(i)));
    glVertex3fv(glm::value_ptr(g.p3(i)));

    glEnd();
  }

  if (dispcenter) {
    glPointSize(1);
    glColor3d(1, 1, 1);
    glBegin(GL_POINTS);
    for (size_t i = 0; i < g.cellCount(); i++) {
      glVertex3fv(
        glm::value_ptr(g[i].center()));
    }
    glEnd();
  }
}


void drawXYZ() {
  glLineWidth(3);
  glBegin(GL_LINES);
  glColor3f(1, 0, 0);
  glVertex3f(0, 0, 0);
  glVertex3f(1, 0, 0);

  glColor3f(0, 1, 0);
  glVertex3f(0, 0, 0);
  glVertex3f(0, 1, 0);

  glColor3f(0, 0, 1);
  glVertex3f(0, 0, 0);
  glVertex3f(0, 0, 1);
  glEnd();
  glLineWidth(1);
}

//レイキャストオブジェクトの定義
my_raycast mydata;


//ウィンドウの幅と高さ
int width, height;

//描画関数
void disp(void) {

  glViewport(0, 0, width, height);

  glClearColor(0.2, 0.2, 0.2, 1);
  glClear(GL_COLOR_BUFFER_BIT | GL_DEPTH_BUFFER_BIT);

  glMatrixMode(GL_PROJECTION);
  glLoadIdentity();
  glm::mat4 proj = glm::perspectiveFov(glm::radians(45.f), (float)width, (float)height, 0.1f, 50.f);
  glLoadMatrixf(glm::value_ptr(proj));

  glMatrixMode(GL_MODELVIEW);
  glLoadIdentity();

  //////////////////////////////////////////
  //////////////////////////////////////////
  // カメラの設定 レイとグリッドの状態を可視化するための表示用
  float z = mydata.lookatZ();
  glm::mat4 look = glm::lookAt(
    glm::vec3(3, 2, z-2 ),// eye
    glm::vec3(0, 0, z ), // lookat
    glm::vec3(0,1, 0)   // up
  );
  glLoadMatrixf(glm::value_ptr(look));
  //////////////////////////////////////////
  // グリッドを表示 OpenGLでグリッドを可視化
  drawGrid(mydata.get_grid(0), false);//from
  drawGrid(mydata.get_grid(1), false);//to
  //////////////////////////////////////////
  // 作成したレイを表示 OpenGLでレイを可視化
  // 第0グリッドの各セルの中央から、台グリッドの各セルの中央へ線分を引く
  glBegin(GL_LINES);
  for (size_t i = 0; i < mydata.ray_count(); i++) {
    auto ray = mydata.get_ray(i);
    glColor3f(1.0, 1.0, 1.0);
    glVertex3fv(glm::value_ptr(ray[0]));
    glColor3f(0.0, 0.0, 1.0);
    glVertex3fv(glm::value_ptr(ray[1]));
  }
  glEnd();

  drawXYZ();

  glFlush();
}

//ウィンドウサイズの変化時に呼び出される
void reshape(int w, int h) {
  width = w; height = h;

  disp();
}

//エントリポイント
int main(int argc, char** argv)
{
  glutInit(&argc, argv);
  glutInitWindowPosition(100, 50);
  glutInitWindowSize(500, 500);
  glutInitDisplayMode(GLUT_SINGLE | GLUT_RGBA);

//レイキャスト用クラスにレイの始点・終点を設定
  mydata.set(
      0.f,//始点のZ座標
      3.f,//終点のZ座標
      10, //X方向の解像度
      10  //Y方向の解像度
  );


  glutCreateWindow("sample");
  glutDisplayFunc(disp);
  glutReshapeFunc(reshape);
  glutMainLoop();

  return 0;
}
Unreal Engine 5のBlankにマネキン(Mannequin)を導入する
Blankでプロジェクトを作るとマネキンがないので入れたい場合。
マネキンの入れ方
1.コンテンツブラウザ → 機能またはコンテンツパックを追加
2.プロジェクトにコンテンツを追加 → サードパーソン を選択しプロジェクトに追加
マネキンが入る。
デフォルトで歩行の設定が入っている
Blankのインプットにもともと軸マッピングがされており、マネキンにAdd Movement Input等が設定されているため、ワールドセッティング→Game Mode→Default Pawn Classにマネキンを設定するだけで歩くようになる。