Rustで.libや.dllを作り、C++から呼び出す
Rust側
プロジェクト設定
まず、cargoで--libを指定してプロジェクトを作成する
Created library `myhello` package
Cargo.tomlに以下の設定を追加:
name = "myhello"
crate-type = ["cdylib"]
なお、これがdllではなくstatic libraryのみの場合は、以下のように設定する。
name = "myhello"
crate-type = ["staticlib"]
プログラム
Rust側では以下のような関数を用意する。
#[no_mangle] は、関数のオーバーロードなどのためにコンパイラが勝手に関数名を変更するのを防ぐために指定。
extern "C" は、関数の呼び出し規約をC言語にするための設定。ほかにも"stdcall"など色々用意されている。
#[no_mangle]
pub extern "C" fn add(a: i32, b: i32) -> i32 {
    a + b
}
ビルド
cargo build --releaseでビルドする。
この時、myhello.dllができるのだが、libのほうがmyhello.dll.lib になってしまう。今のところ修正する方法がないらしいので、気になるなら手動で修正する。
C++側
C++から呼び出し。extern "C"でC++のマングル回避。
// 関数宣言。この関数はRust側にある。
// 本当は.hppファイルなどに定義するべきだが
// 今はここに書いておく。
extern "C" {
    int add(int a, int b);
}

#pragma comment(lib,"myhello.dll.lib")


#include <iostream>

int main()
{

    // 関数呼び出し
    std::cout << add(3,5) << std::endl;
}
mesonを試す(anaconda使用)
mesonはCMakeの代替と言われている。VC++の環境ではPython + ninja +VC++が必要。ただしconda install mesonするとninjaも一緒に入るので実質VC++の設定だけでいい。
環境を混ぜないために以下をして仮想環境mesonenvを作成し、その中で動作させる。必須ではない。
conda create -n mesonenv python=3.11
conda activate mesonenv
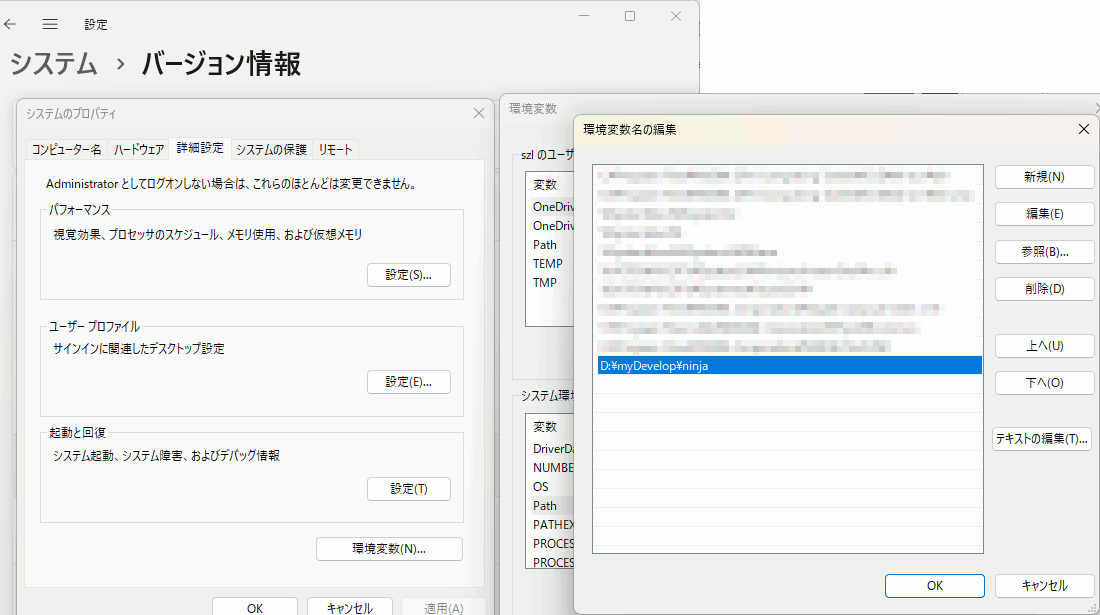
環境構築
mesonとninjaのインストール
conda install meson
VC++の設定
VC++が動くように、以下で環境設定を行う。(VC++2022)
mesonのテスト
まず、testの中にmain.cpp とmeson.buildを作成する。
d:\myDevelop\test
├─main.cpp       ... ソースファイル
├─meson.build     ... 設定ファイル
meson.buildを以下のように記述。
project('MyProject', 'CPP')
executable('myout', ['main.cpp'])
testをカレントれディレクトリとし、以下を実行。
これで、buildの中にmyout.exeが作成される。
d:\myDevelop\test
│  main.cpp
│  meson.build
│
└─build
    │  myout.exe
    │
    ├─meson-info
    │
    ├─meson-logs
    │
    ├─meson-private
    │
    └─myout.exe.p
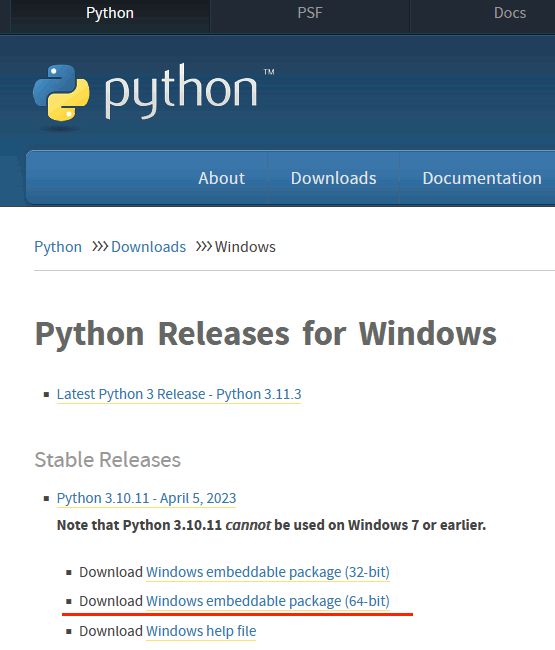
Windowsにzip版Pythonを導入
zip版Pythonをインストールすると、OS側の環境を一切汚さず完全に独立した環境を作れる。
ダウンロード・展開
https://www.python.org/downloads/windows/
各種設定
パスを通した起動用バッチを作る
もちろんwindowsの環境変数を直接書き換えてもいいが、それをやるとわざわざzip版を導入している意味が薄れるので、起動用のバッチファイルを作成してそれを叩いて環境を起動するような使い方にする。
SET PATH=D:\myDevelop\mypython;%PATH%
start cmd.exe
import siteの設定
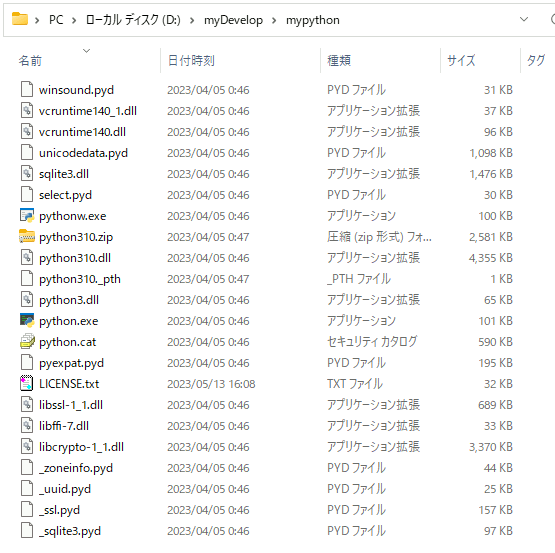
このままでは、exit()で終了できないなど問題があるので、._pthファイルを変更する。ファイル名はバージョンによって違う。今回の場合はpython310._pthを編集する。
import siteの先頭に # がついているのでそれを外す。
python310.zip
.

# Uncomment to run site.main() automatically
import site
pipの導入
以下から、pipをインストールするためのスクリプトをダウンロード
https://pip.pypa.io/en/stable/installation/#get-pip-py
スクリプトを実行
このスクリプトを実行すると、以下のようなWARNINGが出る。
Consider adding this directory to PATH or, if you prefer to suppress this warning, use --no-warn-script-location.
WARNING: The scripts pip.exe, pip3.10.exe and pip3.exe are installed in 'D:\myDevelop\mypython\Scripts' which is not on PATH.
Consider adding this directory to PATH or, if you prefer to suppress this warning, use --no-warn-script-location.
意訳:
pipはD:\myDevelop\mypython\Scriptsにインストールされましたがパスが通ってないので自分で通してください。
WARNINGに従い起動用のバッチファイルにScriptsへのパスも追加する。
SET PATH=D:\myDevelop\mypython;%PATH%
SET PATH=D:\myDevelop\mypython\Scripts;%PATH%
start cmd.exe
ビルドシステムのNinjaでC++のソースコードをビルドしてみる
ninjaはビルドシステムの一つで、makeの仲間。高速なのが取り柄らしい。makeはmakefileを作成してビルドするのに対して、ninjaは.ninjaファイルを作成してビルドする。ただし、.ninjaはcmakeで作ることを想定している。

準備(ninjaの導入)
ninjaは以下URLから環境にあったものをダウンロード、展開する。今回はwindowsなのでninja-win.zipをダウンロードする。
https://github.com/ninja-build/ninja/releases
ninjaを呼び出せるように、ninja.exeへのパスをPathに追加しておく。
作り方
ソースコードの準備
CMakeLists.txt
# CMakeのバージョンを設定 今自分が使っているものを指定している
# 必須要件なので、数字は小さい方がいい。
cmake_minimum_required(VERSION 3.25)

#############################################
#############################################

# ソリューション名を設定
set(MY_SOLUTION_NAME "MySolution")

#プロジェクト名を設定
set(MY_PROJECT_NAME "MyProject")

# 出力ファイル名を設定
set(MY_OUTPUT_NAME "myout")

#############################################
#############################################

# ソリューションを作成
# プロジェクト名と使用する言語を設定
project(${MY_SOLUTION_NAME} CXX)

#############################################
#############################################


# プロジェクトを作成
# out.exeという実行ファイルをmain.cppから作成
add_executable(${MY_PROJECT_NAME} main.cpp )

#############################################
#############################################


#############################################
#############################################

set_target_properties(${MY_PROJECT_NAME} PROPERTIES OUTPUT_NAME ${MY_OUTPUT_NAME})
main.cpp
#include <cstdio>

int main(int argc,char** argv){
	printf("hello world\n");
}
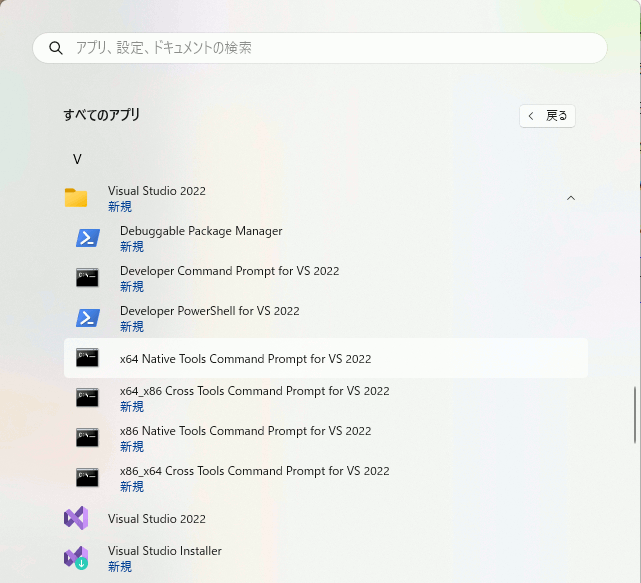
VC++を使える環境でcmake-guiを起動
ninjaは内部で有効なコンパイラを呼び出すので、それらを使用できる環境が必要になる。
今回は、Visual Studio 2022の環境でビルドするため、Visual Studioが動く環境を用意する。
そこでまず、x64 Native Tools Command Prompt for VS 2022 を実行する。
これで、nmakeやcl.exeを使える環境となる。
この状態で、cmake-guiを起動
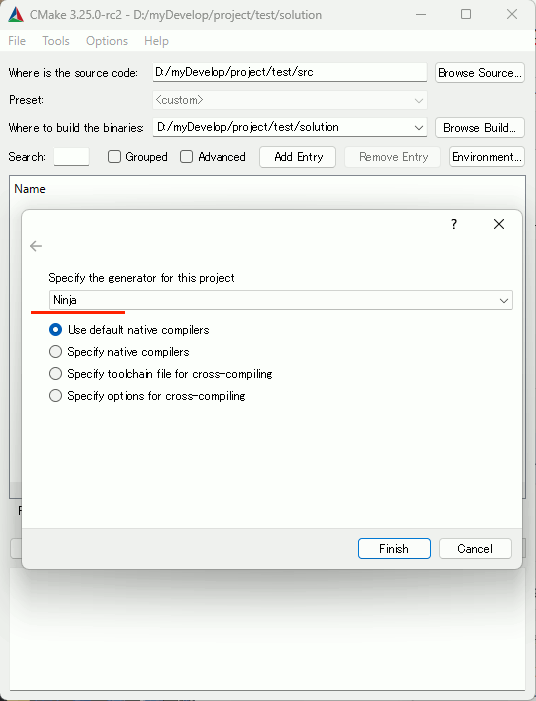
Generateすると、Where to build the binariesにbuild.ninjaが出来上がる。
D:\myDevelop\project\test\
│
├─solution
│  │  build.ninja         ... ninjaファイル
│  │  CMakeCache.txt
│  │  cmake_install.cmake
│  │
│  └─CMakeFiles
│
└─src
        CMakeLists.txt      ... CMakeLists.txt
        function.cpp        ... ソースコード
        main.cpp
        source.hpp
>cd D:\myDevelop\project\test\solution
D:\myDevelop\project\test\solution>
カレントディレクトリにbuild.ninjaがある状態で、ninjaコマンドを実行する。
[1/3] Building CXX object CMakeFiles\MyProject.dir\function.cpp.obj
...
[2/3] Building CXX object CMakeFiles\MyProject.dir\main.cpp.obj
...
[3/3] Linking CXX executable myout.exe
これでmyout.exeが作成された。
余談
予約投稿してなかった。タヒにたい。確定申告のせいだ。
CLaunchとVC++の相性が悪い件
前置き
本当は開発者に直接言うべきなんだが(またか)、腰が重すぎて十年たっても行動する未来が見えないのでここに書いておく。私はCLaunchのヘビーユーザーなのだがVC++の挙動がおかしいのがまさかこれが原因と思わず数か月悩み続けた。
CLaunchは ぴょんきち 氏の開発したランチャーで、以下のサイトからダウンロードできる。
http://hp.vector.co.jp/authors/VA018351/index.html
現象
・Windows 10 または Windows 11
・Visual Studio 2019 または 2022
・CLaunch 4.04 を起動した状態
上記の条件で、C++プロジェクトを作成し、Win32APIを使用するプログラムを書きデバッグモードまたはリリースモードで実行すると、プログラム終了時、exe_common.inlの中のhas_cctor周辺で高確率で例外が発生する。なおver3系では起こらないかもしれない。
プログラム
#include<windows.h>

int WINAPI WinMain(
	HINSTANCE hInstance,
	HINSTANCE hPrevInstance,
	PSTR lpCmdLine,
	int nCmdShow) {
	MessageBox(NULL, TEXT("my test"),
		TEXT("title"), MB_OK);
	return 0;
}
終了時
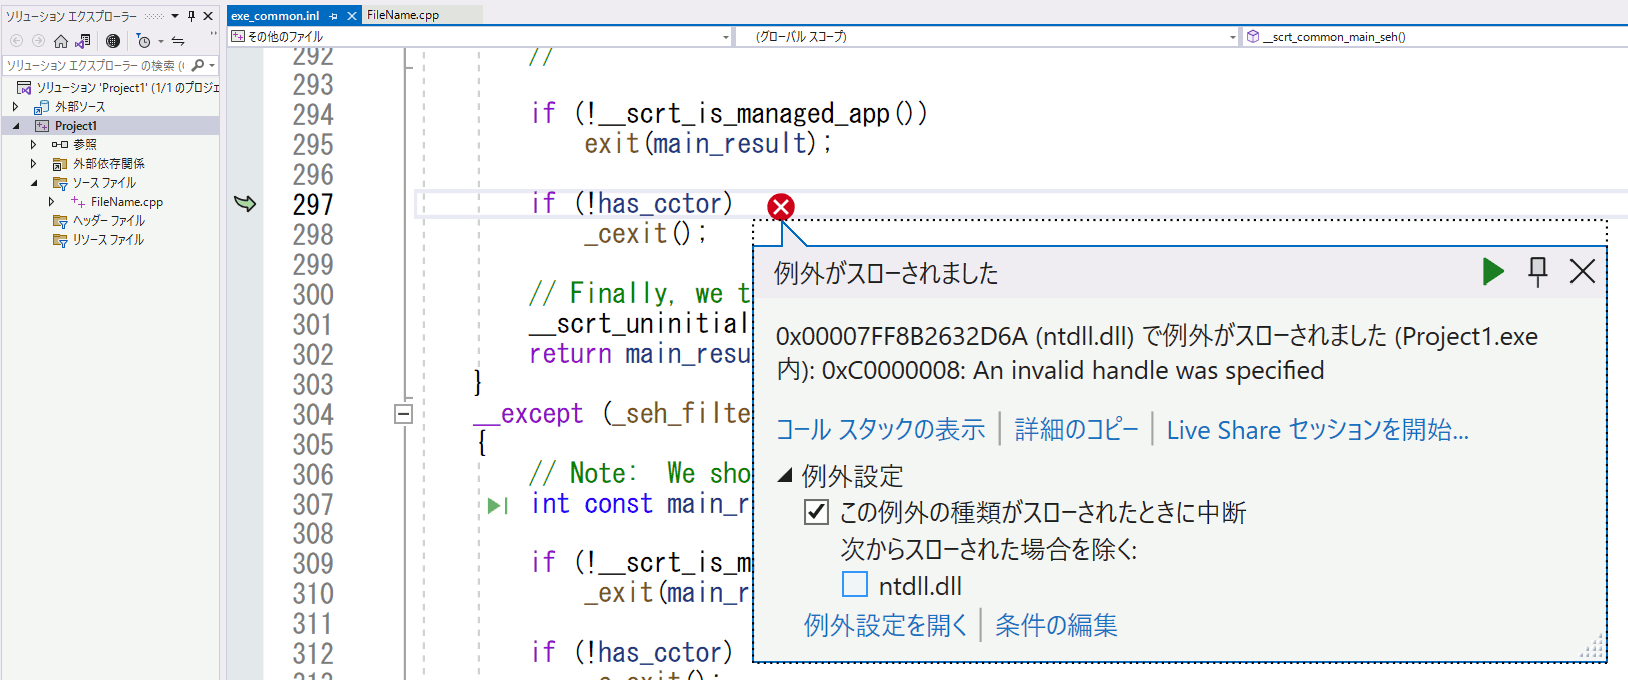
exe_common.inl内、以下のあたりで起こる。
if (!__scrt_is_managed_app())
    exit(main_result);

if (!has_cctor)
    _cexit();
注意
再現性はそこそこ高いのだが出るときはでるものの出ないときは何度試しても出ない。出ないときは何度も実行するか、VC++を再起動するなどするとそのうち発生する。
余談
なお今著者はゼルダの伝説ToKをやっていて記事を書く時間があまりない。
utfcppでutf8を扱う。
C++はUnicodeの文字列の変換機能があるにはあるが非推奨なので、外部ライブラリを使わなければならない。utfcppはBoost Software License 1.0で使える、ヘッダオンリーのutf変換ライブラリ。特にutf8が得意。
ダウンロード:
https://github.com/nemtrif/utfcpp
ヘッダオンリーなのでCMakeは不要。ただ一応CMakeしてinstallすると以下のような配置になる。
install
│
└─include
    └─utf8cpp
        │  utf8.h
        │
        └─utf8
                checked.h
                core.h
                cpp11.h
                cpp17.h
                unchecked.h
UTF16 to UTF8
#include <iostream>
#include <fstream>

#include <utf8cpp/utf8.h>

int main()
{

    std::u16string u16s = u"いろはにほへと";

    // 変換結果格納先。C++20はu8stringを使える
    std::u8string u8s;

    utf8::utf16to8(u16s.begin(), u16s.end(), std::back_inserter(u8s));

    // utf8文字列を保存
    std::ofstream out("output.txt", std::ios::out | std::ios::binary);
    out.write((const char*)u8s.c_str(), u8s.size());

}
utf8を一文字ずつ処理する
utf8::nextで次のutf8文字へ飛べる。ただし、書記素単位ではないので、結合文字を一気にジャンプしてくれない。そういう用途では使用できない。
#include <iostream> #include <fstream> #include <vector> #include <sstream> #include <utf8cpp/utf8.h> int main() { // 👨👩👧👦は結合文字。テストのために入れている。 // utf8::nextはコードポイント単位で次へいけるが、 // 書記素単位ではジャンプできないので、 // 結合文字は 文字,結合文字,文字 と分離してしまう // 結合文字を判別するのは大変なので、utfcpp std::u8string u8s = u8"いろは👨👩👧👦にほへと"; auto itr = u8s.begin(); auto iend = u8s.end(); while (itr != iend) { unsigned int codepoint = utf8::next(itr, iend);//次の文字の先頭へ移動 // コードポイントをutf8に変換 std::u8string tmp; utf8::append(codepoint, std::back_inserter(tmp)); // utf8をutf16に変換 std::u16string u16c; utf8::utf8to16(tmp.begin(), tmp.end(), std::back_inserter(u16c)); // 一文字ずつファイルに出力 static int k = 0; std::stringstream fname; fname << k++ << ".txt"; std::ofstream o(fname.str(), std::ios::out | std::ios::binary); o.write( (const char*)u16c.data(), u16c.size()*2); } }
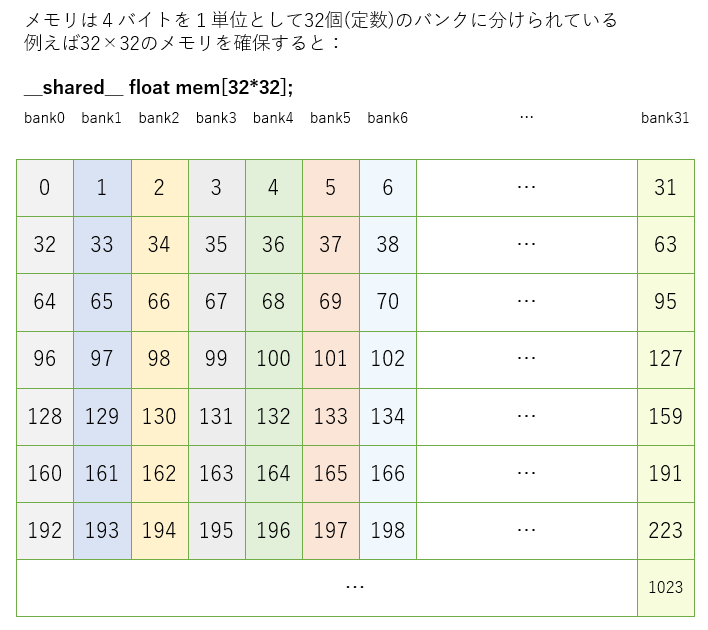
CUDAのバンクコンフリクトを再現・検出してみる
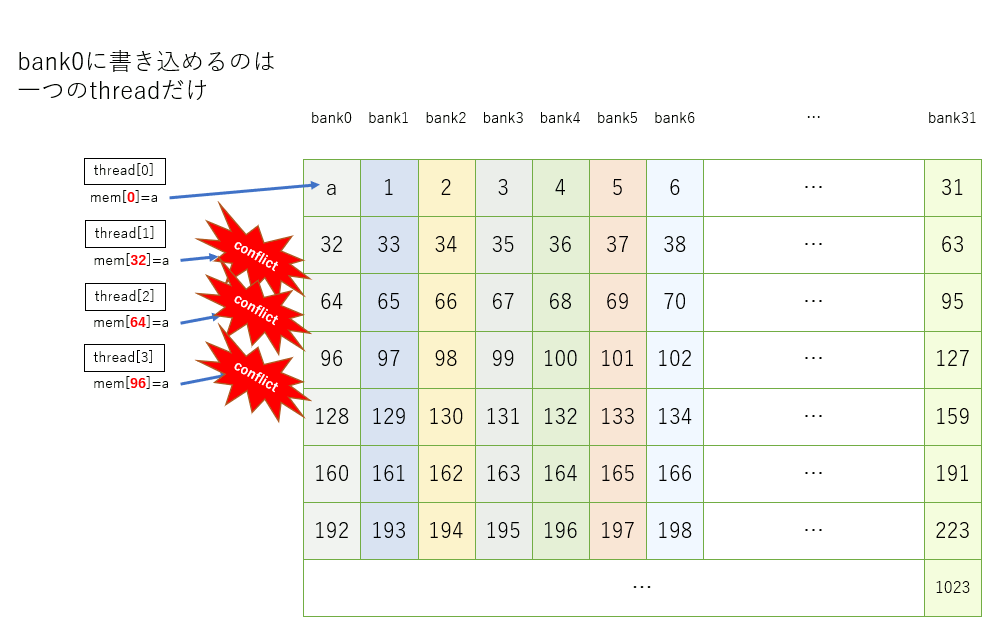
バンクコンフリクトは、CUDAでシェアードメモリを使ったときに生じることがある。
CUDAはシェアードメモリを32個のバンクという単位で分割管理していて、違うスレッドが同じバンクに同時にアクセスできない。
floatの配列で例えると、mem[0],mem[1],mem[2]は全て違うバンクに属するが、mem[0],mem[32],mem[64]は全て同じバンクに属する。
なおバンク数はGPUによって異なる。
バンクコンフリクトを再現するコード
#include "cuda_runtime.h"
#include "device_launch_parameters.h"

#include <stdio.h>
#include <stdlib.h>


///////////////////////////////////////////////
// GPU側 //////////////////////////////////////
// 32個のスレッドで一回ずつ呼び出される。
__global__ void test_kernel(unsigned int* c) {


    // 32 × 32 のシェアードメモリ確保
    // この時、 mem[0] , mem[32] , mem[64] , ... を同時にアクセスするとバンクコンフリクトする
    __shared__ float mem[32*32];


    //このスレッドの番号を取得
    size_t xpos = blockIdx.x * blockDim.x + threadIdx.x;

    // シェアードメモリに書き込み xposが0,1,2,3...なので、0,32,64,...(=同じバンク)に書き込む
    mem[xpos*32] = xpos;

    // これを入れないと最適化?されるのか検出できない
    c[xpos] = mem[xpos];

}
////////////////////////////////////////////////////////////
////////////////////////////////////////////////////////////
////////////////////////////////////////////////////////////

int main()
{

    dim3 grid(1, 1);   //グリッド数

    dim3 block(32, 1); //ブロック数

    unsigned int* p_gpu;

    cudaMalloc( (void**)&p_gpu,32*4);

    test_kernel << <grid, block >> > (p_gpu); // 32個のスレッドを実行

    unsigned int p_cpu[32];
    cudaMemcpy(&p_cpu, p_gpu, 32*4, cudaMemcpyDeviceToHost);//GPU側から実行結果を取得

    cudaFree(p_gpu);//GPU側のメモリを解放


    for (size_t i = 0; i < 32; i++)
        printf("%d\n", p_cpu[i]);

    return 0;
}
このプログラムは各スレッドが0,32,64,96,...の要素にアクセスしようとするが、すべて同じバンクの要素なため、同時に書き換えることができず、遅延が発生する。
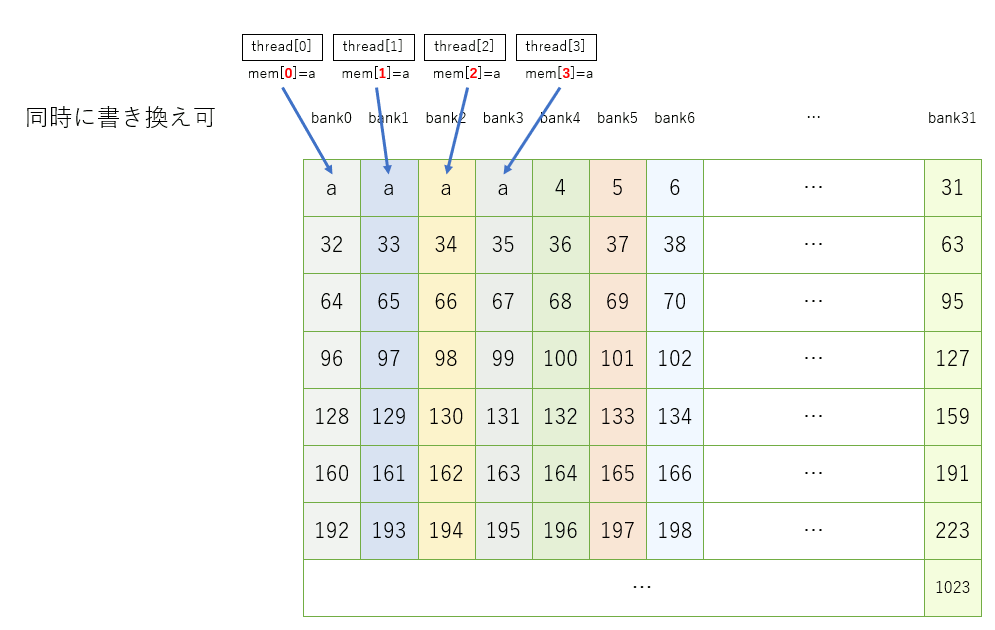
バンクコンフリクトがないコード
カーネルのmemに書き込む部分を変更する。
// 32個のスレッドで一回ずつ呼び出される。
__global__ void test_kernel(unsigned int* c) {


    // 32 × 32 のメモリ
    // この時、 mem[0] , mem[32] , mem[64] , ... を同時にアクセスするとバンクコンフリクトする
    __shared__ float mem[32*32];

    //アクセス法
    //このスレッドが担当する画素の位置を二次元座標で求める
    size_t xpos = blockIdx.x * blockDim.x + threadIdx.x;

    // シェアードメモリに書き込み xposが0,1,2,3,... なので、違うバンクに書き込む
    mem[xpos] = xpos;

    // これを入れないと最適化?されるのか検出できない
    c[xpos] = mem[xpos];

}
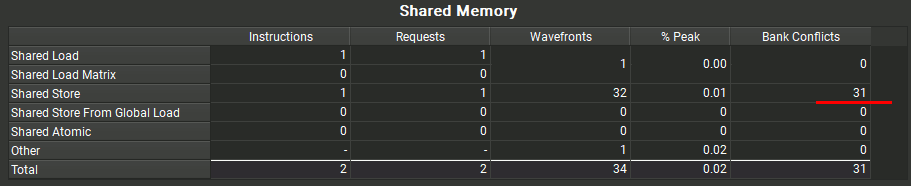
Nsight Computeでバンクコンフリクトを検出してみる(Windows)
Cudaでバンクコンフリクトの実験をしたいが結果の確認のしようがないのでプロファイリングの方法を調べている。とりあえずNsight Computeでそれらしき項目を見つけたのでひとまずメモしておく。
なおプログラムは以下のあたりから借用。
https://toropippi.livedoor.blog/archives/55467682.html
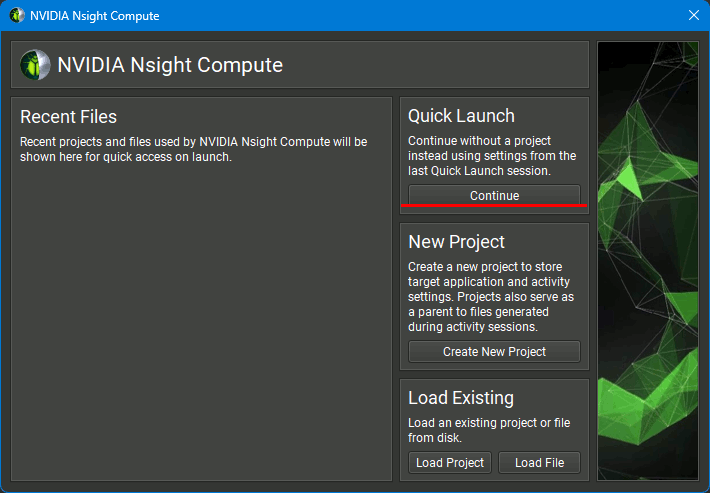
起動
Cuda Toolkit をインストールすると入っている。
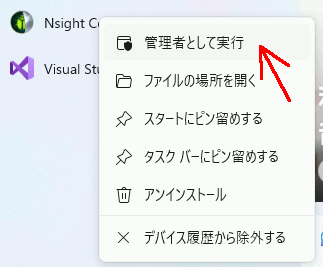
まず起動するときに管理者権限で実行しないとエラーになるので気を付ける。
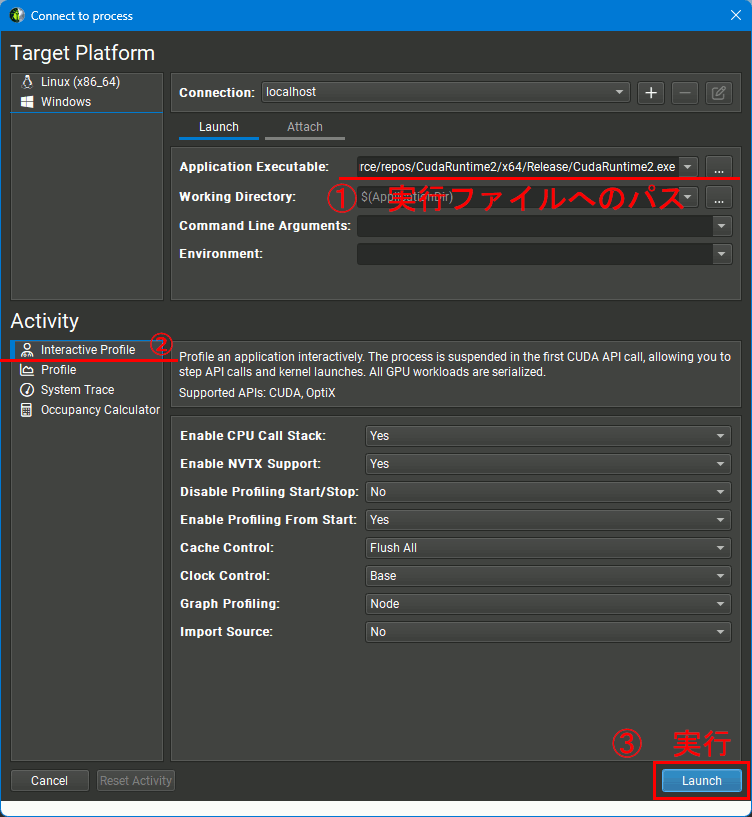
設定
実行ファイルへのパスを指定しLaunchするとNsight Computeから実行できる。
「Profile」でも「Interactive Profile」でもいいが、操作方法が若干違うので注意。
実行・プロファイリング
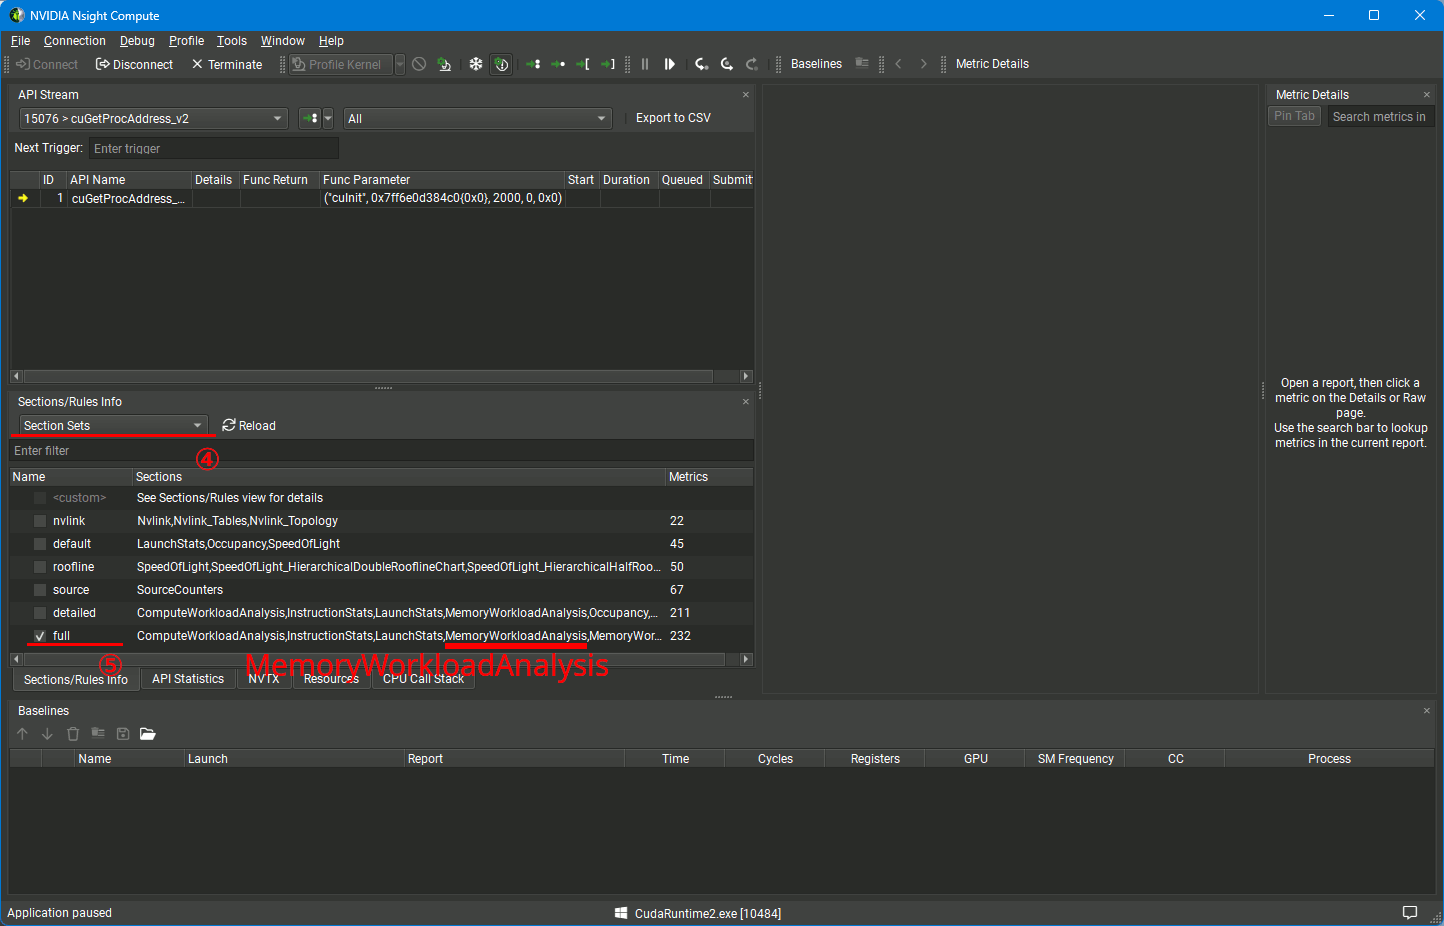
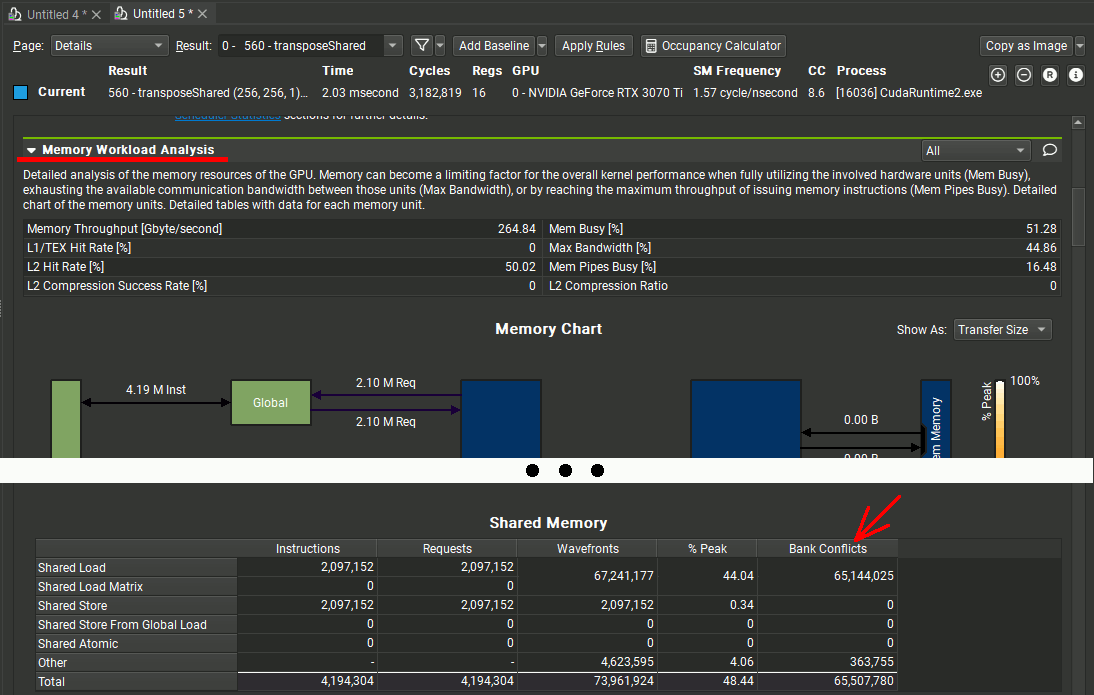
バンクコンフリクトを表示させるにはSectionに「Memory Workload Analysis」を指定している必要がある。前ステップでInteractive Profileを選んだ場合、下のようにLaunchしてからSection Setsから選ぶ。
Profileを選んだ場合はLaunch前にSection一覧から選択する。
⑥のボタンでステップ実行できるので、⑦に見たい関数が表示されるまで処理を進め、「Profile Kernel」をクリックすると右側にプロファイルが表示される
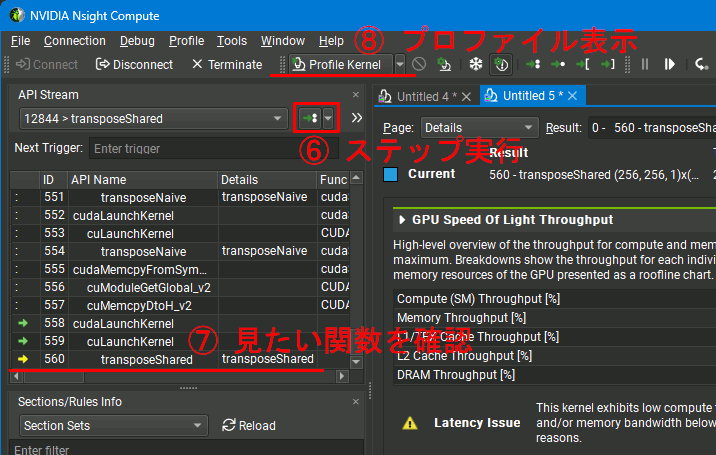
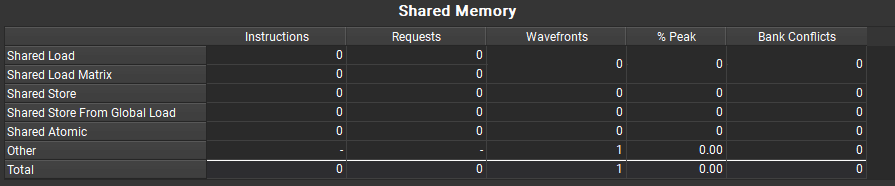
プロファイルの中のMemory Workload Analysisの下の方にBank Conflictsの項目がある。
wxWidgetsを使用する設定を書いたCMakeLists.txtを作成する
CMakeLists.txtの練習として、wxWidgetsを使うCMakeLists.txtを書いてみる。
気になっているのがライブラリのリンクの設定。CMakeLists.txtでは、ライブラリディレクトリを指定する(-L相当)のではなく、ライブラリをひとつずつフルパスを指定する(-l相当)ような設定にするらしい。それはいいのだが、find_directoryで変数にひとつずつライブラリを指定し、後でまとめてtarget_link_librariesに指定する方法しか探せなかった。
CMakeLists.txt
# CMakeのバージョンを設定 今自分が使っているものを指定している
# 必須要件なので、数字は小さい方がいい。
cmake_minimum_required(VERSION 3.25)


#############################################
#############################################

# ソリューション名を設定
set(MY_SOLUTION_NAME "MySolution")

#プロジェクト名を設定
set(MY_PROJECT_NAME "MyProject")

# 出力ファイル名を設定
set(MY_OUTPUT_NAME "myout")

#############################################
#############################################

# ソリューションを作成
# プロジェクト名と使用する言語を設定
project(${MY_SOLUTION_NAME} CXX)

#############################################
#############################################

# main.cpp function.cppからプロジェクト作成
add_executable(${MY_PROJECT_NAME} main.cpp)


#############################################
#############################################
# 出力名を"myout.exe"に設定

set_target_properties(${MY_PROJECT_NAME} PROPERTIES OUTPUT_NAME ${MY_OUTPUT_NAME})


#############################################
#############################################

# wxWidgetsを使うオプションを作成。
# デフォルトで ON にしておく。
option(USE_WXWIDGETS "Use wxWidgets library" ON)
# USE_WXWIDGETSが有効化されている時だけ以下の設定がなされる。
if(USE_WXWIDGETS)

 # includeディレクトリを指定
 include_directories(C:/libraries/wxWidgets/include/)
 include_directories(C:/libraries/wxWidgets/release/lib/vc_x64_dll/mswu)

 set( WXWIDGETS_LIB_PATH C:/libraries/wxWidgets/release/lib/vc_x64_dll)

 # 使用するライブラリをLib1,Lib2,...という変数にフルパスで格納
 find_library( Lib1  NAMES wxbase32u.lib PATHS ${WXWIDGETS_LIB_PATH})
 find_library( Lib2  NAMES wxbase32u_net.lib PATHS ${WXWIDGETS_LIB_PATH})
 find_library( Lib3  NAMES wxbase32u_xml.lib PATHS ${WXWIDGETS_LIB_PATH})
 find_library( Lib4  NAMES wxmsw32u_adv.lib PATHS ${WXWIDGETS_LIB_PATH})
 find_library( Lib5  NAMES wxmsw32u_aui.lib PATHS ${WXWIDGETS_LIB_PATH})
 find_library( Lib6  NAMES wxmsw32u_core.lib PATHS ${WXWIDGETS_LIB_PATH})
 find_library( Lib7  NAMES wxmsw32u_gl.lib PATHS ${WXWIDGETS_LIB_PATH})
 find_library( Lib8  NAMES wxmsw32u_html.lib PATHS ${WXWIDGETS_LIB_PATH})
 find_library( Lib9  NAMES wxmsw32u_media.lib PATHS ${WXWIDGETS_LIB_PATH})
 find_library( Lib10  NAMES wxmsw32u_propgrid.lib PATHS ${WXWIDGETS_LIB_PATH})
 find_library( Lib11  NAMES wxmsw32u_qa.lib PATHS ${WXWIDGETS_LIB_PATH})
 find_library( Lib12  NAMES wxmsw32u_ribbon.lib PATHS ${WXWIDGETS_LIB_PATH})
 find_library( Lib13  NAMES wxmsw32u_richtext.lib PATHS ${WXWIDGETS_LIB_PATH})
 find_library( Lib14  NAMES wxmsw32u_stc.lib PATHS ${WXWIDGETS_LIB_PATH})
 find_library( Lib15  NAMES wxmsw32u_webview.lib PATHS ${WXWIDGETS_LIB_PATH})
 find_library( Lib16  NAMES wxmsw32u_xrc.lib PATHS ${WXWIDGETS_LIB_PATH})

 set(Libs ${Lib1} ${Lib2} ${Lib3} ${Lib4} ${Lib5} ${Lib6} ${Lib7} ${Lib8} ${Lib9} ${Lib10} ${Lib11} ${Lib12} ${Lib13} ${Lib14} ${Lib15} ${Lib16})

 # MyProject に、上で検索して見つかったライブラリをリンク
 # CMakeLists.txtでは、ライブラリディレクトリ(-Lに該当)を指定するのではなく、各ライブラリファイルをフルパスで指定することが推奨されているらしい。
 target_link_libraries(${MY_PROJECT_NAME} PRIVATE ${Libs} )


 # プリプロセッサの定義
 target_compile_definitions(${MY_PROJECT_NAME} PRIVATE -D__WXMSW__)
 target_compile_definitions(${MY_PROJECT_NAME} PRIVATE -DWXUSINGDLL)


endif()
# エントリポイントをWinMainにするオプションを追加。
option(USE_WINMAIN "Use WinMain" ON)
# USE_WINMAINが有効化されている時だけ以下の設定がなされる。
if(USE_WINMAIN)
 # エントリポイントをWinMainにするためにサブシステム変更
 if (WIN32)
    set_target_properties(${MY_PROJECT_NAME} PROPERTIES LINK_FLAGS "/SUBSYSTEM:WINDOWS")
 endif()
endif()
wxwidgets_cmake\
├─solution\
│
└─src\
        CMakeLists.txt
        main.cpp
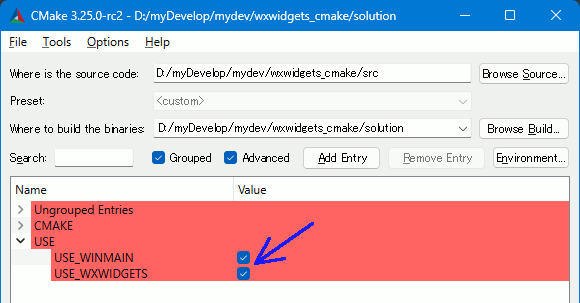
CMake guiで、チェック項目が追加されていることを確認できる。
main.cpp
#ifndef WX_PRECOMP
#include <wx/wx.h>
#endif

#include <wx/gdicmn.h> // wxPointに必要
#include <wx/frame.h>  // wxFrameに必要


/////////////////////////////////////
/////////////////////////////////////
/////////////////////////////////////

// ウィンドウ作成
class MyFrame : public wxFrame
{
    // ボタン
    wxButton* m_button;

public:

    void PostCreate() {

        m_button = new wxButton(this, wxID_ANY, wxT("クリックしてください"));// ボタン作成
        m_button->Show();

    }

    MyFrame(const wxString& title, const wxPoint& pos, const wxSize& size)
        : wxFrame(NULL, wxID_ANY, title, pos, size)
    {

        // CallAfter : 現在処理中のイベントが終わったらPostCreateを実行
        // コンストラクタはウィンドウ生成イベント扱い
        CallAfter(&MyFrame::PostCreate);

        // ウィンドウ生成中にnew wxButtonするとボタンが一画面いっぱいに広がってしまう。
        // ウィンドウ生成処理が終わってからボタンを生成しなければいけない

    }


};


/////////////////////////////////////
/////////////////////////////////////
/////////////////////////////////////

// wxWidgetsのアプリケーション作成
class MyApp : public wxApp {
public:

    virtual bool OnInit() {
        MyFrame* frame = new MyFrame("Hello World", wxPoint(50, 50), wxSize(450, 340));
        frame->Show(true);

        return true;
    }

};

/////////////////////////////////////
/////////////////////////////////////
/////////////////////////////////////

// WinMainをマクロで定義
wxIMPLEMENT_APP(MyApp);
VC++でwxWidgetsを試す(2) ウィジェットを追加
wxWidgetsでボタンを追加する。
CallAfter使用
ウィンドウ生成前に作ってしまうとボタンサイズが画面いっぱいに広がってしまうので、CallAfter関数を使い、ウィンドウ生成イベントが完了してからコントロール生成用関数を呼び出している。
// https://docs.wxwidgets.org/3.0/overview_helloworld.html

// プリプロセッサに以下二つを追加
// __WXMSW__
// WXUSINGDLL

// サブシステムをWindowsに設定(WinMainで呼び出すので)
// Windows (/SUBSYSTEM:WINDOWS)

#ifndef WX_PRECOMP
#include <wx/wx.h>
#endif

#include <wx/gdicmn.h> // wxPointに必要
#include <wx/frame.h>  // wxFrameに必要


#pragma comment(lib,"wxbase32u.lib")
#pragma comment(lib,"wxbase32u_net.lib")
#pragma comment(lib,"wxbase32u_xml.lib")
#pragma comment(lib,"wxmsw32u_adv.lib")
#pragma comment(lib,"wxmsw32u_aui.lib")
#pragma comment(lib,"wxmsw32u_core.lib")
#pragma comment(lib,"wxmsw32u_gl.lib")
#pragma comment(lib,"wxmsw32u_html.lib")
#pragma comment(lib,"wxmsw32u_media.lib")
#pragma comment(lib,"wxmsw32u_propgrid.lib")
#pragma comment(lib,"wxmsw32u_qa.lib")
#pragma comment(lib,"wxmsw32u_ribbon.lib")
#pragma comment(lib,"wxmsw32u_richtext.lib")
#pragma comment(lib,"wxmsw32u_stc.lib")
#pragma comment(lib,"wxmsw32u_webview.lib")
#pragma comment(lib,"wxmsw32u_xrc.lib")


/////////////////////////////////////
/////////////////////////////////////
/////////////////////////////////////
// ウィンドウ作成
class MyFrame : public wxFrame
{
    // ボタン
    wxButton* m_button;

public:

    void PostCreate() {

        m_button = new wxButton(this, wxID_ANY, wxT("クリックしてください"));// ボタン作成
        m_button->Show();

    }

    MyFrame(const wxString& title, const wxPoint& pos, const wxSize& size)
        : wxFrame(NULL, wxID_ANY, title, pos, size)
    {

        // CallAfter : 現在処理中のイベントが終わったらPostCreateを実行
        // コンストラクタはウィンドウ生成イベント扱い
        CallAfter(&MyFrame::PostCreate);

        // ウィンドウ生成中にnew wxButtonするとボタンが一画面いっぱいに広がってしまう。
        // ウィンドウ生成処理が終わってからボタンを生成しなければいけない

    }


};
/////////////////////////////////////
/////////////////////////////////////
/////////////////////////////////////

// wxWidgetsのアプリケーション作成
class MyApp : public wxApp {
public:

    virtual bool OnInit() {
        MyFrame* frame = new MyFrame("Hello World", wxPoint(50, 50), wxSize(450, 340));
        frame->Show(true);

        return true;
    }

};

/////////////////////////////////////
/////////////////////////////////////
/////////////////////////////////////

// WinMainをマクロで定義
wxIMPLEMENT_APP(MyApp);
wxBoxSizer使用
MyFrameのコンストラクタ内でボタンを生成する場合、ボタンが画面いっぱいに広がらないためにsizerを使用する。
// ウィンドウ作成
class MyFrame : public wxFrame
{
    // ボタン
    wxButton* m_button;

public:

    MyFrame(const wxString& title, const wxPoint& pos, const wxSize& size)
        : wxFrame(NULL, wxID_ANY, title, pos, size)
    {

        //MyFrame処理中にウィジェットを作る場合、
        //ボタンを生成してからwxBoxSizerで配置を決定する。

        m_button = new wxButton(this, wxID_EXIT, "Quit");

        // ウィンドウのサイズ変更時にボタンが中央に表示されるように設定
        wxBoxSizer* sizer = new wxBoxSizer(wxVERTICAL);
        sizer->AddStretchSpacer();
        sizer->Add(m_button, 0, wxALIGN_CENTER);
        sizer->AddStretchSpacer();
        SetSizer(sizer);

    }


private:

    // イベント処理しないときはこれを入れない
    // wxDECLARE_EVENT_TABLE();
};
Bindでイベントハンドラ追加する場合
// ウィンドウ作成
class MyFrame : public wxFrame
{
    // ボタン
    wxButton* m_button;

public:

    MyFrame(const wxString& title, const wxPoint& pos, const wxSize& size)
        : wxFrame(NULL, wxID_ANY, title, pos, size)
    {

        m_button = new wxButton(this, 1000/*ID*/, "ボタン1");

        //// ウィンドウのサイズ変更時にボタンが中央に表示されるように設定
        wxBoxSizer* sizer = new wxBoxSizer(wxVERTICAL);
        sizer->AddStretchSpacer();
        sizer->Add(m_button, 0, wxALIGN_CENTER);
        sizer->AddStretchSpacer();
        SetSizer(sizer);

        // イベントハンドラの設定
        Bind(wxEVT_BUTTON, &MyFrame::OnButtonClicked, this, m_button->GetId());

    }

    void OnButtonClicked(wxCommandEvent& event)
    {
        // オブジェクトのポインタを取得
        wxObject* obj = event.GetEventObject();
        wxButton* button = (wxButton*)obj;

        auto c = button->GetLabel().c_str().AsChar();
        wxMessageBox(c, "タイトル", wxOK | wxICON_INFORMATION, this);

        // GetID()でIDから判断してもいい。
        // if (m_button->GetId() == event.GetId()) { ... }
    }

};
wxDECLARE_EVENT_TABLEでイベントハンドラ追加する場合
#define BUTTON_1 100

// ウィンドウ作成
class MyFrame : public wxFrame
{
    // ボタン
    wxButton* m_button;

public:

    MyFrame(const wxString& title, const wxPoint& pos, const wxSize& size)
        : wxFrame(NULL, wxID_ANY, title, pos, size)
    {

        m_button = new wxButton(this, BUTTON_1/*ID*/, "ボタン1");

        //// ウィンドウのサイズ変更時にボタンが中央に表示されるように設定
        wxBoxSizer* sizer = new wxBoxSizer(wxVERTICAL);
        sizer->AddStretchSpacer();
        sizer->Add(m_button, 0, wxALIGN_CENTER);
        sizer->AddStretchSpacer();
        SetSizer(sizer);

    }

    void OnButtonClicked(wxCommandEvent& event)
    {
        // オブジェクトのポインタを取得
        wxObject* obj = event.GetEventObject();
        wxButton* button = (wxButton*)obj;

        auto c = button->GetLabel().c_str().AsChar();
        wxMessageBox(c, "タイトル", wxOK | wxICON_INFORMATION, this);

    }


private:

    // 自分でBindしないときはこれとwxBEGIN_EVENT_TABLEが必要
    wxDECLARE_EVENT_TABLE();
};


wxBEGIN_EVENT_TABLE(MyFrame, wxFrame)
EVT_BUTTON(BUTTON_1, MyFrame::OnButtonClicked)
wxEND_EVENT_TABLE()