Pythonでsqlite
pythonはデフォルトでsqliteを使えるらしい。
import sqlite3

# データベースファイルに接続(なければ自動的に作成される)
conn = sqlite3.connect('test.db')
cursor = conn.cursor()

# テーブル作成
cursor.execute('''
CREATE TABLE IF NOT EXISTS ingredients (
    id INTEGER PRIMARY KEY AUTOINCREMENT,
    name TEXT NOT NULL,
    quantity INTEGER NOT NULL,
    unit TEXT NOT NULL,
    expiration_date TEXT
)
''')

# ダミーデータ挿入
sample_data = [
    ("たまねぎ", 10, "個", "2025-05-01"),
    ("にんじん", 5, "本", "2025-04-15"),
    ("じゃがいも", 20, "個", "2025-04-20"),
    ("牛乳", 2, "本", "2025-04-11"),
    ("卵", 12, "個", "2025-04-18"),
    ("鶏むね肉", 3, "枚", "2025-04-13"),
    ("小麦粉", 1, "袋", "2025-10-01"),
    ("砂糖", 1, "袋", "2026-01-01"),
    ("塩", 1, "袋", None),
]

cursor.executemany('''
INSERT INTO ingredients (name, quantity, unit, expiration_date)
VALUES (?, ?, ?, ?)
''', sample_data)

# コミットして保存
conn.commit()

# データ確認
cursor.execute("SELECT * FROM ingredients")
for row in cursor.fetchall():
    print(row)

# 接続を閉じる
conn.close()
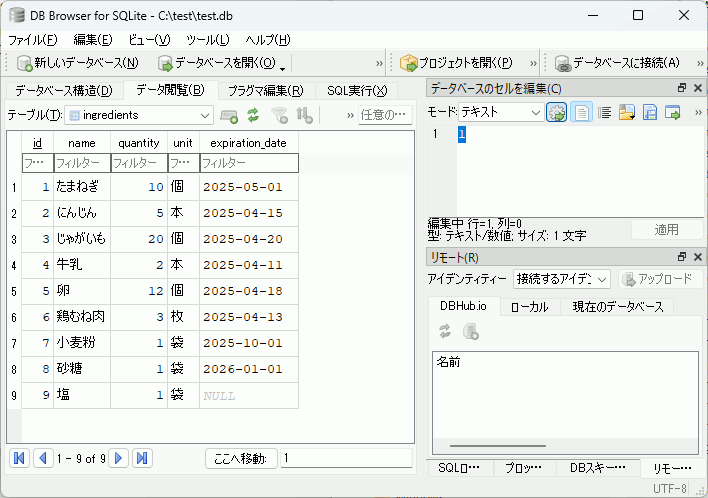
内容確認
DB Browser for SQLite

RustでFreeType-rsを使用
FreeType-rsは内部でビルド済みのFreeTypeを呼び出しているので、ビルド済みFreeTypeを用意する必要がある。加えて、pkg-configが必要。
freetype2の導入
以下でfreetype2を導入。
これにより、freetype2の関連ライブラリと一緒に、.pcファイル(pkg-configに必要)が生成される。
pkg-configの導入と設定
以下よりpkg-config-liteを導入し、パスを通す。
https://sourceforge.net/projects/pkgconfiglite/
Rustで使用
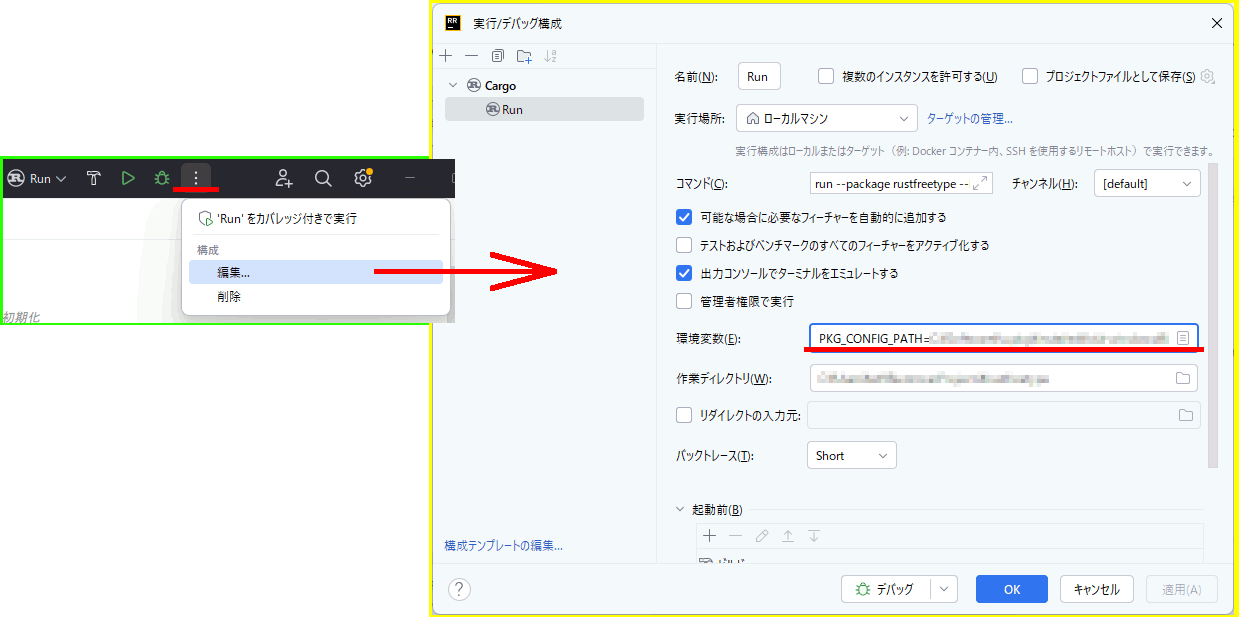
環境変数PKG_CONFIG_PATHを追加。これでcargoが.pcファイルを見つけられるようになる。
PKG_CONFIG_PATH=C:\app\vcpkg\installed\x64-windows\lib\pkgconfig
RustRoverであれば、実行/デバッグ構成から環境変数を設定できる。

Cargo.toml
freetype-rs = "0.38.0"
main.rs
use freetype::Library;

// image = "0.25.6" を追加
use image::{GrayImage, Luma};

fn main() -> Result<(), Box<dyn std::error::Error>> {

    // FreeTypeライブラリ初期化
    let lib = Library::init()?;

    // フォント読み込み
    let face = lib.new_face("C:/Windows/Fonts/arial.ttf", 0)?;
    face.set_char_size(40 * 64, 0, 300, 0)?; // 40pt, 300dpi

    // 描画する文字
    face.load_char('A' as usize, freetype::face::LoadFlag::RENDER)?;

    let glyph = face.glyph();
    let bitmap = glyph.bitmap();

    let width = bitmap.width() as u32;
    let rows = bitmap.rows() as u32;

    // グレースケール画像作成
    let mut img = GrayImage::new(width, rows);

    for y in 0..rows {
        for x in 0..width {
            let value = bitmap.buffer()[(y * width + x) as usize];
            img.put_pixel(x, y, Luma([value]));
        }
    }

    img.save("glyph.png")?;// 出力

    Ok(())
}
Wordを使っていて数式が上下の行に隠れる
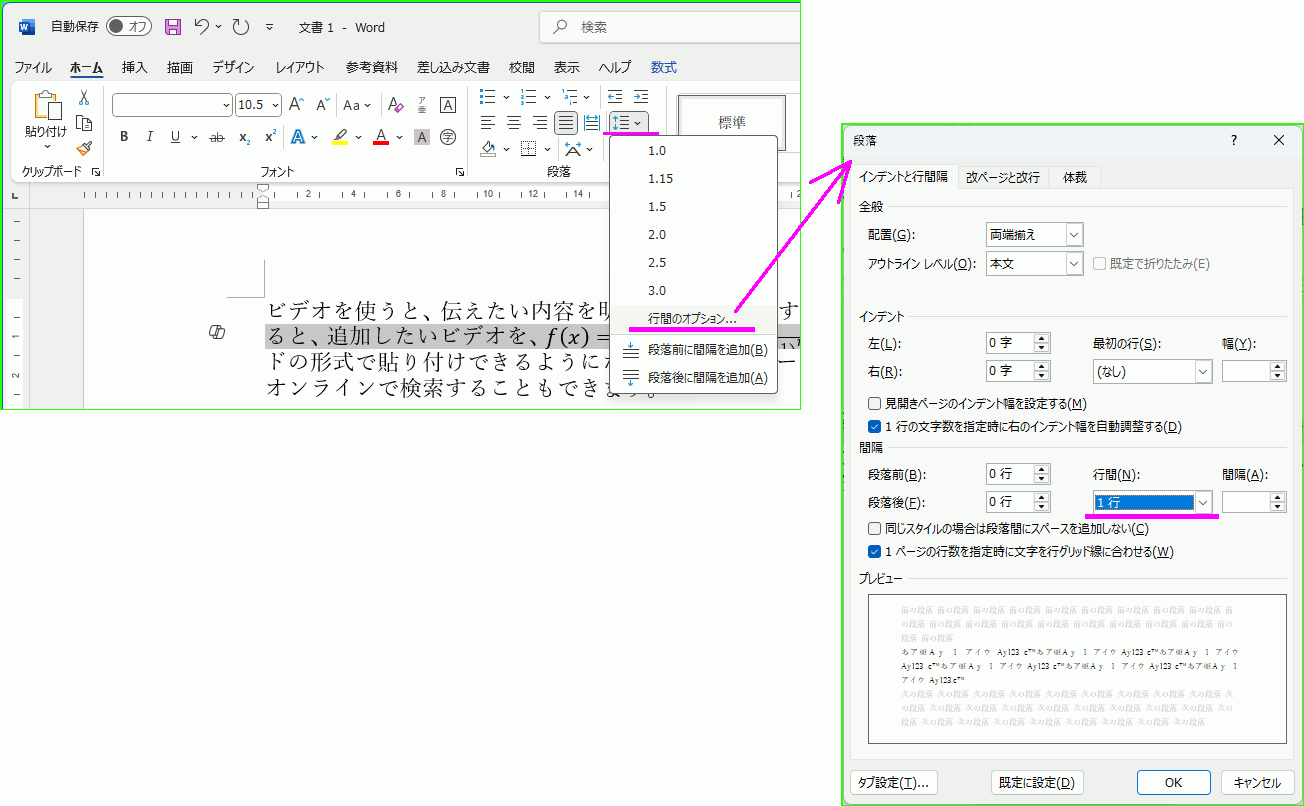
Wordを使って数式を埋め込んだ結果、以下のように数式の上下が見切れてしまう事案が発生。

これは行の高さが固定になっていることが原因で、行間のオプション→行間で、固定値以外を指定する。


Qwen3を使ってみる
Qwen3-8B
中国産のLLM、Qwen3。
今使っているのが NVIDIA GeForce RTX 3070 Ti 。
パラメータ数1Bあたり約1GBのVRAMが必要らしいので、 Qwen3-8B が使える。
https://www.linkedin.com/pulse/qwen3-self-hosting-guide-vllm-sglang-maksym-huczynski-i4v2f?utm_source=chatgpt.com
from langchain_ollama import OllamaLLM

import re

llm = OllamaLLM(model="qwen3:8b")
response = llm.invoke("こんにちは")

response_without_think = re.sub(r"<think>.*?</think>", "", response, flags=re.DOTALL)

print(response_without_think)
出力
応用
結構理想的な答えが返ってきたので、ユーザーの指示通りにPCを操作する超簡易的スクリプトを組んでみた。流石に重要なフォルダを削除などされると困るので、スクリプトを確認してから動作させる。
from langchain_ollama import OllamaEmbeddings
from langchain_community.vectorstores import FAISS
from langchain_community.document_loaders import TextLoader
from langchain_ollama import OllamaLLM
from langchain.text_splitter import RecursiveCharacterTextSplitter
from langchain.chains import RetrievalQA

import re
import subprocess
def GetPythonCodeLLM( llm,shiji ):
   response = llm.invoke("あなたはWindows上で動作するPythonコード生成器です。次の指示を実行可能なPythonコードを作成せよ。出力にPythonコード以外の内容を一切含めてはならない。コードはMarkdownのコードブロックで囲むこと。以下指示:"+ shiji )

   # <think>...</think> を削除
   response_without_think = re.sub(r"<think>.*?</think>", "", response, flags=re.DOTALL)

   return response_without_think
def extract_python_code_blocks(text):
    """
    与えられた文字列から、 ```python ~ ``` で囲まれた範囲のコードをリストで返す。
    """
    pattern = r"```python\s*(.*?)```"
    match = re.search(pattern, text, re.DOTALL)
    return match.group(1) if match else None
llm = OllamaLLM(model="qwen3:8b")


instructions = input("指示:").strip().lower()

response = GetPythonCodeLLM(llm,instructions)
code = extract_python_code_blocks(response)

print(">>>>>>>>>>>>>>>>>>>>>>>>>>>>>>>>>")
print(code)
print("<<<<<<<<<<<<<<<<<<<<<<<<<<<<<<<<<")
confirmation = input("処理を続行しますか? [Y/n]: ").strip().lower()

if confirmation in ['', 'y', 'yes']:

    with open('job.py', 'w') as file:
        file.write(code)
    subprocess.run(["python", "job.py"])

else:
    print("処理を中止しました。")
指示:C:\test2 内のファイル一覧を表示してください
>>>>>>>>>>>>>>>>>>>>>>>>>>>>>>>>>
import os
path = r'C:\test2'
for item in os.listdir(path):
item_path = os.path.join(path, item)
if os.path.isfile(item_path):
print(item)
<<<<<<<<<<<<<<<<<<<<<<<<<<<<<<<<<
処理を続行しますか? [Y/n]: Y
freetypetest.pbm
local.html
meiryob.ttc
s01.gif
時々、リストをそのまま出力することがある。
指示:C:\test2 内のファイル一覧を表示してください
>>>>>>>>>>>>>>>>>>>>>>>>>>>>>>>>>
import os
print(os.listdir(r'C:\test2'))
<<<<<<<<<<<<<<<<<<<<<<<<<<<<<<<<<
処理を続行しますか? [Y/n]: Y
['freetypetest.pbm', 'local.html', 'meiryob.ttc', 's01.gif']
windowsでollamaを使ってみる
ollamaは大規模言語モデルを簡単に使うためのツールで、起動するとサーバーとして常駐する。
手順1.環境変数の設定
モデルデータのダウンロード先を指定する環境変数を設定する。これをしないと何GBあるかわからないようなモデルがCドライブにダウンロードされてしまう。
手順2.ダウンロード
以下からダウンロード・インストール。ポータブル版はないらしく、インストール先も選べないらしい。
手順4.使用例
起動すると常駐する(タスクトレイで確認できる)。
モデルのダウンロード
コマンドプロンプトを開き、以下を実行
モデルの使用
以下のjsonを投げたい。
"model":"llama3",
"prompt":"hello",
"stream":false
}"
コマンドプロンプトからcurlの引数で渡す場合、"をエスケープしなければいけないので、以下のように実行。
pythonスクリプトで実行する例
import requests

res = requests.post("http://localhost:11434/api/generate", json={
    "model": "llama3",
    "prompt": "こんにちは。お元気ですか?",
    "stream": False
})

print(res.json()["response"])
以下のような出力が得られる
Windows 11 でUSB-BT50LEが動かなくなったとき試したこと
IO-DATAのBluetooth USBアダプタ USB-BT50LEがWindows 11で時々動かなくなる。
色々やってるうちに動いたのでメモしておく。
やったこと① ドライバの再インストール
以下からダウンロードしてインストール。とりあえず他の作業をする場合にも再インストールはするのでひとまずこのダウンロードだけはやっておく。
https://www.iodata.jp/lib/software/u/2323.htm
ただし setup.exe からインストールしようとして成功したためしが殆ど無い。BT_Driver\Win10X64\DPInst.exe からドライバのインストールだけ行うと成功することがある。
やったこと② ドライバの削除(デバイスマネージャから)
デバイスマネージャからBluetoothと名のつくもの全て削除。私の環境では、以下を全て削除し、 再起動後にドライバの再インストールを行う。
・Bluetooth Device (RFCOMM Protocol TDI)
・Microsoft Bluetooth Emulator
・Microsoft Bluetooth LE Emulator
・インテル(R) ワイヤレス Bluetooth(R)
・Realtek Bluetooth 5.0 Adapter (今回使いたいドライバ。挿してないときは見えない)
やったこと③ ドライバの削除(Driver Store Explorerから)
フリーソフトのDriver Store Explorerを使用し、Bluetoothの項目のRealtek製ドライバを全て削除し再起動して再インストール

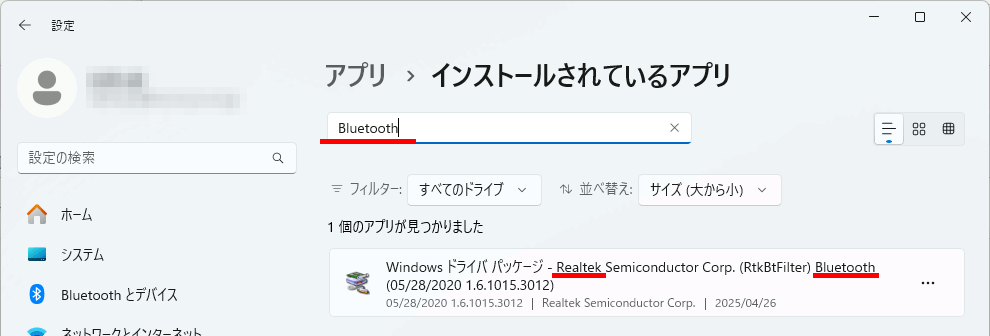
やったこと④ インストールされているアプリから RealtekのBluetooth関連のものを削除
スクリーンショットを取りそこなったのだが実際にはもう一個あった。これらを削除し、再起動後にドライバのインストールを行って動作した。

ディレクトリツリーを作成
以前にもstd::filesystemでディレクトリツリーを作成するコードをいつもより少しだけ真面目に書いた。
#include <iostream>

#include <vector>
#include <string>
#include <filesystem>

// SetConsoleOutputCP のために必要
#include <windows.h>

enum class FileType {
    Ignore,
    Directory,
    File
};
enum class ExceptionType {
    Success,
    // 子要素の収集に失敗(イテレータ取得に失敗)
    // あるノードにこのエラーがついていた場合、そのノードの子要素は取得できていない
    ChildrenIteratorError,
    NodeTypeError,
    NodeNameError,
    NotInit,
    Other,
};

using PathString = std::u8string;

inline PathString ToFilenameString(const std::filesystem::path& path) {

    std::filesystem::path tmp;
    if (path.filename().empty()) {
        tmp = path.parent_path();  // 末尾がスラッシュなら親ディレクトリを取得
    }
    else {
        tmp = path; // 末尾がスラッシュでないならそのまま
    }

    PathString fname = tmp.filename().u8string();
    return fname;

}

struct ErrorData {
    ExceptionType type;
    std::string message;
    std::filesystem::path path;
public:
    ErrorData() : type(ExceptionType::Success) {}
    ErrorData(ExceptionType type, const std::string& message) : type(type), message(message) {}
};
// 自作の例外クラス
class FileSystemTreeException : public std::exception {
private:
    std::string message;
    ErrorData error_data;
public:
    explicit FileSystemTreeException(const std::string& msg, const std::filesystem::path& _path_, const ExceptionType type) :
        message(msg) {
        error_data.type = type;
        error_data.message = msg;
        error_data.path = _path_;
    }

    const char* what() const noexcept override {
        return message.c_str();
    }

    const ErrorData& getErrorData() const {
        return error_data;
    }
};
// ノードの子ノード配列を扱うクラス
// FileSystemTreeで子ノードの読み込みに失敗した場合はerror_dataに内容が入っている
class ChildrenNodes {
    std::vector<std::unique_ptr<class FileSystemTree>> children;
    ErrorData error_data;
public:
    ChildrenNodes() {}

    ChildrenNodes& operator=(std::vector<std::unique_ptr<class FileSystemTree>>&& other) noexcept {
        children = std::move(other);
        return *this;
    }

    void push_back(std::unique_ptr<class FileSystemTree>&& node) {
        children.push_back(std::move(node));
    }
    bool isValid()const { return error_data.type == ExceptionType::Success; }
    void setError(const ErrorData& err) { error_data = err; }
    const ErrorData& getError() const { return error_data; }
    std::vector<std::unique_ptr<class FileSystemTree>>::const_iterator cbegin() const { return children.cbegin(); }
    std::vector<std::unique_ptr<class FileSystemTree>>::const_iterator cend() const { return children.cend(); }
    std::vector<std::unique_ptr<class FileSystemTree>>::iterator begin() { return children.begin(); }
    std::vector<std::unique_ptr<class FileSystemTree>>::iterator end() { return children.end(); }
    std::vector<std::unique_ptr<class FileSystemTree>>::const_iterator begin() const { return children.cbegin(); }
    std::vector<std::unique_ptr<class FileSystemTree>>::const_iterator end() const { return children.cend(); }
};
// ディレクトリツリーのクラス
class FileSystemTree {
    PathString name;               // ファイル名・ディレクトリ名
    FileType type;                 // ファイルかディレクトリか
    ErrorData error_data;          // このノードのエラー情報
    ChildrenNodes children;        // 子ノード一覧
    ChildrenNodes error_children;  // エラーが発生した子ノード一覧

public:
    FileSystemTree(const PathString& name, const FileType type) : name(name), type(type) {}
    FileSystemTree() :type(FileType::Ignore) {};
    FileSystemTree(const ErrorData& err) : error_data(err), type(FileType::Ignore) {}

    // このノードについて、子ノードの読み込みに失敗した場合に設定
    // 注意:子ノード一つ一つではなく、イテレータの取得の段階で失敗したような場合に使用
    void setChildrenError(const ExceptionType type, const std::string str) {
        children.setError(ErrorData(type, str));
    }

    // このノードの子ノード一覧を設定
    // アクセスできない子を見つけた場合はerrorchildrenに入れて渡す
    void setChildren(
        std::vector<std::unique_ptr<FileSystemTree>>&& children,
        std::vector<std::unique_ptr<FileSystemTree>>&& errorchildren) {
        this->children = std::move(children);
        this->error_children = std::move(errorchildren);

    }
    const ChildrenNodes& getChildren()const { return children; }// 子ノード一覧へアクセス
    void setError(const ErrorData& err) { error_data = err; }// このノードがエラーノードであることを設定(普通コンストラクタで指定可能なので使わない)
    bool isChildrenValid() const { return children.isValid(); }// 子ノード一覧の生成に成功したかどうか。たとえ要素0でも生成に成功していればtrue
    ChildrenNodes& getErrorChildren() { return error_children; }// 子ノード一一覧生成時、読み込めなかったときに発生したエラー一覧
    const PathString& getName() const { return name; }// ノード名
    FileType getType() const { return type; }// ファイルかディレクトリか
    bool isFailure() const { return error_data.type != ExceptionType::Success; }// このノードがエラーノードであるか
    const ErrorData& getError() const { return error_data; }// このノードのエラー情報
};
std::unique_ptr<FileSystemTree> MakeFilesystemNode(const std::filesystem::path& path) {

    FileType type;
    PathString name;
    try {
        // ノードの種類を特定
        type = std::filesystem::is_directory(path) ? FileType::Directory : FileType::File;
    }
    catch (const std::exception& e) {
        throw FileSystemTreeException(e.what(), path, ExceptionType::NodeTypeError);
    }

    try {
        // ノードの名前を取得
        name = ToFilenameString(path);
    }
    catch (const std::exception& e) {
        throw FileSystemTreeException(e.what(), path, ExceptionType::NodeNameError);
    }

    std::unique_ptr<FileSystemTree> the_node = std::make_unique<FileSystemTree>(name, type);
    return the_node;
}
// ディレクトリツリーを構築する関数
void buildDirTreeCore(std::unique_ptr<FileSystemTree>& this_directory, const std::filesystem::path& path) {

    if (this_directory->getType() == FileType::Directory) {
        // ノードがディレクトリの場合、子ノードを追加

        // pathの中身を取得するイテレータを作成
        std::filesystem::directory_iterator dir_itr;
        try {
            dir_itr = std::filesystem::directory_iterator(path);
        }
        catch (const std::filesystem::filesystem_error& e) {
            // 失敗した場合、このディレクトリ内のファイルを取得できないことを意味する
            this_directory->setChildrenError(ExceptionType::ChildrenIteratorError, e.what());
            return;
        }
        catch (const std::exception& e) {
            this_directory->setChildrenError(ExceptionType::Other, e.what());
            return;
        }

        std::vector<std::unique_ptr<FileSystemTree>> nowchildren; // this_directoryの子ノード一覧
        std::vector<std::unique_ptr<FileSystemTree>> errors; // エラーが発生した子ノード一覧

        // ディレクトリ内の項目を取得して追加
        for (const auto& entry : dir_itr) {
            std::unique_ptr<FileSystemTree> newnode;

            try {
                // 子要素のリストを作成
                newnode = MakeFilesystemNode(entry.path());
                nowchildren.emplace_back(std::move(newnode));
            }
            catch (const FileSystemTreeException& e) {
                // エラーが発生した場合、エラーノードを追加
                errors.push_back(std::make_unique<FileSystemTree>(e.getErrorData()));
            }

        }

        for (auto& subdirectory : nowchildren) {
            // ディレクトリのみ、サブディレクトリを再帰的に処理
            if (subdirectory->getType() == FileType::Directory) {

                const std::filesystem::path& subpath = path / subdirectory->getName();
                buildDirTreeCore(subdirectory, subpath);
            }
        }
        this_directory->setChildren(std::move(nowchildren), std::move(errors));
    }
}
std::unique_ptr<FileSystemTree> BuildTree(const std::filesystem::path& path) {
    std::unique_ptr<FileSystemTree> this_directory;
    auto entry = path.lexically_normal();
    this_directory = MakeFilesystemNode(entry); // パスからノードを作成
    buildDirTreeCore(this_directory, entry);
    return this_directory;
}
/////////////////////////////////////////////////////////////////////////////////////
// ファイルツリーを表示
void PrintTree(const std::unique_ptr<FileSystemTree>& node, int depth = 0) {


    auto to_string = [](const FileType type) {
        switch (type) {
        case FileType::Ignore:    return "*";
        case FileType::Directory: return "[DIR] ";
        case FileType::File:      return "[FILE] ";
        }
        return "Unknown";
        };

    std::string indent(depth * 2, ' ');
    if (node->isFailure()) {
        std::cout << indent << to_string(node->getType()) << (const char*)node->getName().c_str() << " : " << node->getError().message << "\n";
    }
    else {
        std::cout << indent << to_string(node->getType()) << (const char*)node->getName().c_str() << "\n";
    }
    if (node->isChildrenValid() == false) {
        std::cout << indent << "  ** Children Error: " << node->getChildren().getError().message << "\n";
    }
    else {
        for (const auto& child : node->getChildren()) {
            PrintTree(child, depth + 1);
        }
    }
    for (const auto& error : node->getErrorChildren()) {
        std::cout << indent << "  ** Error: " << error->getError().message << "\n";
    }
}
int main()
{
    // ロケール設定
    std::locale::global(std::locale("ja_JP.UTF-8"));
    std::cerr.imbue(std::locale("ja_JP.UTF-8"));
    std::cout.imbue(std::locale("ja_JP.UTF-8"));
    SetConsoleOutputCP(CP_UTF8);

    std::string path = R"(C:\test\myaccess)";

    std::unique_ptr<FileSystemTree> root = BuildTree(path);// ファイルパスからツリーを作成

    PrintTree(root);

}
スレッドプールのコード
以前、スレッドプールのサンプルのリンクを張った。それを加工したものを作成。
#include <deque>
#include <vector>
#include <thread>
#include <mutex>
#include <condition_variable>
#include <cassert>
//! @brief スレッドに行わせる仕事のインターフェース
//! @details run()メソッドを実装し、処理内容を記述する \n
//! 使用例:
//! @code
//! class MyWork : public JobBase {
//! public:
//!     void run() override {}
//! };
//! @endcode
class JobBase
{
public:
    virtual void run() = 0;
    virtual ~JobBase() {}
};
//! @brief ジョブをためるキュー
class Queue
{
public:
    Queue() {}
    void push(std::unique_ptr<JobBase>&& data) {
        _deque.emplace_back(std::move(data));
    }
    std::unique_ptr<JobBase> pop() {
		if (_deque.empty()) {
			return nullptr;
		}
		auto data = std::move(_deque.front());
		_deque.pop_front();
		return data;
	}

    bool empty() const {
        return _deque.empty();
    }
private:
    // ジョブがたまっているキュー
    // ThreadPoolで作成したN個のThreadWorkerスレッドが、このキューからジョブを取り出して実行する
    std::deque<std::unique_ptr<JobBase>> _deque;
};
//! スレッドプールで動いているスレッドの実装
class ThreadWorker
{
public:
    ThreadWorker(bool& isTerminationRequested, Queue& queue,
        std::mutex& mutex, std::condition_variable& cv,
        int& activeJobCount, std::condition_variable& activeJobCv)
        : _isTerminationRequested(isTerminationRequested),
        _queue(queue),
        _mutex(mutex),
        _cv(cv),
        _activeJobCount(activeJobCount),
        _activeJobCv(activeJobCv)
    {}

    void operator()() {
        while (1) {
            std::unique_ptr<JobBase> jobinstance;
            {
                std::unique_lock<std::mutex> ul(_mutex);
                while (_queue.empty()) {
                    if (_isTerminationRequested) { return; }
                    _cv.wait(ul);
                }

                jobinstance = _queue.pop();
                assert(jobinstance != nullptr);
                _activeJobCount++;
            }

            jobinstance->run(); // ジョブを実行

            {
                std::unique_lock<std::mutex> ul(_mutex);
                _activeJobCount--; // 実行中ジョブ数を減らす
                if (_activeJobCount == 0 && _queue.empty()) {
                    _activeJobCv.notify_all(); // すべてのジョブが完了したことを通知
                }
            }
        }
    }

private:
    bool& _isTerminationRequested;
    Queue& _queue;
    std::mutex& _mutex;
    std::condition_variable& _cv;
    int& _activeJobCount; // 実行中ジョブ数
    std::condition_variable& _activeJobCv; // waitForCompletion() へ通知
};
//! @brief スレッドプールクラス
//! @details N個のスレッドで、M個のジョブを実行する。\n
//! waitForCompletion()で、現在キューを入れたすべてのジョブが完了するまで待機できる \n
//! 使用例:
//! @code
//! ThreadPool pool(4);
//! pool.add(std::make_unique<MyWork>());
//! pool.add(std::make_unique<MyWork>());
//! pool.waitForCompletion();
//! pool.add(std::make_unique<MyWork>());
//! pool.add(std::make_unique<MyWork>());
//! @endcode
class ThreadPool
{
public:
    ThreadPool(int threadCount)
        : _isTerminationRequested(false), _activeJobCount(0)
    {
        for (int n = 0; n < threadCount; n++) {
            auto worker = std::make_shared<ThreadWorker>(_isTerminationRequested, _queue, _mutex, _cv, _activeJobCount, _activeJobCv);
            _workers.push_back(worker);
            _threads.emplace_back(std::thread(std::ref(*worker)));
        }
    }


    ~ThreadPool() {
        {
            std::unique_lock<std::mutex> ul(_mutex);
            _isTerminationRequested = true;
        }
        _cv.notify_all();
        for (auto& thread : _threads) {
            thread.join();
        }
    }

    //! @brief すべてのジョブが完了するまで待機する
    void waitForCompletion() {
        std::unique_lock<std::mutex> ul(_mutex);
        _activeJobCv.wait(ul, [this]() { return _activeJobCount == 0 && _queue.empty(); });
    }

    //! @brief ジョブをキューに追加
    //! @param jobinstance ジョブ
    void add(std::unique_ptr<JobBase>&& jobinstance) {
        {
            std::unique_lock<std::mutex> ul(_mutex);
            _queue.push(std::move(jobinstance));
        }
        _cv.notify_all();
    }

private:
    bool _isTerminationRequested;
    Queue _queue;
    std::mutex _mutex;
    std::condition_variable _cv;
    std::vector<std::thread> _threads;
    std::vector<std::shared_ptr<ThreadWorker>> _workers;

    int _activeJobCount; // 実行中ジョブ数
    std::condition_variable _activeJobCv; // ジョブの完了を待機するための条件変数
};
condition_variableの使用方法勉強中(1)
スレッドを待機させるためのcondition_variableの使い方を確認中。
とりあえず使い方や注意点をまとめたコードを書いてみたがなんか何をやりたいのかよくわからないコードになったのでもう少し考える。
#include <iostream>
#include <vector>
#include <thread>
#include <mutex>
#include <condition_variable>
#include <random>
#include <chrono>

std::vector<double> data;
std::mutex mtx;
std::condition_variable cv;

// データが10個以上あればメインスレッドを起こすという条件を定義
// 判断中にdata.size()が変化する可能性があるので、必ずロック中に呼び出すこと
bool allow_to_main_wakeup() {
    return data.size() >= 10;
}
// 無限にデータを生成し続ける関数
// ただし、10個データが貯まったらメインスレッドで処理する要求を出す
// メインスレッドがデータを移動する間、このスレッドは休止する
void Factory() {

    // 値を生成する関数
    int count = 0;
    auto create_value = [&count]() { return count++; };

    // 無限にデータを生成してdataに追加し続ける
    while (true) {

        bool allow_to_wakeup = false;
        {
            // 仮に、先にメインスレッドでlockした場合、このスレッドはlock(mtx); でブロック中となる
            // メインスレッド側ですぐにcv.wait()で待機開始するため、すぐにこのブロックは解除されることが期待できる
            std::unique_lock<std::mutex> lock(mtx);

            //==================================
            // データ作成処理本体
            data.push_back( create_value() );
            //==================================

            // メインスレッドで処理してよいかを判断。
            // data.size()が別スレッドで変化しないために、ロック中に判断する
            allow_to_wakeup = allow_to_main_wakeup();


            // 仮に、先にFactoryでlockした場合、メインスレッドはlock(mtx); でブロック中となっている
            // ここでスコープを抜けてunlockすることでメインスレッドがlockできるようになり、すぐにcv.wait()で待機開始
        }

        // 現在メインスレッドはcv.wait()で待機中となっている。
        // 特定の条件を満たしたら、メインスレッドで処理するためにメインスレッドを起こす処理をする
        if (allow_to_wakeup == true) {

            // notify_oneは同じcv.waitにより待機中のスレッドを一つだけ起こす。
            cv.notify_one();

            // notify_one()はこのスレッドには何もしないのでここはすぐに処理される
            // これ以降の処理はmainスレッドとの並列処理となる

        }

        // あまり速く動いても動作確認がしづらいのでスリープを入れる
        std::this_thread::sleep_for(std::chrono::milliseconds(100));
    }
}
int main() {

    // Factory関数を別スレッドで実行
    // 以後、別スレッドでデータが自動生成され続ける
    std::thread producer(Factory);

    std::vector<double> tmp;

    //
    while (true) {

        {
            // ここでロック。ただしFactory関数側とどちらが先にロックするかは不定
            std::unique_lock<std::mutex> lock(mtx);

            // waitすると内部でmtx.unlock()が呼ばれる
            // これによりFactory側でlock(mtx)ができるようになり、データの生成が可能になる
            // 同時に、このスレッドはFactory側でnotify_one()が呼ばれるまでここで待機
            cv.wait(lock, [] { return allow_to_main_wakeup(); });
            // cv.waitのラムダ式はSpurious Wakeup対策。
            // 希にwait()中に何もしていないのにスレッドが起こされることがある
            // そのため、起こされたときに本当に起こされるべきかを関数により確認する

            // ここから先はcv.notify_one()により起こされてから実行される
            // これ以降の処理はFactory関数との並列処理となる。
            // なおwait()を抜けた時点で、lockは再びlock状態となる

            //==================================
            // 別スレッドで作成されたデータを移動
            tmp = std::move(data);
            //==================================
        }

        std::cout << "Generated numbers: ";
        for (double num : tmp) {
            std::cout << num << " ";
        }
        std::cout << std::endl;
    }


    producer.join();
    return 0;
}
DockerにインストールしたUbuntuにpython 3.9を入れる
以下のようにコンテナを作ったらpython 3.9のインストールに一手間かかったのでメモ。
なおapt update && apt upgrade はしてある。
まずそのまま
とすると
E: Couldn't find any package by glob 'python3.9'
E: Unable to locate package python3.9-venv
E: Couldn't find any package by glob 'python3.9-venv'
E: Unable to locate package python3.9-dev
E: Couldn't find any package by glob 'python3.9-dev'
が出てくる。ubuntu:latestで導入すると最小構成で入るのでデフォルトのレポジトリに入っていなかったりするらしい。
レポジトリの追加
add-apt-repository ppa:deadsnakes/ppa
apt update
Python 3.9の導入
コマンドのバージョン指定
update-alternativesは複数バージョンあるコマンドに対して、どのバージョンを使うかを指定する。
update-alternatives --config python
Python 3.9用のpipを導入
python3.9 -m pip install --upgrade pip setuptools wheel
確認
python --version
Python 3.9.21
pip --version
pip 25.0.1 from /usr/local/lib/python3.9/dist-packages/pip (python 3.9)