tsl::robin_mapとstd::unordered_mapを比較
C++のstd::unordered_mapと同じように使えるtsl::robin_map。
std::unordered_mapと比較してみた。VC++2022でInsertとFindの時間を計ってみたが、何度かやると順位が入れ替わったりするのであまり大きな差はなさそう。
https://github.com/Tessil/robin-map
#include <iostream>
#include <vector>
#include <string>
#include <algorithm>
#include <random>
#include <chrono>

#include <tsl/robin_map.h>

/*
using KeyT = int;
using ValueT = std::string;

KeyT MakeKey(int i) {
    return i;
}

ValueT MakeValue(int i) {
    return "Value_" + std::to_string(i);
}
*/

using KeyT = std::string;
using ValueT = int;

KeyT MakeKey(int i) {
    return "Value_" + std::to_string(i);
}

ValueT MakeValue(int i) {
    return i;
}
std::vector< std::pair<KeyT, ValueT> > CreateData(int count) {
    std::vector< std::pair<KeyT, ValueT> > data;
    data.reserve(count);
    for (int i = 0; i < count; ++i) {
        data.emplace_back(MakeKey(i), MakeValue(i));
    }
    return data;
}
template<typename HashMap>
void InsertTest(HashMap& mymap,const std::vector< std::pair<KeyT, ValueT> >& data) {
    for (size_t i = 0; i < data.size(); ++i) {
        mymap.insert({ data[i].first,data[i].second });
    }
}
template<typename HashMap>
int FindTest(const HashMap& mymap, const std::vector< std::pair<KeyT, ValueT> >& data) {
    int results_count = 0;
    for (size_t i = 0; i < data.size(); ++i) {
        auto itr = mymap.find(data[i].first);
        if (itr != mymap.end()) {
            ++results_count;
        }
    }
    return results_count;
}
struct test_times {
    std::chrono::microseconds insert_time;
    std::chrono::microseconds find_time;
};
template<typename HashMap>
test_times test(
    const std::vector< std::pair<KeyT, ValueT> > inserts,
    const std::vector< std::pair<KeyT, ValueT> > finds,
    HashMap& mymap) {

    test_times result;

    std::chrono::steady_clock::time_point start,end;
    ///////////////////////////////////////////////////////////////
    {
        // データを保存する時間の計測
        start = std::chrono::high_resolution_clock::now();
        mymap.reserve(inserts.size());
        InsertTest(mymap, inserts);
        end = std::chrono::high_resolution_clock::now();
        result.insert_time = std::chrono::duration_cast<std::chrono::microseconds>(end - start);
    }
    ///////////////////////////////////////////////////////////////
    {
        // データを検索する時間の計測
        start = std::chrono::high_resolution_clock::now();
        volatile int ret = FindTest(mymap, finds);
        end = std::chrono::high_resolution_clock::now();
        result.find_time = std::chrono::duration_cast<std::chrono::microseconds>(end - start);
    }
    ///////////////////////////////////////////////////////////////

    return result;
}
int main()
{
    tsl::robin_map<KeyT, ValueT> mymap_robin;
    std::unordered_map<KeyT, ValueT> mymap_std;

    auto data = CreateData(100000);

    auto inserts = data;
    auto finds = data;


    int count = 100;
    int count_robin_insert = 0;
    int count_robin_find = 0;
    int count_std_insert = 0;
    int count_std_fine = 0;
    for (int i = 0; i < count; i++) {

        // データの並びを変える
        std::shuffle(inserts.begin(), inserts.end(), std::mt19937{ std::random_device{}() });
        std::shuffle(finds.begin(), finds.end(), std::mt19937{ std::random_device{}() });

        mymap_robin.clear();
        mymap_robin.rehash(0);
        mymap_std.clear();
        mymap_std.rehash(0);

        test_times robin = test(inserts, finds, mymap_robin);
        test_times stdmp = test(inserts, finds, mymap_std);

        count_robin_find += robin.find_time.count();
        count_robin_insert += robin.insert_time.count();
        count_std_insert += stdmp.insert_time.count();
        count_std_fine += stdmp.find_time.count();
    }
    std::cout << "robin insert time (ms): " << count_robin_insert / count << std::endl;
    std::cout << " std  insert time (ms): " << count_std_insert / count << std::endl;
    std::cout << "------------------------" << std::endl;
    std::cout << "robin find time   (ms): " << count_robin_find / count << std::endl;
    std::cout << " std  find time   (ms): " << count_std_fine / count << std::endl;

    return 0;

}
KeyT == std::string , ValueT==int の場合
std insert time (ms): 9268
------------------------
robin find time (ms): 3542
std find time (ms): 4069
KeyT==int , ValueT == std::string の場合
std insert time (ms): 6708
------------------------
robin find time (ms): 858
std find time (ms): 1420
構造体のvectorから特定の要素を一列取り出す
構造体の配列から特定の要素だけをまとめた配列を作成する。
#include <vector>
#include <string>

struct test {
    int a;
    float b;
    std::string c;
};
template <typename StructT, typename MemberT>
std::vector<MemberT> column(const std::vector<StructT>& src, MemberT StructT::* member)
{
    std::vector<MemberT> result;
    result.reserve(src.size());
    for (const auto& v : src) {
        result.push_back(v.*member);
    }
    return result;
}
int main()
{
    std::vector<test> vec = {
        {1, 1.1f, "one"},
        {2, 2.2f, "two"},
        {3, 3.3f, "three"}
    };
    std::vector<float> b_values = column(vec, &test::b);

    for (float b : b_values) {
        printf("%f\n", b);
	}


    return 0;
}
2.200000
3.300000
メンバへのポインタを初めて使った。
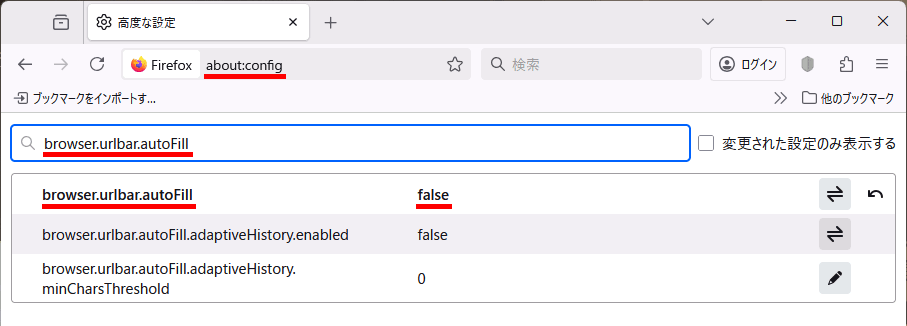
Firefoxのアドレスバーに入力された文字列がURLに近いとき勝手にURLとして扱われる設定を解除
about:config → browser.urlbar.autoFill をfalseに設定する。

cmakeでビルドツリー作成時にファイルコピーを行う
特定のファイルなどがカレントディレクトリにないといけない場合、cmakeでファイル群をコピーできる。
cmake_minimum_required(VERSION 3.16)
# プロジェクト名と使用言語
project(MyApp LANGUAGES CXX)
# 実行ファイルを作成(出力名=MyApp、ソース=main.cpp)
add_executable(MyApp main.cpp)
# /MD
set(CMAKE_MSVC_RUNTIME_LIBRARY "MultiThreadedDLL$<$<CONFIG:Debug>:Debug>")
# DLLのディレクトリ
set(SRC_DIR D:/libraries/VTK-9.5.1/shared-mfcunicode-release/bin/)
## DLLのコピー
set(DST_DIR ${CMAKE_BINARY_DIR}/${CMAKE_BUILD_TYPE}/Release/)
file(COPY ${SRC_DIR} DESTINATION ${DST_DIR})
## DLLのコピー
set(DST_DIR ${CMAKE_BINARY_DIR}/${CMAKE_BUILD_TYPE}/Debug/)
file(COPY ${SRC_DIR} DESTINATION ${DST_DIR})
message("CMAKE_BINARY_DIR = ${DST_DIR}")
Pythonのctypesでwindowsのdll内の関数を呼び出す
C言語側 sample.dll
#include <windows.h>
#include <cstdio>

#if defined(_WIN32)
#define DLL_EXPORT extern "C" __declspec(dllexport)
#else
#define DLL_EXPORT extern "C"
#endif
DLL_EXPORT double squared(double* a) {
    return *a * *a;
}
DLL_EXPORT void squared(double* a) {
    *a = *a * *a;
}
DLL_EXPORT float add_values(int a, float b) {
    return a + b;
}
DLL_EXPORT void get_version(char* const out_buf) {

    const char* text = "Version 1.0.0";
    int len = strlen(text);
    if (out_buf != NULL) {
        strcpy(out_buf,text);
    }
}
// 定数を返す
DLL_EXPORT int get_constant_value() {
    return 42;
}
// メッセージを標準出力に表示
DLL_EXPORT void print_message() {
    printf("Hello World\n");
}
BOOL APIENTRY DllMain( HMODULE hModule,
                       DWORD  ul_reason_for_call,
                       LPVOID lpReserved
                     )
{
    switch (ul_reason_for_call)
    {
    case DLL_PROCESS_ATTACH:
    case DLL_THREAD_ATTACH:
    case DLL_THREAD_DETACH:
    case DLL_PROCESS_DETACH:
        break;
    }
    return TRUE;
}
Python側
import ctypes
from ctypes import c_int, c_float,c_double, c_size_t, c_char_p, POINTER, create_string_buffer

dll = ctypes.CDLL(r".\sample.dll")

#
#  void squared(double* a)
#
dll.squared.argtypes = (ctypes.POINTER(c_double),) # 引数の型指定
dll.squared.restype  = None                        # 戻り値の型指定
v = c_double(3.0)               # Cの double 型の変数作成
dll.squared(ctypes.byref(v))    # 関数呼び出し , ポインタ渡し
ret = v.value                   # 結果取得
print("squared result:", ret)   # 結果表示


#
#  float add_values(int a, float b)
#
dll.add_values.argtypes = (c_int, c_float)  # 引数の型指定
dll.add_values.restype  = c_float           # 戻り値の型指定
ret = dll.add_values(10, c_float(2.5))
print("add_values:", ret)


#
#  void get_version(char* out_buf)
#
dll.get_version.argtypes = (ctypes.c_char_p,) # 引数の型指定
dll.get_version.restype  = None               # 戻り値の型指定

buf = create_string_buffer(64)                # 文字列を受け取るためのバッファ作成
dll.get_version(buf)                          # 関数呼び出し , ポインタ渡し
ret = buf.value.decode("utf-8")               # 結果取得
print("version:", ret)


#
#  int get_constant_value()
#
dll.get_constant_value.argtypes = ()          # 引数なし
dll.get_constant_value.restype  = c_int       # 戻り値の型指定
ret = dll.get_constant_value()
print("constant:", ret)


#
#  void print_message()
#
dll.print_message.argtypes = ()               # 引数なし
dll.print_message.restype  = None             # 戻り値なし
dll.print_message()                           # 関数呼び出し
CMakeLists.txtで作成した.slnの出力先ディレクトリを変える
例えば以下のような CMakeLists.txtを用意し、
cmake_minimum_required(VERSION 3.16)
# プロジェクト名と使用言語
project(MyApp LANGUAGES CXX)
# C++標準(必要に応じて変更)
set(CMAKE_CXX_STANDARD 17)
set(CMAKE_CXX_STANDARD_REQUIRED ON)
set(CMAKE_CXX_EXTENSIONS OFF)
# 実行ファイルを作成(出力名=MyApp、ソース=main.cpp)
add_executable(MyApp main.cpp)
# /MD
set(CMAKE_MSVC_RUNTIME_LIBRARY "MultiThreadedDLL$<$<CONFIG:Debug>:Debug>")
以下でVC++のソリューションとプロジェクトを作成する。
と、プロジェクトの出力先が絶対パスになる。これの何が問題かというとディレクトリごとコピーしてプロジェクト複製したときに出力先が変わらない。

別に手で直せばいい。量もたいしたことは無いので、
とすれば良い。もし自動でやるなら、vcxprojファイルに書かれているので、xmlを編集する要領で書ける。
#include <iostream>
#include <fstream>

#include "pugixml.hpp"

void fix_outdir(const char* path)
{
    pugi::xml_document doc;
    if (!doc.load_file(path))
        return;

    // 全 OutDir を対象に書き換え
    for (auto outdir : doc.select_nodes("//OutDir"))//  //OutDir とすると、出現する全てのOutDirという意味になる
    {
        pugi::xml_node n = outdir.node();
        n.text() = "$(SolutionDir)$(Platform)\\$(Configuration)\\";
    }

    doc.save_file(path);
}


int main()
{
    std::string vcxproj_path = R"(C:\myusertemp\test\build\MyApp.vcxproj)";
    fix_outdir(vcxproj_path.c_str());

}
Windows 11 + wxWidgets 3.3.1 + VTK 9.5.1
VTK 9.5.1を使おうとしたところ、今までのwxWidgets+VTKのコードで動かなくなっていた。
なんとかWindows+wxWidgetsでVTK9.5.1での表示ができるようになった。

#include <wx/wxprec.h>
#include <wx/glcanvas.h>
#include <wx/frame.h>

#ifndef WX_PRECOMP
#include <wx/wx.h>
#endif

#include <GL/gl.h>

#pragma comment(lib, "opengl32.lib")

#include <iostream>

//VTK_MODULE_INITに必要
#include <vtkAutoInit.h>

#include <vtkOutputWindow.h>
#include <vtkSmartPointer.h>
#include <vtkRenderer.h>
#include <vtkRenderWindow.h>
#include <vtkRenderWindowInteractor.h>

#include <vtkActor.h>

#include <vtkPolyDataMapper.h>
#include <vtkCylinderSource.h>
#include <vtkInteractorStyleTrackballCamera.h>


#include <vtkWin32OpenGLRenderWindow.h>
#include <vtkWin32RenderWindowInteractor.h>

#include <vtkConeSource.h>


VTK_MODULE_INIT(vtkRenderingOpenGL2);
VTK_MODULE_INIT(vtkInteractionStyle);


vtkSmartPointer<vtkActor> CreateCone() {
    vtkSmartPointer<vtkConeSource> coneSource;
    coneSource = vtkSmartPointer<vtkConeSource>::New();
    vtkSmartPointer<vtkPolyDataMapper> mapper;
    mapper = vtkSmartPointer<vtkPolyDataMapper>::New();
    mapper->SetInputConnection(coneSource->GetOutputPort());
    vtkSmartPointer<vtkActor> actor;
    actor = vtkSmartPointer<vtkActor>::New();
    actor->SetMapper(mapper);

    return actor;
}

class MyGLCanvas : public wxGLCanvas
{
public:
    MyGLCanvas(wxFrame* parent,int* attribList = NULL);

private:

    wxGLContext* m_context; // OpenGL context
    //////////////////////////////////////////
    vtkNew<vtkWin32OpenGLRenderWindow> _renderWindow;
    vtkNew<vtkWin32RenderWindowInteractor> _interactor;
    vtkNew<vtkRenderer> _renderer;
    //////////////////////////////////////////
    bool vtk_inited = false;
    //////////////////////////////////////////
    // OpenGLコンテキストの作成をしてVTKに貸与する関数
    void InitVTKFromCurrentContext();
    //////////////////////////////////////////
    // マウスイベントを処理
    int last_x_ = 0, last_y_ = 0;
    void OnLeftDown(wxMouseEvent& e);
    void OnLeftUp(wxMouseEvent& e);
    void OnRightDown(wxMouseEvent& e);
    void OnRightUp(wxMouseEvent& e);
    void OnMiddleDown(wxMouseEvent& e);
    void OnMiddleUp(wxMouseEvent& e);
    void OnMotion(wxMouseEvent& e);
    void OnMouseWheel(wxMouseEvent& e);
    //////////////////////////////////////////
    void OnPaint(wxPaintEvent& evt);
};

MyGLCanvas::MyGLCanvas(wxFrame* parent, int* attribList)
    : wxGLCanvas(parent, wxID_ANY, attribList)
{
    Bind(wxEVT_PAINT, &MyGLCanvas::OnPaint, this);

    m_context = new wxGLContext(this);

    SetBackgroundStyle(wxBG_STYLE_CUSTOM);

    Bind(wxEVT_LEFT_DOWN, &MyGLCanvas::OnLeftDown, this);
    Bind(wxEVT_LEFT_UP, &MyGLCanvas::OnLeftUp, this);
    Bind(wxEVT_RIGHT_DOWN, &MyGLCanvas::OnRightDown, this);
    Bind(wxEVT_RIGHT_UP, &MyGLCanvas::OnRightUp, this);
    Bind(wxEVT_MIDDLE_DOWN, &MyGLCanvas::OnMiddleDown, this);
    Bind(wxEVT_MIDDLE_UP, &MyGLCanvas::OnMiddleUp, this);
    Bind(wxEVT_MOTION, &MyGLCanvas::OnMotion, this);
    Bind(wxEVT_MOUSEWHEEL, &MyGLCanvas::OnMouseWheel, this);
}


void MyGLCanvas::OnLeftDown(wxMouseEvent& e) {
    SetFocus();
    CaptureMouse();
    last_x_ = e.GetX(); last_y_ = e.GetY();
    _interactor->SetEventInformationFlipY(last_x_, last_y_, e.ControlDown(), e.ShiftDown());
    _interactor->InvokeEvent(vtkCommand::LeftButtonPressEvent);
}

void MyGLCanvas::OnLeftUp(wxMouseEvent& e) {
    last_x_ = e.GetX(); last_y_ = e.GetY();
    ReleaseMouse();
    _interactor->SetEventInformationFlipY(last_x_, last_y_, e.ControlDown(), e.ShiftDown());
    _interactor->InvokeEvent(vtkCommand::LeftButtonReleaseEvent);
}

void MyGLCanvas::OnRightDown(wxMouseEvent& e) {
    last_x_ = e.GetX(); last_y_ = e.GetY();
    CaptureMouse();
    _interactor->SetEventInformationFlipY(last_x_, last_y_, e.ControlDown(), e.ShiftDown());
    _interactor->InvokeEvent(vtkCommand::RightButtonPressEvent);
}

void MyGLCanvas::OnRightUp(wxMouseEvent& e) {
    last_x_ = e.GetX(); last_y_ = e.GetY();
    ReleaseMouse();
    _interactor->SetEventInformationFlipY(last_x_, last_y_, e.ControlDown(), e.ShiftDown());
    _interactor->InvokeEvent(vtkCommand::RightButtonReleaseEvent);
}

void MyGLCanvas::OnMiddleDown(wxMouseEvent& e) {
    last_x_ = e.GetX(); last_y_ = e.GetY();
    CaptureMouse();
    _interactor->SetEventInformationFlipY(last_x_, last_y_, e.ControlDown(), e.ShiftDown());
    _interactor->InvokeEvent(vtkCommand::MiddleButtonPressEvent);
}

void MyGLCanvas::OnMiddleUp(wxMouseEvent& e) {
    last_x_ = e.GetX(); last_y_ = e.GetY();
    ReleaseMouse();
    _interactor->SetEventInformationFlipY(last_x_, last_y_, e.ControlDown(), e.ShiftDown());
    _interactor->InvokeEvent(vtkCommand::MiddleButtonReleaseEvent);
}

void MyGLCanvas::OnMotion(wxMouseEvent& e) {
    last_x_ = e.GetX(); last_y_ = e.GetY();
    _interactor->SetEventInformationFlipY(last_x_, last_y_, e.ControlDown(), e.ShiftDown());
    _interactor->InvokeEvent(vtkCommand::MouseMoveEvent);
}

void MyGLCanvas::OnMouseWheel(wxMouseEvent& e) {
    last_x_ = e.GetX(); last_y_ = e.GetY();
    _interactor->SetEventInformationFlipY(last_x_, last_y_, e.ControlDown(), e.ShiftDown());
    if (e.GetWheelRotation() > 0) _interactor->InvokeEvent(vtkCommand::MouseWheelForwardEvent);
    else                          _interactor->InvokeEvent(vtkCommand::MouseWheelBackwardEvent);
}


void MyGLCanvas::InitVTKFromCurrentContext() {
    // wxのGLを現在化
    wxPaintDC dc(this);

    SetCurrent(*m_context);

    // Win32ハンドル取得
    HWND hwnd = this->GetHandle();
    HDC  hdc = dc.GetHDC();
    HGLRC hrc = m_context->GetGLRC();

    // wxWidgetsが作ったコンテキストをVTKへ貸与
    _renderWindow->SetWindowId(hwnd);
    _renderWindow->SetDeviceContext(hdc);
    _renderWindow->SetContextId(hrc);
    _renderWindow->InitializeFromCurrentContext();

    // レンダラの設定
    _renderWindow->AddRenderer(_renderer);
    _interactor->SetRenderWindow(_renderWindow);
    _interactor->Initialize();
    _interactor->Enable();

    // マウスイベントを設定.
    auto style = vtkSmartPointer<vtkInteractorStyleTrackballCamera>::New();
    style->SetDefaultRenderer(_renderer);
    _interactor->SetInteractorStyle(style);

    // レンダリング
    _renderer->SetBackground(1.1, 0.2, 0.3);
    _renderer->AddActor(CreateCone());

    vtk_inited = true;
}


void MyGLCanvas::OnPaint(wxPaintEvent& evt)
{
    if (!IsShown()) return;

    if (!vtk_inited)
        InitVTKFromCurrentContext();

    SetCurrent(*m_context);

    _renderWindow->Render();

}


class MyFrame : public wxFrame
{
public:
    MyFrame(const wxString& title, int xpos, int ypos, int width, int height);
    ~MyFrame();

    void OnSize(wxSizeEvent& event);

    MyGLCanvas* m_canvas = NULL;
};


MyFrame::MyFrame(const wxString& title, int xpos, int ypos, int width, int height)
    : wxFrame((wxFrame*)NULL, -1, title, wxPoint(xpos, ypos), wxSize(width, height))
{
    int args[] = { WX_GL_RGBA, WX_GL_DOUBLEBUFFER, WX_GL_DEPTH_SIZE, 16, 0 };


    m_canvas = new MyGLCanvas(this, args);

    Bind(wxEVT_SIZE, &MyFrame::OnSize, this);

}
void MyFrame::OnSize(wxSizeEvent& event) {
    m_canvas->SetSize(event.GetSize());
}

MyFrame::~MyFrame()
{
    delete m_canvas;
}


class MyApp : public wxApp
{
public:
    bool OnInit();
};


bool MyApp::OnInit()
{
    // VTKのデバッグ出力ウィンドウを表示しない
    vtkOutputWindow::SetGlobalWarningDisplay(0);


    MyFrame* frame = new MyFrame(wxT("wxWidgets OpenGL"), 50, 50, 400, 400);
    frame->Show();

    return true;
}

IMPLEMENT_APP(MyApp)
追記
OnSizeを以下のように記述。
void MyGLCanvas::OnSize(wxSizeEvent& e)
{
    if (!vtk_inited || !IsShownOnScreen())
        return;

    int w = 0, h = 0;
    GetClientSize(&w, &h);

    // HiDPI 対応(MSW の例)
    int pw = w, ph = h;
#ifdef __WXMSW__
    double scale = GetContentScaleFactor();
    pw = static_cast<int>(std::lround(w * scale));
    ph = static_cast<int>(std::lround(h * scale));
#endif


    // 次のペイントで描画
    Refresh(false);

    e.Skip(); // 既定処理も通す

}
VTKで平行移動・Roll・ズームができるインタラクタ作成
#include <vtkInteractorStyleTrackballCamera.h>

// 移動・視線方向回転・ズームのみできるインタラクタスタイル
class InteractorStylePanRollZoom final : public vtkInteractorStyleTrackballCamera {
public:
    static InteractorStylePanRollZoom* New();
    vtkTypeMacro(InteractorStylePanRollZoom, vtkInteractorStyleTrackballCamera);

    // 左ドラッグ開始
    void OnLeftButtonDown() override {

        // 分割ビューなどを想定し、マウス位置からレンダラーを特定
        // マウス位置にあるレンダラーをCurrentRendererにセット
        this->FindPokedRenderer(
            this->Interactor->GetEventPosition()[0],
            this->Interactor->GetEventPosition()[1]
        );

        if (!this->CurrentRenderer) {
            return;
        }


        // vtkInteractorStyleTrackballCameraの機能を使って 視線方向基準のRollを開始
        this->StartSpin();
    }

    // 左ドラッグ終了
    void OnLeftButtonUp() override {
        this->EndSpin();
        if (this->Interactor) {
            this->ReleaseFocus();
        }
    }

    // 不要なキーボード操作を無効化
    void OnChar() override {
        // 何もしない 既定のキーバインドを殺す
    }
};
vtkStandardNewMacro(InteractorStylePanRollZoom);
使用例
    auto renderer = vtkSmartPointer<vtkRenderer>::New();

    renderer->AddActor(actor);

    //////////////////////////////////////
    auto interactor = vtkSmartPointer<vtkRenderWindowInteractor>::New();

    auto style = vtkSmartPointer<InteractorStylePanRollZoom>::New();
    interactor->SetInteractorStyle(style);
    //////////////////////////////////////
    auto renderWindow = vtkSmartPointer<vtkRenderWindow>::New();
    renderWindow->AddRenderer(renderer);
    renderWindow->SetInteractor(interactor);

    interactor->Start(); //イベントループへ入る

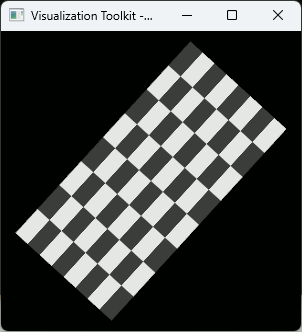
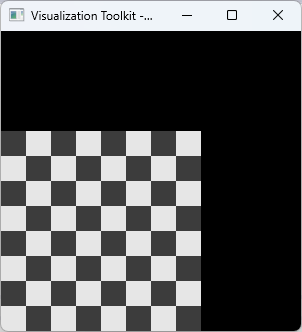
vtkPolyDataMapper2D , vtkTexturedActor2D で二次元表示
vtkPolyDataMapper2D,vtkTextureActor2Dを使うとカメラの影響を受けなくなるのでスクリーンを画面に貼り付けるような用途に使える。
あと座標指定がピクセルになる。
    // テクスチャオブジェクト作成 ///////////////
    vtkNew<vtkTexture> texture;

    // 画像データ作成 ///////////////////////////
    std::vector<unsigned char> pixels = MakeCheckerRGBA(256, 256, 32);

    // 画像データをvtkImageDataに変換 ///////////
    vtkSmartPointer<vtkImageData> imgdata = MakeImageDataFromBuffer(pixels.data(), 256, 256, 4);

    // テクスチャに画像データをセット ///////////
    SetTextureImage(texture, imgdata);

    // ポリゴン作成 /////////////////////////////
    auto poly_quad = MakeScreenAlignedQuad(200, 200); // ポリゴンサイズをピクセル指定で作成

    // 2Dマッパ & アクタ
    vtkNew<vtkPolyDataMapper2D> mapper2d;
    mapper2d->SetInputData(poly_quad);
    vtkNew<vtkTexturedActor2D> actor2d;
    actor2d->SetMapper(mapper2d);
    actor2d->SetPosition(0, 0); // 画面上の配置(左下オフセット)
    actor2d->SetTexture(texture);

    renderer->AddActor(actor2d);

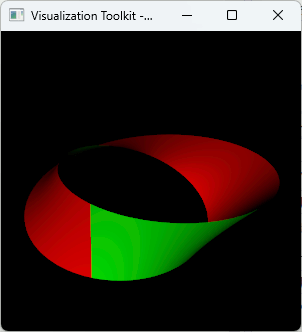
VTKで表裏の面の色を変える
actor->SetBackfacePropertyを設定する。
    //#include <vtkParametricMobius.h>
    //#include <vtkParametricFunctionSource.h>

    // メビウス
    vtkNew<vtkParametricMobius> mobius;
    mobius->SetRadius(5.0);
    const double halfWidth = 2.0;
    mobius->SetMinimumV(-halfWidth);
    mobius->SetMaximumV(+halfWidth);

    vtkNew<vtkParametricFunctionSource> parametricSource;
    parametricSource->SetParametricFunction(mobius);
    parametricSource->SetUResolution(100);
    parametricSource->SetVResolution(30);

    parametricSource->Update();
    vtkNew<vtkPolyDataMapper> mapper;
    mapper->SetInputConnection(parametricSource->GetOutputPort());
    vtkNew<vtkActor> actor;
    actor->SetMapper(mapper);
    // 表裏色設定
    actor->GetProperty()->SetColor(1.0, 0.0, 0.0); // 表
    vtkNew<vtkProperty> backProp;
    backProp->SetColor(0.0, 1.0, 0.0); // 裏
    actor->SetBackfaceProperty(backProp);

カスタムシェーダを使う方法
フラグメントシェーダを置換する方法でもできる。
    // カスタムシェーダ適用
    actor->GetProperty()->ShadingOn();
    actor->GetProperty()->SetInterpolationToPhong();

    vtkShaderProperty* shaderProperty = actor->GetShaderProperty();

    // フラグメントシェーダにコードを追加
    shaderProperty->AddFragmentShaderReplacement(
        "//VTK::Light::Impl",  // 挿入位置(照明計算の後)
        false,                 // 前のコードを置換
        R"(
vec3 faceTint2 = gl_FrontFacing ? vec3(1.0, 0.0, 0.0) : vec3(0.0, 1.0, 0.0);
fragOutput0 = vec4(faceTint2, 1.0) * fragOutput0;
)",
        false
    );