C++にLuaを組み込む(1)C++からスクリプト実行/スクリプトからC++の関数実行
LuaはC言語に組み込みやすい言語。
Windows版をmakeするのは面倒なので、ビルド済みバイナリをダウンロードする。
以下URLへ行き、Historyから Release 1とついているものをダウンロードする。
https://luabinaries.sourceforge.net

例1 与えた文字列をスクリプトとして実行
#include <lua.hpp>

// lua54.dllが必要
#pragma comment(lib, "lua54.lib")

int main()
{
    lua_State* luas = luaL_newstate();

    // Luaの標準ライブラリを読み込む
    luaL_openlibs(luas);

    // Luaスクリプト
    const char* script = R"(
for i = 1,5 do
  print(i)
end
)";

    // 文字列で与えてスクリプトを実行する
    luaL_dostring(luas, script);

    // Luaの終了。全てのメモリ解放
    lua_close(luas);

}
2
3
4
5
例2 ファイル名を与えて実行
myscript.lua
for i = 1,5 do
  print(i)
end
呼び出し側
#include <iostream>

#include <lua.hpp>

// lua54.dllが必要
#pragma comment(lib, "lua54.lib")

int main()
{
    lua_State* luas = luaL_newstate();

    // Luaの標準ライブラリを読み込む
    luaL_openlibs(luas);

    // myscript.luaを実行する
    // luaL_dofileでもいい。luaL_dofileはマクロ。
    // luaL_dofile(luas, "myscript.lua");

    luaL_loadfile(luas, "myscript.lua");// スクリプトファイル読み込み
    lua_pcall(luas, 0, LUA_MULTRET, 0);// スクリプト実行

    // Luaの終了。全てのメモリ解放
    lua_close(luas);

}
2
3
4
5
例3 C++からLuaの関数を呼び出す
#include <lua.hpp>

// lua54.dllが必要
#pragma comment(lib, "lua54.lib")

int main()
{
    lua_State* luas = luaL_newstate();

    // Luaの標準ライブラリを読み込む
    luaL_openlibs(luas);

    luaL_dostring(luas,
R"(
function calc(x, y)
  return
    x + y,
    x - y,
    x * y,
    x / y
end
)"
);

    // Luaの関数を呼び出す
    // 引数はスタックにプッシュして渡す
    /////////////////////////////////////////////
    lua_getglobal(luas, "calc"); // add 関数をスタックにプッシュ
    lua_pushnumber(luas, 3); // 第一引数 x に 3 をプッシュ
    lua_pushnumber(luas, 7); // 第二引数 y に 7 をプッシュ
    /////////////////////////////////////////////
    // 関数呼び出し
    int ret = lua_pcall(
        luas,
        2, // 引数の数
        4, // 戻り値の数
        0  // エラーハンドラのインデックス
    );
    /////////////////////////////////////////////
    // エラーチェック
    if (ret != LUA_OK) {
        const char* err = lua_tostring(luas, -1);
        printf("error: %s\n", err);
        return -1;
    }
    /////////////////////////////////////////////
    // 戻り値を取得
    int add = (int)lua_tonumber(luas, -4);// 戻り値1
    int sub = (int)lua_tonumber(luas, -3);// 戻り値2
    double mul = (double)lua_tonumber(luas, -2);// 戻り値3
    double div = (double)lua_tonumber(luas, -1);// 戻り値4
    printf("add = %d\n", add);
    printf("sub = %d\n", sub);
    printf("mul = %f\n", mul);
    printf("div = %f\n", div);
    /////////////////////////////////////////////

    // Luaの終了。全てのメモリ解放
    lua_close(luas);

}
sub = -4
mul = 21.000000
div = 0.428571
例4 LuaからC++の関数を呼び出す
#include <lua.hpp>

// lua54.dllが必要
#pragma comment(lib, "lua54.lib")
int ccalc(lua_State* L) {
    double a = luaL_checknumber(L, 1); // 1番目の引数を取得
    double b = luaL_checknumber(L, 2); // 2番目の引数を取得

    // 結果をスタックにプッシュ
    lua_pushnumber(L, a + b);
    lua_pushnumber(L, a - b);
    lua_pushnumber(L, a * b);
    lua_pushnumber(L, a / b);
    return 4; // 戻り値の数を返す
}
int main()
{
    lua_State* luas = luaL_newstate();

    // Luaの標準ライブラリを読み込む
    luaL_openlibs(luas);

    // C++の関数をLuaに登録
    lua_register(luas, "ccalc", ccalc);

    // LuaからC++の関数を呼び出す
    luaL_dostring(luas,
R"(
add,sub,mul,div = ccalc(3, 7)
print("add",add)
print("sub",sub)
print("sub",mul)
print("div",div)
)"
);

    // Luaの終了。全てのメモリ解放
    lua_close(luas);

}
sub -4.0
sub 21.0
div 0.42857142857143
C++CLIでParallel::For (改)
過去のParallel::Forの記事がかなりわかりにくかったので再度書く。過去記事:
以下サンプル
C++(普通コード)
int i;
int c1[100];

for (i = 0; i < 100; i ++) {
  c1[i] = i;
}
C++CLI (Parallel::For)
#include "pch.h"

using namespace System;
// Parallel::Forでデータを操作する関数を含んだクラス
ref struct LoopObject {
    int *_array;
public:
    LoopObject(int* data) {
        _array = data;
    }

    // データを操作する関数
    // Parallel::Forの場合は、intの引数一つである必要がある
    // 引数 i ループカウンタ for(int i = 0;i<SIZE;i++){  function(i); } のような感じ
    void function(int i) {

        // データを操作
        _array[i] = i;

    }
};
int main(array<System::String^>^ args)
{
    // データ
    const int SIZE = 100;
    int c1[SIZE];

    // Parallel::Forでデータを操作する関数を含んだクラスのインスタンスを生成
    LoopObject^ forInstance = gcnew LoopObject(c1);// コンストラクタにデータを渡す

    // forの範囲を指定
    int BEGIN = 0;
    int END = SIZE;

    // 並列処理実行 For( 開始Index , 終了Index , 一回分の処理を行う関数オブジェクト )
    System::Threading::Tasks::Parallel::For(
        BEGIN,
        END,
        gcnew Action<int>(forInstance, &LoopObject::function)
    );

    // 結果を表示
    for (int i = 0; i < SIZE; i++) {
        System::Console::WriteLine(
            System::String::Format("mydata[{0}] = {1}", i, c1[i]));
    }

    Console::ReadLine();

    return 0;
}
Action<int>のintはLoopObject::functionの引数がintなので、ループカウンタを与える関数に合わせているのだが、問題はParallel::Forがintしか受け付けていないので、実質Action<int>以外に選択肢がない(Action<size_t>などやってもParallel::Forでビルドエラーになる)。
C++で構造だけまねた例
要は「関数オブジェクトを並列で呼び出す関数」がParallel::Forで、Actionのインスタンスが関数オブジェクトになる。C++でそれっぽいコードを書くと以下になる。
std::sort(begin,end,[](...){...});とやるときと考え方は同じ。
#include <functional>

struct LoopObject {
    int* _array;
public:
    LoopObject(int* data) {
        _array = data;
    }

    // データを操作する関数
    // Parallel::Forの場合は、intの引数一つである必要がある
    // 引数 i ループカウンタ for(int i = 0;i<SIZE;i++){  function(i); } のような感じ
    void function(int i) {

        // データを操作
        _array[i] = i;

    }
};

namespace Parallel
{
    void For(int start, int end, LoopObject* action)
    {
        // 本来はここは並列処理で呼び出すが
        // 今回はシングルスレッドで実行する
        for (int i = start; i < end; i++)
        {
            action->function(i);
        }
    }
}

int main()
{
    int c1[100];

    auto action = new LoopObject(c1);

    Parallel::For(0, 100, action);


    // 結果の表示
    for (int i = 0; i < 100; i++)
    {
        printf("%d\n", c1[i]);
    }


}
FreeType2でBold、Italicの文字を描画(2)
Bold、Italicなどが別々のファイルに分かれている場合、各ファイルのfamily_nameがフォントの種類を特定する指標となり、同じフォントのfamily_nameは共通しているので、family_nameごとに纏めた辞書を作れば、特定のfamillyに対してスタイルを選択することができる。
#include <iostream>

#include <vector>
#include <fstream>
#include <filesystem>
#include <unordered_map>

#include <ft2build.h>
#include FT_FREETYPE_H

#pragma warning(disable:4996)

#ifdef _DEBUG
#pragma comment(lib,"freetyped.lib")
#else
#pragma comment(lib,"freetype.lib")
#endif


//! @brief PBM(1byte,テキスト)を書き込む
//! @param [in] fname ファイル名
//! @param [in] width 画像の幅
//! @param [in] height 画像の高さ
//! @param [in] p 画像のメモリへのアドレス
//! @details 1画素1Byteのメモリを渡すと、0,1テキストでファイル名fnameで書き込む
void pbmP1_Write(const char* const fname, const int width, const int height, const unsigned char* const p) { // PPM ASCII

    FILE* fp = fopen(fname, "wb");
    fprintf(fp, "P1\n%d\n%d\n", width, height);

    size_t k = 0;
    for (size_t i = 0; i < (size_t)height; i++) {
        for (size_t j = 0; j < (size_t)width; j++) {
            fprintf(fp, "%d ", p[k] ? 0 : 1);
            k++;
        }
        fprintf(fp, "\n");
    }

    fclose(fp);
}
bool render(FT_Face face, FT_ULong character) {

    //文字コード指定
    FT_Error error = FT_Select_Charmap(
        face,               // target face object
        FT_ENCODING_UNICODE // エンコード指定
    );


    if (error == FT_Err_Unknown_File_Format)
        return false;
    else if (error)
        return false;

    //この二つの値でフォントサイズ調整
    FT_F26Dot6 fontsize = 16 * 64*2;
    FT_UInt CHAR_RESOLUTION = 300;
    error = FT_Set_Char_Size(
        face,                // handle to face object
        0,                   // char_width in 1/64th of points
        fontsize,            // char_height in 1/64th of points
        CHAR_RESOLUTION,     // horizontal device resolution
        CHAR_RESOLUTION);    // vertical device resolution


    FT_UInt char_index = FT_Get_Char_Index(face, character);

    // グリフ(字の形状)読込
    error = FT_Load_Glyph(face, char_index, FT_LOAD_RENDER);
    if (error)
        return -1; // ignore errors

    // 文字を画像化
    FT_Render_Glyph(face->glyph, FT_RENDER_MODE_NORMAL);

    int Width = face->glyph->bitmap.width;
    int Height = face->glyph->bitmap.rows;


    char filename[1024];
    sprintf(filename, "C:\\test\\freetypetest_%s.pbm", face->style_name);

    pbmP1_Write(// ファイル保存
        filename,
        Width,
        Height,
        face->glyph->bitmap.buffer
    );

}
// filesystemでフォントファイル名一覧を取得する
std::vector<std::string> getFontFileList(const std::string& fontdir) {
    namespace fs = std::filesystem;

    std::vector<std::string> fontList;

    if (!fs::exists(fontdir) || !fs::is_directory(fontdir)) {
        std::cerr << "Directory does not exist: " << fontdir << std::endl;
        return fontList;
    }

    // Iterate through the directory
    for (const auto& entry : fs::directory_iterator(fontdir)) {
        if (entry.is_regular_file()) {
            auto path = entry.path();
            fontList.push_back(path.string());
        }
    }

    return fontList;
}
// フォントファイルからフォントを取得し、フォントファミリでグループ化する
std::unordered_map<std::string, std::vector<std::pair<std::string, FT_Face>> > getFonts(FT_Library library,const std::vector<std::string>& flist) {

    std::unordered_map<
        std::string,
        std::vector< std::pair<std::string,FT_Face> > > fontmap;

    for (const auto& file : flist) {

        FT_Face face;      // handle to face object

        // フォントファイル読み込み
        FT_Error error = FT_New_Face(
            library,
            file.c_str(),
            0,
            &face
        );
        if(error)
            continue;

        fontmap[face->family_name].push_back({ file,face });// ファミリ名をキーとしてフェイスを保存

    }

    return fontmap;

}
int main()
{

    FT_Library library; // handle to library
    FT_Error error;

    error = FT_Init_FreeType(&library);
    if (error)
        return -1;

    std::vector<std::string> flist = getFontFileList("C:\\Windows\\Fonts\\");

    // フォントファミリでグループ化したフォントリストを取得
    auto famillies = getFonts(library, flist);

    // arialフォントのファミリ名で取得
    const auto& arial = famillies["Arial"];
    for( const auto& [file,face] : arial){
        std::cout << face->style_name << std::endl;
        render(face, wchar_t(L'A'));
    }

    // フォント解放
    for (auto& familly : famillies) {
        for (std::pair<std::string,FT_Face>& tf : familly.second) {
            FT_Face face = tf.second;
            FT_Done_Face(face);
        }
    }


    FT_Done_FreeType(library);
}
出力
Bold
Bold Italic
Italic
Narrow
Narrow Bold
Narrow Bold Italic
Narrow Italic
Black

FreeType2でBold、Italicの文字を描画(1)
同じフォントの太字、斜体でも、別のファイルに分かれていることがかなりある。フォントフォルダから別フォルダに移すとファイル名がわかる。

#include <iostream>

#include <vector>
#include <fstream>


#include <ft2build.h>
#include FT_FREETYPE_H

#pragma warning(disable:4996)

#ifdef _DEBUG
#pragma comment(lib,"freetyped.lib")
#else
#pragma comment(lib,"freetype.lib")
#endif


//! @brief PBM(1byte,テキスト)を書き込む
//! @param [in] fname ファイル名
//! @param [in] width 画像の幅
//! @param [in] height 画像の高さ
//! @param [in] p 画像のメモリへのアドレス
//! @details 1画素1Byteのメモリを渡すと、0,1テキストでファイル名fnameで書き込む
void pbmP1_Write(const char* const fname, const int width, const int height, const unsigned char* const p) { // PPM ASCII

    FILE* fp = fopen(fname, "wb");
    fprintf(fp, "P1\n%d\n%d\n", width, height);

    size_t k = 0;
    for (size_t i = 0; i < (size_t)height; i++) {
        for (size_t j = 0; j < (size_t)width; j++) {
            fprintf(fp, "%d ", p[k] ? 0 : 1);
            k++;
        }
        fprintf(fp, "\n");
    }

    fclose(fp);
}
bool render(FT_Library library,const std::string fname, FT_ULong character,int face_index) {


    FT_Face face;      // handle to face object

    // フォントファイル読み込み
    FT_Error error = FT_New_Face(
        library,
        fname.c_str(),
        0,
        &face
    );

    //文字コード指定
    error = FT_Select_Charmap(
        face,               // target face object
        FT_ENCODING_UNICODE // エンコード指定
    );


    if (error == FT_Err_Unknown_File_Format)
        return false;
    else if (error)
        return false;

    //この二つの値でフォントサイズ調整
    FT_F26Dot6 fontsize = 16 * 64;
    FT_UInt CHAR_RESOLUTION = 300;
    error = FT_Set_Char_Size(
        face,                // handle to face object
        0,                   // char_width in 1/64th of points
        fontsize,            // char_height in 1/64th of points
        CHAR_RESOLUTION,     // horizontal device resolution
        CHAR_RESOLUTION);    // vertical device resolution


    FT_UInt char_index = FT_Get_Char_Index(face, character);

    // グリフ(字の形状)読込
    error = FT_Load_Glyph(face, char_index, FT_LOAD_RENDER);
    if (error)
        return -1; // ignore errors

    // 文字を画像化
    FT_Render_Glyph(face->glyph, FT_RENDER_MODE_NORMAL);

    int Width = face->glyph->bitmap.width;
    int Height = face->glyph->bitmap.rows;


    char filename[1024];
    sprintf(filename, "C:\\test\\freetypetest_%d.pbm", face_index);

    pbmP1_Write(// ファイル保存
        filename,
        Width,
        Height,
        face->glyph->bitmap.buffer
    );

    // FreeType2の解放
    FT_Done_Face(face);


}
int main()
{

    FT_Library  library; // handle to library
    FT_Error error;

    error = FT_Init_FreeType(&library);
    if (error)
        return -1;

    // 文字の取得
    FT_ULong character = wchar_t(L'A');

    render(library, "C:\\Windows\\Fonts\\arial.ttf", character, 0);    // Regular
    render(library, "C:\\Windows\\Fonts\\ariali.ttf", character,1);    // Italic
    render(library, "C:\\Windows\\Fonts\\arialbd.ttf",character,2);    // Bold
    render(library, "C:\\Windows\\Fonts\\arialnbi.ttf", character, 3); // Bold Italic

    FT_Done_FreeType(library);
}

VC++で選択されている状態で>などを入力すると<>で囲まれてしまう機能の無効化
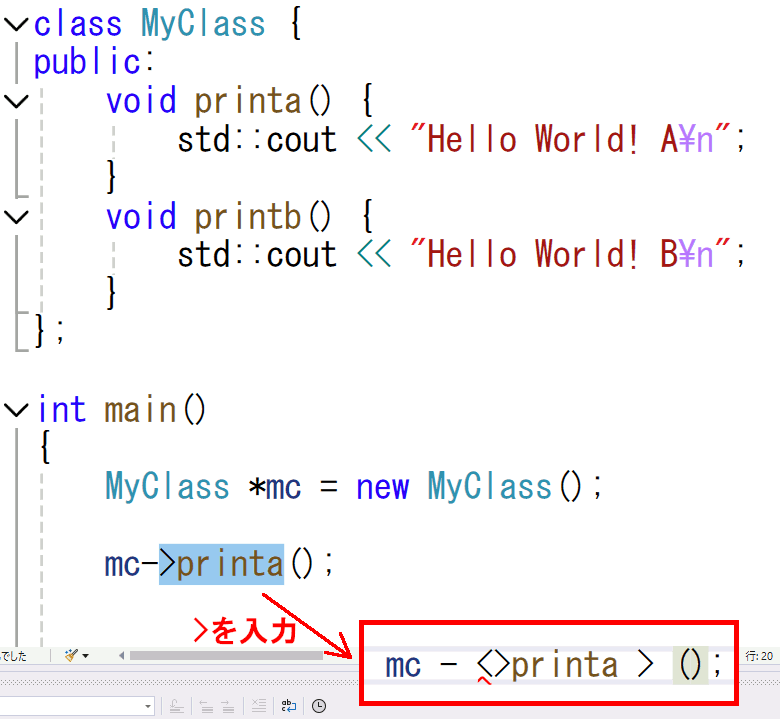
症状
最近のVC++(2022とか)で、文字列を選択した状態で、>を入力すると、選択した内容が <選択範囲> の形で囲まれてしまう。"でも同様のことが起こる。HTMLタグとかtemplate引数とかには便利かもしれないが、選択中に文字を入力したら置換してほしい。特に、時々やるのが、メンバ関数を間違ったときに書き換えようとして状況が悪化するため、この挙動に年単位で悩まされていた。

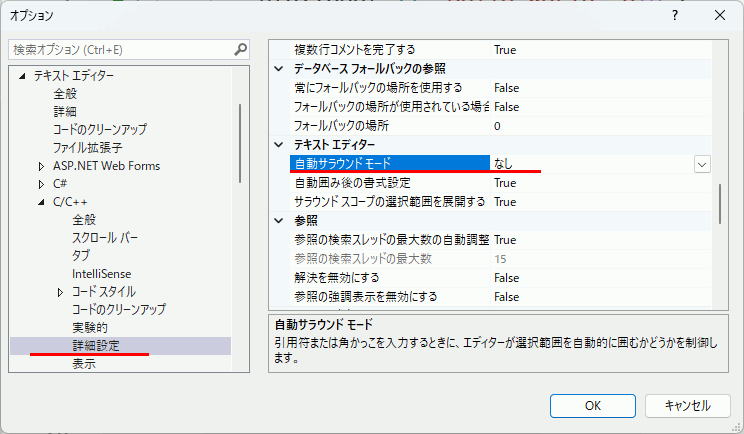
設定
「自動サラウンドモード」を「なし」に設定する。

なお
メンバの修正は、VC++では、ctrl+spaceでメンバの候補リストを出すことができる。
単語だけ選択→Backspace→ctrl+spaceをするのが正当な修正方法。
二つの配列からなる値をクイックソート
前回C++で実装したクイックソートで、二つの配列を同時にクイックソートする。
#include <iostream>
#include <vector>
// 配列の分割を行う関数(ピボットの位置を変更しない)
template<typename Container, class QElem>
size_t partition(Container& arr, size_t low, size_t high) {
    size_t mid = low + (high - low) / 2; // 中央の要素をピボットとして選択
    QElem pivot(arr, mid);               // ピボットの値を取得

    size_t i = low;
    size_t j = high;

    while (true) {
        // ピボットより小さい要素を左側に移動
        while (QElem::Lesser(arr,i,pivot) ){
            i++;
        }

        // ピボットより大きい要素を右側に移動
        while (QElem::Greater(arr,j,pivot) ) {
            j--;
        }

        // 左右の走査が交差した場合に分割終了
        if (i >= j) {
            return j;
        }

        // 交差していない場合、要素を交換
        QElem::Swap(arr, i, j);
        i++;
        j--;
    }
}
// クイックソートを行う関数
template<typename Container, class QElem>
void quick_sort(Container& arr, size_t low, size_t high) {

    if (low < high) {
        size_t pi = partition<Container,QElem>(arr, low, high);

        if (pi > low)
            quick_sort<Container, QElem>(arr, low, pi);// ピボットの左側をソート
        quick_sort<Container, QElem>(arr, pi + 1, high);// ピボットの右側をソート
    }
}
// 二つの配列を一つにまとめて渡すための構造体
struct Vector2Reference {
    std::vector<float>& value;
    std::vector<std::string>& label;
    Vector2Reference(std::vector<float>& v, std::vector<std::string>& l) : value(v), label(l) {}
    size_t size() const {
        return value.size();
    }
};
struct QsortElement {
    float value;

    // Pivotの値を保存するためのオブジェクト用のコンストラクタ
    QsortElement(const Vector2Reference& arr, size_t index) {
        value = arr.value[index];
    }

    // 要素の交換関数
    static void Swap(Vector2Reference& arr, size_t i, size_t j) {
        std::swap(arr.value[i], arr.value[j]);
        std::swap(arr.label[i], arr.label[j]);
    }

    // 比較関数
    static bool Lesser(Vector2Reference& arr, size_t i, const QsortElement& qe) {
        return arr.value[i] < qe.value;
	}
    // 比較関数
    static bool Greater(Vector2Reference& arr, size_t i, const QsortElement& qe) {
        return arr.value[i] > qe.value;
    }
};
int main() {

    std::vector<float> value;
    std::vector<std::string> label;
    value.push_back(5.0f);    label.push_back("e");
    value.push_back(1.0f);    label.push_back("a");
    value.push_back(3.0f);    label.push_back("c");
    value.push_back(4.0f);    label.push_back("d");
    value.push_back(2.0f);    label.push_back("b");


    Vector2Reference arr2(value, label);

    std::cout << "ソート前の配列: " << std::endl;
    for (size_t i = 0; i < arr2.size(); i++) {
        std::cout << arr2.value[i] << " " << arr2.label[i] << std::endl;
    }

    quick_sort< Vector2Reference, QsortElement>(arr2, (size_t)0, arr2.size()-1);

    std::cout << "ソート後の配列: " << std::endl;
    for (size_t i = 0; i < arr2.size(); i++) {
        std::cout << arr2.value[i] << " " << arr2.label[i] << std::endl;
    }


    return 0;
}
5 e
1 a
3 c
4 d
2 b
ソート後の配列:
1 a
2 b
3 c
4 d
5 e
C++でクイックソート(テンプレート使用)
C++でクイックソートを実装する。ただし、諸事情によりピボット保存、比較演算、スワップ関数を外部で実装し、テンプレートで渡す形式にする(QElem)。
#include <iostream>
#include <vector>
// 配列の分割を行う関数
template<typename Container, class QElem>
size_t partition(Container& arr, size_t low, size_t high) {
    size_t mid = low + (high - low) / 2; // 中央の要素をピボットとして選択
    QElem pivot(arr, mid);               // ピボットの値を取得

    size_t i = low;
    size_t j = high;

    while (true) {
        // ピボットより小さい要素を左側に移動
        while (QElem::Lesser(arr,i,pivot) ){
            i++;
        }

        // ピボットより大きい要素を右側に移動
        while (QElem::Greater(arr,j,pivot) ) {
            j--;
        }

        // 左右の走査が交差した場合に分割終了
        if (i >= j) {
            return j;
        }

        // 交差していない場合、要素を交換
        QElem::Swap(arr, i, j);
        i++;
        j--;
    }
}
// クイックソートを行う関数
template<typename Container, class QElem>
void quick_sort(Container& arr, size_t low, size_t high) {

    if (low < high) {
        size_t pi = partition<Container,QElem>(arr, low, high);

        if (pi > low)
            quick_sort<Container, QElem>(arr, low, pi);// ピボットの左側をソート
        quick_sort<Container, QElem>(arr, pi + 1, high);// ピボットの右側をソート
    }
}
struct QsortElement {
    float value;

    // Pivotの値を保存するためのオブジェクト用のコンストラクタ
    QsortElement(const std::vector<float>& arr, size_t index) {
        value = arr[index];
    }

    // 要素の交換関数
    static void Swap(std::vector<float>& arr, size_t i, size_t j) {
        std::swap(arr[i], arr[j]);
    }

    // 比較関数
    static bool Lesser(std::vector<float>& arr, size_t i, const QsortElement& qe) {
        return arr[i] < qe.value;
    }
    // 比較関数
    static bool Greater(std::vector<float>& arr, size_t i, const QsortElement& qe) {
        return arr[i] > qe.value;
    }
};
int main() {

    std::vector<float> arr = {5.2f, 1.8f, 3.2f, 4.3f, 2.7f};

    std::cout << "ソート前の配列: " << std::endl;
    for (size_t i = 0; i < arr.size(); i++) {
        std::cout << arr[i] << " " << std::endl;
    }

    quick_sort< std::vector<float>, QsortElement>(arr, (size_t)0, arr.size()-1);

    std::cout << "ソート後の配列: " << std::endl;
    for (size_t i = 0; i < arr.size(); i++) {
        std::cout << arr[i] << " " << std::endl;
    }


    return 0;
}
5.2
1.8
3.2
4.3
2.7
ソート後の配列:
1.8
2.7
3.2
4.3
5.2
vimでコメントを見やすくする
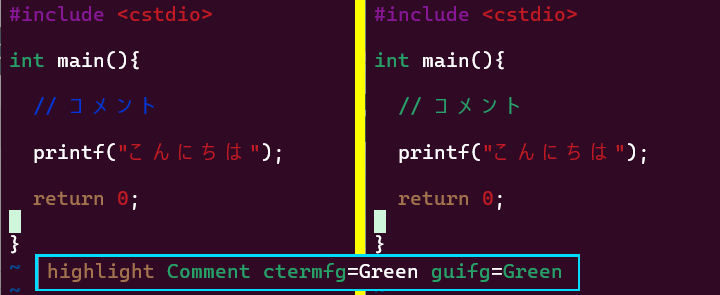
WSL2内でvimを使っているのだがコメントが濃い青で背景が黒で極めて見づらいので色を変えたい。
~/.vimrc ファイルがなければ新規作成し、以下の設定を書き込めば、コメントの色は変わる。

これでいいと思ったのだが、自動でタブがインデントされなかったり、コメント行で改行しても次の行頭にコメントが入らなかったりと、なぜか設定が変わる。
以下のように設定することで既存の設定を維持してコメント色を変更できる。
" 既存の設定を保持するための設定
syntax enable
filetype plugin indent on

" コメントの色を緑色に変更
highlight Comment ctermfg=Green guifg=Green

" 自動インデントを有効にする
set autoindent
set smartindent

" コメントの継続を有効にする
set formatoptions+=cro
vtkAssemblyでvtkActorをまとめる
vtkAssemblyで、二つ以上のvtkActorを纏めることができる。
#include <iostream>

//VTK_MODULE_INITに必要
#include <vtkAutoInit.h>


#include <vtkSmartPointer.h>
#include <vtkRenderer.h>
#include <vtkRenderWindow.h>
#include <vtkRenderWindowInteractor.h>

//円筒とその表示に必要
#include <vtkCylinderSource.h>
#include <vtkPolyDataMapper.h>

#include <vtkActor.h>
#include <vtkCubeSource.h>
#include <vtkProperty.h>

#include <vtkAssembly.h>
#include <vtkTransform.h>

#pragma comment(lib,"opengl32.lib")
#pragma comment(lib,"psapi.lib")
#pragma comment(lib,"dbghelp.lib")
#pragma comment(lib,"ws2_32.lib")


// コールバック関数を使用するのに必要
#include <vtkCallbackCommand.h>


//必須
VTK_MODULE_INIT(vtkRenderingOpenGL2);
VTK_MODULE_INIT(vtkInteractionStyle);


///////////////////////////////////////////////////////////////
///////////////////////////////////////////////////////////////
///////////////////////////////////////////////////////////////
///////////////////////////////////////////////////////////////
// コールバック関数に渡すデータ
struct MyData
{
  vtkSmartPointer<vtkAssembly> assembly;
};

// タイマーのコールバック関数
void MyTimerCallbackFunction(vtkObject* caller, long unsigned int eventId, void* clientData, void* callData)
{
  MyData* data = static_cast<MyData*>(clientData);

  static int angle = 0;

  vtkSmartPointer<vtkTransform> tra = vtkSmartPointer<vtkTransform>::New();
  tra->RotateWXYZ(angle+=10, 0, 0, 1);
  tra->Update();

  data->assembly->SetUserTransform(tra);

  // 画面更新
  auto interactor = static_cast<vtkRenderWindowInteractor*>(caller);
  interactor->Render();
}
///////////////////////////////////////////////////////////////
///////////////////////////////////////////////////////////////
///////////////////////////////////////////////////////////////
///////////////////////////////////////////////////////////////


vtkSmartPointer<vtkActor> createActor1();
vtkSmartPointer<vtkActor> createActor2();


int main(int /*argc*/, char** /*argv*/)
{
  // アクタを作成
  vtkSmartPointer<vtkActor> actor1 = createActor1();
  vtkSmartPointer<vtkActor> actor2 = createActor2();

  // アクタをまとめてアセンブリを作成
  vtkSmartPointer<vtkAssembly> assembly = vtkSmartPointer<vtkAssembly>::New();
  assembly->AddPart(actor1);
  assembly->AddPart(actor2);

  //////////////////////////////////////
  auto renderer = vtkSmartPointer<vtkRenderer>::New();
  renderer->ResetCamera();

  // アセンブリをレンダラに追加
  renderer->AddActor(assembly);


  //////////////////////////////////////

  auto interactor = vtkSmartPointer<vtkRenderWindowInteractor>::New();

  auto renderWindow = vtkSmartPointer<vtkRenderWindow>::New();
  renderWindow->AddRenderer(renderer);
  renderWindow->SetInteractor(interactor);
  renderWindow->Render();

  //////////////////////////////////////
  //////////////////////////////////////

  // タイマーに渡す構造体の作成
  MyData callbackData{ assembly };

  // タイマー作成
  auto timerCallback = vtkSmartPointer<vtkCallbackCommand>::New();
  timerCallback->SetCallback(MyTimerCallbackFunction); // コールバック関数を設定
  timerCallback->SetClientData(&callbackData); // コールバック関数に渡すデータを設定

  interactor->AddObserver(vtkCommand::TimerEvent, timerCallback); // タイマーイベントにコールバック関数を設定

  interactor->Initialize();
  interactor->CreateRepeatingTimer(100); // 100msごとにタイマーイベントを発生させる

  //////////////////////////////////////
  //////////////////////////////////////

  interactor->Start(); //イベントループへ入る

  return 0;
}
vtkSmartPointer<vtkActor> createActor1()
{
  // 1つ目の立方体を作成
  vtkSmartPointer<vtkCubeSource> cubeSource1 = vtkSmartPointer<vtkCubeSource>::New();
  vtkSmartPointer<vtkPolyDataMapper> mapper1 = vtkSmartPointer<vtkPolyDataMapper>::New();
  mapper1->SetInputConnection(cubeSource1->GetOutputPort());
  vtkSmartPointer<vtkActor> actor1 = vtkSmartPointer<vtkActor>::New();
  actor1->SetMapper(mapper1);
  actor1->GetProperty()->SetColor(1, 0, 0); // 赤色

  return actor1;
}
vtkSmartPointer<vtkActor> createActor2()
{
  // 2つ目の立方体を作成
  vtkSmartPointer<vtkCubeSource> cubeSource2 = vtkSmartPointer<vtkCubeSource>::New();
  cubeSource2->SetCenter(1.2, 0, 0); // 位置を変更
  vtkSmartPointer<vtkPolyDataMapper> mapper2 = vtkSmartPointer<vtkPolyDataMapper>::New();
  mapper2->SetInputConnection(cubeSource2->GetOutputPort());
  vtkSmartPointer<vtkActor> actor2 = vtkSmartPointer<vtkActor>::New();
  actor2->SetMapper(mapper2);
  actor2->GetProperty()->SetColor(0, 1, 0); // 緑色

  return actor2;
}
実行例
二つのオブジェクトにまとめて行列を適用している。

VTKで三角柱・N角柱を描画
三角柱
作ってみたら意外と発見があったのでコードを置いておく。斬新だったのは、二つのvtkPolyDataをvtkAppendPolyDataで結合するところで、これができるといろいろと複雑なモデルを作りやすい。
#include <iostream>

//VTK_MODULE_INITに必要
#include <vtkAutoInit.h>


#include <vtkSmartPointer.h>
#include <vtkRenderer.h>
#include <vtkRenderWindow.h>
#include <vtkRenderWindowInteractor.h>

// メッシュ生成に必要
#include <vtkQuad.h>
#include <vtkTriangle.h>
#include <vtkPolyDataMapper.h>
#include <vtkAppendPolyData.h>

#pragma comment(lib,"opengl32.lib")
#pragma comment(lib,"psapi.lib")
#pragma comment(lib,"dbghelp.lib")
#pragma comment(lib,"ws2_32.lib")


//必須
VTK_MODULE_INIT(vtkRenderingOpenGL2);
VTK_MODULE_INIT(vtkInteractionStyle);
vtkSmartPointer<vtkPolyData> MyCreateTriangularPrism(float height)
{

  float ph = height/2;
  float mh = -height/2;

  float x[6] = { 0.0,1.0,0.5,0.0,1.0,0.5 };
  float y[6] = { 0.0,0.0,0.866,0.0,0.0,0.866 };
  float z[6] = { mh,mh,mh,ph,ph,ph };

  // 頂点を定義
  vtkSmartPointer<vtkPoints> points = vtkSmartPointer<vtkPoints>::New();
  points->InsertNextPoint(x[0], z[0], y[0]); // 0
  points->InsertNextPoint(x[1], z[1], y[1]); // 1
  points->InsertNextPoint(x[2], z[2], y[2]); // 2
  points->InsertNextPoint(x[3], z[3], y[3]); // 3
  points->InsertNextPoint(x[4], z[4], y[4]); // 4
  points->InsertNextPoint(x[5], z[5], y[5]); // 5


  // 三角形一覧を定義
  vtkSmartPointer<vtkCellArray> top_bottom = vtkSmartPointer<vtkCellArray>::New();

  // 底面
  vtkSmartPointer<vtkTriangle> t_bottom = vtkSmartPointer<vtkTriangle>::New();
  t_bottom->GetPointIds()->SetId(0, 0);
  t_bottom->GetPointIds()->SetId(1, 2);
  t_bottom->GetPointIds()->SetId(2, 1);
  top_bottom->InsertNextCell(t_bottom);

  // 上面
  vtkSmartPointer<vtkTriangle> t_top = vtkSmartPointer<vtkTriangle>::New();
  t_top->GetPointIds()->SetId(0, 3);
  t_top->GetPointIds()->SetId(1, 4);
  t_top->GetPointIds()->SetId(2, 5);
  top_bottom->InsertNextCell(t_top);


  // 四角形一覧(側面用)を定義
  vtkSmartPointer<vtkCellArray> quads_sides = vtkSmartPointer<vtkCellArray>::New();

  vtkSmartPointer<vtkQuad> quad1 = vtkSmartPointer<vtkQuad>::New();
  quad1->GetPointIds()->SetId(0, 0);
  quad1->GetPointIds()->SetId(1, 1);
  quad1->GetPointIds()->SetId(2, 4);
  quad1->GetPointIds()->SetId(3, 3);
  quads_sides->InsertNextCell(quad1);

  vtkSmartPointer<vtkQuad> quad2 = vtkSmartPointer<vtkQuad>::New();
  quad2->GetPointIds()->SetId(0, 1);
  quad2->GetPointIds()->SetId(1, 2);
  quad2->GetPointIds()->SetId(2, 5);
  quad2->GetPointIds()->SetId(3, 4);
  quads_sides->InsertNextCell(quad2);

  vtkSmartPointer<vtkQuad> quad3 = vtkSmartPointer<vtkQuad>::New();
  quad3->GetPointIds()->SetId(0, 2);
  quad3->GetPointIds()->SetId(1, 0);
  quad3->GetPointIds()->SetId(2, 3);
  quad3->GetPointIds()->SetId(3, 5);
  quads_sides->InsertNextCell(quad3);

  ///////////////////////////////////////////////////////
  // 上下の三角形二枚からなるPolyDataを作成
  vtkSmartPointer<vtkPolyData> polyData1 = vtkSmartPointer<vtkPolyData>::New();
  polyData1->SetPoints(points);
  polyData1->SetPolys(top_bottom);

  // 側面の四角形からなるPolyDataを作成
  vtkSmartPointer<vtkPolyData> polyData2 = vtkSmartPointer<vtkPolyData>::New();
  polyData2->SetPoints(points);
  polyData2->SetPolys(quads_sides);
  ///////////////////////////////////////////////////////
  // PolyDataを結合
  vtkSmartPointer<vtkAppendPolyData> appendFilter = vtkSmartPointer<vtkAppendPolyData>::New();
  appendFilter->AddInputData(polyData1);
  appendFilter->AddInputData(polyData2);
  appendFilter->Update();

  vtkSmartPointer<vtkPolyData> polyData = appendFilter->GetOutput();

  return polyData;
}
int main(int /*argc*/, char** /*argv*/)
{

  vtkSmartPointer<vtkPolyData> triangularprim = MyCreateTriangularPrism(3.0f); // 三角柱(高さ3.0)

  // マッパーを作成
  vtkSmartPointer<vtkPolyDataMapper> mapper = vtkSmartPointer<vtkPolyDataMapper>::New();
  mapper->SetInputData(triangularprim);

  // アクターを作成
  vtkSmartPointer<vtkActor> actor = vtkSmartPointer<vtkActor>::New();
  actor->SetMapper(mapper);


  //////////////////////////////////////
  auto renderer = vtkSmartPointer<vtkRenderer>::New();
  renderer->AddActor(actor);
  renderer->ResetCamera();

  //////////////////////////////////////
  auto interactor = vtkSmartPointer<vtkRenderWindowInteractor>::New();

  //////////////////////////////////////
  auto renderWindow = vtkSmartPointer<vtkRenderWindow>::New();
  renderWindow->AddRenderer(renderer);
  renderWindow->SetInteractor(interactor);
  renderWindow->Render();

  interactor->Start(); //イベントループへ入る

  return 0;
}

N角柱
#include <iostream>

//VTK_MODULE_INITに必要
#include <vtkAutoInit.h>


#include <vtkSmartPointer.h>
#include <vtkRenderer.h>
#include <vtkRenderWindow.h>
#include <vtkRenderWindowInteractor.h>

// メッシュ生成に必要
#include <vtkQuad.h>
#include <vtkTriangle.h>
#include <vtkPolyDataMapper.h>
#include <vtkAppendPolyData.h>
#include <vtkPolygon.h>

#pragma comment(lib,"opengl32.lib")
#pragma comment(lib,"psapi.lib")
#pragma comment(lib,"dbghelp.lib")
#pragma comment(lib,"ws2_32.lib")


//必須
VTK_MODULE_INIT(vtkRenderingOpenGL2);
VTK_MODULE_INIT(vtkInteractionStyle);
vtkSmartPointer<vtkPolyData> MyCreateNPrism(float height, int N)
{
  // 角柱の上面、底面の位置を定義
  float ph = height / 2;
  float mh = -height / 2;

  vtkSmartPointer<vtkPoints> points = vtkSmartPointer<vtkPoints>::New();
  vtkSmartPointer<vtkCellArray> top_bottom = vtkSmartPointer<vtkCellArray>::New();
  vtkSmartPointer<vtkCellArray> quads_sides = vtkSmartPointer<vtkCellArray>::New();

  // 底面と上面の頂点を定義
  for (int i = 0; i < N; ++i)
  {
    double angle = 2.0 * 3.1415926535 * i / N;
    double x = cos(angle);
    double y = sin(angle);
    points->InsertNextPoint(x, y, mh); // 底面
    points->InsertNextPoint(x, y, ph); // 上面
  }

  // 底面と上面のポリゴンを定義
  vtkSmartPointer<vtkPolygon> polygon_bottom = vtkSmartPointer<vtkPolygon>::New();
  polygon_bottom->GetPointIds()->SetNumberOfIds(N);
  vtkSmartPointer<vtkPolygon> polygon_top = vtkSmartPointer<vtkPolygon>::New();
  polygon_top->GetPointIds()->SetNumberOfIds(N);

  for (int i = 0; i < N; ++i)
  {
    polygon_bottom->GetPointIds()->SetId(i, i * 2);
    polygon_top->GetPointIds()->SetId(i, i * 2 + 1);
  }

  top_bottom->InsertNextCell(polygon_bottom);
  top_bottom->InsertNextCell(polygon_top);

  // 側面を定義
  for (int i = 0; i < N; ++i)
  {
    vtkSmartPointer<vtkQuad> quad = vtkSmartPointer<vtkQuad>::New();
    quad->GetPointIds()->SetId(0, (i * 2));
    quad->GetPointIds()->SetId(1, ((i * 2 + 2) % (N * 2)));
    quad->GetPointIds()->SetId(2, ((i * 2 + 3) % (N * 2)));
    quad->GetPointIds()->SetId(3, (i * 2 + 1));
    quads_sides->InsertNextCell(quad);
  }

  // 上下の面をなすPolyDataを作成
  vtkSmartPointer<vtkPolyData> polyData1 = vtkSmartPointer<vtkPolyData>::New();
  polyData1->SetPoints(points);
  polyData1->SetPolys(top_bottom);

  // 側面の四角形からなるPolyDataを作成
  vtkSmartPointer<vtkPolyData> polyData2 = vtkSmartPointer<vtkPolyData>::New();
  polyData2->SetPoints(points);
  polyData2->SetPolys(quads_sides);

  // PolyDataを結合
  vtkSmartPointer<vtkAppendPolyData> appendFilter = vtkSmartPointer<vtkAppendPolyData>::New();
  appendFilter->AddInputData(polyData1);
  appendFilter->AddInputData(polyData2);
  appendFilter->Update();

  vtkSmartPointer<vtkPolyData> polyData = appendFilter->GetOutput();

  return polyData;
}
int main(int /*argc*/, char** /*argv*/)
{

  vtkSmartPointer<vtkPolyData> nprim = MyCreateNPrism(3.0, 5);// 五角柱を作成

  // マッパーを作成
  vtkSmartPointer<vtkPolyDataMapper> mapper = vtkSmartPointer<vtkPolyDataMapper>::New();
  mapper->SetInputData(nprim);

  // アクターを作成
  vtkSmartPointer<vtkActor> actor = vtkSmartPointer<vtkActor>::New();
  actor->SetMapper(mapper);


  //////////////////////////////////////
  auto renderer = vtkSmartPointer<vtkRenderer>::New();
  renderer->AddActor(actor);
  renderer->ResetCamera();

  //////////////////////////////////////
  auto interactor = vtkSmartPointer<vtkRenderWindowInteractor>::New();

  //////////////////////////////////////
  auto renderWindow = vtkSmartPointer<vtkRenderWindow>::New();
  renderWindow->AddRenderer(renderer);
  renderWindow->SetInteractor(interactor);
  renderWindow->Render();

  interactor->Start(); //イベントループへ入る

  return 0;
}
