libavifを試す(3) avifファイルを出力
avifを出力するサンプル。
#pragma comment(lib, "avif.lib")

// 4996無効
#define _CRT_SECURE_NO_WARNINGS


#include <iostream>
#include <avif/avif.h>
#include <vector>


// RGBの画像データを作成
std::vector<uint8_t> create_image(int width, int height) {
    std::vector<uint8_t> image(width * height * 3);

    for (int y = 0; y < height; ++y) {
        for (int x = 0; x < width; ++x) {
            int index = (y * width + x) * 3;

            float t = static_cast<float>(y) / (height - 1);

            uint8_t red = static_cast<uint8_t>(255 * (1.0 - t));
            uint8_t green = static_cast<uint8_t>(255 * t);
            uint8_t blue = 0;

            image[index] = red;
            image[index + 1] = green;
            image[index + 2] = blue;
        }
    }

    return image;
}

///////////////////////////////////////////////////
///////////////////////////////////////////////////
///////////////////////////////////////////////////
// libavif で RGBデータをavifデータに変換する
int main()
{
    std::vector<uint8_t> rgb_src;
    int width = 300;
    int height = 200;
    rgb_src = create_image(width, height);

    // RGBデータをエンコードする( YUVデータは入力しないという意味 )
    avifBool encodeYUVDirectly = AVIF_FALSE;


    // 今回はRGBデータを変換するサンプルとする

    if (encodeYUVDirectly == AVIF_FALSE) {

        ////////////////////////////////////////////
        // 変換後のデータの設定を行う
        int yuvDepth = 8;
        avifImage* dst_image = avifImageCreate(width, height, yuvDepth, AVIF_PIXEL_FORMAT_YUV444);

        ////////////////////////////////////////////
        // 変換前データの設定を行う
        avifRGBImage src_Image;
        avifRGBImageSetDefaults(& src_Image, dst_image);
        src_Image.format = AVIF_RGB_FORMAT_RGB;
        src_Image.pixels = rgb_src.data();
        src_Image.rowBytes = width * 3;

        // AVIFはYUV形式で表現するため、まずYUVデータに変換する
        avifResult result = avifImageRGBToYUV(dst_image, &src_Image);
        if (result != AVIF_RESULT_OK) {
            printf("Failed to convert RGB image to YUV: %s\n", avifResultToString(result));
        }
        ////////////////////////////////////////////
        // YUV形式のデータからAVIFのデータを生成
        avifEncoder* encoder = avifEncoderCreate();
        uint32_t quality = 90; // AVIFエンコード品質(0〜100)
        encoder->minQuantizer = AVIF_QUANTIZER_WORST_QUALITY - (uint8_t)(quality * 2.55);
        encoder->maxQuantizer = encoder->minQuantizer;
        ////////////////////////////////////////////

        // エンコード
        avifRWData output = AVIF_DATA_EMPTY;
        result = avifEncoderWrite(encoder, dst_image, &output);
        ////////////////////////////////////////////

        // 作成した画像をファイルに出力
        FILE* oFile = fopen("output.avif", "wb");
        fwrite(output.data, 1, output.size, oFile);
        fclose(oFile);
        ////////////////////////////////////////////
        // 終了処理

        if (dst_image) {
            avifImageDestroy(dst_image);
        }

        avifEncoderDestroy(encoder);
        if (output.data) {
            avifRWDataFree(&output);
        }

    }

    return 0;
}
libavifを試す(2)-libavifをビルド
ダウンロード
- libavif
- https://github.com/AOMediaCodec/libavif/releases
- 上記、Source code (zip) からダウンロード
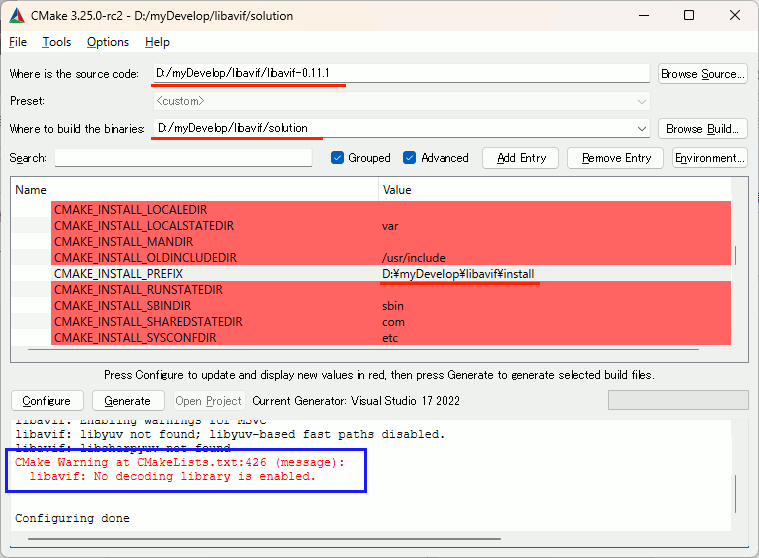
普通にCMakeする。インストールディレクトリなどを指定する。
この時、以下のWarningが出る。
libavif: No decoding library is enabled.
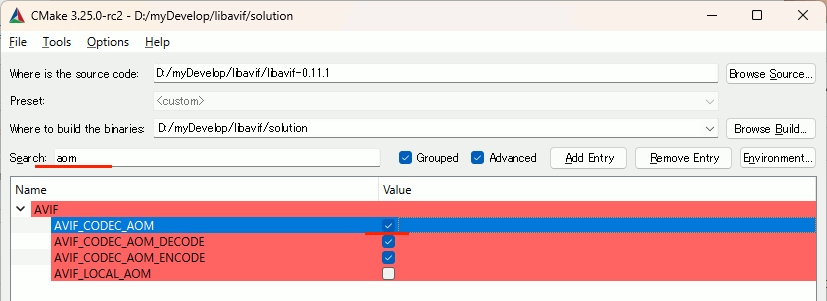
aomの指定
Searchにaomを入れるとAVIF_CODEC_AOMの項目を簡単に見つけられるので、ここにチェックを入れてConfigureする。
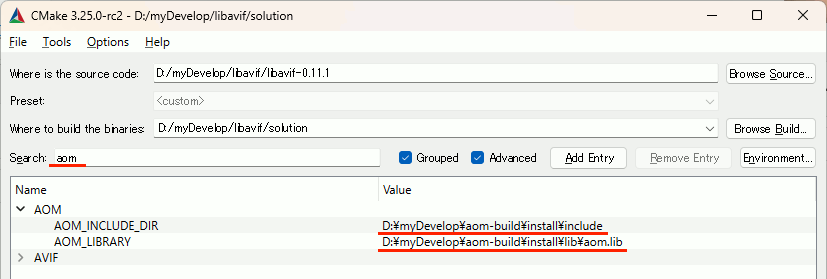
するとAOM_INCLUDE_DIRとAOM_LIBRARYを指定できるので、ビルド済みのライブラリとincludeでぃれくとりを指定する。
あとはConfigure , Generate ,Open Project , ALL_BUILD , INSTALL でインストールまで行く。
libavifを試す(1)-libavifに必要なaomをビルド
基本コンセプト
極力開発環境に変更を加えずにaomをビルドする
必須
ダウンロード
- CMakeGUI
- https://cmake.org/download/
- 上記から Windows x64 ZIP をダウンロード
- Git
- https://git-scm.com/download/win
- 上記から 64-bit Git for Windows Portable をダウンロード
- Perl
- https://strawberryperl.com/releases.html
- 上記から strawberry-perl-5.32.1.1-64bit-portable.zip をダウンロード
- nasm
- https://www.nasm.us/
- 上記から、Index of /pub/nasm/releasebuilds/2.16.01/win64 を辿る
- 上記から、nasm-2.16.01-win64.zip をダウンロード
環境変数の設定
上記したものはパスが通っている必要があるが、環境変数へ直接書き足すと今回のコンセプトに反するので、バッチファイルを作り、上記すべてが使えるコンソールを立ち上げることにする。
上記すべてをどこかのパスに展開し、例えば以下のようなbatファイルを作り実行すると、パスの通ったコンソールが起動する。
REM perl
SET PATH=C:\Software\strawberry-perl-5.32.1.1-64bit-portable;%PATH%

REM Git
SET PATH=C:\Software\PortableGit\bin;%PATH%

REM CMake-GUI
SET PATH=C:\Software\cmake-3.25.0-rc2-windows-x86_64\bin;%PATH%

REM nasm
SET PATH=C:\Software\nasm-2.16.01;%PATH%

REM strawberry-perl environment
call portableshell.bat


start cmd.exe
ビルド
まず、作業ディレクトリへ移動
git cloneでソースをダウンロード
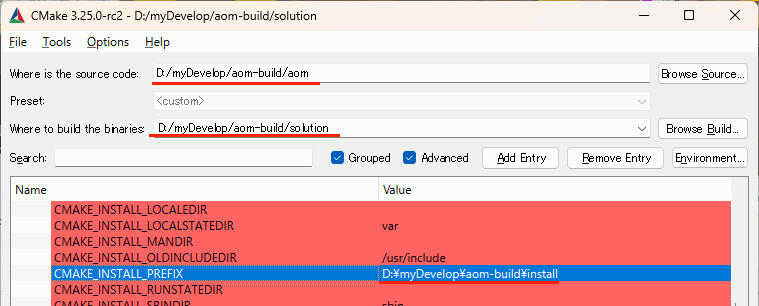
cmakeする。コンソールからでももちろんいいが個人的に使い慣れているcmake-guiを起動。
Configure → Generate → Open → ALLBUILD → INSTALL
ビルドにやや時間がかかるが、D:\myDevelop\aom-build\install に各種includeファイルとaom.libが生成される。
D:\myDevelop\aom-build
├─aom                  ... git cloneでダウンロードすると生成
├─install              ... INSTALL用に作成
│  ├─bin
│  ├─include
│  │  └─aom
│  └─lib
└─solution             ... cmakeした結果格納用に作成
C++でnlohmann::jsonでjson形式でOpenAIと通信する
準備
以下からダウンロードし、single_include/nlohmann を適切な場所に展開する。ヘッダオンリーなのでincludeパスを通すだけでよい。
https://github.com/nlohmann/json
使用例
使用例1 文字列を整形して標準出力
前回OpenAIから取得したjsonを整形して表示してみる。nlohmann:json::parseでパースし、dumpでstd::stringに変換できる。
#include <iostream>

#include <nlohmann/json.hpp>

int main()
{
    // json形式の文字列
    std::string res = R"({"id":"cmpl-7NcCYUs1IuINlSSc8Km6ulUTjrakG","object":"text_completion","created":1685862746,"model":"text-davinci-003","choices":[{"text":"\n\nKonnichiwa, sekai.","index":0,"logprobs":null,"finish_reason":"stop"}],"usage":{"prompt_tokens":16,"completion_tokens":11,"total_tokens":27}}
)";

    // パース
    nlohmann::json j = nlohmann::json::parse(res);

    // 4はインデント(スペース)の個数
    std::cout << j.dump(4);


}
出力
{
    "choices": [
        {
            "finish_reason": "stop",
            "index": 0,
            "logprobs": null,
            "text": "\n\nKonnichiwa, sekai."
        }
    ],
    "created": 1685862746,
    "id": "cmpl-7NcCYUs1IuINlSSc8Km6ulUTjrakG",
    "model": "text-davinci-003",
    "object": "text_completion",
    "usage": {
        "completion_tokens": 11,
        "prompt_tokens": 16,
        "total_tokens": 27
    }
}
使用例2 データを一つだけ取り出す
#include <iostream>

#include <nlohmann/json.hpp>

int main()
{
    // json形式の文字列
    std::string res = R"({"id":"cmpl-7NcCYUs1IuINlSSc8Km6ulUTjrakG","object":"text_completion","created":1685862746,"model":"text-davinci-003","choices":[{"text":"\n\nKonnichiwa, sekai.","index":0,"logprobs":null,"finish_reason":"stop"}],"usage":{"prompt_tokens":16,"completion_tokens":11,"total_tokens":27}}
)";

    // パース
    nlohmann::json j = nlohmann::json::parse(res);


    // std::cout << j["choices"].type_name();  // 「array」なのでこれは配列
    // std::cout << j["choices"].size();       // 配列の要素数。この例では「1」となる。

    assert(j["choices"].type_name()=="array");

    // j["choices"]は要素数1の配列。"text"というキーのアイテムは0番に入っている
    std::string text = j["choices"][0]["text"];

    // 4はインデント(スペース)の個数
    std::cout << text << std::endl;


}
OpenAIとの通信例
#include <iostream>
#include <fstream>
#include <string>

// libcurlを使うために必要
#define CURL_STATICLIB
#include <curl/curl.h>

// ssl対応したlibcurlに必要
#pragma comment(lib, "CRYPT32.LIB")
#pragma comment(lib, "wldap32.lib" )
#pragma comment(lib, "Ws2_32.lib")

// ssl対応したlibcurlに必要
#pragma comment(lib,"libcurl.lib")
#pragma comment(lib,"libssl.lib")
#pragma comment(lib,"libcrypto.lib")

////////////////////////////////
// jsonを扱うために必要
#include <nlohmann/json.hpp>

std::size_t WriteCallback(
    const char* in,
    std::size_t size,
    std::size_t num,
    std::string* out)
{
    const std::size_t totalBytes(size * num);
    out->append(in, totalBytes);
    return totalBytes;
}

////////////////////////////////////////////////////////////////////
////////////////////////////////////////////////////////////////////
////////////////////////////////////////////////////////////////////

int main() {

    ////////////////////////////////////////////////////////////////////
    ////////////////////////////////////////////////////////////////////
    ////////////////////////////////////////////////////////////////////
    // まず、OpenAI APIへアクセスするURLと、送信するデータを定義する

    const std::string url = "https://api.openai.com/v1/completions";


    // 送信するデータをjsonで記述。
    nlohmann::json json_data;
    json_data["model"] = u8"text-davinci-003"; // モデル名
    json_data["prompt"] = u8"'Hello, world'を日本語に訳してください。";
    json_data["max_tokens"] = 60;

    const std::string data = json_data.dump();

    ////////////////////////////////////////////////////////////////////
    ////////////////////////////////////////////////////////////////////
    ////////////////////////////////////////////////////////////////////
    // ここからlibcurlの処理開始

    CURL* curl = curl_easy_init();

    if (!curl) {
        std::cerr << "Error: Failed to initialize libcurl." << std::endl;
        return false;
    }
    ////////////////////////////////////////////////////////////////////
    ////////////////////////////////////////////////////////////////////
    ////////////////////////////////////////////////////////////////////
    // httpsの場合は、以下の設定が必要
    curl_easy_setopt(curl, CURLOPT_SSL_VERIFYSTATUS, 1);
    curl_easy_setopt(curl, CURLOPT_CAINFO, R"(.\cacert.pem)");
    curl_easy_setopt(curl, CURLOPT_CAPATH, R"(.\cacert.pem)");
    curl_easy_setopt(curl, CURLOPT_SSL_VERIFYPEER, 1L);
    curl_easy_setopt(curl, CURLOPT_SSL_VERIFYHOST, 1L);
    ////////////////////////////////////////////////////////////////////
    ////////////////////////////////////////////////////////////////////
    ////////////////////////////////////////////////////////////////////
    // サーバー側からの返答を受け取る関数と受け取ったデータを保存する変数を渡す
    std::string response;
    curl_easy_setopt(curl, CURLOPT_WRITEFUNCTION, WriteCallback);
    curl_easy_setopt(curl, CURLOPT_WRITEDATA, &response);

    // OpenAI APIへのアクセスをするURLを設定
    CURLcode res = curl_easy_setopt(curl, CURLOPT_URL, url.c_str());
    if (res != CURLE_OK) {
        fprintf(stderr, "curl_easy_setopt() failed: %s\n", curl_easy_strerror(res));
        return 1;
    }

    //sk-ABCDEFGHIJK1234567890 はAPIキー。これを自分のものに変える。
    curl_slist* hs = NULL;
    hs = curl_slist_append(hs, "Content-Type: application/json");
    hs = curl_slist_append(hs, "Authorization: Bearer sk-ABCDEFGHIJK1234567890");

    curl_easy_setopt(curl, CURLOPT_HTTPHEADER, hs);
    curl_easy_setopt(curl, CURLOPT_POSTFIELDS, data.c_str());

    ////////////////////////////////////////////////////////////////////
    ////////////////////////////////////////////////////////////////////
    ////////////////////////////////////////////////////////////////////

    // 通信の実行
    res = curl_easy_perform(curl);
    if (res != CURLE_OK) {
        fprintf(stderr, "curl_easy_perform() failed: %s\n", curl_easy_strerror(res));
    }
    else {

        // エラーの場合は、response_codeが200以外になる
        long response_code;
        curl_easy_getinfo(curl, CURLINFO_RESPONSE_CODE, &response_code);
        if (response_code != 200) {
            std::wcout << "ERROR" << std::endl;
        }
        else
        {
	    std::wcout << "SUCCESS" << std::endl;
	}
        // 成功の場合、responseには結果が入る。
        // エラーの場合、responseにはエラーの原因などが入る。
        std::cout << "HTTP Response code: " << response_code << std::endl;
        std::cout << "Response: " << response << std::endl;

        // OpenAIの返答を取得して、答えの部分だけを抽出する
        nlohmann::json jout = nlohmann::json::parse(response);
        std::string out = jout["choices"][0]["text"];

        // utf8で受け取ったデータをファイルへ保存
        std::ofstream ofs("response.txt");
        ofs << out;
        ofs.close();

    }

    ////////////////////////////////////////////////////////////////////
    ////////////////////////////////////////////////////////////////////
    ////////////////////////////////////////////////////////////////////

    curl_slist_free_all(hs);
    curl_easy_cleanup(curl);

    return 0;
}
C/C++からlibcurlでOpenAIに接続してみる
サンプルコード
SSLに対応したlibcurlで、OpenAIへリクエストを送る。
#include <iostream>
#include <fstream>
#include <string>

// libcurlを使うために必要
#define CURL_STATICLIB
#include <curl/curl.h>

// ssl対応したlibcurlに必要
#pragma comment(lib, "CRYPT32.LIB")
#pragma comment(lib, "wldap32.lib" )
#pragma comment(lib, "Ws2_32.lib")

// ssl対応したlibcurlに必要
#pragma comment(lib,"libcurl.lib")
#pragma comment(lib,"libssl.lib")
#pragma comment(lib,"libcrypto.lib")


std::size_t WriteCallback(
    const char* in,
    std::size_t size,
    std::size_t num,
    std::string* out)
{
    const std::size_t totalBytes(size * num);
    out->append(in, totalBytes);
    return totalBytes;
}

////////////////////////////////////////////////////////////////////
////////////////////////////////////////////////////////////////////
////////////////////////////////////////////////////////////////////

int main() {

    ////////////////////////////////////////////////////////////////////
    ////////////////////////////////////////////////////////////////////
    ////////////////////////////////////////////////////////////////////
    // まず、OpenAI APIへアクセスするURLと、送信するデータを定義する

    // text-davinci-003 がモデル名。
    const std::string url = "https://api.openai.com/v1/engines/text-davinci-003/completions";

    // 送信するデータをjsonで記述。promptに指示を入れる。
    const std::string data =
R"(
        {
            "prompt":"Translate the following English text to Japanese Romaji: 'Hello, world'",
            "max_tokens":60
        }
)";

    ////////////////////////////////////////////////////////////////////
    ////////////////////////////////////////////////////////////////////
    ////////////////////////////////////////////////////////////////////
    // ここからlibcurlの処理開始

    CURL* curl = curl_easy_init();

    if (!curl) {
        std::cerr << "Error: Failed to initialize libcurl." << std::endl;
        return false;
    }
    ////////////////////////////////////////////////////////////////////
    ////////////////////////////////////////////////////////////////////
    ////////////////////////////////////////////////////////////////////
    // httpsの場合は、以下の設定が必要
    curl_easy_setopt(curl, CURLOPT_SSL_VERIFYSTATUS, 1);
    curl_easy_setopt(curl, CURLOPT_CAINFO, R"(.\cacert.pem)");
    curl_easy_setopt(curl, CURLOPT_CAPATH, R"(.\cacert.pem)");
    curl_easy_setopt(curl, CURLOPT_SSL_VERIFYPEER, 1L);
    curl_easy_setopt(curl, CURLOPT_SSL_VERIFYHOST, 1L);
    ////////////////////////////////////////////////////////////////////
    ////////////////////////////////////////////////////////////////////
    ////////////////////////////////////////////////////////////////////
    // サーバー側からの返答を受け取る関数と受け取ったデータを保存する変数を渡す
    std::string response;
    curl_easy_setopt(curl, CURLOPT_WRITEFUNCTION, WriteCallback);
    curl_easy_setopt(curl, CURLOPT_WRITEDATA, &response);

    // OpenAI APIへのアクセスをするURLを設定
    CURLcode res = curl_easy_setopt(curl, CURLOPT_URL, url.c_str());
    if (res != CURLE_OK) {
        fprintf(stderr, "curl_easy_setopt() failed: %s\n", curl_easy_strerror(res));
        return 1;
    }

    // sk-ABCDEFGHIJK1234567890 はAPIキー。これを自分のものに変える。
    curl_slist* hs = NULL;
    hs = curl_slist_append(hs, "Content-Type: application/json");
    hs = curl_slist_append(hs, "Authorization: Bearer sk-ABCDEFGHIJK1234567890");

    curl_easy_setopt(curl, CURLOPT_HTTPHEADER, hs);
    curl_easy_setopt(curl, CURLOPT_POSTFIELDS, data.c_str());

    ////////////////////////////////////////////////////////////////////
    ////////////////////////////////////////////////////////////////////
    ////////////////////////////////////////////////////////////////////

    // 通信の実行
    res = curl_easy_perform(curl);
    if (res != CURLE_OK) {
        fprintf(stderr, "curl_easy_perform() failed: %s\n", curl_easy_strerror(res));
    }
    else {

        // エラーの場合は、response_codeが200以外になる
        long response_code;
        curl_easy_getinfo(curl, CURLINFO_RESPONSE_CODE, &response_code);
        if (response_code != 200) {
            std::wcout << "ERROR" << std::endl;
        }
        else
        {
	    std::wcout << "SUCCESS" << std::endl;
	}
        // 成功の場合、responseには結果が入る。
        // エラーの場合、responseにはエラーの原因などが入る。
        std::cout << "HTTP Response code: " << response_code << std::endl;
        std::cout << "Response: " << response << std::endl;

        // utf8で受け取ったデータを、Shift-JISに変換して保存する
        std::ofstream ofs("response.txt");
        ofs << response;
        ofs.close();

    }

    ////////////////////////////////////////////////////////////////////
    ////////////////////////////////////////////////////////////////////
    ////////////////////////////////////////////////////////////////////

    curl_slist_free_all(hs);
    curl_easy_cleanup(curl);

    return 0;
}
返答(成功例)
ローマ字と指定しているので、Konnichiwa, sekai という返答が返ってきている。
VC++でlibcurlを使う(https OpenSSLの場合)
libcurlをlibssl.lib+libcrypto.libで再ビルド
前回OpenSSLをビルドしてlibssl.libとlibcrypto.libを作ったので、それらをリンクしたlibcurl.libをビルドする。
前々回のlibcurlのビルドで、プロジェクト設定を以下のように変更する。
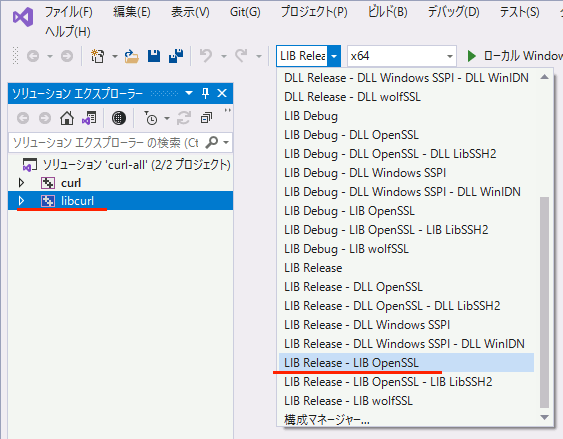
まずLIB Release - LIB OpenSSL を選択。
libssl.lib ; libcrypto.libを依存ファイルとして設定。それらがあるライブラリディレクトリを指定。
opensslのincludeディレクトリを指定。
libcurlをリンクしてプログラムをビルド
以上でlibcurlをビルドできたので、これを使ったプログラムをビルドしてみる。
ライブラリを設定
curlのlibファイルのディレクトリに加え、opensslのlibファイルのディレクトリも追加してビルドする。
以下の二つを追加ライブラリディレクトリに設定
- D:\myDevelop\oss\curl-8.0.1\build\Win64\VC14.10\LIB Release - LIB OpenSSL
- D:\myDevelop\oss\src\openssl-install\lib
pemファイルの準備
以下から、cacert.pemをダウンロードして、カレントディレクトリに配置する。
https://curl.se/docs/caextract.html
サンプルコード
#include <iostream>

#define CURL_STATICLIB
#include<curl/curl.h>

// OS提供
#pragma comment(lib, "CRYPT32.LIB")
#pragma comment(lib, "wldap32.lib" )
#pragma comment(lib, "Ws2_32.lib")

// 作成したlibcurl
#pragma comment(lib,"libcurl.lib")

// 作成したopenssl
#pragma comment(lib,"libssl.lib")
#pragma comment(lib,"libcrypto.lib")


size_t WriteCallback(void* contents, size_t size, size_t nmemb, void* userp) {
    ((std::string*)userp)->append((char*)contents, size * nmemb);
    return size * nmemb;
}

bool PerformHttpsRequest(const std::string& url, std::string& response) {
    CURL* curl;
    CURLcode res;

    curl_global_init(CURL_GLOBAL_DEFAULT);
    curl = curl_easy_init();

    if (!curl) {
        std::cerr << "Error: Failed to initialize libcurl." << std::endl;
        return false;
    }
    curl_easy_setopt(curl, CURLOPT_SSL_VERIFYPEER, 0L);

    /// /////////
    // 相手がhttpsの場合、以下五行を入れないと SSL peer certificate or SSH remote key was not OK というエラーが出る。
    curl_easy_setopt(curl, CURLOPT_SSL_VERIFYSTATUS, 1);
    curl_easy_setopt(curl, CURLOPT_CAINFO, R"(.\cacert.pem)");
    curl_easy_setopt(curl, CURLOPT_CAPATH, R"(.\cacert.pem)");
    curl_easy_setopt(curl, CURLOPT_SSL_VERIFYPEER, 1L);
    curl_easy_setopt(curl, CURLOPT_SSL_VERIFYHOST, 1L);
    curl_easy_setopt(curl, CURLOPT_URL, url.c_str());
    curl_easy_setopt(curl, CURLOPT_WRITEFUNCTION, WriteCallback);
    curl_easy_setopt(curl, CURLOPT_WRITEDATA, &response);

    res = curl_easy_perform(curl);

    if (res != CURLE_OK) {
        std::cerr << "Error: curl_easy_perform() failed: " << curl_easy_strerror(res) << std::endl;
        curl_easy_cleanup(curl);
        curl_global_cleanup();
        return false;
    }

    curl_easy_cleanup(curl);
    curl_global_cleanup();
    return true;
}

int main() {
    std::string url = "https://suzulang.com/";
    std::string response;

    if (PerformHttpsRequest(url, response)) {
        std::cout << "Response from " << url << ":" << std::endl;
        std::cout << response << std::endl;
    }

    return 0;
}
VC++からlibcurlでhttpsを使うためにOpenSSLをビルド
環境を汚さないことをコンセプトに、Perl+NASM+nmakeでOpenSSLをビルドする。
単体の記事として成立するのでlibcurlは次回。
OpenSSL 環境準備
NASM
まず、nasmの公式へ行き、
Stableから、
Index of /pub/nasm/releasebuilds/2.16.01/win64
まで潜り、zipをダウンロード・展開する。
nasm-2.16.01-win64.zip
Strawberry Perl
https://strawberryperl.com/releases.html
へ行き、Portable 64bit版をダウンロードする。
strawberry-perl-5.32.1.1-64bit-portable.zip
OpenSSL
https://github.com/openssl/openssl
へ行き、以下をダウンロード
openssl-master.zip
ディレクトリ構成
今回は、上記を展開し、以下のように配置する。
D:\myDevelop\oss\
├─src\
│  ├─openssl-install\      ... ビルドした結果を格納するためのディレクトリ
│  └─openssl-master\       ... GitHubからダウンロードしたソースコードのディレクトリ
└─tool\
    ├─nasm-2.16.01\
    └─strawberry-perl-5.32.1.1-64bit-portable\
OpenSSL ビルド
1.x64 Native Tools Command Prompt for VS 2019を起動する
今回、x64 Native ToolsのプロンプトがC:\で、ビルド作業をD:\で行い、コマンドプロンプトを使用するので、先にD:\へ移動しておく
>d:\
2.perlのコンソールを起動
プロンプトから、portableshell.batを実行
>cd D:\myDevelop\oss\tool\strawberry-perl-5.32.1.1-64bit-portable
>portableshell.bat
これで、x64 NativeToolsが使えるコンソール上でperlの設定済が適用される。
2.nasmをパスへ追加
このコンソールからnasmを使えるようにパスを追加する。
>set PATH=D:\myDevelop\oss\tool\nasm-2.16.01;%PATH%
3.カレントディレクトリをopensslのトップへ移動
>cd D:\myDevelop\oss\src\openssl-master
4.ビルド開始
>perl Configure VC-WIN64A --prefix=%CD%\..\openssl-install --openssldir=%CD%\ssl no-shared
>nmake
>nmake install
次回
libcurlにリンクしてhttpsに対応する。
VC++でlibcurlを使う(httpの場合)
httpsの場合はopenssl設定が必要になるのでまた後。httpプロトコルのみであればビルドもプログラムもかなり簡単。しかしhttpsのアドレス入れるとUnsupported protocolとか言われる。
ビルド
公式からcurl-8.0.1.zipをダウンロードし展開する。
展開し、VC++のソリューションが入っているディレクトリを探す。
curl-8.0.1\projects\README.md を読むと、以下のバージョン対応表があってわかりやすい。
- VC10 (Visual Studio 2010 Version 10.0)
- VC11 (Visual Studio 2012 Version 11.0)
- VC12 (Visual Studio 2013 Version 12.0)
- VC14 (Visual Studio 2015 Version 14.0)
- VC14.10 (Visual Studio 2017 Version 15.0)
- VC14.30 (Visual Studio 2022 Version 17.0)
今回使ったのはVC++2019なので、VC14.10を開き、ソリューションをアップデートすることにする。以下を開く。
ソリューション構成を LIB Releaseに設定。
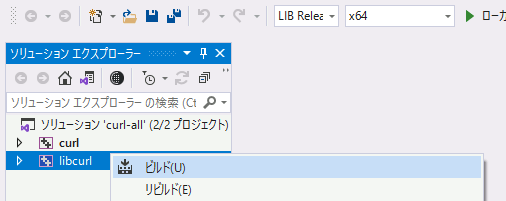
libcurlをビルド。
curl-8.0.1\build\Win64\VC14.10\LIB Release\libcurl.lib が出来上がる。
curl-8.0.1
├─build\
│  └─Win64\
│      └─VC14.10\
│          └─LIB Release\
│             └─lib\       ...  libcurl.lib の出力先
├─CMake\
├─docs\
├─include\
│  └─curl\
├─lib\
├─m4\
├─packages\
├─plan9\
├─projects\
│  └─Windows\
│      ├─VC10\
│      ├─VC11\
│      ├─VC12\
│      ├─VC14\
│      ├─VC14.10\         ... ここに.slnが入っている
│      └─VC14.30\
├─scripts\
├─src\
├─tests\
└─winbuild\
サンプルコード
#include <iostream>

#define CURL_STATICLIB
#include<curl/curl.h>

// OS標準
#pragma comment(lib, "CRYPT32.LIB")
#pragma comment(lib, "wldap32.lib" )
#pragma comment(lib, "Ws2_32.lib")


// 作成したlibcurl
#pragma comment(lib,"libcurl.lib")

// 参考
// https://gist.github.com/alghanmi/c5d7b761b2c9ab199157
static size_t WriteCallback(void* contents, size_t size, size_t nmemb, void* userp)
{
    ((std::string*)userp)->append((char*)contents, size * nmemb);
    return size * nmemb;
}
int main(void)
{
    CURL* curl;
    CURLcode res;
    std::string readBuffer;

    // CURL の初期化
    curl = curl_easy_init();
    if (curl) {

        // 読みたいURLを指定
        curl_easy_setopt(curl, CURLOPT_URL, "http://www.google.com/");


        // データを受け取るためのコールバック関数を指定
        curl_easy_setopt(curl, CURLOPT_WRITEFUNCTION, WriteCallback);

        // データを受け取るためのコールバック関数「WriteCallback」に渡す、データの格納先
        curl_easy_setopt(curl, CURLOPT_WRITEDATA, &readBuffer);

        // 実際にHTTPリクエストを送信。
        // 実際にWriteCallbackが呼ばれるのはここ。
        res = curl_easy_perform(curl);

        if (res != CURLE_OK) {
            std::cerr << "curl_easy_perform failed: " << curl_easy_strerror(res) << std::endl;
            curl_easy_cleanup(curl);
            return 1;
        }


        // CURL の終了処理
        curl_easy_cleanup(curl);

        // 結果の表示
        std::cout << readBuffer << std::endl;
    }
    return 0;
}
Rustで.libや.dllを作り、C++から呼び出す
Rust側
プロジェクト設定
まず、cargoで--libを指定してプロジェクトを作成する
Created library `myhello` package
Cargo.tomlに以下の設定を追加:
name = "myhello"
crate-type = ["cdylib"]
なお、これがdllではなくstatic libraryのみの場合は、以下のように設定する。
name = "myhello"
crate-type = ["staticlib"]
プログラム
Rust側では以下のような関数を用意する。
#[no_mangle] は、関数のオーバーロードなどのためにコンパイラが勝手に関数名を変更するのを防ぐために指定。
extern "C" は、関数の呼び出し規約をC言語にするための設定。ほかにも"stdcall"など色々用意されている。
#[no_mangle]
pub extern "C" fn add(a: i32, b: i32) -> i32 {
    a + b
}
ビルド
cargo build --releaseでビルドする。
この時、myhello.dllができるのだが、libのほうがmyhello.dll.lib になってしまう。今のところ修正する方法がないらしいので、気になるなら手動で修正する。
C++側
C++から呼び出し。extern "C"でC++のマングル回避。
// 関数宣言。この関数はRust側にある。
// 本当は.hppファイルなどに定義するべきだが
// 今はここに書いておく。
extern "C" {
    int add(int a, int b);
}

#pragma comment(lib,"myhello.dll.lib")


#include <iostream>

int main()
{

    // 関数呼び出し
    std::cout << add(3,5) << std::endl;
}
mesonを試す(anaconda使用)
mesonはCMakeの代替と言われている。VC++の環境ではPython + ninja +VC++が必要。ただしconda install mesonするとninjaも一緒に入るので実質VC++の設定だけでいい。
環境を混ぜないために以下をして仮想環境mesonenvを作成し、その中で動作させる。必須ではない。
conda create -n mesonenv python=3.11
conda activate mesonenv
環境構築
mesonとninjaのインストール
conda install meson
VC++の設定
VC++が動くように、以下で環境設定を行う。(VC++2022)
mesonのテスト
まず、testの中にmain.cpp とmeson.buildを作成する。
d:\myDevelop\test
├─main.cpp       ... ソースファイル
├─meson.build     ... 設定ファイル
meson.buildを以下のように記述。
project('MyProject', 'CPP')
executable('myout', ['main.cpp'])
testをカレントれディレクトリとし、以下を実行。
これで、buildの中にmyout.exeが作成される。
d:\myDevelop\test
│  main.cpp
│  meson.build
│
└─build
    │  myout.exe
    │
    ├─meson-info
    │
    ├─meson-logs
    │
    ├─meson-private
    │
    └─myout.exe.p
