OpenFrameworksのprojectGeneratorで作成したプロジェクトを移動すると読み込めなくなる対応
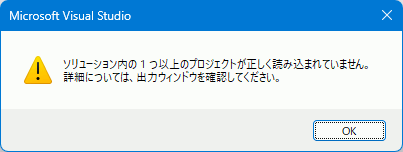
projectGeneratorで作成したソリューションを(いうまでもないがディレクトリごと)別のパスへ移動すると、エラーとなる。例えば作成したmyTestディレクトリのパスを変える。
before
・D:\myDevelop\of-test\myTest\myTest.sln
after
・D:\myDevelop\of-test\test\myTest\myTest.sln
前提として、以下のパスにOpenFrameworksを配置している。
先に結論
before:
after:
ただし場所によっては/区切りなので、それにも対応しておく。
before:
after:
極力絶対パスで指定したい場合
.slnファイルの修正
以下、どうしても絶対パスを使いたい場合の注意。
修正前:
修正後:

.vcxprojファイルの修正
まず、フルパスに置換するために以下を置換する
before:
after:
before:
after:
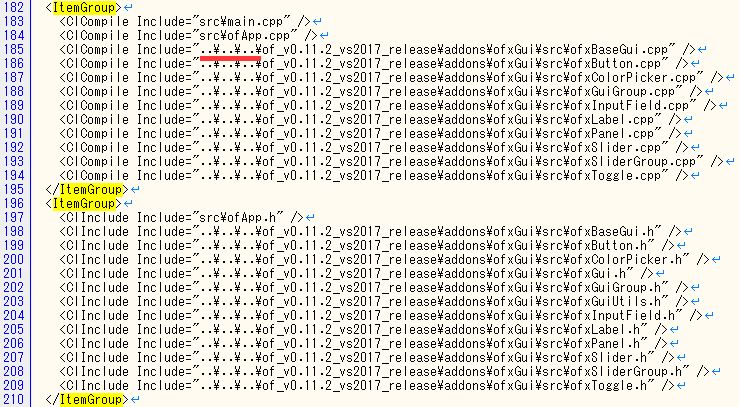
基本的には全て絶対パスでも動くのだが、<ItemGroup>の部分だけは相対パスでなければならない。
OpenFrameworksをWindows,VisualC++から使ってみる(1)
導入は非常に簡単で、ダウンロードするだけ。CMake不要。さらに外部ツールのProjectGenerator(インストール不要)を使ってプロジェクトを作成するので間違いもない。
導入
非常に簡単。
OpenFrameworksの公式サイトへ行き、visual studio(2017-2022)をダウンロード、解凍する。
https://openframeworks.cc/ja/download/
2.テスト(ProjectGeneratorなしの場合)
適当なフォルダへ展開できたら、以下のディレクトリ内にある、emptyExample.slnを開く。
コピーする場合、of_v0.11.2_vs2017_releaseフォルダごとコピーしなければいけないことに注意
OpenGLを使ってみる
ofApp.cppに入っているofApp::draw()の中にOpenGLの描画関数を入れてみる。
#include "ofApp.h"

//--------------------------------------------------------------
void ofApp::setup(){

}

//--------------------------------------------------------------
void ofApp::update(){

}
//--------------------------------------------------------------
void ofApp::draw(){
	glClearColor(1, 0, 0, 1);
	glClear(GL_COLOR_BUFFER_BIT);
	glFlush();
}
//--------------------------------------------------------------
void ofApp::keyPressed(int key){

}

//--------------------------------------------------------------
void ofApp::keyReleased(int key){

}
GUIパーツを使ってみる
ofApp.h
#pragma once

#include "ofMain.h"

// of-test\of_v0.11.2_vs2017_release\addons\ofxGui\src
// GUI部品
#include <ofxGui.h>

class ofApp : public ofBaseApp{

  //  GUI部品 ofxGui.h
  ofxPanel gui;

  ofxFloatSlider angle; // スライダー

  ofxButton button;     // ボタン

  ofxToggle toggle;     // チェックボックス

  ofxTextField text;    // テキストボックス

  // ボタンのイベントリスナー
  void buttonClicked() {
    cout << "ボタンが押された" << endl;
  }

  public:
    void setup();
    void update();
    void draw();

    void keyPressed(int key);
    // ...
};
ofApp.cpp
#include "ofApp.h"
//--------------------------------------------------------------
void ofApp::setup(){

  //  GUI部品の作成・登録
  gui.setup();
  gui.add(angle.setup("angle", 0, 10, 300));        // スライダー作成
  gui.add(button.setup("push", 140, 50));           // ボタン作成
  gui.add(toggle.setup("toggle",false, 140, 30));   // チェックボックス作成
  gui.add(text.setup("text-field", "default text"));// テキスト入力

  // ボタンにイベントリスナーを登録
  button.addListener(this, &ofApp::buttonClicked);

}
//--------------------------------------------------------------
void ofApp::draw(){
  glClearColor(1, 0, 0, 1);
  glClear(GL_COLOR_BUFFER_BIT);


  ////////////////////////////////////////////
  // OpenGL 1 で 描画開始
  int width = ofGetWindowWidth();
  int height = ofGetWindowHeight();
  glViewport(0, 0, width, height);
  glOrtho(-1, 1, -1, 1, -1, 1);


  glMatrixMode(GL_PROJECTION);
  glPushMatrix();
  glLoadIdentity();

  glMatrixMode(GL_MODELVIEW);

  glPushMatrix();
  glLoadIdentity();
  glRotatef(angle.getParameter().cast<float>().get(), 0, 0, 1);

  glBegin(GL_QUADS);
  glColor3d(1, 0, 0);
  glVertex2d(-0.7, -0.7);
  glColor3d(0, 1, 0);
  glVertex2d(-0.7, 0.7);
  glColor3d(0, 0, 1);
  glVertex2d(0.7, 0.7);
  glColor3d(1, 1, 1);
  glVertex2d(0.7, -0.7);
  glEnd();

  glPopMatrix();

  ////////////////////////////////////////////
  // UIを表示
  glMatrixMode(GL_PROJECTION);
  glPopMatrix();
  gui.draw();


  glFlush();


}
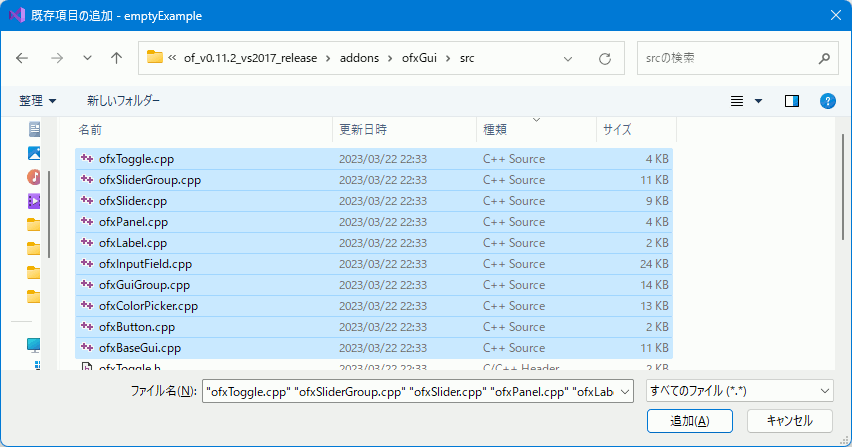
CPPファイルをプロジェクトへ追加
上記だけだとGUIパーツ関係でリンクエラーになるので各.cppファイルをプロジェクトへ追加する。
2.ProjectGeneratorを使ってプロジェクトを生成
調べるとVisual Studioのプラグインを使用する例がたくさん出てくるが、どうも現在はProjectGeneratorという外部ツールでソリューションを作る方式に変わっている気がする。
以下にProjectGenerator.exeがあるのでそれを起動する。
of_v0.11.2_vs2017_release\projectGenerator\projectGenerator.exe
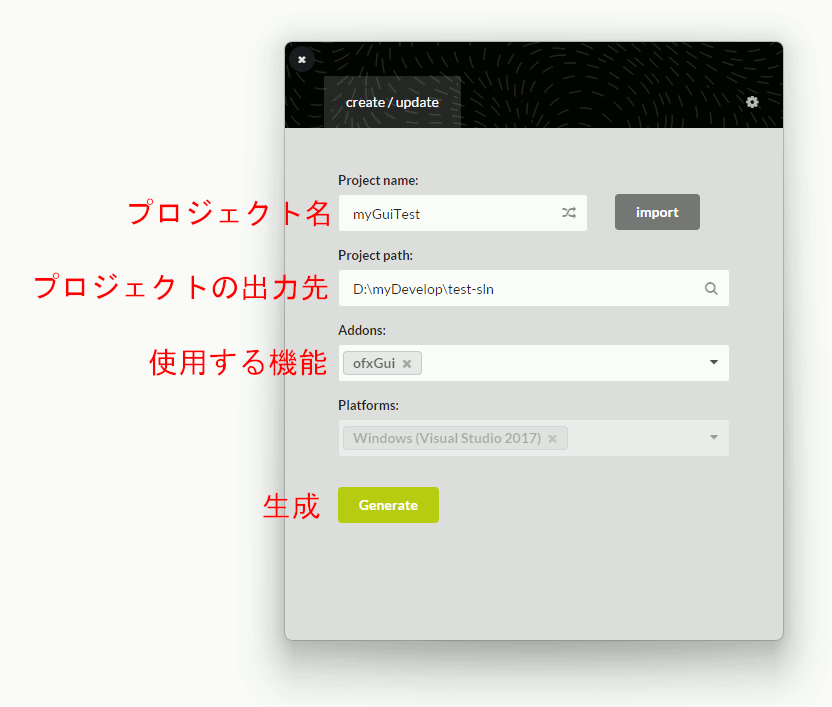
Success!と言われたら出力したソリューションを叩くかOpen in IDEでプロジェクトを開ける。
あとは最初と同じコードで動く。
RustでscraperでHTMLクレイピング
Cargo.toml
name = "htmlgen"
version = "0.1.0"
edition = "2021"
[dependencies]
# HTMLのscraper
# html5ever = "0.26.0"
scraper = "0.15.0"
サンプルコード
fn main() {
    let source:&str = r#"<!DOCTYPE html>
    <html lang="ja">
      <head>
        <title> HTML in the code </title>
      </head>
      <body>
        <div id="mymain">
          <p> first line </p>
          <p> second <br/> line </p>
          <p>
   third
   line
          </p>
          <img src="data.jpg" />
        </div>
        <div id="myfooter">
          <p>copyright</p>
        </div>
      </body>
    </html
    "#;
    //////////////////////////
    // HTMLの解析
    let myparse:scraper::Html = scraper::Html::parse_document(&source);

    let selector:scraper::Selector = scraper::Selector::parse("*").unwrap();

    let parsed:scraper::ElementRef = myparse.select(&selector).next().unwrap();

    println!("*************************");

    traverse_element(&parsed,1);

}
/// @brief 解析済みのHTMLを再帰的に走査して内容を表示
/// @param [in] elementref 解析済みのエレメント
/// @param [in] depth 再帰の階層
/// @return なし
fn traverse_element(elementref: &scraper::ElementRef, depth: usize) {


    let indent:String = " ".repeat(depth*3);// 階層に合わせて左側に挿入するスペース

    let element:&scraper::node::Element = elementref.value();
    let tag_name:&str = element.name();


    print!("{}",depth); // 階層の表示

    print!("{} {}",indent,tag_name); // タグ名表示

    // 属性取得・保存
    for attr in element.attrs(){
        let attr_name =&attr.0.to_string();
        let attr_value =&attr.1.to_string();
        print!(" {} = {}",
            &attr_name,
            &attr_value
        );

    }
    println!("");


    // 子要素を再帰的に辿る
    for child in elementref.children() {

        if let Some(child_element) = child.value().as_element() {
            // タグの場合

            // 子要素を走査
            let c_elem_ref:scraper::ElementRef = scraper::ElementRef::wrap(child).unwrap();
            traverse_element(&c_elem_ref, depth + 1);


        } else if let Some(text) = child.value().as_text() {
            // コンテンツの場合
            let contents:&str = text.trim();
            if !contents.is_empty() {
                print!("{}",depth);
                // コンテンツを表示
                println!("[[[[[[[[[[[[[[[[[[{}]]]]]]]]]]]]]]]]]]]]]", contents);
            }
        }
    }

}
実行結果
1    html lang = ja
2       head
3          title
3[[[[[[[[[[[[[[[[[[HTML in the code]]]]]]]]]]]]]]]]]]]]]
2       body
3          div id = mymain
4             p
4[[[[[[[[[[[[[[[[[[first line]]]]]]]]]]]]]]]]]]]]]
4             p
4[[[[[[[[[[[[[[[[[[second]]]]]]]]]]]]]]]]]]]]]
5                br
4[[[[[[[[[[[[[[[[[[line]]]]]]]]]]]]]]]]]]]]]
4             p
4[[[[[[[[[[[[[[[[[[third
   line]]]]]]]]]]]]]]]]]]]]]
4             img src = data.jpg
3          div id = myfooter
4             p
4[[[[[[[[[[[[[[[[[[copyright]]]]]]]]]]]]]]]]]]]]]
KotlinでJSoupを使ってスクレイピングしてみる
IntelliJ IDEAでJSoupを使ってみる。
全くやったことがないので導入だけのメモになる。
プログラム
コードは以下の通り。
import org.jsoup.Jsoup;
import org.jsoup.nodes.Document;
import org.jsoup.nodes.Element;


fun main(args: Array<String>) {

    val url = "https://suzulang.com/"
    val doc = Jsoup.connect(url).get();

    println(doc.title());  // タイトル取得

    // divの内容をリストで取得
    val divs = doc.select("div");
    for(div in divs){

        // div に子要素があればその内容をループ
        if( div.children().size > 0 ){

            // pの一覧を取得
            val paragraphs = div.children().select("p");
            for(p in paragraphs){

                println(p.text()); // pの内容を表示

            }
        }
    }
}
IntelliJでJSoupを導入する方法
以下からダウンロード
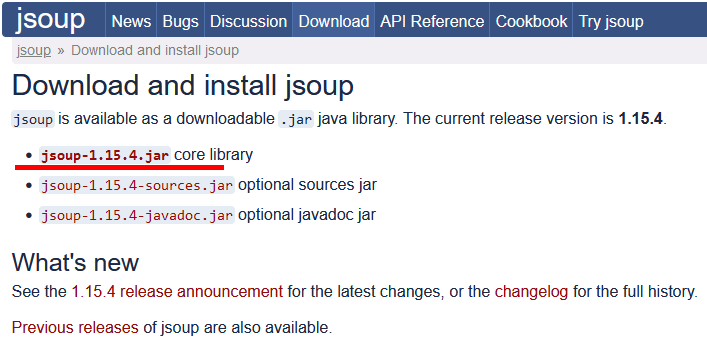
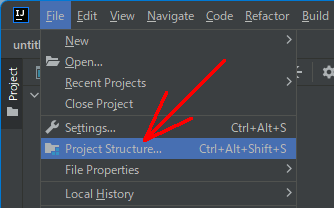
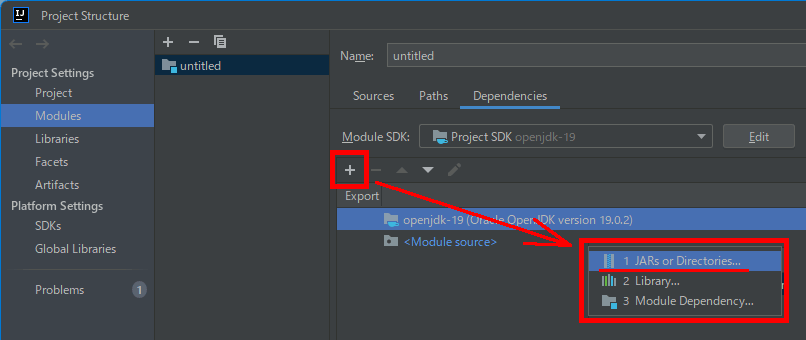
展開したら、[File]→[Project Structure...]を選択
Dependenciesの中の+をクリックし、JARs or Directories...を選択
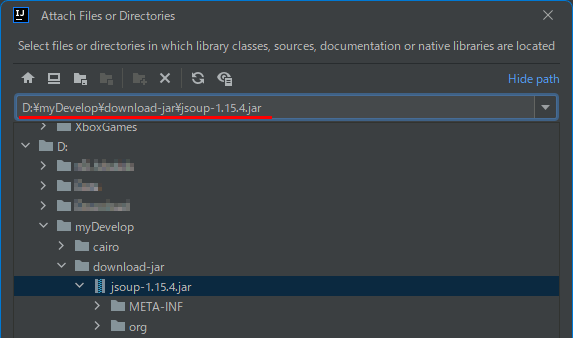
jsoup-1.15.4.jarファイルへのフルパスを指定。ディレクトリまでしか指定しないとjarファイルが表示されないので入力欄にファイル名まで全部入力するといい。
PythonでHTML(2)lxml
lxmlを使うとデータをツリー構造に格納してくれる。
インストール
使用例(テキストから)
import lxml.html


# HTMLのテキスト
text = """<html>
<head><title>タイトル</title>
<body>
<p> hello world </p>
<p> 二行目 </p>
<div>
子要素
</div>
</body>
</html>

"""

ret = lxml.html.fromstring( text )

for itr in ret: # forでイテレーションする

	print(itr.tag) # タグへアクセス

	if len(list(itr)): # 子要素があるかどうかはlistの長さを調べる

		print("{")
		for i in itr:
			print(i.tag ,"[" ,  i.text , "]" )
		print("}")
{
title [ タイトル ]
}
body
{
p [ hello world ]
p [ 二行目 ]
div [
子要素
]
}
URLを指定してインターネットからHTML取得
lxml.html.parseはURLを渡せるのだが、
どうやらHTTPSに対応していないらしい。
urllibでインターネットからデータを取得
urllib.requestを使ってHTMLを取得し、それをfromstringへ入力する。
# lxmlはhttpsに対応していない。
# html.parse( /*ここに入れていいのはhttpのURLだけ*/ )
# urllib.request.urlopenを使ってhttpsからテキストを取得してそれを入力する
# from urllib import urlopen # Python2だとurllib2らしい
import urllib.request


urldata = urllib.request.urlopen('https://suzulang.com/')

text = urldata.read()
print( text )
PythonでHTML(1) HTMLParserを使ってHTMLをパースする
HTMLParserでHTMLをパースする。
HTMLParserクラスは、このクラスを継承して使用する。
HTMLParser.feedを呼び出すと、タグなどが見つかった際にオーバーライドしたhandle_starttagメソッドが呼ばれるので、その度に必要な処理を記述する。
注意
公式ドキュメント
https://docs.python.org/3/library/html.parser.html
にあるコードだとHTML内に改行が見つかるたびにhandle_dataが呼び出されてしまうので、\n単体が見つかった場合は何もしないように処理を追加。
from html.parser import HTMLParser

#####################################
# HTMLのテキスト
text = """<html>
<body>
<p> hello world </p>
</body>
</html>

"""
#####################################
#https://docs.python.org/3/library/html.parser.html
# HTMLParserを継承したMyHTMLParserを作成
class MyHTMLParser(HTMLParser):

    # HTMLParser.feed を呼び出すと、以下の各関数がパース中に呼び出される

    def handle_starttag(self, tag, attrs):
        print("Encountered a start tag:", tag)

    def handle_endtag(self, tag):
        print("Encountered an end tag :", tag)

    def handle_data(self, data):

        # タグの後の改行でもhandle_dataが呼び出されてしまうため
        # 改行単体の時はひとまず抜ける
        if data == '\n':
            return

        print("Encountered some data  :", data)
#####################################
# パース処理


ps = MyHTMLParser() # パーサー作成

ps.feed(text) # パース実行
Rust glutinクレートでOpenGLのウィンドウを開く
OpenGLのウィンドウ生成。
Cargo.toml
[package]
name = "testglutin"
version = "0.1.0"
edition = "2021"
[dependencies]
glutin = "0.26.0"
gl="0.14.0"
main.rc
fn main() {

    let event_loop = glutin::event_loop::EventLoop::new();
    let window = glutin::window::WindowBuilder::new().with_title("Rust glutin OpenGL");
    // GLのコンテキストを作成
    // この gl_context は ContextBuilder<NotCurrent,Window> 型
    let gl_context = glutin::ContextBuilder::new()
        .with_gl(glutin::GlRequest::Specific(glutin::Api::OpenGl, (3, 3)))
        .build_windowed(window, &event_loop)
        .expect("Cannot create context");

    // Rustにはシャドーイングがあるので、同じ名前の別変数を同じスコープ内に定義できる。
    // この gl_context は ContextBuilder<PossibleCurrent,Window> 型
    // 以降、gl_currentは以前の型の意味で用いることはできない
    let gl_context = unsafe {
        gl_context
            .make_current()
            .expect("Failed to make context current")
    };
    // OpenGLの各関数を初期化
    // これでgl::Viewportをはじめとする各関数の関数ポインタにアドレスが設定され、呼び出せるようになる。
    gl::load_with(|symbol| gl_context.get_proc_address(symbol) as *const _);

    // event_loopを開始する
    event_loop.run(move |event, _, control_flow| {

        // Pollを指定するとループが走り続ける
        // Waitを指定するとイベントが発生したときだけループが動く。
        *control_flow = glutin::event_loop::ControlFlow::Wait;


        match event {

            glutin::event::Event::WindowEvent { event, .. } => match event {
                ////////////////////////////////////////////////////////////////////
                // ウィンドウを閉じる
                glutin::event::WindowEvent::CloseRequested => {
                    // ウィンドウが閉じられた場合、event_loopを停止する
                    *control_flow = glutin::event_loop::ControlFlow::Exit;
                },
                ////////////////////////////////////////////////////////////////////
                // ウィンドウのサイズを変更
                glutin::event::WindowEvent::Resized(new_size) => {

                    // ビューポート再設定
                    unsafe {
                        gl::Viewport(0, 0, new_size.width as i32, new_size.height as i32);
                    }
                },
                ////////////////////////////////////////////////////////////////////
                _ => (),
            },


            _ => (),
        }
        // 描画
        unsafe {
            gl::Clear(gl::COLOR_BUFFER_BIT);
            gl::ClearColor(0.3, 0.3, 0.5, 1.0);
        }
        // スワップバッファ
        gl_context.swap_buffers().unwrap();
    });


}
FreeType2でFT_Get_Kerningでカーニングする
カーニングはアルファベットを描画する際に例えばVとAの間を狭く描画するような描画位置調整のことで、GT_Get_Kerningで文字の位置の差を取得する。
#include <iostream>
#include <vector>

#include <ft2build.h>
#include FT_FREETYPE_H


#pragma warning(disable:4996)

#pragma comment(lib,"freetype.lib")


void pnmP2_Write(
  const char* const fname,
  const int width,
  const int height,
  const unsigned char* const p);

void draw(
  const int width,
  const int height,
  unsigned char* p,
  const int charw,
  const int charh,
  const int ox,
  const int oy,
  const unsigned char* charp
);

int main()
{

  FT_Library  library; // handle to library
  FT_Error error;

  error = FT_Init_FreeType(&library);
  if (error)
    return -1;

  FT_Face face;    // handle to face object

  // フォントファイル読み込み
  error = FT_New_Face(
    library,
    "C:\\Windows\\Fonts\\meiryo.ttc",
    0,
    &face
  );

  //文字コード指定
  error = FT_Select_Charmap(
    face,         // target face object
    FT_ENCODING_UNICODE // エンコード指定
  );


  if (error == FT_Err_Unknown_File_Format)
    return -1;
  else if (error)
    return -1;


  //この二つの値でフォントサイズ調整
  FT_F26Dot6 fontsize = 32 * 64;
  FT_UInt CHAR_RESOLUTION = 300;
  error = FT_Set_Char_Size(
    face,        // handle to face object
    0,           // char_width in 1/64th of points
    fontsize,      // char_height in 1/64th of points
    CHAR_RESOLUTION,   // horizontal device resolution
    CHAR_RESOLUTION);  // vertical device resolution


  // 出力画像のメモリ確保
  const int iw = 500;
  const int ih = 300;
  std::vector<unsigned char> image(iw*ih,0);
  // カーニングのために直前の文字を保存しておく
  FT_UInt previous_glyph = 0;
  // 描画位置
  int posx = 0;
  int posy = 200;

  for (size_t i = 0; i < 4; i++) {
    // 文字の取得
    FT_ULong character = U"VAOX"[i];
    FT_UInt char_index = FT_Get_Char_Index(face, character);
    // カーニング
    if(previous_glyph && true/*カーニングしないならfalse*/)
    {
      FT_Vector kerning_delta; // 文字のずれ量を保存

      // 文字のシフト量を取得
      FT_Get_Kerning(
        face,
        previous_glyph, char_index,
        FT_KERNING_DEFAULT,
        &kerning_delta
      );
      posx += ( kerning_delta.x >> 6 );// 文字のシフト
    }
    // 直前に使ったグリフを更新
    previous_glyph = char_index;
    // グリフ(字の形状)読込
    error = FT_Load_Glyph(face, char_index, FT_LOAD_RENDER);
    if (error)
      return -1; // ignore errors


      // 文字を画像化
    FT_Render_Glyph(face->glyph, FT_RENDER_MODE_NORMAL);

    // 出力画像に文字を書き込み
    draw(
      //出力先データ
      iw, ih, image.data(),

      // 文字の画像
      face->glyph->bitmap.width,
      face->glyph->bitmap.rows,
      posx + face->glyph->bitmap_left,
      posy - face->glyph->bitmap_top,
      face->glyph->bitmap.buffer
    );

    posx += (face->glyph->advance.x >> 6);
    posy -= (face->glyph->advance.y >> 6);

  }

  pnmP2_Write(// ファイル保存
    "C:\\MyData\\freetypetest.pgm",
    iw,
    ih,
    image.data()
  );

  // FreeType2の解放
  FT_Done_Face(face);
  FT_Done_FreeType(library);
}

//! @brief Portable Gray map
//! @param [in] fname ファイル名
//! @param [in] width 画像の幅
//! @param [in] height 画像の高さ
//! @param [in] p 画像のメモリへのアドレス
//! @details RGBRGBRGB....のメモリを渡すと、RGBテキストでファイル名fnameで書き込む
void pnmP2_Write(
  const char* const fname,
  const int width,
  const int height,
  const unsigned char* const p) { // PPM ASCII

  FILE* fp = fopen(fname, "wb");
  fprintf(fp, "P2\n%d %d\n%d\n", width, height, 255);

  size_t k = 0;
  for (size_t i = 0; i < (size_t)height; i++) {
    for (size_t j = 0; j < (size_t)width; j++) {
      fprintf(fp, "%d ", p[k]);
      k++;
    }
    fprintf(fp, "\n");
  }

  fclose(fp);
}

//! @brief 出力画像へ文字を書き込む
//! @param [in] width 出力先のサイズ
//! @param [in] height 出力先のサイズ
//! @param [out] p 出力先
//! @param [in] charw 文字画像のサイズ
//! @param [in] charh 文字画像のサイズ
//! @param [in] ox 描画始点
//! @param [in] oy 描画始点
//! @param [in] charp 文字画像
void draw(
  const int width,
  const int height,
  unsigned char* p,
  const int charw,
  const int charh,
  const int ox,
  const int oy,
  const unsigned char* charp
) {

  for (int cx = 0; cx < charw; cx++) {
    for (int cy = 0; cy < charh; cy++) {

      int x = ox + cx;
      int y = oy + cy;

      if (x < 0 || x >= width)continue;
      if (y < 0 || y >= height)continue;

      int ipos = y * width + x;
      int cpos = cy * charw + cx;

      int c = (int)(p[ipos]) + (int)(charp[cpos]);

      c = std::min(c, 255);

      p[ipos] = c;

    }
  }

}
FreeType2 FT_Set_Transformで文字の座標を平行移動
#include <iostream>
#include <vector>

#include <ft2build.h>
#include FT_FREETYPE_H


#pragma warning(disable:4996)

#pragma comment(lib,"freetype.lib")


void pnmP2_Write(
  const char* const fname,
  const int width,
  const int height,
  const unsigned char* const p);

void draw(
  const int width,
  const int height,
  unsigned char* p,
  const int charw,
  const int charh,
  const int ox,
  const int oy,
  const unsigned char* charp
);

int main()
{

  FT_Library  library; // handle to library
  FT_Error error;

  error = FT_Init_FreeType(&library);
  if (error)
    return -1;

  FT_Face face;    // handle to face object

  // フォントファイル読み込み
  error = FT_New_Face(
    library,
    "C:\\Windows\\Fonts\\meiryo.ttc",
    0,
    &face
  );

  //文字コード指定
  error = FT_Select_Charmap(
    face,         // target face object
    FT_ENCODING_UNICODE // エンコード指定
  );


  if (error == FT_Err_Unknown_File_Format)
    return -1;
  else if (error)
    return -1;


  //この二つの値でフォントサイズ調整
  FT_F26Dot6 fontsize = 32 * 64;
  FT_UInt CHAR_RESOLUTION = 300;
  error = FT_Set_Char_Size(
    face,        // handle to face object
    0,           // char_width in 1/64th of points
    fontsize,      // char_height in 1/64th of points
    CHAR_RESOLUTION,   // horizontal device resolution
    CHAR_RESOLUTION);  // vertical device resolution


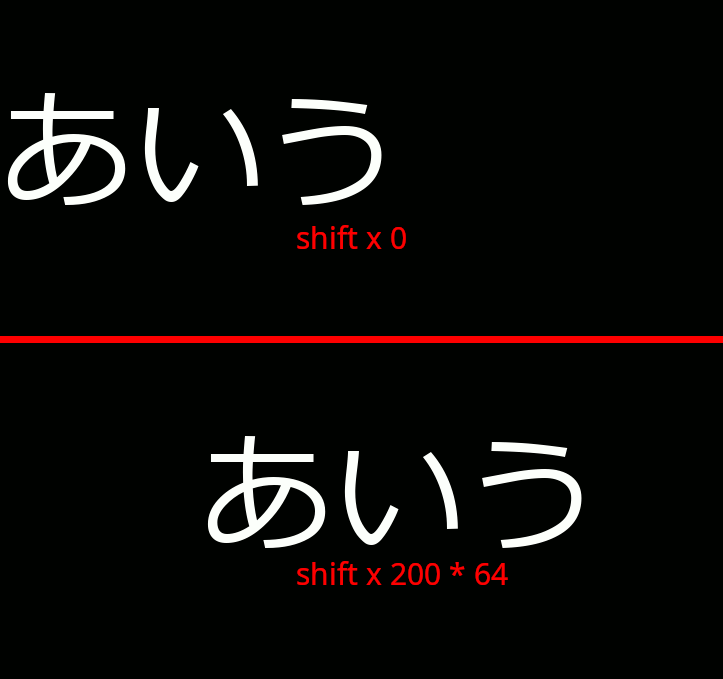
  // 1 Unit == 1/64 なので、×64 して200 pixel になる
  FT_F26Dot6 shiftx = 200 * 64;
  FT_F26Dot6 shifty =  0;
  FT_Vector mv;
  mv.x = shiftx;
  mv.y = 0;
  FT_Set_Transform(face, 0, &mv);

  // 出力画像のメモリ確保
  const int iw = 1000;
  const int ih = 1000;
  std::vector<unsigned char> image(iw*ih,0);

  // 描画位置
  int posx = 0;
  int posy = 200;
  for (size_t i = 0; i < 3; i++) {
    // 文字の取得
    FT_ULong character = U"あいう"[i];
    FT_UInt char_index = FT_Get_Char_Index(face, character);

    // グリフ(字の形状)読込
    error = FT_Load_Glyph(face, char_index, FT_LOAD_RENDER);
    if (error)
      return -1; // ignore errors


      // 文字を画像化
    FT_Render_Glyph(face->glyph, FT_RENDER_MODE_NORMAL);

    // 出力画像に文字を書き込み
    draw(
      //出力先データ
      iw, ih, image.data(),

      // 文字の画像
      face->glyph->bitmap.width,
      face->glyph->bitmap.rows,
      posx + face->glyph->bitmap_left,
      posy - face->glyph->bitmap_top,
      face->glyph->bitmap.buffer
    );

    posx += (face->glyph->advance.x >> 6);
    posy -= (face->glyph->advance.y >> 6);

  }

  pnmP2_Write(// ファイル保存
    "C:\\MyData\\freetypetest.pgm",
    iw,
    ih,
    image.data()
  );

  // FreeType2の解放
  FT_Done_Face(face);
  FT_Done_FreeType(library);
}

//! @brief Portable Gray map
//! @param [in] fname ファイル名
//! @param [in] width 画像の幅
//! @param [in] height 画像の高さ
//! @param [in] p 画像のメモリへのアドレス
//! @details RGBRGBRGB....のメモリを渡すと、RGBテキストでファイル名fnameで書き込む
void pnmP2_Write(
  const char* const fname,
  const int width,
  const int height,
  const unsigned char* const p) { // PPM ASCII

  FILE* fp = fopen(fname, "wb");
  fprintf(fp, "P2\n%d %d\n%d\n", width, height, 255);

  size_t k = 0;
  for (size_t i = 0; i < (size_t)height; i++) {
    for (size_t j = 0; j < (size_t)width; j++) {
      fprintf(fp, "%d ", p[k]);
      k++;
    }
    fprintf(fp, "\n");
  }

  fclose(fp);
}

//! @brief 出力画像へ文字を書き込む
//! @param [in] width 出力先のサイズ
//! @param [in] height 出力先のサイズ
//! @param [out] p 出力先
//! @param [in] charw 文字画像のサイズ
//! @param [in] charh 文字画像のサイズ
//! @param [in] ox 描画始点
//! @param [in] oy 描画始点
//! @param [in] charp 文字画像
void draw(
  const int width,
  const int height,
  unsigned char* p,
  const int charw,
  const int charh,
  const int ox,
  const int oy,
  const unsigned char* charp
) {

  for (int cx = 0; cx < charw; cx++) {
    for (int cy = 0; cy < charh; cy++) {

      int x = ox + cx;
      int y = oy + cy;

      if (x < 0 || x >= width)continue;
      if (y < 0 || y >= height)continue;

      int ipos = y * width + x;
      int cpos = cy * charw + cx;

      int c = (int)(p[ipos]) + (int)(charp[cpos]);

      c = std::min(c, 255);

      p[ipos] = c;

    }
  }

}
Rust で glfw クレートを使う
[package]
name = "winittest"
version = "0.1.0"
edition = "2021"
# See more keys and their definitions at https://doc.rust-lang.org/cargo/reference/manifest.html
[dependencies]
glfw = "0.51.0"
gl="0.14.0"
use glfw::{Action, Context, Key, ffi::glfwTerminate};


fn main() {

    let mut glfw = glfw::init(glfw::FAIL_ON_ERRORS).unwrap();

    ////////////////////////////////////////////////
    ////////////////////////////////////////////////

    let (mut window, events) = glfw.create_window(300, 300, "Hello this is window", glfw::WindowMode::Windowed)
        .expect("Failed to create GLFW window.");
    window.make_current();

    ////////////////////////////////////////////////
    ////////////////////////////////////////////////

    gl::load_with(|s| glfw.get_proc_address_raw(s));
    gl::Viewport::load_with(|s| glfw.get_proc_address_raw(s));

    ////////////////////////////////////////////////
    ////////////////////////////////////////////////

    while window.should_close() == false{

        let (width,height)=window.get_framebuffer_size();

        unsafe{
            gl::Viewport(0,0,width,height);
            gl::ClearColor(0.5,0.5,0.5,1.0);
            gl::Clear(gl::COLOR_BUFFER_BIT);
        }

        window.swap_buffers();

        glfw.wait_events();

    }


}
なお、
と聞かれた場合、Rustが中でcmake.exeを読んでいるので、cmake.exeへのパスを通しておく必要がある。
