Rust winitでウィンドウを作成してみる
Winitはクロスプラットフォームの、Rustでウィンドウを生成するクレート。
ただしこれはウィンドウを生成する機能しか持っておらず、ボタンなどを設置する機能は持っていない。OpenGLもそのままでは使えずWindowsであればwglを使わないといけない。
Cargo.toml
[package]
name = "winittest"
version = "0.1.0"
edition = "2021"
# See more keys and their definitions at https://doc.rust-lang.org/cargo/reference/manifest.html
[dependencies]
winit = "0.28.2"
main.rs
Rust文法がまだよくわかっていなのでコードの整頓にとどめる。
use winit::{
    event::{ Event, WindowEvent, DeviceId, ElementState },
    event_loop::{ ControlFlow, EventLoop },
    window::WindowBuilder,
    platform::windows::WindowExtWindows, // hwndを使うなら必要
    dpi::PhysicalPosition,
};

// https://github.com/rust-windowing/winit

fn main() {

    // イベントループ
    let event_loop = EventLoop::new();

    // ウィンドウ生成
    let window = WindowBuilder::new()
        .with_inner_size(winit::dpi::LogicalSize::new(500, 300))
        .with_title("winit")
        .build(&event_loop).unwrap();


    // ウィンドウハンドルを取得
    // let hwnd:winit::platform::windows::HWND = (window.hwnd() as isize);


    event_loop.run(move |event, _, control_flow| {
        *control_flow = ControlFlow::Wait;

        let mut pos: PhysicalPosition<f64>; // マウス座標の格納先

        match event {
            ///////////////////////////////////////////////
            ///////////////////////////////////////////////
            // 条件
            Event::WindowEvent {
                event: WindowEvent::CloseRequested,
                window_id,
            } if window_id == window.id()

            =>
            // 処理
            {
                *control_flow = ControlFlow::Exit
            }
            ,

            ///////////////////////////////////////////////
            ///////////////////////////////////////////////
            // 条件 マウス移動
            Event::WindowEvent {
                event:WindowEvent::CursorMoved {
                     position:pos,
                     ..
                },
                window_id,
            } if window_id == window.id()

            =>

            // 処理
            {
                println!("{} {}",pos.x,pos.y);
            },

            ///////////////////////////////////////////////
            ///////////////////////////////////////////////
            // 条件 左マウスボタン押下
            Event::WindowEvent{
                event: WindowEvent::MouseInput{
                    state:ElementState::Pressed,
                    button:winit::event::MouseButton::Left,
                    .. // 「..」で省略できる
                },
                window_id,
            } if window_id == window.id()

            =>
            // 処理
            {
                println!("left pushed");
            },

            ///////////////////////////////////////////////
            ///////////////////////////////////////////////
            // 条件 右マウスボタン押下
            Event::WindowEvent{
                event: WindowEvent::KeyboardInput{
                    input:winit::event::KeyboardInput{
                        state:ElementState::Pressed,
                        virtual_keycode:Some(winit::event::VirtualKeyCode::A),
                        ..
                    },
                    .. // 「..」で省略できる
                },
                window_id,
            } if window_id == window.id()

            =>
            // 処理
            {
                println!("A pushed")
            },
            ///////////////////////////////////////////////
            ///////////////////////////////////////////////

            // そのほか

            _ => (),
        }
    });
}
Visual C++のソリューションの不要なファイルを削除する。(PowerShell)
Get-ChildItemを使って、カレントディレクトリ以下の指定した拡張子のファイルを一括削除できる。
これを利用して、VC++のプロジェクト内のいらないファイルを一括削除できる。
Get-ChildItem -Include *.aps,*.dep,*.idb,*.ilk,*.ncb,*.obj,*.pch,*.pdb,*.res,*.suo,*.user -Recurse | del
この時、引数に -WhatIf オプションを指定すると、実際にファイルが削除されずに、どのファイルが削除されるのかを見ることができる。
Get-ChildItem -Include *.aps,*.dep,*.idb,*.ilk,*.ncb,*.obj,*.pch,*.pdb,*.res,*.suo,*.user -Recurse | del -WhatIf
WordPressのLocal by FlywheelでCould not update hosts file
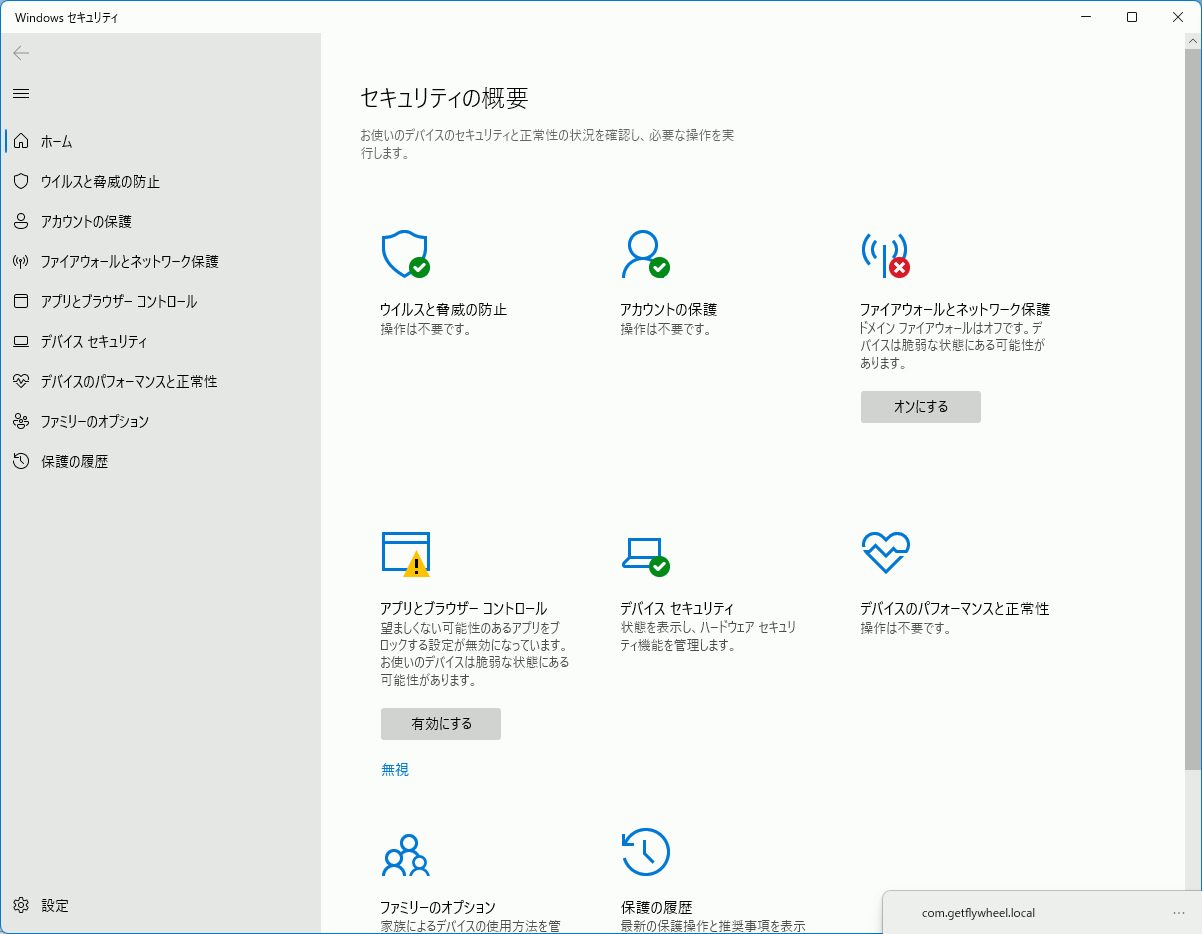
Local by Flywheel(WordPressの仮想環境。現 Local )で仮想環境を作ろうとすると、最終段階で以下のエラーが発生する。
Uh-oh! Could not update hosts file
Local ran into a problem when trying to update the hosts file.
Please ensure that the hosts file is not locked by anti-virus.
意訳:
調べるといろいろとやり方が出てくるが、このエラー、環境を作成/削除するときに出るだけで、作った環境を動かすときには出てこない。
したがって、その瞬間だけセキュリティソフトを止めるのが一番手っ取り早い。
普段使用しているセキュリティソフトを無効化し、Windows Defenderも一瞬だけ止める。
これで回避可能。Wordpress環境ができたらすぐに元に戻す。
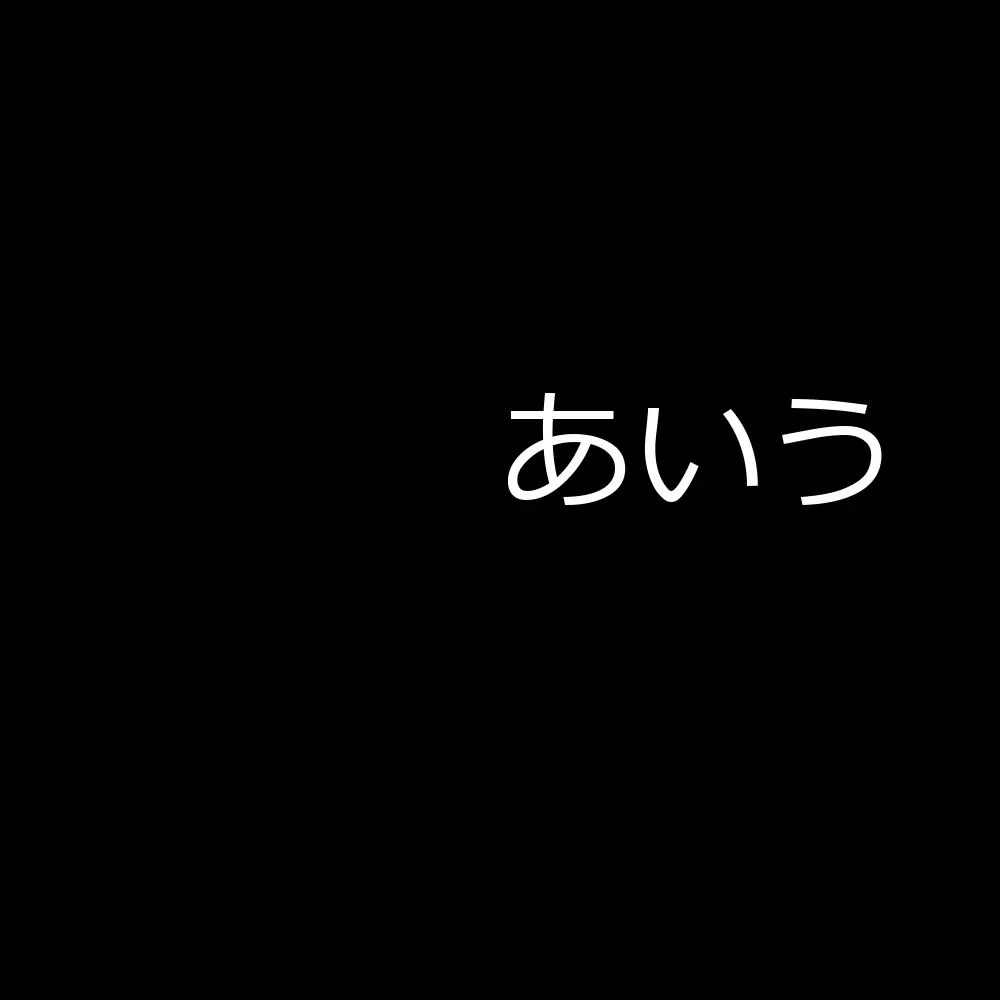
FreeType2 FT_Set_Transformで文字を回転させて出力(2)文字列を出力
#include <iostream>
#include <vector>

#include <ft2build.h>
#include FT_FREETYPE_H


#pragma warning(disable:4996)

#pragma comment(lib,"freetype.lib")


void pnmP2_Write(
  const char* const fname,
  const int width,
  const int height,
  const unsigned char* const p);
void draw(
  const int width,
  const int height,
  unsigned char* p,
  const int charw,
  const int charh,
  const int ox,
  const int oy,
  const unsigned char* charp
);
int main()
{

  FT_Library  library; // handle to library
  FT_Error error;

  error = FT_Init_FreeType(&library);
  if (error)
    return -1;

  FT_Face face;    // handle to face object

  // フォントファイル読み込み
  error = FT_New_Face(
    library,
    "C:\\Windows\\Fonts\\meiryo.ttc",
    0,
    &face
  );

  //文字コード指定
  error = FT_Select_Charmap(
    face,         // target face object
    FT_ENCODING_UNICODE // エンコード指定
  );


  if (error == FT_Err_Unknown_File_Format)
    return -1;
  else if (error)
    return -1;

  //この二つの値でフォントサイズ調整
  FT_F26Dot6 fontsize = 16 * 64*2;
  FT_UInt CHAR_RESOLUTION = 300;
  error = FT_Set_Char_Size(
    face,        // handle to face object
    0,           // char_width in 1/64th of points
    fontsize,      // char_height in 1/64th of points
    CHAR_RESOLUTION,   // horizontal device resolution
    CHAR_RESOLUTION);  // vertical device resolution
  // 回転の指定
  double theta = -65.0 * 3.1415 / 180.0;
  // matrix.xxの型はFT_Fixedだが、これは typedef signed long FT_Fixed
  FT_Matrix  matrix;
  matrix.xx = (FT_Fixed)(cos(theta) * 0x10000L);
  matrix.xy = (FT_Fixed)(-sin(theta) * 0x10000L);
  matrix.yx = (FT_Fixed)(sin(theta) * 0x10000L);
  matrix.yy = (FT_Fixed)(cos(theta) * 0x10000L);

  FT_Set_Transform(face, &matrix, 0);
  // 出力画像のメモリ確保
  const int iw = 1000;
  const int ih = 1000;
  std::vector<unsigned char> image(iw*ih,0);

  // 描画位置
  int posx = 500;
  int posy = 500;
  for (size_t i = 0; i < 3; i++) {
    // 文字の取得
    FT_ULong character = U"あいう"[i];
    FT_UInt char_index = FT_Get_Char_Index(face, character);

    // グリフ(字の形状)読込
    error = FT_Load_Glyph(face, char_index, FT_LOAD_RENDER);
    if (error)
      return -1; // ignore errors


    // 文字を画像化
    FT_Render_Glyph(face->glyph, FT_RENDER_MODE_NORMAL);
    // 出力画像に文字を書き込み
    draw(
      //出力先データ
      iw, ih, image.data(),

      // 文字の画像
      face->glyph->bitmap.width,
      face->glyph->bitmap.rows,
      posx + face->glyph->bitmap_left,
      posy - face->glyph->bitmap_top,
      face->glyph->bitmap.buffer
    );
    posx += (face->glyph->advance.x >> 6);
    posy -= (face->glyph->advance.y >> 6);

  }

  pnmP2_Write(// ファイル保存
    "C:\\MyData\\freetypetest.pgm",
    iw,
    ih,
    image.data()
  );

  // FreeType2の解放
  FT_Done_Face(face);
  FT_Done_FreeType(library);
}

//! @brief Portable Gray map
//! @param [in] fname ファイル名
//! @param [in] width 画像の幅
//! @param [in] height 画像の高さ
//! @param [in] p 画像のメモリへのアドレス
//! @details RGBRGBRGB....のメモリを渡すと、RGBテキストでファイル名fnameで書き込む
void pnmP2_Write(
  const char* const fname,
  const int width,
  const int height,
  const unsigned char* const p) { // PPM ASCII

  FILE* fp = fopen(fname, "wb");
  fprintf(fp, "P2\n%d %d\n%d\n", width, height, 255);

  size_t k = 0;
  for (size_t i = 0; i < (size_t)height; i++) {
    for (size_t j = 0; j < (size_t)width; j++) {
      fprintf(fp, "%d ", p[k]);
      k++;
    }
    fprintf(fp, "\n");
  }

  fclose(fp);
}
//! @brief 出力画像へ文字を書き込む
//! @param [in] width 出力先のサイズ
//! @param [in] height 出力先のサイズ
//! @param [out] p 出力先
//! @param [in] charw 文字画像のサイズ
//! @param [in] charh 文字画像のサイズ
//! @param [in] ox 描画始点
//! @param [in] oy 描画始点
//! @param [in] charp 文字画像
void draw(
  const int width,
  const int height,
  unsigned char* p,
  const int charw,
  const int charh,
  const int ox,
  const int oy,
  const unsigned char* charp
) {

  for (int cx = 0; cx < charw; cx++) {
    for (int cy = 0; cy < charh; cy++) {

      int x = ox + cx;
      int y = oy + cy;

      if (x < 0 || x >= width)continue;
      if (y < 0 || y >= height)continue;

      int ipos = y * width + x;
      int cpos = cy * charw + cx;

      int c = (int)(p[ipos]) + (int)(charp[cpos]);

      c = std::min(c, 255);

      p[ipos] = c;

    }
  }

}
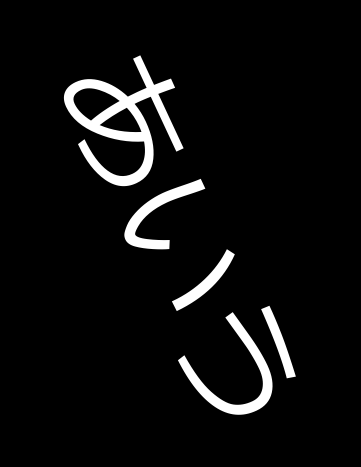
360度回転させてみた例
FreeType2 FT_Set_Transformで文字を回転させて出力(1)
FT_Set_Transform , FT_Load_Glyph , FT_Render_Glyph の順で呼び出すと文字を回転させられる。
注意点としてはFT_Set_Transformに与えるFT_Matrixの要素はfloat型ではなく、FT_Fixedという整数型。
#include <iostream>
#include <vector>

#include <ft2build.h>
#include FT_FREETYPE_H


#pragma warning(disable:4996)

#pragma comment(lib,"freetype.lib")


void pnmP2_Write(
  const char* const fname,
  const int width,
  const int height,
  const unsigned char* const p);

#pragma warning(disable:4996)
int main()
{

  FT_Library  library; // handle to library
  FT_Error error;

  error = FT_Init_FreeType(&library);
  if (error)
    return -1;

  FT_Face face;    // handle to face object

  // フォントファイル読み込み
  error = FT_New_Face(
    library,
    "C:\\Windows\\Fonts\\meiryo.ttc",
    0,
    &face
  );

  //文字コード指定
  error = FT_Select_Charmap(
    face,         // target face object
    FT_ENCODING_UNICODE // エンコード指定
  );


  if (error == FT_Err_Unknown_File_Format)
    return -1;
  else if (error)
    return -1;

  //この二つの値でフォントサイズ調整
  FT_F26Dot6 fontsize = 16 * 64;
  FT_UInt CHAR_RESOLUTION = 300;
  error = FT_Set_Char_Size(
    face,        // handle to face object
    0,           // char_width in 1/64th of points
    fontsize,      // char_height in 1/64th of points
    CHAR_RESOLUTION,   // horizontal device resolution
    CHAR_RESOLUTION);  // vertical device resolution

    // 文字の取得
  FT_ULong character = wchar_t(L'あ');
  FT_UInt char_index = FT_Get_Char_Index(face, character);
  double theta = 45.0 * 3.1415 / 180.0;
  // matrix.xxの型はFT_Fixedだが、これは typedef signed long FT_Fixed
  FT_Matrix  matrix;
  matrix.xx = (FT_Fixed)(cos(theta) * 0x10000L);
  matrix.xy = (FT_Fixed)(-sin(theta) * 0x10000L);
  matrix.yx = (FT_Fixed)(sin(theta) * 0x10000L);
  matrix.yy = (FT_Fixed)(cos(theta) * 0x10000L);
  FT_Set_Transform(face, &matrix, 0);
  // グリフ(字の形状)読込
  error = FT_Load_Glyph(face, char_index, FT_LOAD_RENDER);
  if (error)
    return -1; // ignore errors


    // 文字を画像化
  FT_Render_Glyph(face->glyph, FT_RENDER_MODE_NORMAL);

  int Width = face->glyph->bitmap.width;
  int Height = face->glyph->bitmap.rows;
  pnmP2_Write(// ファイル保存
    "C:\\MyData\\freetypetest.pgm",
    Width,
    Height,
    face->glyph->bitmap.buffer
  );

  // FreeType2の解放
  FT_Done_Face(face);
  FT_Done_FreeType(library);
}

//! @brief Portable Gray map
//! @param [in] fname ファイル名
//! @param [in] width 画像の幅
//! @param [in] height 画像の高さ
//! @param [in] p 画像のメモリへのアドレス
//! @details RGBRGBRGB....のメモリを渡すと、RGBテキストでファイル名fnameで書き込む
void pnmP2_Write(
  const char* const fname,
  const int width,
  const int height,
  const unsigned char* const p) { // PPM ASCII

  FILE* fp = fopen(fname, "wb");
  fprintf(fp, "P2\n%d %d\n%d\n", width, height, 255);

  size_t k = 0;
  for (size_t i = 0; i < (size_t)height; i++) {
    for (size_t j = 0; j < (size_t)width; j++) {
      fprintf(fp, "%d ", p[k]);
      k++;
    }
    fprintf(fp, "\n");
  }

  fclose(fp);
}
Rust+windows-rs,win32apiでCreateWindowしてみる
元のプログラムは以下。しかし一部コピペでは動かなかった部分もあるので修正をしている。
https://github.com/microsoft/windows-samples-rs/blob/master/create_window/src/main.rs
main.rs
以前作った自作WinMainを呼び出すmain関数。
main.rsと同じディレクトリに次のWinMain.rsが存在する。
use windows::Win32::System::LibraryLoader::GetModuleHandleA;
use std::env;
use windows::Win32::System::Threading::{GetStartupInfoW, STARTUPINFOW};

// mod ファイル名
mod winmain;
// use 関数名(など)
use winmain::WinMain;

// Rustのwindows-rsからウィンドウズアプリケーションをビルドする時には、
// WinWain ではなくmainをエントリポイントとする。

fn main()-> windows::core::Result<()>  {

    let hInstance:windows::Win32::Foundation::HINSTANCE;
    unsafe{
        // https://github.com/microsoft/windows-samples-rs/blob/master/create_window/src/main.rs
        hInstance = windows::Win32::System::LibraryLoader::GetModuleHandleA(None).unwrap();
    }

    // https://doc.rust-jp.rs/book-ja/ch12-01-accepting-command-line-arguments.html
    let args: Vec<String> = env::args().collect();


    // https://stackoverflow.com/questions/68322072/how-to-get-args-from-winmain-or-wwinmain-in-rust
    let mut si = windows::Win32::System::Threading::STARTUPINFOW {
        cb: std::mem::size_of::<windows::Win32::System::Threading::STARTUPINFOW>() as u32,
        ..Default::default()
    };
    unsafe {
        windows::Win32::System::Threading::GetStartupInfoW(&mut si)
    };
    let cmd_show = si.wShowWindow as i32;

    ////////////////////////////////////////////////////////////////////////////////////
    // 自作WinMainを呼び出す
    WinMain(
        hInstance,
        windows::Win32::Foundation::HINSTANCE(0),
        args,
        cmd_show
    );


    Ok(())

}
WinMain.rs
use windows::{
    core::*, Win32::Foundation::*, Win32::Graphics::Gdi::ValidateRect,
    Win32::System::LibraryLoader::GetModuleHandleA, Win32::UI::WindowsAndMessaging::*,
};
extern "system" fn wndproc(window: HWND, message: u32, wparam: WPARAM, lparam: LPARAM) -> LRESULT {
    unsafe {


        let rectnullptr: ::core::option::Option<*const windows::Win32::Foundation::RECT> = None;

        match message as u32 {
            WM_PAINT => {
                println!("WM_PAINT");
                ValidateRect(window, rectnullptr);
                LRESULT(0)
            }
            WM_DESTROY => {
                println!("WM_DESTROY");
                PostQuitMessage(0);
                LRESULT(0)
            }
            _ => DefWindowProcA(window, message, wparam, lparam),
        }
    }
}
/// 自作 WinMain
pub fn WinMain(
        hInstance : windows::Win32::Foundation::HINSTANCE,
        hPrevInstance : windows::Win32::Foundation::HINSTANCE,
        lpCmdLine:Vec<String>,
        nCmdShow:i32
    )->i32{

    unsafe{
        let _hCursor = LoadCursorW(None,IDC_ARROW).unwrap();
        let _hInstance = hInstance;
        let _lpszClassName = PCSTR::from_raw("MY_NEW_WINDOW\0".as_ptr());
        let _style = CS_HREDRAW | CS_VREDRAW;

        // https://microsoft.github.io/windows-docs-rs/doc/windows/Win32/UI/WindowsAndMessaging/struct.WNDCLASSA.html
        let wc=windows::Win32::UI::WindowsAndMessaging::WNDCLASSA{
            hCursor :_hCursor,
            hInstance: _hInstance,
            lpszClassName: _lpszClassName,
            style: _style,
            lpfnWndProc: Some(wndproc),
            ..Default::default()
        };

        let atom = RegisterClassA(&wc);
        debug_assert!(atom != 0);


        let nullptr: ::core::option::Option<*const ::core::ffi::c_void> = None;

        CreateWindowExA(
            Default::default(),
            _lpszClassName,
            PCSTR::from_raw("This is a sample window\0".as_ptr()),
            WS_OVERLAPPEDWINDOW | WS_VISIBLE,
            CW_USEDEFAULT,
            CW_USEDEFAULT,
            CW_USEDEFAULT,
            CW_USEDEFAULT,
            None,
            None,
            _hInstance,
            nullptr,
        );


        let mut message = MSG::default();

        while GetMessageA(&mut message, HWND(0), 0, 0).into() {
            DispatchMessageA(&mut message);
        }
    }
    return 0;


}
Cargo.toml
[package]
name = "rs_win"
version = "0.1.0"
edition = "2021"
# See more keys and their definitions at https://doc.rust-lang.org/cargo/reference/manifest.html
[dependencies]
[dependencies.windows]
version = "0.44.0"
# 最新版のバージョンは https://github.com/microsoft/windows-rs で確認
# ・バージョンによってfeaturesを変えなければいけないかもしれない
features = [
"Win32_Graphics_Gdi",
"Win32_Foundation",
"Win32_UI_WindowsAndMessaging",
"Win32_System_LibraryLoader",
"Win32_System_Threading",
]
調べ方・記述方法など
関数や構造体の場所がわからないとき
例えば、WNDCLASSAが見つからずエラーになった場合、まず以下のURLへ飛ぶ。
Required features:
"Win32_UI_WindowsAndMessaging","Win32_Foundation","Win32_Graphics_Gdi"
これらが必要なので、Cargo.tomlに記述する。
features = [
"Win32_Graphics_Gdi",
"Win32_Foundation",
"Win32_UI_WindowsAndMessaging",
]
PCSTR型の文字列作成
PCSTR::from_rawを使う。
PCSTR::from_raw("This is a sample window\0".as_ptr()),
関数の戻り値がResult<>の場合
Result<>をunwrap()する。
let _hCursor = LoadCursorW(None,IDC_ARROW).unwrap();
NULLの作成
::core::option::OptionにNoneを代入
let nullptr: ::core::option::Option<*const ::core::ffi::c_void> = None;
問題はOptionのGeneric<>に何を渡すかで、これは関数定義を素直にコピペするのが一番楽。VSCode関数を右クリックなどして定義へ移動し、該当引数の型をそのまま持ってきてNone代入する。
RustでWinMainのようなものを作る
RustでWin32APIを書くときはWinMainがエントリポイントにならないので、mainから始める。
各種関数を駆使すればWinMainの引数と同等のものを得ることができるが、コマンドライン引数だけはスペースで区切られた配列で得る方法しか見つからなかった。
use windows::Win32::System::LibraryLoader::GetModuleHandleA;
use std::env;
use windows::Win32::System::Threading::{GetStartupInfoW, STARTUPINFOW};

// Rustのwindows-rsからウィンドウズアプリケーションをビルドする時には、
// WinWain ではなくmainをエントリポイントとする。
fn main()-> windows::core::Result<()>  {

    let hInstance:windows::Win32::Foundation::HINSTANCE;
    unsafe{
        // https://github.com/microsoft/windows-samples-rs/blob/master/create_window/src/main.rs
        hInstance = windows::Win32::System::LibraryLoader::GetModuleHandleA(None).unwrap();
    }

    // https://doc.rust-jp.rs/book-ja/ch12-01-accepting-command-line-arguments.html
    let args: Vec<String> = env::args().collect();


    // https://stackoverflow.com/questions/68322072/how-to-get-args-from-winmain-or-wwinmain-in-rust
    let mut si = windows::Win32::System::Threading::STARTUPINFOW {
        cb: std::mem::size_of::<windows::Win32::System::Threading::STARTUPINFOW>() as u32,
        ..Default::default()
    };
    unsafe {
        windows::Win32::System::Threading::GetStartupInfoW(&mut si)
    };
    let cmd_show = si.wShowWindow as i32;

    ////////////////////////////////////////////////////////////////////////////////////
    // 自作WinMainを呼び出す
    WinMain(
        hInstance,
        windows::Win32::Foundation::HINSTANCE(0),
        args,
        cmd_show
    );


    Ok(())

}
/// やっぱり WinMain から起動したほうが読みやすい人のために
/// 自作 WinMain を作成
fn WinMain(
	hInstance : windows::Win32::Foundation::HINSTANCE,
	hPrevInstance : windows::Win32::Foundation::HINSTANCE,
	lpCmdLine:Vec<String>,
	nCmdShow:i32
)->i32{

    println!("hInstance : {}",hInstance.0);
    println!("hPrevInstance : {}", hPrevInstance.0);
    println!("lpCmdLine : {:?}", lpCmdLine);
    println!("nCmdShow : {}", nCmdShow);

    return 0;

}
hInstance : 140697499664384
hPrevInstance : 0
lpCmdLine : ["rs_win.exe", "hello world"]
nCmdShow : 1
Blender 3 Saplingで葉の根元に出る白い矩形はなんなのか。あと消す方法。
疑問
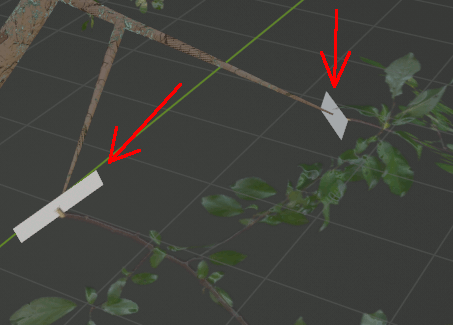
BlenderでSaplingを使うと、なぜかはの付け根に白い四角形が生じる。これは何で、どうやったら消せるのか。
答え・解決方法
Saplingの葉は、実はオブジェクトの上に生成したinstanceである。
(実体化するためにはMake Instances Realしなければならないことから明らかだ。)
だから、葉を選択(実際にはその根元にある四角形が本体)し、Object Properties→Instancing→Facesを辿り、Show Instancerのチェックを外せば、非表示にできる。
Unreal Engine 5 でC++からブループリントの自作ノード作成
前提 Visual C++ の Unreal Engineのインストーラーを導入
1.C++クラスの追加
新規C++クラス
・[ツール] → [新規 C++ クラス ...] を選択
・「親クラスを選択」で 「Blueprint Function Library」を選択し、次へ
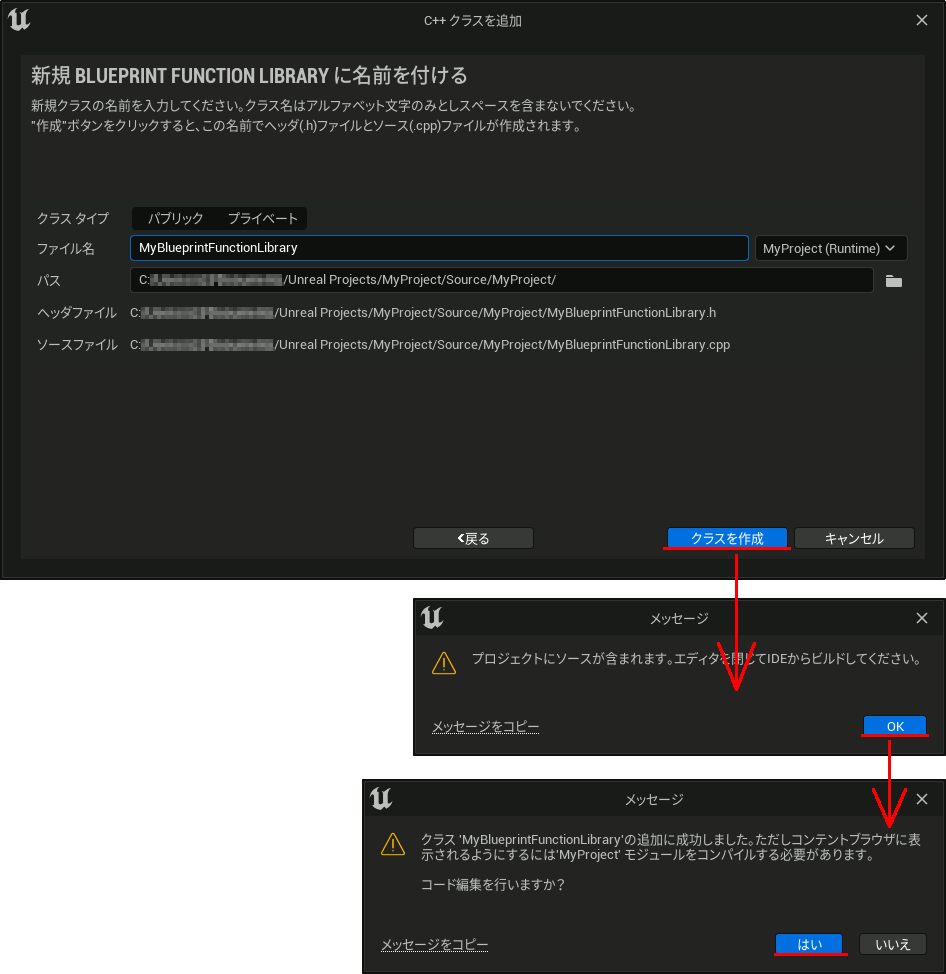
新規 BLUEPRINT FUNCTION LIBRARY に名前を付ける
[クラスを作成]をクリック。
・「プロジェクトにソースが含まれます。エディタを閉じてIDEからビルドしてください。」をOK
・「クラス 'MyBlueprintFunctionLibrary' の追加に成功しました。ただしコンテントブラウザに表示されるようにするには'MyProject'モジュールをコンパイルする必要があります。」を「はい」
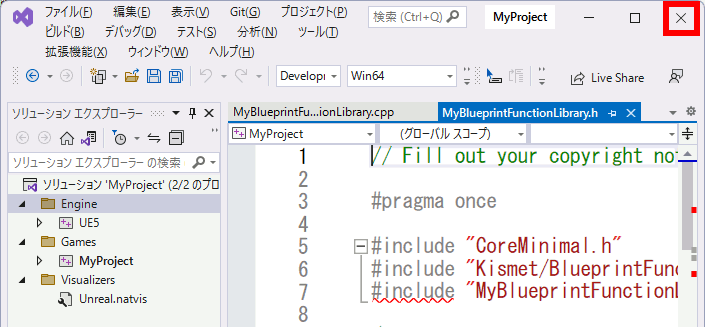
Visual Studio とUnreal Engine 5 を一度閉じる。
VC++が自動で開くが、一度閉じる。
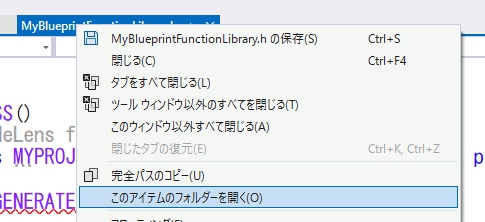
※ もう一度slnを開くために、このアイテムのフォルダーを開くからパスを確認しておくと便利。
さらにUnreal Engineも閉じる。
2.C++のコード編集
MyBlueprintFunctionLibrary.h
上で閉じたslnを手動で開き、MyBlueprintFunctionLibrary.h に以下のメンバ関数宣言を追加する。
// Fill out your copyright notice in the Description page of Project Settings.

#pragma once

#include "CoreMinimal.h"
#include "Kismet/BlueprintFunctionLibrary.h"
#include "MyBlueprintFunctionLibrary.generated.h"

/**
 *
 */
UCLASS()
class MYPROJECT_API UMyBlueprintFunctionLibrary : public UBlueprintFunctionLibrary
{
	GENERATED_BODY()
	// 追加
	UFUNCTION(BlueprintCallable, Category = "MyCategory")
	static FString MyFirstCppNode();
};
MyBlueprintFunctionLibrary.cpp
// Fill out your copyright notice in the Description page of Project Settings.


#include "MyBlueprintFunctionLibrary.h"

FString UMyBlueprintFunctionLibrary::MyFirstCppNode() {

	return FString("output from C++");

}
プロジェクトをビルド
普通にビルドする。
3.Unreal Engineからノードを追加
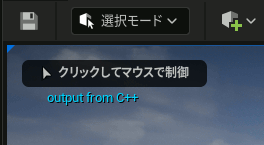
閉じたUE5プロジェクトを再び開き、レベルブループリントなどに上記で追加した関数名と同じノードを使用する
実行
Unreal Engine 5 画面内にボタンを配置してUIを作る
ウィジェットブループリントを追加
ウィジェットを追加しMyUserWidgetと名前を設定
[追加]→[ユーザーインタフェース]→[ウィジェットブループリント]を選択し、[User Widget]をクリック。名前を「MyUserWidget」へ変更しておく。
MyUserWidgetをダブルクリックして編集
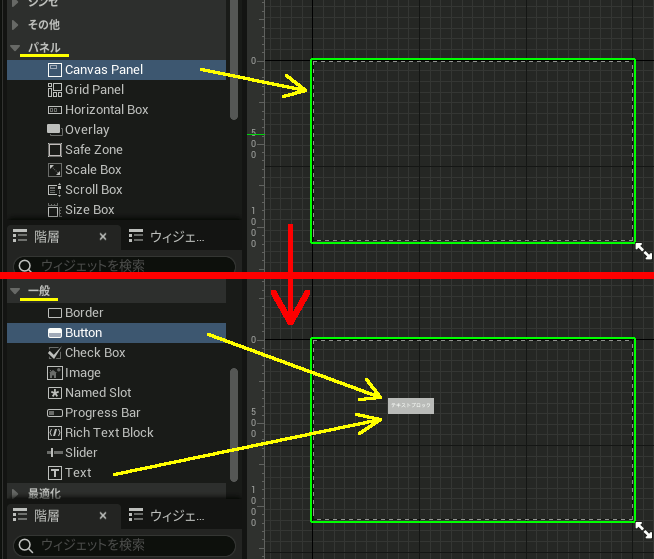
[パネル]→[Canvas Panel]を追加する。CanvasPanelを追加しないとボタンが全画面になる。
次に[一般]→[Button] を追加し、Buttonへ[Text]を追加。ボタンとテキストを親子関係にしてボタンに文字をつける。
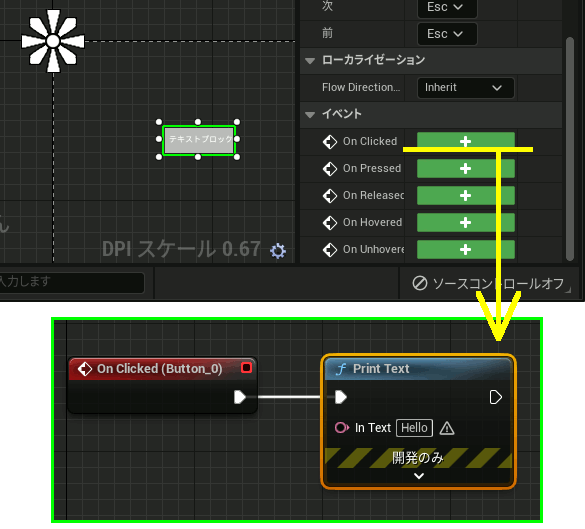
ボタンを押した挙動を設定
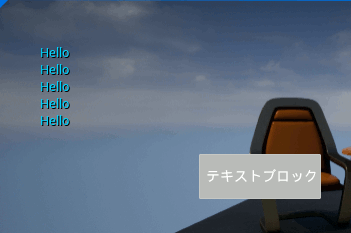
On Clickイベントを追加し、Print textのブループリントを追加しておく。
UIを画面に表示
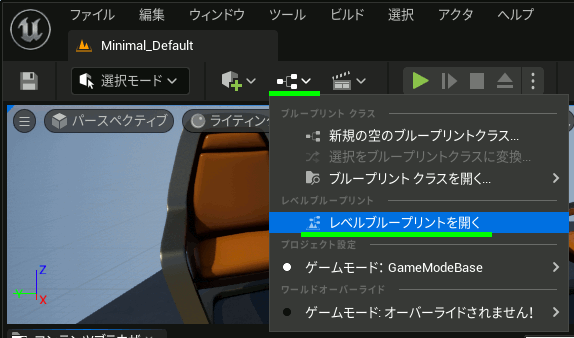
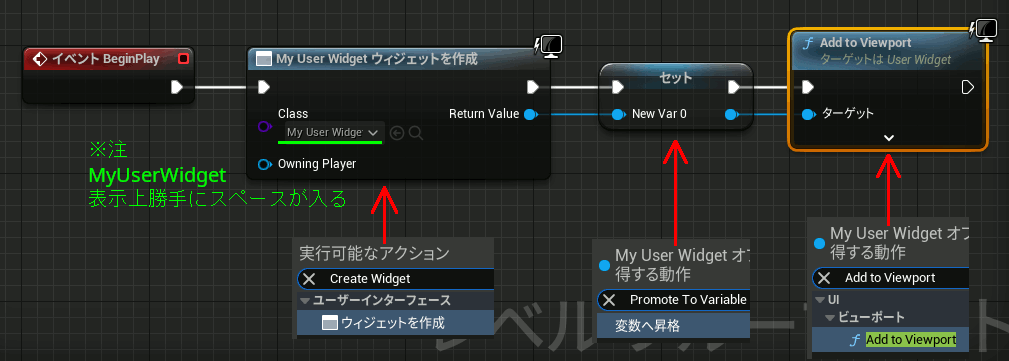
レベルブループリントを開き、
- Create Widget
- Promote to Variable
- Add to Viewport
を繋げて配置。Create Widgetで最初に追加したMyUserWidgetを設定する。

