Rust + windows-rs でMessageBoxAを呼び出す
MessageBoxAにs!で文字列を渡すと日本語が文字化けするので、encoding_rsでShiftJISへ変換する。さらに0終端にするためにto_vec()でvecへ変換し0をpushする。
なおencoding_rsを使うための設定をCargo.tomlに加筆する。
※ このやり方が正攻法なのかよくわからない。
main.rs
use windows::Win32::UI::WindowsAndMessaging::{MessageBoxA, MB_OK};
use encoding_rs::*;


fn main( )->windows::core::Result<()>{

  // windows::core::s! マクロ ... 文字列(utf8)をLPCSTR へ変換。
  // MessageBoxWを使う場合はLPCWSTR へ変換するw!を使用。

  unsafe {

    // windows::core::s!() にそのまま日本語を与えると文字化けする。
    // Rustはu8が基本。 MessageBoxA はnull終端のマルチバイト(ShiftJIS)なので、変換が必要
    let msg = SHIFT_JIS.encode("ハローワールド");
    let ttl = SHIFT_JIS.encode("タイトル");

    let mut msg0 = msg.0.to_vec();
    let mut ttl0 = ttl.0.to_vec();

    // null 終端にする
    msg0.push(0);
    ttl0.push(0);

    let smsg0 = windows::core::PCSTR(msg0.as_ptr());
    let sttl0 = windows::core::PCSTR(ttl0.as_ptr());
    MessageBoxA(
      None,
      smsg0,
      sttl0,
       MB_OK
    );
  }

  Ok(())

}
Cargo.toml
[package]
name = "myproject"
version = "0.1.0"
edition = "2021"

# See more keys and their definitions at https://doc.rust-lang.org/cargo/reference/manifest.html
[dependencies.windows]

version = "0.44.0"

# 最新版のバージョンは https://github.com/microsoft/windows-rs で確認
# ・バージョンによってfeaturesを変えなければいけないかもしれない
# ・バージョンによって何が使えるか(どこにあるか?)が変わる
#  例えば windows::Win32::Foundation::HINSTANCE やs!は0.32.0にはない

features = [
    "Win32_Foundation",
    "Win32_UI_WindowsAndMessaging",
]
[dependencies.encoding_rs]
version="0.8.31"
TCLAPでC++でコマンドライン引数を解析
からもダウンロードできる。そこにMIT Licenseと書いてあるのでライセンスはかなり緩い。
ビルドしなくても使えるのでその点は良いが、インクルードがヘッダファイル一つでも関連ファイルが多いので追加のインクルードディレクトリを指定しなければいけない。
#include <iostream>

//https://tclap.sourceforge.net/

#include <tclap/CmdLine.h>

int main(int argc, char** argv) {
  int val_int;
  std::string val_string;
  // Define the command line object
  TCLAP::CmdLine cmd(
    "test program"    // アプリケーションの説明
    , ' '             // コマンドライン引数の区切り文字
    , "0.1"           // ツールのバージョン
    , true            // -hで表示されるヘルプを作成する
  );
  TCLAP::ValueArg<int> arg_i(
      "n"                           // 引数指定方法 -n 123 のように記述
    , "number"                      // 引数指定方法 --number のように記述
    , "count of data"               // ヘルプに表示する説明
    , true                          // 必須項目であることを示す
    , 0                             // 初期値
    , "integer"                     // ヘルプに表示するこのオプションのデータ型
  );
  cmd.add(arg_i);
  TCLAP::ValueArg<std::string> arg_s(
      "t"                           // 引数指定方法 -t abc のように記述
    , "text"                        // 引数指定方法 --text のように記述
    , "text data"                   // ヘルプに表示する説明
    , false                         // 必須項目であることを示す
    , "void"                        // 初期値
    , "text"                     // ヘルプに表示するこのオプションのデータ型
  );
  cmd.add(arg_s);
  // コマンドライン引数を解釈する
  cmd.parse(argc, argv);

  // 解釈した値を取得する
  val_int = arg_i.getValue();
  val_string = arg_s.getValue();

  // 入力されたオプションを確認
  std::cout << "input : " << val_int << std::endl;
  std::cout << "input : " << val_string << std::endl;

  return 0;
}
実行例1 引数を指定して実行してみる。
input : 123
input : void
実行例2 ヘルプを作成しているので、-hで使い方表示ができるようになっている。
app.exe -h

USAGE:

   app  [-h] [--version] [-t <text>] -n <integer>


Where:

   -n <integer>,  --number <integer>
     (required) count of data

   -t <text>,  --text <text>
     text data

   --,  --ignore_rest
     Ignores the rest of the labeled arguments following this flag.

   --version
     Displays version information and exits.

   -h,  --help
     Displays usage information and exits.

   test program
Rust + windows-rs でMessageBoxWを呼び出す
main.rs
use windows::Win32::UI::WindowsAndMessaging::{MessageBoxW, MB_OK};


fn main( )->windows::core::Result<()>{

  // windows::core::s! マクロ ... 文字列(utf8)をLPCSTR へ変換。
  // MessageBoxWを使う場合はLPCWSTR へ変換するw!を使用。

  unsafe {
    MessageBoxW(
      None,
      windows::core::w!("ハローワールド"),
      windows::core::w!("タイトル"),
       MB_OK
    );

  }

  Ok(())

}
Cargo.toml
[package]
name = "myproject"
version = "0.1.0"
edition = "2021"

# See more keys and their definitions at https://doc.rust-lang.org/cargo/reference/manifest.html
[dependencies.windows]

version = "0.44.0"

# 最新版のバージョンは https://github.com/microsoft/windows-rs で確認
# ・バージョンによってfeaturesを変えなければいけないかもしれない
# ・バージョンによって何が使えるか(どこにあるか?)が変わる
#  例えば windows::Win32::Foundation::HINSTANCE やs!は0.32.0にはない

features = [
#    "alloc",                     # 0.32.0では必要
    "Win32_Foundation",
    "Win32_UI_WindowsAndMessaging",
]
Rustでソースコードを二つ以上のファイルに分割する
1.main.rsの隣にあるファイルを読み込む
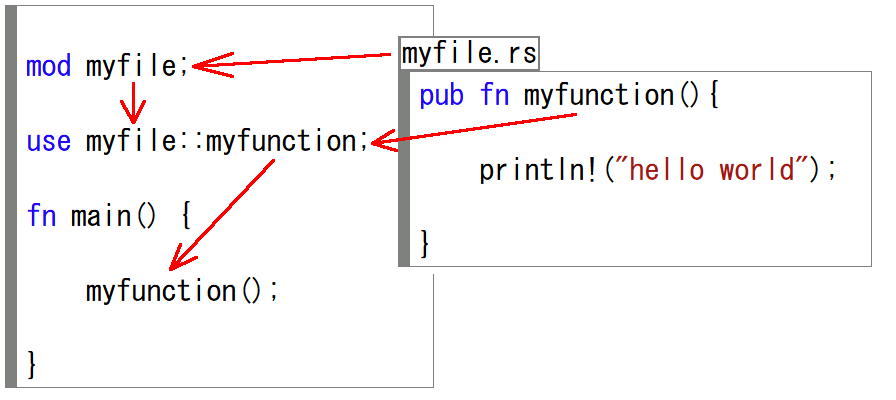
呼び出し側で、
mod ファイル名
use ファイル名::関数名
と書いておけば、呼び出せるようになる。
あと、構造体や関数が別ファイルに分かれている場合、先頭にpubをつけておかなければいけない。
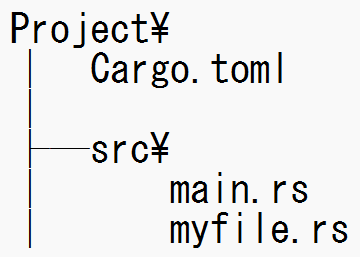
同じディレクトリにmain.rsとmyfile.rsがある場合、以下のように記述する。
main.rs
// main.rs  エントリポイントのあるファイル

// mod ファイル名
mod myfile;

// use ファイル名::関数名(など)
use myfile::myfunction; // 使いたいものだけ ファイル名::シンボル
use myfile::myparam;    // use myfile::*; も可能


fn main() {

    let ab:myparam = myparam{a:1,b:2.0};

    myfunction(&ab);

}
myfile.rs
// myfile.rs 分離したファイル

// 関数の先頭にpubをつける
pub fn myfunction(ab : &myparam){

    println!("{} {}",ab.a,ab.b);

}

// 構造体の先頭にpubをつける
pub struct myparam{
    pub a:i32, // メンバにも pub をつける
    pub b:f32,
}
https://zenn.dev/newgyu/articles/3b4677b4086768
2.自分の隣のファイルを読み込む
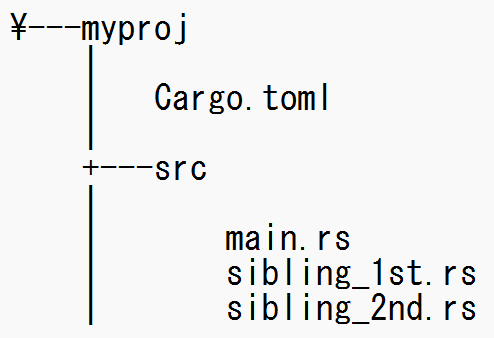
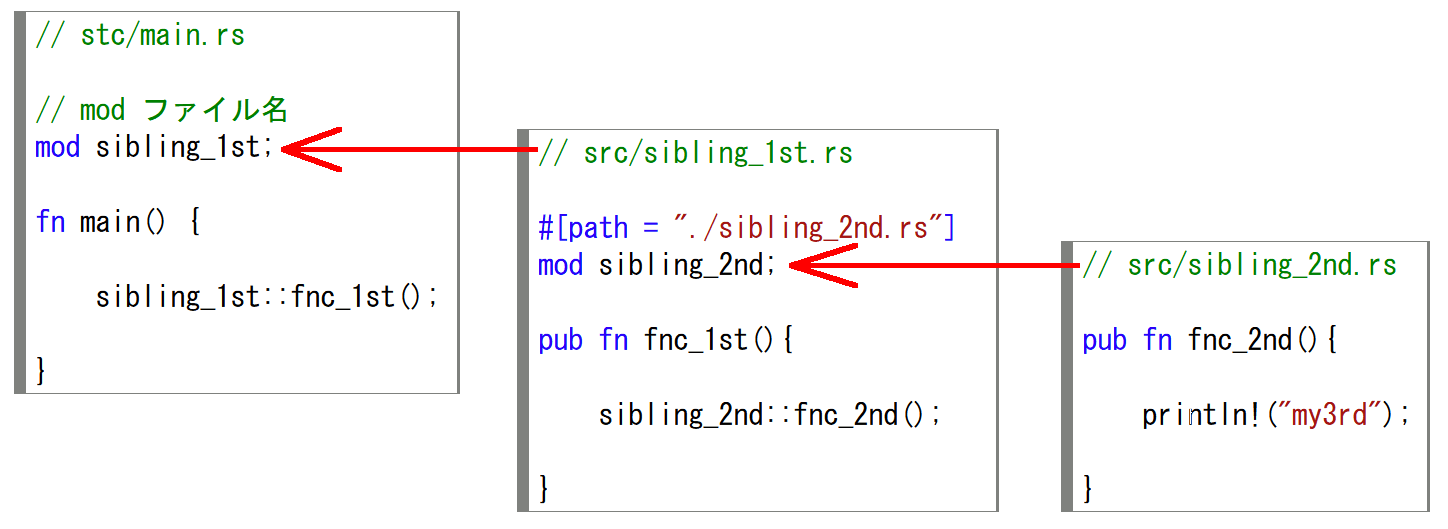
main.rs , sibling_1st.rs,sibling_2nd.rsがすべて同じ階層にあった場合、main.rsは自分の隣をmodだけで読み込めるが、それ以外は#[path=""]の形でパスを指定しなければならないらしい。
main.rs
// main.rs

// mod ファイル名
mod sibling_1st;

fn main() {

    sibling_1st::fnc_1st();

}
sibling_1st.rs
// sibling_1st.rs

#[path = "./sibling_2nd.rs"]
mod sibling_2nd;

pub fn fnc_1st(){

    sibling_2nd::fnc_2nd();

}
sibling_2nd.rs
// sibling_2nd.rs

pub fn fnc_2nd(){

    println!("my3rd!!!");

}
3.自分の隣のディレクトリ内のファイルを読み込む
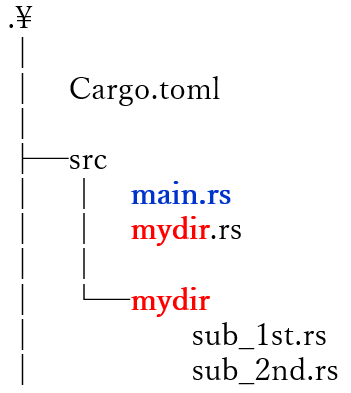
読み込みたいファイルがサブディレクトリにある場合、そのディレクトリ名と同じ名前のrsファイルを置き、中にそれ以下のファイル名をmodで指定する。
main.rs
// stc/main.rs

// mod ファイル名
// 同名のディレクトリを同じ位置に存在させている
mod mydir;

fn main() {

    mydir::sub_1st::fnc_1st();

}
mydir.rs
// stc/mydir.rs

pub mod sub_1st;
pub mod sub_2nd;
sub_1st.rs
// src/mydir/sub_1st.rs

#[path = "./sub_2nd.rs"]
mod sub_2nd;

pub fn fnc_1st(){

    sub_2nd::fnc_2nd();

}
sub_2nd.rs
// src/mydir/sub_2nd.rs

pub fn fnc_2nd(){

    println!("fnc_2nd called");

}
Rust 参照と借用をC++と比較して確認
参照
Rust版
Rustでは、値を変更できる参照は一度に一つしか作れない。
struct structAB {
  v:i32,
}


fn main() {

    let mut oo=structAB{v:5};

    let _r:&mut structAB = &mut oo; // OK
    let _g:&mut structAB = &mut oo; // NG 可変の参照。二つ目以降は作れない
    let _b:&mut structAB = &mut oo; // NG

    _r.v=2;
    _g.v=1; // NG そもそも定義できない
    _b.v=0; // NG そもそも定義できない


}
immutableな参照であればいくつでも作れる。
struct structAB {
  v:i32,
}


fn main() {

    let mut oo=structAB{v:5};

    let _r:&structAB = &oo; // OK
    let _g:&structAB = &oo; // OK &mut でなければいくつでも作れる
    let _b:&structAB = &oo; // OK

    let r = _r.v; // OK 読み取りはできる
    let g = _g.v; // ただし 書き換えられない。
    let b = _b.v; //

}
C++で類似コード
Rustの参照は制限がきつく間違った使い方をコンパイラがはじいてくれるweak_ptrと考えるとC++erにとってはわかりやすいかもしれない。
#include <iostream>
#include <memory>

struct StructAB {
    int v;
    StructAB(int a) :v(a) {}
};

int main()
{
    auto oo = std::make_shared<StructAB>(5);

    // C++ では所有権を持たない参照をいくつでも参照を作れる
    std::weak_ptr<StructAB> _r = oo;
    std::weak_ptr<StructAB> _g = oo; // Rustではエラー
    std::weak_ptr<StructAB> _b = oo; // 二つ目以降の可変な参照を作れない

    _r.lock()->v = 2;
    _g.lock()->v = 1; // Rustではエラー
    _b.lock()->v = 0; // Rustではエラー

}
借用
借用はC++でいうところのmove。問題は、Rustの場合、(プリミティブ型以外)=代入の挙動がデフォルトでmoveになっていることで、「operator=は常にコピーであることが望ましい」というC++の哲学とは全く相いれない。
Rust版
struct structAB {
  v:i32,
}

fn main() {

    let oo=structAB{v:5};

    let pp = oo; // ただの=がmoveになる

    println!("{} => {}",oo.v , pp.v);// value borrowed here after move  (ooが無効)

}
C++で類似コード
#include <iostream>
#include <memory>

struct StructAB {
    int v;
    StructAB(int a) :v(a) {}
};

int main()
{
    auto oo = std::make_unique<StructAB>(5);

    auto pp = std::move(oo); // ここでmoveすると以降ooはnullptr

    printf("%d => %d\n", oo->v,pp->v); // ランタイムエラー (ooがnullptr)

}
それどころか、引数渡しですらデフォルトでmoveなので、迂闊に渡すとライフタイムが切れてしまう。
Rust版
struct structAB {
  v:i32,
}
fn test(ii:structAB)->i32{

  return ii.v*2;

  // ii はここで解放される
}
fn main() {

    let oo=structAB{v:5};

    let pp = test(oo); // ここで oo がmoveされてしまうので、test関数から抜けた段階でライフタイムが切れる

    println!("{} => {}",oo.v , pp);

}
C++で類似コード
#include <iostream>
#include <memory>

struct StructAB {
    int v;
    StructAB(int a) :v(a) {}
};
int test(std::unique_ptr<StructAB> ii) {

    return ii->v * 2;

    // ii はここでデストラクトされる
}
int main()
{
    auto oo = std::make_unique<StructAB>(5);

    auto pp = test(std::move(oo)); // ここでmoveすると以降ooはnullptr

    printf("%d => %d\n", oo->v,pp);

}
Rust ライフタイムアノテーションについて
Rustはライフタイムという概念で参照切れを起こすコードをコンパイルエラーにし、実行時エラーの可能性を最小にしようと努力する(借用チェッカー)。問題は、参照切れを起こす「かもしれない」コードを判定できないので、結果「参照切れを起こすからビルドできない」場合の他に「参照切れを起こすかどうかわからないからビルドできない」という場合も出てくる。
そんな時に、コンパイラにライフタイムの計算方法を教えてやることで、「わからないからエラー」ではなく「参照切れになるからエラー」と言わせるのがライフタイムアノテーション(らしい)。
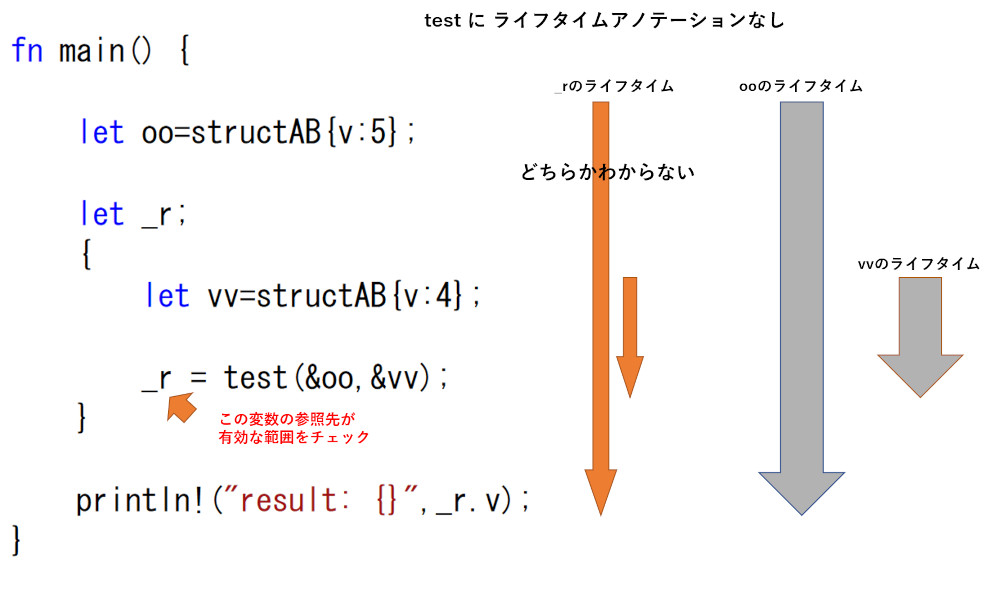
例1 参照切れになるかどうかわからないからエラー
以下のtest関数の戻り値はgetinput()によって決まる。つまり実行時のユーザの入力次第。
testは参照を返すので、_r がmain()内の oo を指すのか、 vv を指すのかわからない。
これを借用チェッカーが評価できないらしく、ライフタイムが計算できないとエラーを出す。
struct structAB {
  v:i32,
}
fn test(jj:&structAB,kk:&structAB )->&structAB{ // error[E0106]: missing lifetime specifier

    let val = getinput();// 入力によってどちらが帰るかが決まる

    if val%2==0{
        return jj;
    }
    else{
        return kk;
    }

}
fn main() {

    let oo=structAB{v:5};

    let _r;
    {
        let vv=structAB{v:4};

        _r = test(&oo,&vv);// _r のライフタイムが oo か vv かわからない

    }

    println!("result: {}",_r.v);
}
fn getinput()->i32{
    let mut buffer = String::new();
    let ret = std::io::stdin().read_line(&mut buffer);
    let val:i32=buffer.trim().parse().unwrap();

    return val;

}
例2 参照切れになる可能性があるからエラー
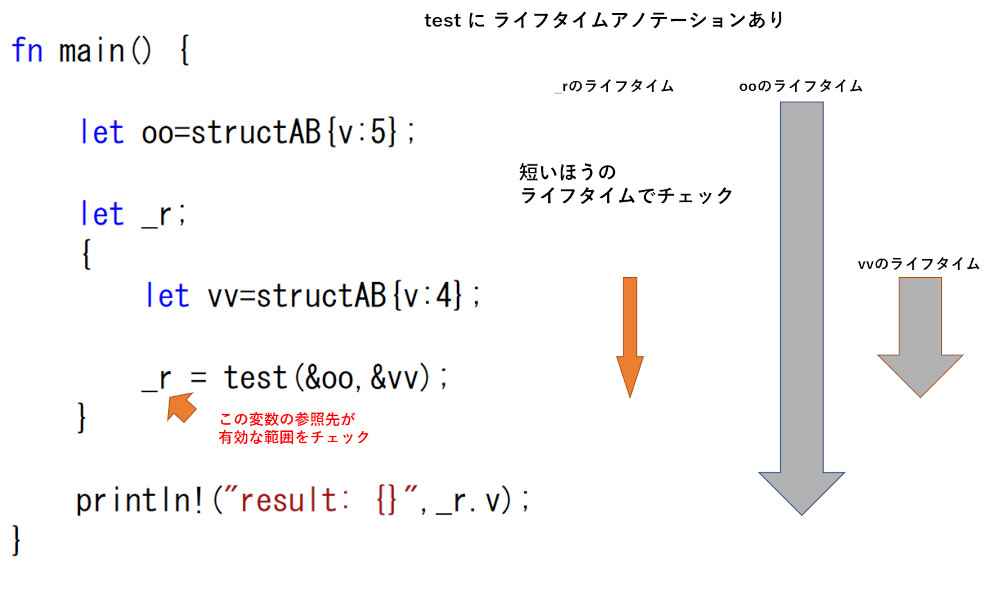
上記コードにライフタイムアノテーションを付ける。
これにより、test関数の各引数は、jj または kk どちらか一方の、より短い方のライフタイムを持つもの、「として借用チェックを行え」という指示となる。
下の例では、test関数内で入力が偶数であれば呼び出し元の「oo」への参照が帰るので、このプログラムは正常動作するが、ライフタイムが両方ともvvの長さとして計算されるので、_rの参照切れの可能性を検知でき、エラーとできる。
struct structAB {
  v:i32,
}
// ライフタイムアノテーション('a)付き
fn test<'a>(jj:&'a structAB,kk:&'a structAB )->&'a structAB{

    let val = getinput();

    if val%2==0{
        return jj;
    }
    else{
        return kk;
    }

}
fn main() {

    let oo=structAB{v:5};

    let _r;
    {
        let vv=structAB{v:4};

        _r = test(&oo,&vv);// 「_rのライフタイムは oo と vv のどちらか短いほう」とみなして検証される
    }

    println!("result: {}",_r.v);
}
fn getinput()->i32{
    let mut buffer = String::new();
    let ret = std::io::stdin().read_line(&mut buffer);
    let val:i32=buffer.trim().parse().unwrap();

    return val;

}
例3 参照切れにならないコードに変更
原因が _r の参照切れの可能性なので、参照でなくコピーを保存するようなコードであればエラーでなくなる、ということがわかるので、そのように変更する。
#[derive(Copy, Clone)]
struct structAB {
  v:i32,
}
// ライフタイムアノテーション('a)付き
fn test<'a>(jj:&'a structAB,kk:&'a structAB )->&'a structAB{

    let val = getinput();

    if val%2==0{
        return jj;
    }
    else{
        return kk;
    }

}
fn main() {

    let oo=structAB{v:5};

    let _r:structAB;
    {
        let vv=structAB{v:4};

        _r = test(&oo,&vv).clone();// 参照をしようと思うから破綻するので、コピーすれば問題ない
    }

    println!("result: {}",_r.v);
}
fn getinput()->i32{
    let mut buffer = String::new();
    let ret = std::io::stdin().read_line(&mut buffer);
    let val:i32=buffer.trim().parse().unwrap();

    return val;

}
なお、Rustでは参照を「借用」(borrow)と言い、所有権すなわち破棄する権利は元の変数にある。
つまりC++でいうところのweak_ptrに似た性質を持つ。
Win32API+WinRT+XamlなGUIを.NETやUWPなしで作成する(3)xamlコントロールをxamlテキストから生成
プログラム冒頭に以下を追加。
特に今回必要なのはXamlReader。
// イベントハンドラのため追加
#include <winrt/Windows.UI.Xaml.Controls.Primitives.h>


// XamlReader
#include <winrt/Windows.UI.Xaml.Markup.h>


// イベントハンドラ
struct handler {
  void ClickHandler(
    winrt::Windows::Foundation::IInspectable const& sender,
    winrt::Windows::UI::Xaml::RoutedEventArgs const& args) {

    // クリックされたらメッセージボックス表示
    MessageBox(nullptr, L"Clicked", nullptr, 0);
  }
};
Windows::UI::Xaml::Markup::XamlReader::XamlReader::Load でテキストからコントロールを作成できる。
少なくともネイティブWinRTではXamlの中のイベントハンドラ指定はできないらしいので、読み込んでから追加する。
  auto xamltxt = LR"(
<Page
  xmlns="http://schemas.microsoft.com/winfx/2006/xaml/presentation"
  xmlns:x="http://schemas.microsoft.com/winfx/2006/xaml">

  <StackPanel Orientation="Horizontal" HorizontalAlignment="Center" VerticalAlignment="Center">
    <Button x:Name="myButton" Height="116" Width="207">Click Me</Button>
  </StackPanel>
</Page>
)";


  // winrtの文字列形式に変換
  winrt::hstring hs(xamltxt);
  ////////////////////////
  // xamlコントロールを作成
  auto xamlContainer = Windows::UI::Xaml::Markup::XamlReader::XamlReader::Load(hs).as<Windows::UI::Xaml::Controls::Page>();
  desktopSource.Content(xamlContainer);

  // ボタンのインスタンスを取り出す
  Windows::UI::Xaml::Controls::Page page = desktopSource.Content().as<Windows::UI::Xaml::Controls::Page>();
  Windows::UI::Xaml::Controls::Button btn = page.FindName(winrt::hstring(L"myButton")).as< Windows::UI::Xaml::Controls::Button>();

  // イベントハンドラ追加
  handler hd;
  auto revoker = btn.Click({&hd,&handler::ClickHandler });
Win32API+WinRT+XamlなGUIを.NETやUWPなしで作成する(2)ボタン追加+イベントハンドラ追加
ボタンを追加し、クリックしたときのイベントハンドラを追加する。
include
// イベントハンドラのため追加
#include <winrt/Windows.UI.Xaml.Controls.Primitives.h>
イベントハンドラ追加
// イベントハンドラ
struct handler {
  void ClickHandler(
    winrt::Windows::Foundation::IInspectable const& sender,
    winrt::Windows::UI::Xaml::RoutedEventArgs const& args) {

    // クリックされたらメッセージボックス表示
    MessageBox(nullptr, L"Clicked", nullptr, 0);
  }
};
ボタン追加
前回コードのラベルの部分をボタンに変更する。
ボタン追加は難しくないが、タイトルをwinrt::box_value型で渡さなければいけない。
イベントハンドラはメンバ関数の場合はthisを渡せばいいが今回はクラス内ではないので構造体のオブジェクトを作成して渡す。
  // ボタンを追加
  Windows::UI::Xaml::Controls::Button btn;
  btn.Content(winrt::box_value(L"Click")); // ボタンタイトル

  // イベントハンドラ追加
  handler hd;
  auto revoker = btn.Click({&hd,&handler::ClickHandler });

  btn.VerticalAlignment(Windows::UI::Xaml::VerticalAlignment::Center);
  btn.HorizontalAlignment(Windows::UI::Xaml::HorizontalAlignment::Center);
  btn.FontSize(48);
  xamlContainer.Children().Append(btn);
  xamlContainer.UpdateLayout();
  desktopSource.Content(xamlContainer);
Win32API+WinRT+XamlなGUIを.NETやUWPなしで作成する(1)
ネイティブからXamlでGUI作成する方法を探した。実装がよくわかってないので内部的には.NETかUWPに依存しているのかもしれない。未確認。少なくともC++17から呼び出すことが可能。
転載元
MS公式
C++ デスクトップ (Win32) アプリで標準 WinRT XAML コントロールをホストする
手順
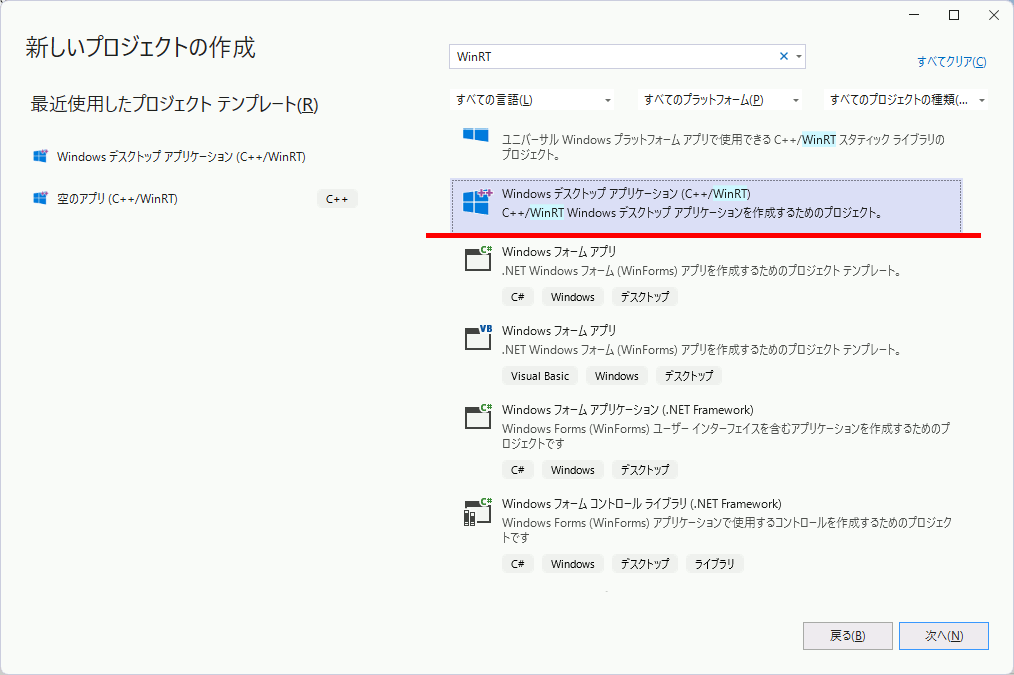
WinRTのプロジェクトを作成。ここでUWPが含まれるものを選択しないように注意
上記からプロジェクトを作るとデフォルトでマニフェストファイルが生成されているので、マニフェストツールから追加のマニフェストファイルに登録する。
マニフェストファイルの内容を以下のように設定。バージョンはWindows10以降である必要がある。
<?xml version="1.0" encoding="UTF-8"?>
<assembly xmlns="urn:schemas-microsoft-com:asm.v1" manifestVersion="1.0">
  <compatibility xmlns="urn:schemas-microsoft-com:compatibility.v1">
    <application>
      <!-- Windows 10 -->
      <maxversiontested Id="10.0.18362.0"/>
      <supportedOS Id="{8e0f7a12-bfb3-4fe8-b9a5-48fd50a15a9a}" />
    </application>
  </compatibility>
</assembly>
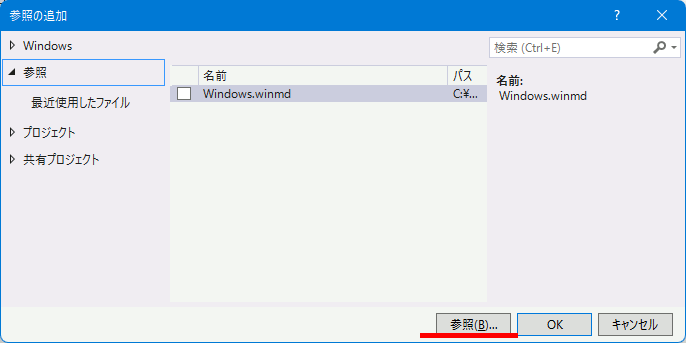
続いて、参照を右クリック→参照の追加 を選択。
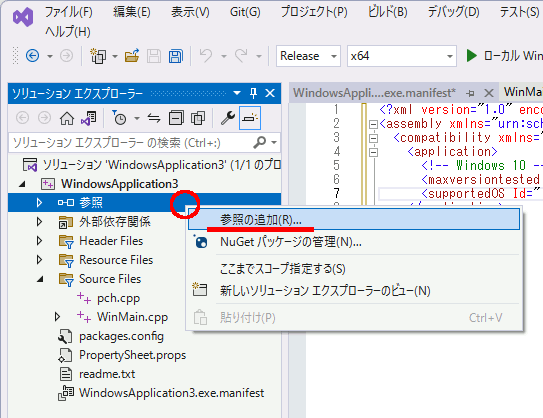
ファイルを追加。
以下のようにコードを記述。
#include "pch.h"

#include <windows.h>
#include <stdlib.h>
#include <string.h>

#include <winrt/Windows.Foundation.Collections.h>
#include <winrt/Windows.system.h>
#include <winrt/windows.ui.xaml.hosting.h>
#include <windows.ui.xaml.hosting.desktopwindowxamlsource.h>
#include <winrt/windows.ui.xaml.controls.h>
#include <winrt/Windows.ui.xaml.media.h>

using namespace winrt;
using namespace Windows::UI;
using namespace Windows::UI::Composition;
using namespace Windows::UI::Xaml::Hosting;
using namespace Windows::Foundation::Numerics;


// Microsoftのサンプルをそのままビルドすると
// TextOutでリンクエラーが出るのでこれらを追加しておく
#pragma comment(lib,"gdi32.lib")


LRESULT CALLBACK WindowProc(HWND, UINT, WPARAM, LPARAM);

HWND _hWnd;
HWND _childhWnd;
HINSTANCE _hInstance;
int CALLBACK WinMain(_In_ HINSTANCE hInstance, _In_opt_ HINSTANCE hPrevInstance, _In_ LPSTR lpCmdLine, _In_ int nCmdShow)
{
  _hInstance = hInstance;

  // The main window class name.
  const wchar_t szWindowClass[] = L"Win32DesktopApp";
  WNDCLASSEX windowClass = { };

  windowClass.cbSize = sizeof(WNDCLASSEX);
  windowClass.lpfnWndProc = WindowProc;
  windowClass.hInstance = hInstance;
  windowClass.lpszClassName = szWindowClass;
  windowClass.hbrBackground = (HBRUSH)(COLOR_WINDOW + 1);

  windowClass.hIconSm = LoadIcon(windowClass.hInstance, IDI_APPLICATION);

  if (RegisterClassEx(&windowClass) == NULL)
  {
    MessageBox(NULL, L"Windows registration failed!", L"Error", NULL);
    return 0;
  }

  _hWnd = CreateWindow(
    szWindowClass,
    L"Windows c++ Win32 Desktop App",
    WS_OVERLAPPEDWINDOW | WS_VISIBLE,
    CW_USEDEFAULT, CW_USEDEFAULT, CW_USEDEFAULT, CW_USEDEFAULT,
    NULL,
    NULL,
    hInstance,
    NULL
  );
  if (_hWnd == NULL)
  {
    MessageBox(NULL, L"Call to CreateWindow failed!", L"Error", NULL);
    return 0;
  }


  // Begin XAML Island section.

  // The call to winrt::init_apartment initializes COM; by default, in a multithreaded apartment.
  winrt::init_apartment(apartment_type::single_threaded);

  // Initialize the XAML framework's core window for the current thread.
  WindowsXamlManager winxamlmanager = WindowsXamlManager::InitializeForCurrentThread();

  // This DesktopWindowXamlSource is the object that enables a non-UWP desktop application
  // to host WinRT XAML controls in any UI element that is associated with a window handle (HWND).
  DesktopWindowXamlSource desktopSource;

  // Get handle to the core window.
  auto interop = desktopSource.as<IDesktopWindowXamlSourceNative>();

  // Parent the DesktopWindowXamlSource object to the current window.
  check_hresult(interop->AttachToWindow(_hWnd));

  // This HWND will be the window handler for the XAML Island: A child window that contains XAML.
  HWND hWndXamlIsland = nullptr;

  // Get the new child window's HWND.
  interop->get_WindowHandle(&hWndXamlIsland);

  // Update the XAML Island window size because initially it is 0,0.
  SetWindowPos(hWndXamlIsland, 0, 200, 100, 800, 200, SWP_SHOWWINDOW);

  // Create the XAML content.
  Windows::UI::Xaml::Controls::StackPanel xamlContainer;
  xamlContainer.Background(Windows::UI::Xaml::Media::SolidColorBrush{ Windows::UI::Colors::LightGray() });

  Windows::UI::Xaml::Controls::TextBlock tb;
  tb.Text(L"Hello World from Xaml Islands!");
  tb.VerticalAlignment(Windows::UI::Xaml::VerticalAlignment::Center);
  tb.HorizontalAlignment(Windows::UI::Xaml::HorizontalAlignment::Center);
  tb.FontSize(48);

  xamlContainer.Children().Append(tb);
  xamlContainer.UpdateLayout();
  desktopSource.Content(xamlContainer);

  // End XAML Island section.

  ShowWindow(_hWnd, nCmdShow);
  UpdateWindow(_hWnd);

  //Message loop:
  MSG msg = { };
  while (GetMessage(&msg, NULL, 0, 0))
  {
    TranslateMessage(&msg);
    DispatchMessage(&msg);
  }

  return 0;
}
///////////////////////////////////////////////////////////
///////////////////////////////////////////////////////////
///////////////////////////////////////////////////////////

LRESULT CALLBACK WindowProc(HWND hWnd, UINT messageCode, WPARAM wParam, LPARAM lParam)
{
  PAINTSTRUCT ps;
  HDC hdc;
  wchar_t greeting[] = L"Hello World in Win32!";
  RECT rcClient;

  switch (messageCode)
  {
  case WM_PAINT:
    if (hWnd == _hWnd)
    {
      hdc = BeginPaint(hWnd, &ps);
      TextOut(hdc, 300, 5, greeting, wcslen(greeting));
      EndPaint(hWnd, &ps);
    }
    break;
  case WM_DESTROY:
    PostQuitMessage(0);
    break;

    // Create main window
  case WM_CREATE:
    _childhWnd = CreateWindowEx(0, L"ChildWClass", NULL, WS_CHILD | WS_BORDER, 0, 0, 0, 0, hWnd, NULL, _hInstance, NULL);
    return 0;

    // Main window changed size
  case WM_SIZE:
    // Get the dimensions of the main window's client
    // area, and enumerate the child windows. Pass the
    // dimensions to the child windows during enumeration.
    GetClientRect(hWnd, &rcClient);
    MoveWindow(_childhWnd, 200, 200, 400, 500, TRUE);
    ShowWindow(_childhWnd, SW_SHOW);

    return 0;

    // Process other messages.

  default:
    return DefWindowProc(hWnd, messageCode, wParam, lParam);
    break;
  }

  return 0;
}
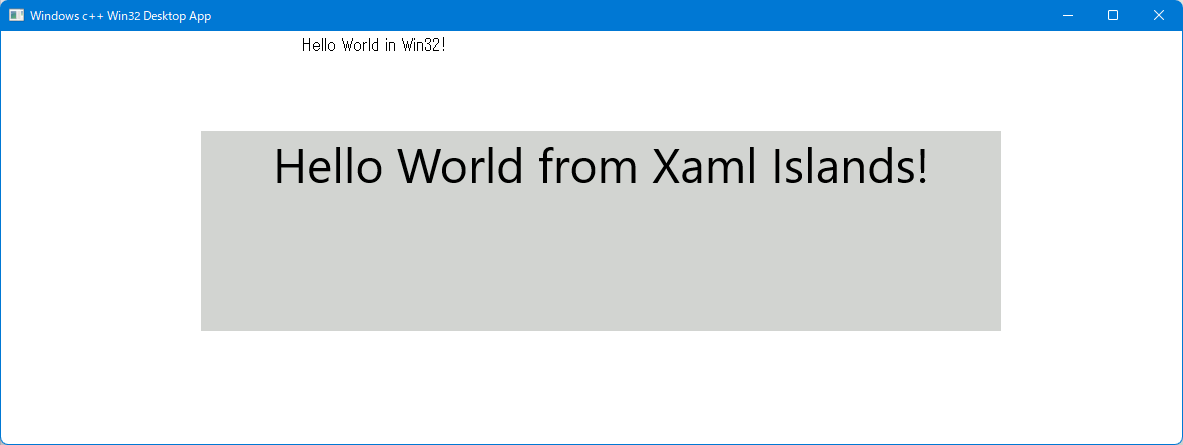
実行例
続く。
Rustやってみる(10)ライフタイム
Rustのライフタイムについて。
まず、多くのプログラミング言語では、「スコープ」という概念がある。
これは変数の寿命のことで、変数は例えば{}で括られた範囲でしか有効ではない。
この仕組みはRustにもある。
#include <iostream>

int main()
{
  {
    int value = 10;

    value = 20;
  }

  printf("%d\n", value ); // コンパイルエラー valueはこのスコープに存在しない
}
fn main( ){

  {
    let mut value = 10;

    value = 20;
  }

  println!("{}",value);// コンパイルエラー valueはこのスコープに存在しない

}
それとは別に、Rustには「ライフタイム」という概念がある。
ライフタイムは「参照の有効範囲」のことで、C++などでは参照が実は切れていることを、実行時にしか判別できない(下コード左)。
しかしRustではコンパイルの段階で明らかに参照が切れているような状態を検出できる(下コード右)ので、参照が切れるようなコードはそもそもコンパイルが通らず、実行すること自体ができない。
故にRustでは「ビルドが通ったなら安易な参照切れは起こしていない」と言える。
#include <iostream>

struct AB {
  int a, b;
};

int main()
{
  auto myref = std::make_unique<AB>(AB{ 5,10 });

  {
    auto ab = std::move(myref); // ここで myrefからabへmove

    printf("%d\n", ab->a);
  }

  // 実行時エラー 参照先が無効
  auto k = myref->a;

  printf("%d\n", k);
}
struct AB{
  a:i32,
  b:i32,
}
//////////////////////////////////////////////////
fn main( ){

  let myref=AB{a:5,b:10};
  {

    let ab=myref; // ここで myrefからabへmove

    println!("{}",ab.a);

  }

  // コンパイルエラー 参照先が無効
  let k = myref.a;

  println!("{}",k);

}
