PostgreSQLをC言語から呼び出す(1)
pg_ctl start しておく必要がある。
includeディレクトリ: C:\PostgreSQL\include
ライブラリディレクトリ:C:\PostgreSQL\lib
必要なDLLは:C:\PostgreSQL\bin
・libcrypto-3-x64.dll
・libiconv-2.dll
・libintl-9.dll
・libpq.dll
・libssl-3-x64.dll
・libwinpthread-1.dll
#include <iostream>

#include <libpq-fe.h>

#pragma comment(lib,"libpq.lib")

int main()
{

  // データベースへ接続する
  // ユーザー名:postgres
  // パスワード:password
  PGconn* conn;
  conn = PQconnectdb("user=postgres password=password");
  if (PQstatus(conn) != CONNECTION_OK)
  {
    printf("%s", PQerrorMessage(conn));
    exit(1);
  }

  PGresult* pgres;

#if 1

  // ユーザー名 cuser , cpassword でユーザー作成
  pgres = PQexec(conn, "CREATE USER cuser WITH PASSWORD 'cpassword'");
  if (PQresultStatus(pgres) != PGRES_COMMAND_OK)
  {
    // 確認方法:postgres=# SELECT usename FROM pg_user;
    printf("%s", PQerrorMessage(conn));
    PQclear(pgres);
    exit(1);
  }
  PQclear(pgres);

  // データベース名 cdatabase , 使用者 cuser でユーザー作成
  pgres = PQexec(conn, "CREATE DATABASE cdatabase OWNER cuser");
  if (PQresultStatus(pgres) != PGRES_COMMAND_OK)
  {
    // 確認方法:\l
    printf("%s", PQerrorMessage(conn));
    PQclear(pgres);
    exit(1);
  }
  PQclear(pgres);

#else

  // ユーザやデータベースを削除する場合:

  pgres = PQexec(conn, "DROP DATABASE cdatabase");
  if (PQresultStatus(pgres) != PGRES_COMMAND_OK)
  {
    printf("%s", PQerrorMessage(conn));
    PQclear(pgres);
    exit(1);
  }
  PQclear(pgres);


  pgres = PQexec(conn, "DROP USER cuser");
  if (PQresultStatus(pgres) != PGRES_COMMAND_OK)
  {
    printf("%s", PQerrorMessage(conn));
    PQclear(pgres);
    exit(1);
  }
  PQclear(pgres);


#endif

  PQfinish(conn);


}
PostgreSQLでサーバを起動してユーザ・データベース・テーブルを作るまで
データベースを使いたくなったのでBSD LicenseのPostgreSQLを使ってみる。
インストール
以下のサイトを参考にzipからインストールする。(これ以上うまくまとめられないのでリンク先に一任)。
なお、環境変数PGDATAを設定しないと、pg_ctl startやpg_clt stopの度に -D My-DataDirectory の指定をしなければならず面倒なことになるので設定したほうがいい。
サーバー起動・停止
サーバー起動は以下:
サーバー停止は以下:
サーバーを停止せずにプロンプトを切ってしまった場合など、pg_ctl startが聞かなくなることがある。そういう時はrestartする。
restartは以下:
上記、My-DataDirectoryは環境変数PGDATAに指定したものと同じ。
データベースを使えるようにするまで
postgresユーザで接続
psqlコマンドを使って「postgres」ユーザーで接続する。
なお接続を切るには
データベースのユーザをパスワード付きで作成
ユーザが作成できたかどうか確認するためにユーザ一覧を表示するには
なおユーザー削除は
データベースをユーザを指定して作成
なおパスワードはユーザーに指定するもので、データベースには指定しない(戸惑った)
データベースが作成できたかどうか確認するためデータベース一覧を表示するには
なおデータベースを削除するには
データベースのテーブルへアクセス権を付与
まずpostgresユーザーでの接続を切り、
ユーザー「myuser」でデータベース「mydatabase」へ接続
GRANT で「ALL PRIVILEGES」をすべてのテーブルへ付加
データベースへテーブルを作成
ID integer,
TITLE text,
AUTHOR text
);
使用例
Thunderbirdのメール一覧の文字サイズを変更する
Thunderbirdのメール本文の文字サイズは設定から変更できるが、フォルダ一覧やメール一覧の文字サイズを変更するにはcssファイルを追加しなければならない。
1.toolkit.legacyUserProfileCustomizations.stylesheetsの設定
まずはCSSファイルを読み込む設定を有効にする。
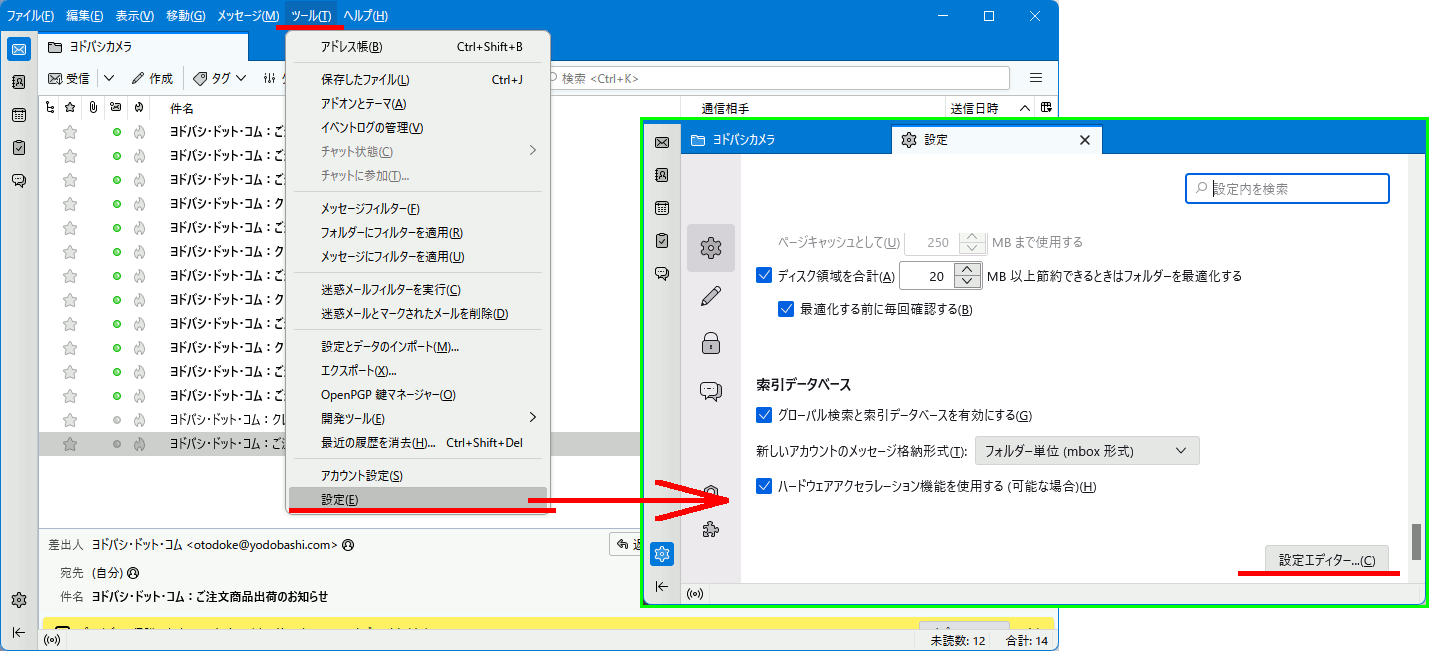
[ツール] → [設定] → [設定エディター] を開く。
toolkit.legacyUserProfileCustomizations.stylesheets をTrueに設定。
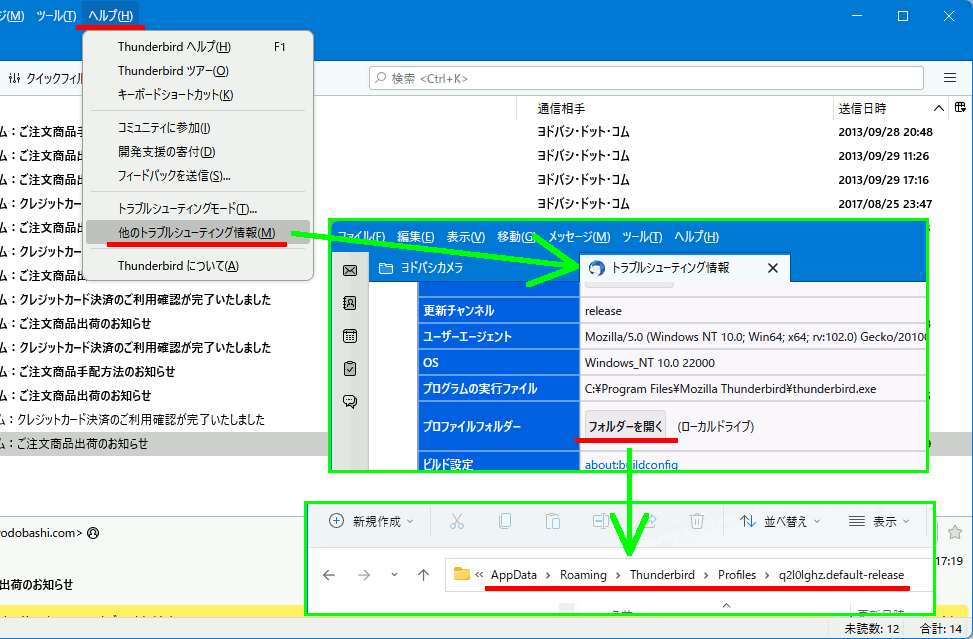
2. プロファイルフォルダを開く
3.chrome\userChrome.css を追加
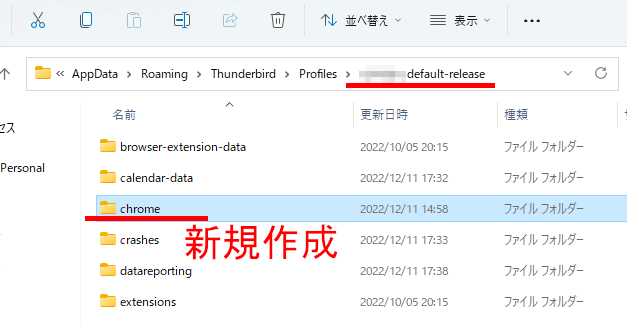
プロファイルフォルダへchromeフォルダを追加し、中にuserChrome.cssファイルを追加。
4.userChrome.css
以下のCSSを記述して保存。
@namespace url("http://www.mozilla.org/keymaster/gatekeeper/there.is.only.xul");

/*
reference:
https://gist.github.com/AnthonyDiGirolamo/6032387
*/

/* メール一覧の文字サイズ */
#threadTree treechildren {
  font-size:30px !important;
}

/* フォルダ一覧の文字サイズ*/
#folderTree treechildren{
  font-size: 25px;
}

/* フォルダ一覧の行間 */
#folderTree treechildren::-moz-tree-row    {
  height: 35px !important; }
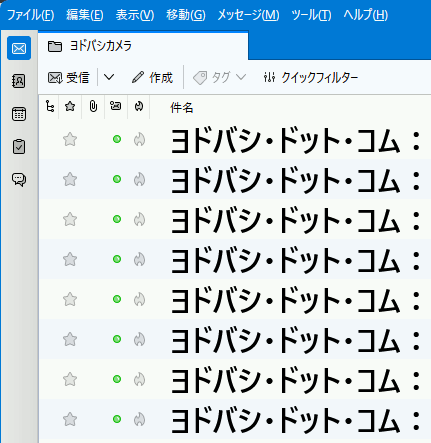
Thunderbirdを再起動すると反映される。
その他
https://gist.github.com/AnthonyDiGirolamo/6032387
上記にはほかの設定例も書かれている。
例えば奇数行偶数行で色を変える方法は以下。
#threadTree treechildren::-moz-tree-row(odd) {
  -moz-appearance: none !important;
  background-image: none !important;
  background-color:#F3F6FA !important;
}
Windows 11 + CUERipper 2.2.2 で生じたトラブル一覧
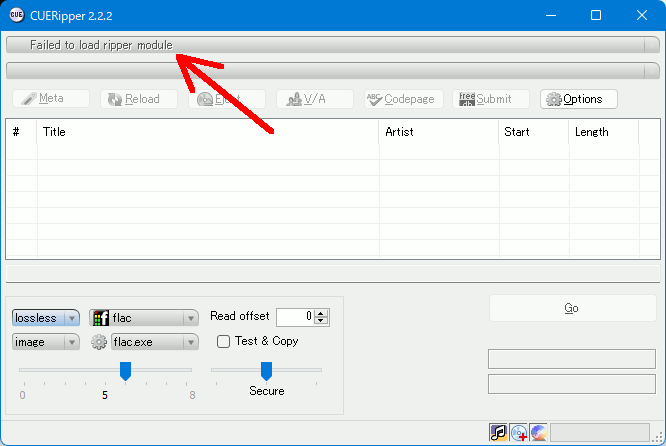
1. Failed to load ripper module
ドライブ一覧が無効になり、Failed to load ripper module と表示されている。
原因はよくわからないが、Windows 標準のzip展開機能で展開した場合こうなるという話を見つけた。なので7zで展開することで回避。多分他のソフトでも行ける。とにかくWindowsの標準zip以外で試してみること。
2. Exception: flac.exe: 指定されたファイルが見つかりません。
いざリッピングをGoしてみると、Exception: flac.exe: 指定されたファイルが見つかりません。
と出る。
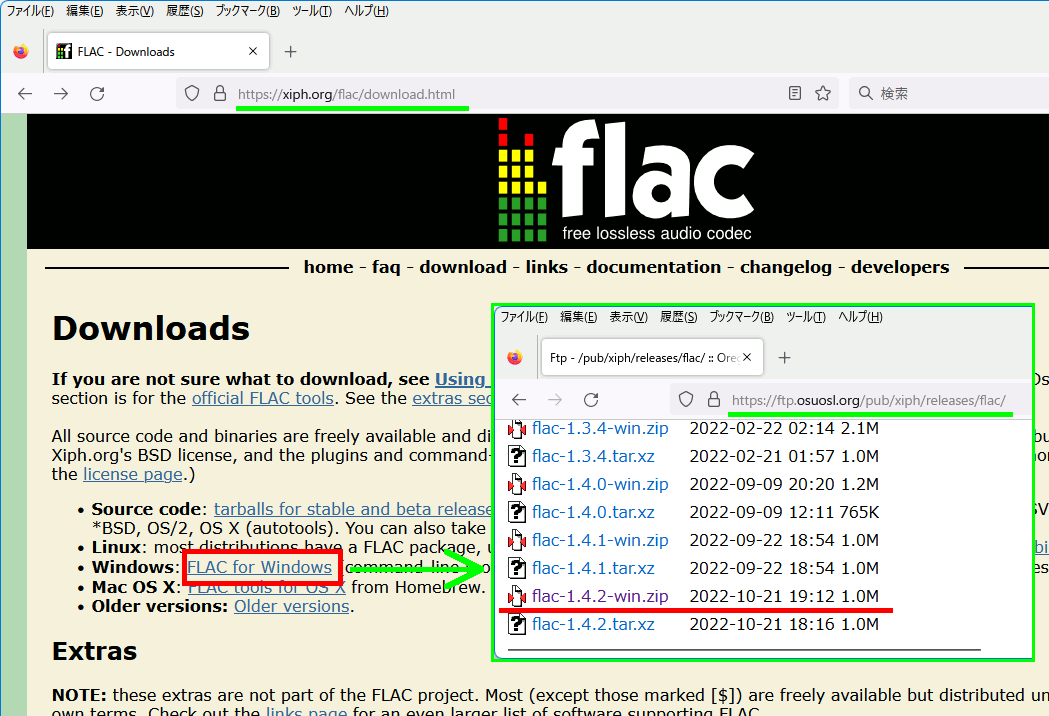
flac.exeをダウンロード・インストールする。
https://xiph.org/flac/download.html
からdownloadへ行く。
https://ftp.osuosl.org/pub/xiph/releases/flac/
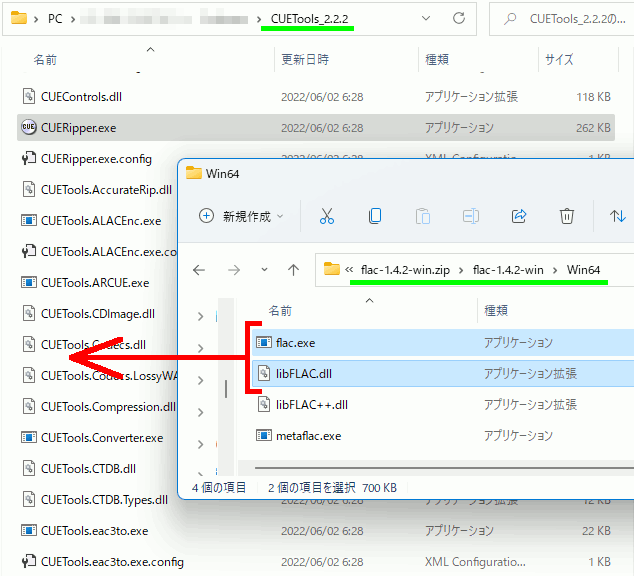
最新版の flac-1.4.2.-win.zip をダウンロードし、flac.exe , libFLAC.dll を展開し、CUERipper.exeと同じ場所へ配置する。
3. Exception: Error reading CD: medium error: UNRECOVERED READ ERROR
最後に Exception: Error reading CD: medium error: UNRECOVERED READ ERROR が出る。
斜め読みした限り、どうもCUERipperでLGのドライブを指定したときにこのエラーが出るらしい。
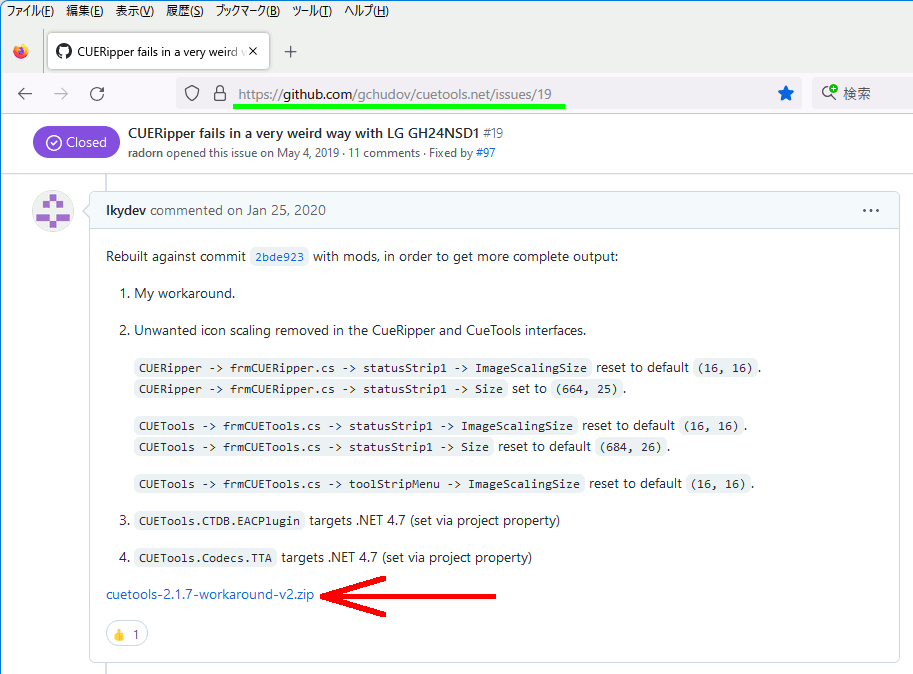
https://github.com/gchudov/cuetools.net/issues/19
調べてみたところ、確かに新調したPCの内蔵ドライブがGH24NSD5、日立LG製だった。
なんというか、さすがにそこまで体力はない。解決できない。
私の場合、仕方がないので余っていた外付けドライブがあったのでそれを繋いで動作することを確認できたが、これは酷い。
ドライブを変えられない人は
2020年1月時点、v2.1.7のものだが、有志がリビルドしたものを公開している。
上記サイト https://github.com/gchudov/cuetools.net/issues/19 のJan 25, 2020コメントにリンクがある。
というかいい加減三年前の指摘になるのになんでまだ正式版に反映されていないのか。
一応動作することは確認したが、Windowsが安全ではない可能性云々と言ってきて不快である。
FreeType2でFT_RENDER_MODE_MONOを指定したときpixel_mode==FT_PIXEL_MODE_MONOなデータのビット列をピクセルにする
FreeType2でFT_RENDER_MODE_MONOを指定すると、pixel_modeがFT_PIXEL_MODE_MONOになる。
この時、画像データは1ビット1ピクセルの格好をしているので、それを取り出す必要がある。
注意点は、各ビット列をreverse、つまり向きを逆にしてやる必要があることと、例えば幅10ピクセルなら2バイト10ビットであり、残りの6ビットが未使用領域になっているので読み飛ばさなければならない。
#include <vector>

#include <ft2build.h>
#include FT_FREETYPE_H

#include <freetype/ftstroke.h>

#pragma warning(disable:4996)

#pragma comment(lib,"freetype.lib")

#include <bitset>

int main()
{

    FT_Library  library; // handle to library
    FT_Error error;

    error = FT_Init_FreeType(&library);
    if (error)
        return -1;

    FT_Face face;      // handle to face object

    //msgothic.ttc
    //meiryo.ttc
    // フォントファイル読み込み
    error = FT_New_Face(
        library,
        "C:\\Windows\\Fonts\\msgothic.ttc",
        0,
        &face
    );

    //文字コード指定
    error = FT_Select_Charmap(
        face,               // target face object
        FT_ENCODING_UNICODE // エンコード指定
    );


    if (error == FT_Err_Unknown_File_Format)
        return -1;
    else if (error)
        return -1;

    int pixel_heigth = 13;

    //この二つの値でフォントサイズ調整
    FT_Set_Pixel_Sizes(
        face,          // handle to face object
        0,             // pixel_width
        pixel_heigth   // pixel_height
    );

    // 文字の取得
    FT_ULong character = wchar_t(L'あ');
    FT_UInt char_index = FT_Get_Char_Index(face, character);

    // グリフ(字の形状)読込
    error = FT_Load_Glyph(face, char_index, FT_LOAD_DEFAULT/*FT_LOAD_RENDER*/);
    if (error)
        return -1; // ignore errors

    // 文字を画像化
    FT_Render_Glyph(face->glyph, FT_RENDER_MODE_MONO/*FT_RENDER_MODE_NORMAL*/);
    int Width = face->glyph->bitmap.width;
    int Height = face->glyph->bitmap.rows;
    ////////////////////////////////////////
    ////////////////////////////////////////
    // face->glyph->bitmap.buffer には1ドット1ビットで入っている

    // 画素数
    const int size = face->glyph->bitmap.rows * face->glyph->bitmap.width;

    std::vector<unsigned char> bools;
    int k = 0;
    while (bools.size() < size) {

        // 各ビットに[]でアクセスできるようにする
        std::bitset<8> bits = face->glyph->bitmap.buffer[k];

        // ビットの向きが桁の大きいほうにより左側のドットが入っているので
        // 逆側から格納する
        for (int i = 7; i >= 0; i--) {
            bools.push_back(bits[i]);

            // 例えば画素数 が10の時は、2byte使用、ただし[8bit] + [2bit , 余り6bitは使わない]
            // という構造をしているので、画像の幅の分だけピクセルがたまったら
            // そのバイトの残りは捨てて次の行の格納を開始する
            if (bools.size() % Width == 0)
                break;
        }

        k++;
    }
    ////////////////////////////////////////
    ////////////////////////////////////////

    FILE* fp = fopen("C:\\test\\freetypetest.pbm", "wb");
    fprintf(fp, "P1\n%d %d\n", Width, Height);
    for (int i = 0; i < bools.size();i++) {
        fprintf(fp, "%s", bools[i]?"1":"0");
    }
    fclose(fp);
    ////////////////////////////////////////
    ////////////////////////////////////////
    // FreeType2の解放
    FT_Done_Face(face);
    FT_Done_FreeType(library);
}
FreeType2で異体字を描画する
あるフォントの、指定した文字の異体字一覧を取得するにはFT_Face_GetVariantsOfCharを使う。この関数を使うとフォントが対応している異体字セレクタの一覧を取得できる。
フォント+異体字の情報があれば、FT_Face_GetCharVariantIndexでグリフインデクスを取得できる。あとはFT_Load_Glyphすればよい。
#include <vector>

#include <ft2build.h>
#include FT_FREETYPE_H

#include <freetype/ftstroke.h>

#pragma warning(disable:4996)

#pragma comment(lib,"freetype.lib")

#include <bitset>

int main()
{

    FT_Library  library; // handle to library
    FT_Error error;

    error = FT_Init_FreeType(&library);
    if (error)
        return -1;

    FT_Face face;      // handle to face object

    //msgothic.ttc
    //meiryo.ttc
    // フォントファイル読み込み
    error = FT_New_Face(
        library,
        "C:\\Windows\\Fonts\\msgothic.ttc",
        0,
        &face
    );

    //文字コード指定
    error = FT_Select_Charmap(
        face,               // target face object
        FT_ENCODING_UNICODE // エンコード指定
    );


    if (error == FT_Err_Unknown_File_Format)
        return -1;
    else if (error)
        return -1;

    int pixel_heigth = 255;

    //この二つの値でフォントサイズ調整
    FT_Set_Pixel_Sizes(
        face,          // handle to face object
        0,             // pixel_width
        pixel_heigth   // pixel_height
    );

    /////////////////////////////
    // 文字の取得
    FT_ULong character = wchar_t(L'辻');
    /////////////////////////////
    // 異体字セレクタの一覧を取得
    FT_UInt32* list = FT_Face_GetVariantsOfChar(face, character);
    int ivs_count = 0;

    // 異体字セレクタの一覧を表示・個数カウント
    for (FT_UInt32* li = list; *li != 0; li++) {
        printf("%x", *list);
        ivs_count++;
    }

    // 異体字を使わないなら0にする
    // ivs_count = 0;

    FT_UInt char_index;
    if (ivs_count != 0) {
        // 文字コードと異体字セレクタからグリフインデクス取得
        char_index = FT_Face_GetCharVariantIndex(face, character, list[0]);
    }
    else{
        //異体字が一つもない時は普通のグリフインデクス取得
        char_index = FT_Get_Char_Index(face, character);
    }
    // グリフ(字の形状)読込
    error = FT_Load_Glyph(face, char_index, FT_LOAD_DEFAULT/*FT_LOAD_RENDER*/);
    if (error)
        return -1; // ignore errors

    // 文字を画像化
    FT_Render_Glyph(face->glyph, FT_RENDER_MODE_NORMAL);


    int Width = face->glyph->bitmap.width;
    int Height = face->glyph->bitmap.rows;
    ////////////////////////////////////////
    ////////////////////////////////////////
    // ファイル出力
    FILE* fp = fopen("C:\\test\\freetypetest.pbm", "wb");
    fprintf(fp, "P2\n%d %d\n255\n", Width, Height);
    for (int i = 0; i < Width*Height;i++) {
        fprintf(fp, "%d ", face->glyph->bitmap.buffer[i]);
    }
    fclose(fp);
    ////////////////////////////////////////
    ////////////////////////////////////////

    // FreeType2の解放
    FT_Done_Face(face);
    FT_Done_FreeType(library);
}
FreeType2で文字のアウトラインを描く
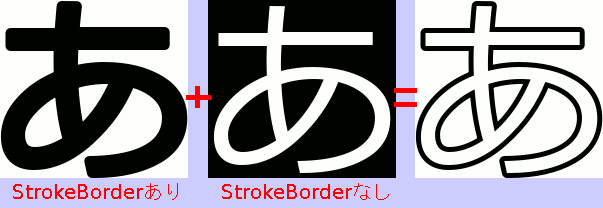
FT_Glyph_StrokeBorderを呼び出して描画する場合に比べ、FT_Glyph_StrokeBorderを呼び出さずに描画した場合のほうが文字が細くなる。
それを利用して、一度太く書いた場所と同じ場所に細く書くことでアウトラインを描画する。
気を付けるのは、FT_Glyph_StrokeBorderあり、なしで文字が入るボックスのサイズが異なってしまうので、top,leftを見て位置合わせが必要になる。
#include <vector>

#include <ft2build.h>
#include FT_FREETYPE_H

#include <freetype/ftstroke.h>

#pragma warning(disable:4996)

#pragma comment(lib,"freetype.lib")


//! @brief PGM(1byte,テキスト)を書き込む
//! @param [in] fname ファイル名
//! @param [in] width 画像の幅
//! @param [in] height 画像の高さ
//! @param [in] p 画像のメモリへのアドレス
//! @details 1画素1Byteのメモリを渡すと、0,1テキストでファイル名fnameで書き込む
void pgmP1_Write(const char* const fname, const int width, const int height, const unsigned char* const p) { // PPM ASCII

    FILE* fp = fopen(fname, "wb");
    fprintf(fp, "P2\n%d %d\n255\n", width, height);

    size_t k = 0;
    for (size_t i = 0; i < (size_t)height; i++) {
        for (size_t j = 0; j < (size_t)width; j++) {
            fprintf(fp, "%d ", p[k] );
            k++;
        }
        fprintf(fp, "\n");
    }

    fclose(fp);
}


struct image_t {
    std::vector<unsigned char> buffer;
    int width;
    int height;
    int top;
    int left;
};

// https://stackoverflow.com/questions/20874056/draw-text-outline-with-freetype
// library FT_Library
// face FT_Face
// character レンダリングする文字のコードポイント
// img 画像の出力先
// thickness アウトラインの太さをピクセルで指定
// is_strokeborder strokeborderを呼ぶかどうか(初回・呼ぶ、二回目・呼ばない)
int draw_stroker(FT_Library& library, FT_Face& face, FT_ULong character, image_t& img,int thickness ,bool is_strokeborder) {

    // initialize stroker, so you can create outline font
    FT_Stroker stroker;
    FT_Stroker_New(library, &stroker);
    //  2 * 64 result in 2px outline
    FT_Stroker_Set(stroker, thickness * 64, FT_STROKER_LINECAP_ROUND, FT_STROKER_LINEJOIN_ROUND, 0);

    ///////////////////////////////////////////////
    ///////////////////////////////////////////////

    // generation of an outline for single glyph:
    FT_UInt glyphIndex = FT_Get_Char_Index(face, character);

    FT_Error error = FT_Load_Glyph(face, glyphIndex, FT_LOAD_DEFAULT);
    if (error)
        return -1; // ignore errors

    ///////////////////////////////////////////////
    ///////////////////////////////////////////////


    FT_Glyph glyph;
    FT_Get_Glyph(face->glyph, &glyph);

    if (is_strokeborder) {
        FT_Glyph_StrokeBorder(&glyph, stroker, false, true);
    }
    FT_Glyph_To_Bitmap(&glyph, FT_RENDER_MODE_NORMAL, nullptr, true);
    FT_BitmapGlyph bitmapGlyph = reinterpret_cast<FT_BitmapGlyph>(glyph);
    // blit the glyph here on your target surface.
    // For positioning use bitmapGlyph->left, bitmapGlyph->top
    // For iteration over the glyph data use bitmapGlyph->bitmap.buffer, bitmapGlyph->bitmap.width, bitmapGlyph->bitmap.rows, bitmapGlyph->bitmap.pitch.

    if (is_strokeborder) {

        img.width = bitmapGlyph->bitmap.width;;
        img.height = bitmapGlyph->bitmap.rows;
        img.top = bitmapGlyph->top;
        img.left = bitmapGlyph->left;

        for (size_t i = 0; i < img.width * img.height; i++) {
            // 白黒反転して保存。これで背景が白になる
            img.buffer.push_back(255 - bitmapGlyph->bitmap.buffer[i]);
        }
    }
    else {

        // strokeborderしないほうが画像が小さいので画像のサイズが異なる
        // 左側と上側にオフセットを設けるために位置の差を求める
        int hw = bitmapGlyph->left - img.left;
        int hh = img.top - bitmapGlyph->top;

        int notBorderW = bitmapGlyph->bitmap.width;
        int notBorderH = bitmapGlyph->bitmap.rows;
        for (size_t x = 0; x < notBorderW; x++) {
            for (size_t y = 0; y < notBorderH; y++) {
                int p = y * notBorderW + x;

                // strokeborderしないで描かれた領域はくりぬきたいので
                // その部分を白く塗る。
                // しかしグレースケール、アンチエイリアスで描かれているので
                // ただ255にせず色を足すことでアンチエイリアスを保つ
                if (bitmapGlyph->bitmap.buffer[p] != 0) {

                    int s = (y+hh) * img.width + (x+hw);
                    img.buffer[s] += bitmapGlyph->bitmap.buffer[p];

                }

            }
        }

    }

}
int main()
{

    FT_Library  library; // handle to library
    FT_Error error;

    error = FT_Init_FreeType(&library);
    if (error)
        return -1;

    FT_Face face;      // handle to face object

    // フォントファイル読み込み
    error = FT_New_Face(
        library,
        "C:\\Windows\\Fonts\\meiryo.ttc",
        0,
        &face
    );

    //文字コード指定
    error = FT_Select_Charmap(
        face,               // target face object
        FT_ENCODING_UNICODE // エンコード指定
    );


    if (error == FT_Err_Unknown_File_Format)
        return -1;
    else if (error)
        return -1;

    //この二つの値でフォントサイズ調整
    FT_F26Dot6 fontsize = 16 * 64*3;
    FT_UInt CHAR_RESOLUTION = 300;
    error = FT_Set_Char_Size(
        face,                // handle to face object
        0,                   // char_width in 1/64th of points
        fontsize,            // char_height in 1/64th of points
        CHAR_RESOLUTION,     // horizontal device resolution
        CHAR_RESOLUTION);    // vertical device resolution

      // 文字の取得
    FT_ULong character = wchar_t(L'あ');


    /////////////////////////////
    image_t img;
    // FT_Glyph_StrokeBorder の呼び出しの有無で二回呼び出す
    draw_stroker(library, face, character,img,5,true);
    draw_stroker(library, face, character, img,5, false);


    int Width = img.width;
    int Height = img.height;
    pgmP1_Write(// ファイル保存
        "C:\\test\\freetypetest.pgm",
        Width,
        Height,
        img.buffer.data()
    );

    // FreeType2の解放
    FT_Done_Face(face);
    FT_Done_FreeType(library);
}
ImageMagickでアニメーションpng,gif,webpを作成
アニメーション gif (1.96 MB)
アニメーション webp (607 KB)
アニメーション png (5.15MB)
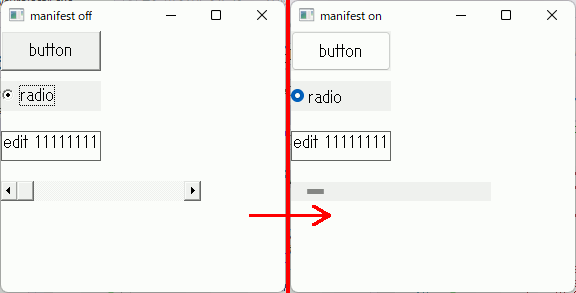
マニフェストを追加してwin32apiのUIにVisualStyleを適用する
パターン1 プログラム先頭に#pragma commentを設定する
#pragma comment(linker,"\"/manifestdependency:type='win32' \
name='Microsoft.Windows.Common-Controls' version='6.0.0.0' \
processorArchitecture='*' publicKeyToken='6595b64144ccf1df'
language='*'\"")
https://learn.microsoft.com/ja-jp/windows/win32/controls/cookbook-overview
#include <windows.h>

// ビジュアルスタイル適用
#pragma comment(linker,"\"/manifestdependency:type='win32' \
name='Microsoft.Windows.Common-Controls' version='6.0.0.0' \
processorArchitecture='*' publicKeyToken='6595b64144ccf1df' language='*'\"")


LRESULT CALLBACK WndProc(HWND hwnd, UINT msg, WPARAM wp, LPARAM lp) {
  switch (msg) {
  case WM_DESTROY:
    PostQuitMessage(0);
    return 0;
  }
  return DefWindowProc(hwnd, msg, wp, lp);
}

int WINAPI WinMain(HINSTANCE hInstance, HINSTANCE hPrevInstance,
  PSTR lpCmdLine, int nCmdShow) {
  HWND hwnd;
  MSG msg;
  WNDCLASS winc;

  winc.style = CS_HREDRAW | CS_VREDRAW;
  winc.lpfnWndProc = WndProc;
  winc.cbClsExtra = winc.cbWndExtra = 0;
  winc.hInstance = hInstance;
  winc.hIcon = LoadIcon(NULL, IDI_APPLICATION);
  winc.hCursor = LoadCursor(NULL, IDC_ARROW);
  winc.hbrBackground = (HBRUSH)GetStockObject(WHITE_BRUSH);
  winc.lpszMenuName = NULL;
  winc.lpszClassName = TEXT("SZLWND");

  if (!RegisterClass(&winc)) return -1;

  hwnd = CreateWindow(
    TEXT("SZLWND"), TEXT("manifest on"),
    WS_OVERLAPPEDWINDOW | WS_VISIBLE,
    CW_USEDEFAULT, CW_USEDEFAULT,
    300, 300,
    NULL, NULL, hInstance, NULL
  );

  CreateWindow(
    TEXT("BUTTON"), TEXT("button"),
    WS_CHILD | WS_VISIBLE | BS_PUSHBUTTON,
    0, 0, 100, 40,
    hwnd, NULL, hInstance, NULL
  );
  CreateWindow(
    TEXT("BUTTON"), TEXT("radio"),
    WS_CHILD | WS_VISIBLE | BS_AUTORADIOBUTTON,
    0, 50, 100, 30,
    hwnd, NULL, hInstance, NULL
  );

  CreateWindow(
    TEXT("EDIT"), TEXT("edit 111111111111111111"),
    WS_CHILD | WS_VISIBLE | WS_BORDER | ES_LEFT ,
    0, 100, 100, 30,
    hwnd, NULL,hInstance, NULL
  );
  CreateWindow(
    TEXT("SCROLLBAR"), TEXT(""),
    WS_CHILD | WS_VISIBLE | SBS_HORZ,
    0, 150, 200, 20,
    hwnd, NULL,hInstance, NULL
  );

  if (hwnd == NULL) return -1;

  while (GetMessage(&msg, NULL, 0, 0)) DispatchMessage(&msg);
  return msg.wParam;
}
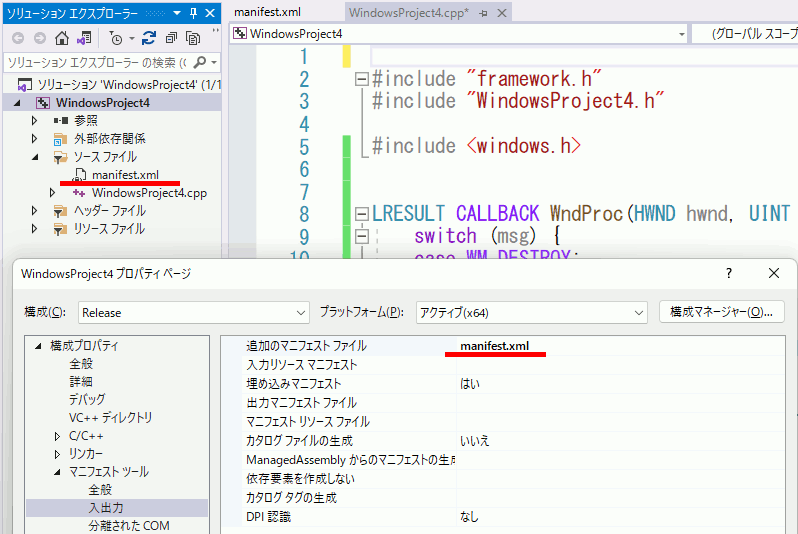
パターン2 マニフェストファイルをプロジェクトに追加
manifest.xml
<?xml version="1.0" encoding="UTF-8" standalone="yes"?>
<assembly xmlns="urn:schemas-microsoft-com:asm.v1" manifestVersion="1.0">
<assemblyIdentity
    version="1.0.0.0"
    processorArchitecture="*"
    name="CompanyName.ProductName.YourApplication"
    type="win32"
/>
<description>Your application description here.</description>
<dependency>
    <dependentAssembly>
        <assemblyIdentity
            type="win32"
            name="Microsoft.Windows.Common-Controls"
            version="6.0.0.0"
            processorArchitecture="*"
            publicKeyToken="6595b64144ccf1df"
            language="*"
        />
    </dependentAssembly>
</dependency>
</assembly>
condaでopen3dをインストールする(改)
公式の方法ではcondaでopen3dを入れられない。というかopen3d 0.15からpip推奨になっているらしい。
しかしpipはcondaの他の環境に影響を与えるので、使いたくない。
公式の方法:
エラー
Collecting package metadata (current_repodata.json): done
Solving environment: failed with initial frozen solve. Retrying with flexible solve.
Solving environment: failed with repodata from current_repodata.json, will retry with next repodata source.
Collecting package metadata (repodata.json): done
Solving environment: failed with initial frozen solve. Retrying with flexible solve.
Solving environment: \
Found conflicts! Looking for incompatible packages.
This can take several minutes. Press CTRL-C to abort.
failed
UnsatisfiableError: The following specifications were found to be incompatible with each other:
Output in format: Requested package -> Available versions
conda-forgeから導入
conda-forgeとopen3d-adminを同時に指定すると導入に成功する。
-cはチャンネル(=レポジトリ名)。
open3d 0.15では、チャンネルをconda-forgeとopen3d-admin、両方とも指定しなければ失敗する様子。
問題と今後の予想
この方法で導入した場合、open3dを使用したスクリプトを実行するたびに以下のWarningが出てしまう。
2022年6月時点で、condaサポートがRequestされているので、多分、、、多分公式が折れてくれるのではないか。
