環境変数を設定したPowerShellをbatから起動
PowerShellを使いたい。環境変数を都度設定するのが面倒なのでスクリプトファイルにまとめるのだが、そのままでは権限不足で実行できない。そこでbatを作りcmdを走らせ、中から権限付与したpowershellを起動。起動時に実行させたいスクリプトを書いたps1ファイルを与えて実行する。
callps.bat
@rem SJISで保存しないとコメントが文字化けする
@rem noexit poweshell を閉じない
@rem ExecutionPolicy 権限を変更
@rem .\path.ps1 powershell のスクリプトを実行

powershell -noexit -ExecutionPolicy Unrestricted .\path.ps1
path.ps1
# 権限がちゃんと変更されているかを確認表示
Get-ExecutionPolicy

# 使いたいアプリケーションのパスを追加
$ENV:Path+=";C:\apps\7z2201-extra"
$ENV:Path+=";C:\apps\sakuraeditor"
$ENV:Path+=";C:\apps\ImageMagick-7.1.0-portable-Q16-x64"


cd C:\Software\command\work
使い方
上記.bat , ps1ファイルを同じ場所へ置き、callps.batをダブルクリックなりすると設定したPowerShellが起動する。
VTKでPointCloud表示
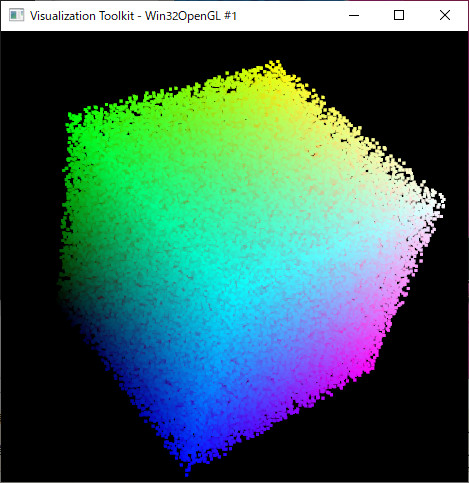
VTKでPointCloudを表示する方法。VTKにはPointCloud型というものがなく、PolyDataで点群も表すようになっている。元となったコードがPythonだったのでそれをC++に書き換えた格好になる。
元コード(Python)
https://stackoverflow.com/questions/7591204/how-to-display-point-cloud-in-vtk-in-different-colors
VTK_PointCloud.hpp
#pragma once

// https://stackoverflow.com/questions/7591204/how-to-display-point-cloud-in-vtk-in-different-colors
#include <vtkRenderer.h>
#include <vtkSmartPointer.h>

#include <vtkPolyData.h> //vtkPolyData用
#include <vtkPolyDataMapper.h>
#include <vtkPointData.h> // 頂点データ用

#include <vtkUnsignedCharArray.h> //色データ用
#include <vtkProperty.h>

//#include <vtkPoints.h>
//#include <vtkPolygon.h>

class VtkPointCloud {

public:

  vtkSmartPointer<vtkPolyData> _polydata;
  vtkSmartPointer<vtkPolyDataMapper> _mapper;
  vtkSmartPointer<vtkActor> _actor;
  vtkSmartPointer < vtkPoints > _points;
  vtkSmartPointer < vtkCellArray > _cells;

  vtkSmartPointer < vtkUnsignedCharArray > _colors;

  VtkPointCloud(double zMin = -10.0, double zMax = 10.0, int maxNumPoints = 1e6) {

    _polydata = vtkSmartPointer<vtkPolyData>::New();
    clearPoints();
    _mapper = vtkSmartPointer<vtkPolyDataMapper>::New();
    _mapper->SetInputData(_polydata);
    _mapper->SetColorModeToDefault();
    //_mapper->SetScalarRange(zMin, zMax);
    _mapper->SetScalarVisibility(1);
    _actor = vtkSmartPointer<vtkActor>::New();
    _actor->SetMapper(_mapper);
  }

  void addPoint(double point[3], unsigned char color[3]) {

    vtkIdType pointId = _points->InsertNextPoint(point);
    _cells->InsertNextCell(1);
    _cells->InsertCellPoint(pointId);
    _colors->InsertNextTuple3(color[0], color[1], color[2]);

  }

  void clearPoints() {
    _points = vtkSmartPointer < vtkPoints >::New();
    _cells = vtkSmartPointer < vtkCellArray>::New();

    ////////////////////////////////////
    _colors = vtkSmartPointer<vtkUnsignedCharArray>::New();
    _colors->SetNumberOfComponents(3);
    _colors->SetName("Colors");
    _polydata->GetPointData()->SetScalars(_colors);
    _polydata->GetPointData()->SetActiveScalars("Colors");
    ////////////////////////////////////

    _polydata->SetPoints(_points);
    _polydata->SetVerts(_cells);

  }


};
main.cpp
#pragma once

#include "VTK_PointCloud.hpp"


// VTK_MODULE_INITに必要
#include <vtkAutoInit.h>

#include <vtkRenderer.h>
#include <vtkRenderWindow.h>
#include <vtkWin32RenderWindowInteractor.h> //win32api対応
#include <vtkInteractorStyleImage.h>

////////////////////////////////////////////////////////

#pragma comment(lib,"vtkCommonCore-9.1.lib")
#pragma comment(lib,"vtkRenderingCore-9.1.lib")
#pragma comment(lib,"vtkInteractionStyle-9.1.lib")
#pragma comment(lib,"vtkCommonDataModel-9.1.lib ") // ポリゴン用

#pragma comment(lib,"vtkRenderingOpenGL2-9.1.lib")


//必須
VTK_MODULE_INIT(vtkRenderingOpenGL2);
VTK_MODULE_INIT(vtkInteractionStyle);


int main(int argc, char** argv)
{

  // 点群生成
  auto ptc = std::make_unique< VtkPointCloud>();
  for (size_t i = 0; i < 100000; i++) {
    double x = (double)rand() / (double)RAND_MAX;
    double y = (double)rand() / (double)RAND_MAX;
    double z = (double)rand() / (double)RAND_MAX;
    ptc->addPoint(
      std::array<double, 3>{ x, y, z }.data(),
      std::array<unsigned char, 3>{ (unsigned char)(x * 255), (unsigned char)(y * 255), (unsigned char)(z * 255)}.data()
    );
  }

  // 頂点サイズを指定する場合
  // #include <vtkProperty.h>
  ptc->_actor->GetProperty()->SetPointSize(3);

  //////////////////////////////////////////////////////////////////
  //////////////////////////////////////////////////////////////////
  //////////////////////////////////////////////////////////////////
  //////////////////////////////////////////////////////////////////

  vtkSmartPointer<vtkRenderer> renderer = vtkSmartPointer<vtkRenderer>::New();
  renderer->AddActor(ptc->_actor);
  renderer->ResetCamera();

  //////////////////////////////////////
  auto interactor = vtkSmartPointer<vtkRenderWindowInteractor>::New();

  vtkSmartPointer<vtkInteractorStyleTrackballCamera> style =
    vtkSmartPointer<vtkInteractorStyleTrackballCamera>::New();
  interactor->SetInteractorStyle(style);

  //////////////////////////////////////
  auto renderWindow = vtkSmartPointer<vtkRenderWindow>::New();
  renderWindow->AddRenderer(renderer);
  renderWindow->SetInteractor(interactor);
  renderWindow->Render();

  interactor->Start(); //イベントループへ入る

  return 0;
}
Ubuntu + g++ + Python/C APIでPythonからCを呼び出す
ずっとWindowsでやってきたので今度はUbuntuで同じことをする。
Ubuntuの場合はdllではなくsoファイルという事になるが、手順などは変わらない。
必要なファイルのパスを見つける
sysconfig.get_config_varsで各パスを見つける。.aはwindowsの.libに該当。
一覧を出すと長いので引数に値名を入れて必要なものだけ見つける
# where-is-pyh.py

import sysconfig
import pprint
pprint.pprint(sysconfig.get_config_vars('LIBDIR')) # .a ファイルの場所
pprint.pprint(sysconfig.get_config_vars('LIBRARY')) # .a ファイルの名前
pprint.pprint(sysconfig.get_config_vars('INCLUDEPY')) # python.h の場所
['/home/myname/anaconda3/envs/BindTest/lib']
['libpython3.9.a']
C++のプログラムを書く
Windows版と動的リンクライブラリの設定が若干違う(というかない)が基本的には同じ。DllMainなどは不要なのでその分コードは短い。
mymod.hpp
// mymod.hpp

// このプロジェクトのビルド結果を「sopy.so」とする。

#include <Python.h>

// この関数をPython側から呼び出したいとする。
PyObject * hello_in_c(PyObject*);
// 第一引数はPython側のself用。


// 関数へアクセスする方法一覧
static PyMethodDef method_list[] = {
    // Pythonで使用する関数名 , C++内で使用する関数名 , 引数の個数に関するフラグ , docstring
    { "hello_on_python", (PyCFunction)hello_in_c, METH_VARARGS , nullptr },

    // ... 公開したい関数の個数分だけ記述する

    // 配列の最後は全てNULLの要素を入れておく
    { nullptr, nullptr, 0, nullptr }
};


// モジュールを定義する構造体
static PyModuleDef module_def = {
    PyModuleDef_HEAD_INIT,
    "sopy",               // モジュール名
    "Example of pyhton wrapper",  // モジュール説明
    0,
    method_list                   // Structure that defines the methods of the module
};


// 関数名はPyInit_ + soファイル名
PyMODINIT_FUNC PyInit_sopy() {
    return PyModule_Create(&module_def);
}
mymod.cpp
// mymod.cpp

#include "mymod.hpp"

PyObject* hello_in_c(PyObject*) {
  printf("hello world from C");

  return Py_None;
}
ビルド
最初のステップでsysconfigで見つけたパスとライブラリ名をそれぞれ指定する。
$ g++ mymod.cpp -shared -fPIC -o sopy.so -I/home/myname/anaconda3/envs/BindTest/include/python3.9 -L/home/myname/anaconda3/envs/BindTest/lib -lpython3.9
テスト
import sopy

sopy.hello_on_python()
Windows + VC++ + Python/C APIでPythonからCを呼び出す(6)PythonのリストをC++へ渡す
Python側からリストを渡したときの受け取り方。
mymod.cpp
// mymod.cpp

#include "mymod.hpp"

void print_int(PyObject* p);
void print_float(PyObject* p);
void print_string(PyObject* p);


PyObject* list_in_c(PyObject*, PyObject* args) {

  // 受け取ったリストの内容をlistargsへ入れる
  PyObject* listargs;
  if (!PyArg_ParseTuple(args, "O!", &PyList_Type, &listargs))
    return NULL;

  // リストの要素数を取得
  int count = PyList_Size(listargs);
  printf("list item count == %d\n", count);

  // リストのアイテムを取得
  PyObject* val_0 = PyList_GetItem(listargs, 0);
  PyObject* val_1 = PyList_GetItem(listargs, 1);
  PyObject* val_2 = PyList_GetItem(listargs, 2);

  //各要素の型は、PyObject*を _Check 関数にかけて型チェックを行う

  //////////////////////////////
  if ((bool)PyLong_Check(val_0) == true) {
    print_int(val_0);
  }
  else if ((bool)PyFloat_Check(val_0) == true) {
    print_float(val_0);

  }
  else if ((bool)PyUnicode_Check(val_0) == true) {
    print_string(val_0);
  }
  //////////////////////////////
  if ((bool)PyLong_Check(val_1) == true) {
    print_int(val_1);
  }
  else if ((bool)PyFloat_Check(val_1) == true) {
    print_float(val_1);

  }
  else if ((bool)PyUnicode_Check(val_1) == true) {
    print_string(val_1);
  }
  //////////////////////////////
  if ((bool)PyLong_Check(val_2) == true) {
    print_int(val_2);
  }
  else if ((bool)PyFloat_Check(val_2) == true) {
    print_float(val_2);

  }
  else if ((bool)PyUnicode_Check(val_2) == true) {
    print_string(val_2);
  }


}

void print_int(PyObject* p) {
  long v = PyLong_AsLong(p);
  printf("%d\n", v);
}
void print_float(PyObject* p) {
  float v = PyFloat_AsDouble(p);
  printf("%lf\n", v);
}
void print_string(PyObject* p) {
  const char* v = PyUnicode_AsUTF8(p);
  printf("%s\n", v);
}
mymod.hpp 抜粋
__declspec(dllexport) extern "C" PyObject * list_in_c(PyObject*, PyObject*);

// 関数へアクセスする方法一覧
static PyMethodDef method_list[] = {
    // Pythonで使用する関数名 , C++内で使用する関数名 , 引数の個数に関するフラグ , docstring
    { "list_function", (PyCFunction)list_in_c, METH_VARARGS , nullptr },

    // 配列の最後は全てNULLの要素を入れておく
    { nullptr, nullptr, 0, nullptr }
};
Pythonスクリプト
import DLLforPython

DLLforPython.list_function([22,"abc",12.3])
実行結果
22
abc
12.300000
Windows + VC++ + Python/C APIでPythonからCを呼び出す(5)CのポインタをPythonへ渡す
ポインタを渡す場合はPyCapsule_Newで包んで渡す。
データがnewされたものなら、一緒にdeleterも渡すことができる。
mymod.hpp 変更
// C++側の関数宣言

// 配列作成
__declspec(dllexport) extern "C" PyObject * create_array_in_c(PyObject*);

// 配列からアイテム取得
__declspec(dllexport) extern "C" PyObject * get_item_in_c(PyObject*, PyObject* args);


// 関数へアクセスする方法一覧
static PyMethodDef method_list[] = {
    { "create_array", (PyCFunction)create_array_in_c, METH_VARARGS , nullptr },
    { "get_item", (PyCFunction)get_item_in_c, METH_VARARGS , nullptr },

    // 配列の最後は全てNULLの要素を入れておく
    { nullptr, nullptr, 0, nullptr }
};
mymod.cpp
// mymod.cpp

#include "mymod.hpp"

#define NAME nullptr

// デリータ
void array_deleter(PyObject* obj)
{
  long* p = (long*)PyCapsule_GetPointer(obj, NAME);
  delete [] p;
}

// データを作成する関数
PyObject* create_array_in_c(PyObject*) {

  long* p = new long[5]{
    0,1,2,3,4
  };

  // ポインタをPyObjectへ変換
  // 同時にデリータを指定して自動解放を可能にする
  PyObject* pyo = PyCapsule_New(p, NAME, array_deleter);

  return pyo;
}

PyObject * get_item_in_c(PyObject*, PyObject * args) {

  PyObject* dataptr;
  int index;

  // argsから引数取り出し
  // PyObject* は 'O' を使用
  if (!PyArg_ParseTuple(args, "Oi", &dataptr, &index)) return NULL;

  long* p = (long*)PyCapsule_GetPointer(dataptr, NAME);

  return PyLong_FromLong(p[index]);

}
test.py
import DLLforPython

array = DLLforPython.create_array()

print( DLLforPython.get_item(array,3) )
Windows + VC++ + Python/C APIでPythonからCを呼び出す(4)Cへ複数の引数を渡す
Python/C APIでは引数を複数渡す場合、第二引数にPython側から渡された引数がすべてまとめられている。それを取り出すためにPyArg_ParseTupleを使うのだが、この時何番目の引数の型が何かを関数へ教えてやる必要がある。
下の例では、それが第二引数の"ii"となっている。
簡単な例
mymod.hpp
// mymod.hpp

#pragma once

#include <Python.h>

#pragma comment (lib,"python39.lib")
// C++側の関数宣言
// python側から引数が複数与えられる場合、
// 第二引数に全ての引数がまとめて入っている
__declspec(dllexport) extern "C" PyObject * add_in_c(PyObject*, PyObject* xy);
// 関数へアクセスする方法一覧
static PyMethodDef method_list[] = {
    // Pythonで使用する関数名 , C++内で使用する関数名 , 引数の個数に関するフラグ , docstring
    { "add", (PyCFunction)add_in_c, METH_VARARGS , nullptr },

    // 配列の最後は全てNULLの要素を入れておく
    { nullptr, nullptr, 0, nullptr }
};
// モジュールを定義する構造体
static PyModuleDef module_def = {
    PyModuleDef_HEAD_INIT,
    "DLLforPython",               // モジュール名
    "Example of pyhton wrapper",  // モジュール説明
    0,
    method_list                   // Structure that defines the methods of the module
};

PyMODINIT_FUNC PyInit_DLLforPython() {
    return PyModule_Create(&module_def);
}
mymod.cpp
// mymod.cpp

#include "mymod.hpp"

PyObject* add_in_c(PyObject*, PyObject* xy) {

  long a, b;

  // 引数xyからPython側から渡された二つの引数を取り出す
  // 第二引数の "ii" はaがint,bがintを表す
  int ret = PyArg_ParseTuple(xy, "ii", &a, &b);

  if (!ret) return NULL;

  return PyLong_FromLong(a + b);
}
test.py
import DLLforPython

print( DLLforPython.add(2,3) )
PyArg_ParseTuple の第二引数について
データ型によってどのような指定を行うかは以下に書かれている。
https://docs.python.org/ja/3/c-api/arg.html
mymod.hpp 変更
// C++側の関数宣言
// python側から引数が複数与えられる場合、
// 第二引数に全ての引数がまとめて入っている
__declspec(dllexport) extern "C" PyObject * function_in_c(PyObject*, PyObject* xy);


// 関数へアクセスする方法一覧
static PyMethodDef method_list[] = {
    // Pythonで使用する関数名 , C++内で使用する関数名 , 引数の個数に関するフラグ , docstring
    { "function", (PyCFunction)function_in_c, METH_VARARGS , nullptr },

    // 配列の最後は全てNULLの要素を入れておく
    { nullptr, nullptr, 0, nullptr }
};
mymod.cpp
// mymod.cpp

#include "mymod.hpp"

PyObject* function_in_c(PyObject*, PyObject* args) {

  bool b;      // PyArg_ParseTupleには b を与える
  char *s;     // PyArg_ParseTupleには s を与える
  long i;      // PyArg_ParseTupleには i を与える
  float f;     // PyArg_ParseTupleには f を与える
  Py_complex d;// PyArg_ParseTupleには D を与える

  // 第三引数以降は可変長引数
  int ret = PyArg_ParseTuple(
    args,
    "bsifD",
    &b,
    &s,
    &i,
    &f,
    &d
  );

  printf("bool    %s\n", b ? "true" : "false");
  printf("char    %s\n", s);
  printf("long    %d\n", i);
  printf("float   %lf\n", f);
  printf("complex %lf+i%lf\n", d.real, d.imag);

  return Py_None;
}
test.py
import DLLforPython

DLLforPython.function(
    True,
    "hello",
    5,
    4.8,
    3+2j
)
char hello
long 5
float 4.800000
complex 3.000000+i2.000000
Windows + VC++ + Python/C APIでPythonからCを呼び出す(3)Cから値を返す
mymod.h
#pragma once

#include <Python.h>

// libファイルが必要
// anaconda3\Include にPython.hがある時、おそらく
// anaconda3\libs    にある。
#pragma comment (lib,"python39.lib")
// C++側の関数宣言
__declspec(dllexport) extern "C" PyObject * get_int_in_c(PyObject*);
__declspec(dllexport) extern "C" PyObject * get_bool_in_c(PyObject*);
__declspec(dllexport) extern "C" PyObject * get_float_in_c(PyObject*);
__declspec(dllexport) extern "C" PyObject * get_string_in_c(PyObject*);
// 関数へアクセスする方法一覧
static PyMethodDef method_list[] = {
    // Pythonで使用する関数名 , C++内で使用する関数名 , 引数の個数に関するフラグ , docstring
    { "get_int", (PyCFunction)get_int_in_c, METH_VARARGS , nullptr },
    { "get_bool", (PyCFunction)get_bool_in_c, METH_VARARGS , nullptr },
    { "get_float", (PyCFunction)get_float_in_c, METH_VARARGS , nullptr },
    { "get_string", (PyCFunction)get_string_in_c, METH_VARARGS , nullptr },

    // 配列の最後は全てNULLの要素を入れておく
    { nullptr, nullptr, 0, nullptr }
};
// モジュールを定義する構造体
static PyModuleDef module_def = {
    PyModuleDef_HEAD_INIT,
    "DLLforPython",               // モジュール名
    "Example of pyhton wrapper",  // モジュール説明
    0,
    method_list                   // Structure that defines the methods of the module
};

PyMODINIT_FUNC PyInit_DLLforPython() {
    return PyModule_Create(&module_def);
}
mymod.cpp
// mymod.cpp

#include "mymod.hpp"
// intを返す
PyObject* get_int_in_c(PyObject*) {

  PyObject* obj = PyLong_FromLong(100);
  return obj;
}
// boolを返す
PyObject* get_bool_in_c(PyObject*) {

  PyObject* obj = PyBool_FromLong((long)false);
  return obj;
}
// floatを返す
PyObject * get_float_in_c(PyObject*) {

  PyObject* obj = PyFloat_FromDouble(3.5);
  return obj;
}
// stringを返す
PyObject * get_string_in_c(PyObject*) {

  PyObject* obj = PyUnicode_FromFormat("test");
  return obj;
}
test.py
import DLLforPython

print( DLLforPython.get_int() )

print( DLLforPython.get_bool() )

print( DLLforPython.get_float() )

print( DLLforPython.get_string() )
False
3.5
test
Windows + VC++ + Python/C APIでPythonからCを呼び出す(2)プリミティブ型の引数をCへ渡す
Python側からintやfloatなどの型を渡す場合、全てPyObject*型として渡されるので、PyLong_AsLongなどの関数を使って実際の値に変換する必要がある。
それ以外はMETH_VARARGSを使用。
mymod.hpp
// mymod.hpp

#pragma once

#include <Python.h>

// libファイルが必要
// anaconda3\Include にPython.hがある時、おそらく
// anaconda3\libs    にある。
#pragma comment (lib,"python39.lib")
// C++側の関数宣言
__declspec(dllexport) extern "C" PyObject * display_int(PyObject*, PyObject*);
__declspec(dllexport) extern "C" PyObject * display_bool(PyObject*, PyObject*);
__declspec(dllexport) extern "C" PyObject * display_float(PyObject*, PyObject*);
__declspec(dllexport) extern "C" PyObject * display_string(PyObject*, PyObject*);
// 関数へアクセスする方法一覧
static PyMethodDef method_list[] = {
    // Pythonで使用する関数名 , C++内で使用する関数名 , 引数の個数に関するフラグ , docstring
    { "disp_int", (PyCFunction)display_int, METH_O , nullptr },
    { "disp_bool", (PyCFunction)display_bool, METH_O , nullptr },
    { "disp_float", (PyCFunction)display_float, METH_O , nullptr },
    { "disp_string", (PyCFunction)display_string, METH_O , nullptr },

    // 配列の最後は全てNULLの要素を入れておく
    { nullptr, nullptr, 0, nullptr }
};
// モジュールを定義する構造体
static PyModuleDef module_def = {
    PyModuleDef_HEAD_INIT,
    "DLLforPython",               // モジュール名
    "Example of pyhton wrapper",  // モジュール説明
    0,
    method_list                   // Structure that defines the methods of the module
};

PyMODINIT_FUNC PyInit_DLLforPython() {
    return PyModule_Create(&module_def);
}
mymod.cpp
// mymod.cpp

#include "mymod.hpp"
// intを受け取る
PyObject* display_int(PyObject*, PyObject* val) {

  long value = PyLong_AsLong(val);
  printf("%d\n", value);

  return Py_None;
}
// boolを受け取る
PyObject* display_bool(PyObject*, PyObject* val) {

  int value = PyObject_IsTrue(val);

  puts(bool(value) ? "TRUE" : "FALSE");

  return Py_None;
}
// floatを受け取る
PyObject * display_float(PyObject*, PyObject* val) {

  double value = PyFloat_AsDouble(val);
  printf("%lf\n", value);

  return Py_None;
}
// stringを受け取る
PyObject * display_string(PyObject*, PyObject* val) {

  const char* value = PyUnicode_AsUTF8(val);
  printf("%s\n", value);

  return Py_None;

}
test.py
import DLLforPython

DLLforPython.disp_int(500)

DLLforPython.disp_bool(True)

DLLforPython.disp_float(1.5)

DLLforPython.disp_string('test')
TRUE
1.500000
test
Windows + VC++ + Python/C APIでPythonからCを呼び出す(1)
要点:
1.Python/C APIで作ったモジュールはただのdllファイルの拡張子をpydに変更したもの
2.Pythonへdll内にある関数一覧を公開するため、dll内にPyInit_pydファイル名 という関数を用意しておく
3.dll側の関数は戻り値がPyObject*,引数も全てPyObject*型にする
とりあえず作ってみる
Python.hの場所を確認
以下のスクリプトを実行し、'INCLUDEPY' という値を見つける。
# where-is-pyh.py

import sysconfig
import pprint
pprint.pprint(sysconfig.get_config_vars())
VC++でDLLをビルド
以下のプログラムを書き、DLLとしてビルドする。
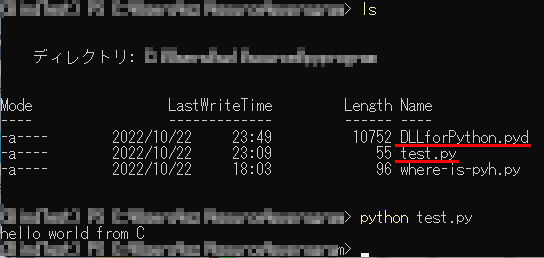
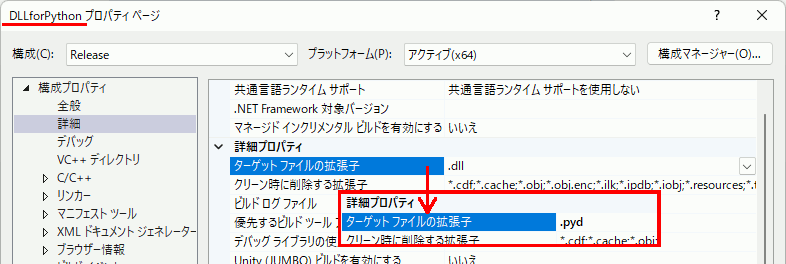
注意:モジュール名==dllファイル名 なので、出力ファイル名が DLLforPython.pyd となるようにプロジェクト設定を調整しておく。普通プロジェクト名がそのままファイル名になるので拡張子設定だけを変えればいい。
mymod.hpp
// mymod.hpp

// このプロジェクトのビルド結果は「DLLforPython.pyd」となる。
// 当然だが.dllで出力して拡張子だけ変えてもいい

#pragma once

#include <Python.h>

// libファイルが必要
// anaconda3\Include にPython.hがある時、おそらく
// anaconda3\libs    にある。
#pragma comment (lib,"python39.lib")

// この関数をPython側から呼び出したいとする。
__declspec(dllexport) extern "C" PyObject * hello_in_c(PyObject*);
// ↑今回はlibでimportしないので__declspecの切り替えは不要
// 第一引数はPython側のself用。
// 関数へアクセスする方法一覧
static PyMethodDef method_list[] = {
    // Pythonで使用する関数名 , C++内で使用する関数名 , 引数の個数に関するフラグ , docstring
    { "hello_on_python", (PyCFunction)hello_in_c, METH_VARARGS , nullptr },

    // ... 公開したい関数の個数分だけ記述する

    // 配列の最後は全てNULLの要素を入れておく
    { nullptr, nullptr, 0, nullptr }
};
// モジュールを定義する構造体
static PyModuleDef module_def = {
    PyModuleDef_HEAD_INIT,
    "DLLforPython",               // モジュール名
    "Example of pyhton wrapper",  // モジュール説明
    0,
    method_list                   // Structure that defines the methods of the module
};
// 関数名はPyInit_ + pydファイル名
PyMODINIT_FUNC PyInit_DLLforPython() {
    return PyModule_Create(&module_def);
}
mymod.cpp
// mymod.cpp

#include "mymod.hpp"

PyObject* hello_in_c(PyObject*) {
  printf("hello world from C");

  return Py_None;
}
dllmain.cpp
dllmain.cppはVC++でプロジェクトを作ると勝手にできるのでいじらなければそれでいい。
// dllmain.cpp : DLL アプリケーションのエントリ ポイントを定義します。
#include "pch.h"


BOOL APIENTRY DllMain( HMODULE hModule,
                       DWORD  ul_reason_for_call,
                       LPVOID lpReserved
                     )
{
    switch (ul_reason_for_call)
    {
    case DLL_PROCESS_ATTACH:
    case DLL_THREAD_ATTACH:
    case DLL_THREAD_DETACH:
    case DLL_PROCESS_DETACH:
        break;
    }
    return TRUE;
}
Python側から呼び出し
ビルドしたpydファイルをpythonスクリプトと同じディレクトリに置き、テスト用のスクリプトでimportして使用する。
test.py
# test.py

import DLLforPython

DLLforPython.hello_on_python()
実行例

細工なしのstd::shared_ptrからポインタの管理を剥奪することは絶対にできないので注意する事
デリータの指定なしで作ったshared_ptrからポインタを奪い取ることはどうあがいてもできそうにない。unique_ptrをshared_ptrへ変換することも、uniue_ptrから生ポインタを解放することもできるが、shared_ptrはshared_ptrから変更できない。
#include <memory>
void pattern1() {

  std::unique_ptr<int> unique_p(new int);

  // OK 管理を shared_ptrへ変更
  std::shared_ptr<int> shared_p = std::move(unique_p);

}
void pattern2() {

  std::unique_ptr<int> unique_p(new int);

  // OK 管理を自ら行う
  int* p = unique_p.release();

}
void pattern3() {

  std::shared_ptr<int> shared_p(new int);

  // NG releaseは存在しない
  int* p = shared_p.release();

  // NG unique_ptr への変換はできない
  std::unique_ptr<int> unique_p(std::move(shared_p));

}
これはつまり、「自分以外にshared_ptrの生成権限(業務上)がある場合はどうしようもない」という事を意味する。だから被害者を減らすために、スマートポインタの扱いには注意を払うべきである。
例1 Factory関数からはunique_ptrを返す
unique_ptrであれば、少なくともshared_ptrに意図的に変えるまではどうとでもできる。他者が使うかもしれない自コードがshared_ptrを生成して返すような真似は、未来に誰かを不幸にする可能性があるので避けるようにする。
#include <iostream>

#include <memory>
// unique_ptrを返すFactory。後でいろいろと融通が利く
std::unique_ptr<int> Factory_unique() {

  return std::make_unique<int>();
}
void job_happy() {

  auto uptr = std::move(Factory_unique());

  *uptr = 5;
  printf("%d\n", *uptr);

  // OK int* ptr = uptr.release();
  // OK std::shared_ptr<int> sptr = std::move(uptr);

}
// shared_ptrを返すFactory。融通が利かない
std::shared_ptr<int> Factory_shared() {

  return std::make_shared<int>();
}
void job_unhappy() {

  auto sptr = Factory_shared();

  *sptr = 7;
  printf("%d\n", *sptr);

  //NG int* ptr = sptr.release();
  //NG std::unique_ptr<int> sptr = std::move(sptr);

}
int main()
{

  job_happy();

  job_unhappy();

}
例2 デリータにポインタを解放できるようなオブジェクトを指定
get_deleterを使えばデリータを取り出すことができる。メモリを解放するかしないかを選択できるクラスのインスタンスをデリータにしておけば、その指示を出すことができるようになる。
#include <iostream>

#include <memory>
// オブジェクトを削除しない場合を指定できるデリータ
struct ReleasableDeleter {

  // 削除しない場合はtrue
  bool _release;

  ReleasableDeleter() :_release(false) {}

  template <class T>
  void operator()(T* p)
  {
    if (_release == false) {
      delete p;
    }
  }
};
// テスト用のデータ型
class Object {
public:
  const char* _name;
  Object(const char* name) :_name(name){}
  ~Object() {
    std::cout << "delete " << _name << std::endl;

  }
};
int main()
{
  Object* valid;
  {
    std::shared_ptr<Object> p1(new Object("obj1"), ReleasableDeleter());
    std::shared_ptr<Object> p2(new Object("obj2"), ReleasableDeleter());

    // 削除しない設定
    ReleasableDeleter* deleter = std::get_deleter<ReleasableDeleter>(p1);
    deleter->_release = true;

    valid = p1.get();
  }

  std::cout << "まだ生きている: " << valid->_name << std::endl;

  delete valid;

  //std::cout << "解放済み: " << valid->_name << std::endl;

}
まだ生きている: obj1
delete obj1

