C++ std::condition_variableについて
スレッドプールのコードの中でわからなかったcondition_variableについて調べた。
条件変数と訳される。wait()で待機状態にしたスレッドに対して、別のスレッドからnotify_all()で通知を送ると待機していたスレッドが動き出す。
condition_variable使用例1 (不完全版)
コード
#pragma warning(disable:4996)

#include <iostream>

#include <functional>
#include <thread>

#include <mutex>
#include <condition_variable>

std::mutex mtx;
std::condition_variable cv;
void func1() {


  for (size_t i = 0; i < 10;i++) {
    _sleep(10);
    printf("func1 # %d\n", i);

    if (i == 5) {
      printf("*** func1 から通知を送る *** \n");
      cv.notify_all();
    }
  }

}
void func2() {

  printf("待機開始\n");
  std::unique_lock<std::mutex> ul(mtx);
  cv.wait(ul);
  printf("通知が来たので func2 スレッド再開\n");

  for (size_t i = 0; i < 10; i++) {
    _sleep(10);
    printf("func2 : %d\n", i);
  }

}
int main()
{

  std::thread th1(func1);
  std::thread th2(func2);

  th1.join();
  th2.join();

  std::cout << "Hello World!\n";
}
実行結果
待機開始func1 # 0
func1 # 1
func1 # 2
func1 # 3
func1 # 4
func1 # 5
*** func1 から通知を送る ***
通知が来たので func2 スレッド再開
func2 : 0
func1 # 6
func2 : 1
func1 # 7
func1 # 8
func2 : 2
func2 : 3
func1 # 9
func2 : 4
func2 : 5
func2 : 6
func2 : 7
func2 : 8
func2 : 9
Hello World!
condition_variable使用例2 spurious wakeup対応
condition_variableは、.wait()の場所で、notify_all()などで通知が来るまで待機するのだが、「たまに、なぜか知らないが、どういうわけか通知が来ていないのに待機が解除されてしまいスレッドが走り出す」という現象が起こるらしい。これをspurious wakeupといい、condition_variableを使う場合、この現象への対応をしておかなければならないという。
コード ステート変数使用版
ステート変数notifyを追加し、この変数がtrueの時だけwaitを解除する。
#pragma warning(disable:4996)

#include <iostream>

#include <functional>
#include <thread>

#include <mutex>
#include <condition_variable>

bool notify = false; // Spurious Wakeup考慮 ステート変数
std::mutex mtx;
std::condition_variable cv;

void func1() {


  for (size_t i = 0; i < 10;i++) {
    _sleep(10);
    printf("func1 # %d\n", i);

    if (i == 5) {
      printf("*** func1 から通知を送る *** \n");
      notify = true;// notify_allするときにしかnotifyがtrueになることはない
      cv.notify_all();
    }
  }

}


void func2() {

  printf("待機開始\n");

  std::unique_lock<std::mutex> ul(mtx);
  cv.wait(ul, [&]{return notify; });// notifyがtrueの時だけ待機解除

  printf("通知が来たので func2 スレッド再開\n");

  for (size_t i = 0; i < 10; i++) {
    _sleep(10);
    printf("func2 : %d\n", i);
  }

}


int main()
{

  std::thread th1(func1);
  std::thread th2(func2);

  th1.join();
  th2.join();

  std::cout << "Hello World!\n";
}
C++のスレッドプールのコードを見つけたのでコピペして動作確認してみた話
以下のページにあったスレッドプールを使用してみる。
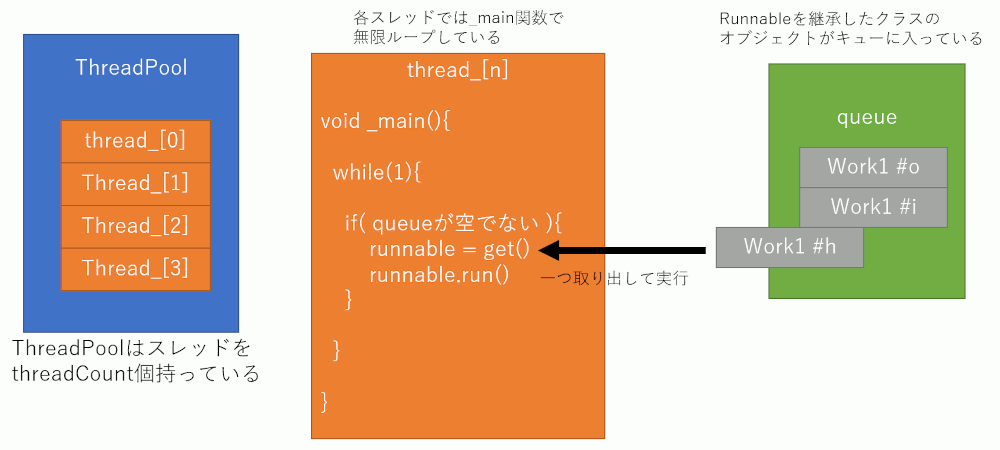
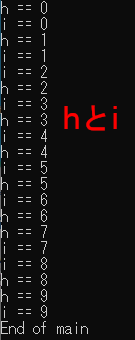
使い方はこんな感じ。Runnableを継承したクラスに処理を書き、ThreadPoolにaddする。
#pragma warning(disable:4996)

#include <iostream>

// https://cutlassfish.wordpress.com/2016/09/14/c-%E3%81%A7-worker-thread-%E3%83%91%E3%82%BF%E3%83%BC%E3%83%B3/
#include "WorkerThread.hpp"
class Work1 : public Runnable {

  const char* _name;
  const int _count;
public:
  Work1(const char* name,int count):
    _name(name),_count(count)
  {}
  virtual void run() override {
    for (int i = 0; i < 10; i++) {
      _sleep(_count);
      printf("%s == %d\n",_name, i);
    }
  }

};
int main()
{
  int thread_count = 5;// 同時に走るスレッドの数
  int queue_count = 5;// 積んでおける仕事の数

  ThreadPool pool(thread_count,queue_count);

  pool.add(std::make_shared<Work1>("h",20));
  pool.add(std::make_shared<Work1>("i",25));
  pool.add(std::make_shared<Work1>("o",30));
  pool.add(std::make_shared<Work1>("k",35));


  _sleep(5000);
  std::cout << "End of main\n";
}
構造的には、threadCount個のスレッドが作られ、それらがキューを監視し、キューにジョブが入っていたらそれをとってきて実行する、という構造になっている。
注意1 threadCount
スレッド数を指定できる。同時に実行できる処理の数はスレッドの数だけ。
例えば以下のように指定する。
int main()
{
  int thread_count = 2;
  int queue_count = 5;
  ThreadPool pool(thread_count,queue_count);

  pool.add(std::make_shared<Work1>("h",20));
  pool.add(std::make_shared<Work1>("i",25));
  pool.add(std::make_shared<Work1>("o",30));
  pool.add(std::make_shared<Work1>("k",35));


  _sleep(5000);
  std::cout << "End of main\n";
}
一度に処理できるのは二つまでなので、並列に処理されるのは二つだけだが、最終的に四つすべての処理が行われている。

注意2 queueSize
キューの最大個数を2にすると、登録できる処理が二つだけになる。たとえ4個の処理をaddに与えても、キューに入りきらないものは捨てられている。
  int thread_count = 5;
  int queue_count = 2;
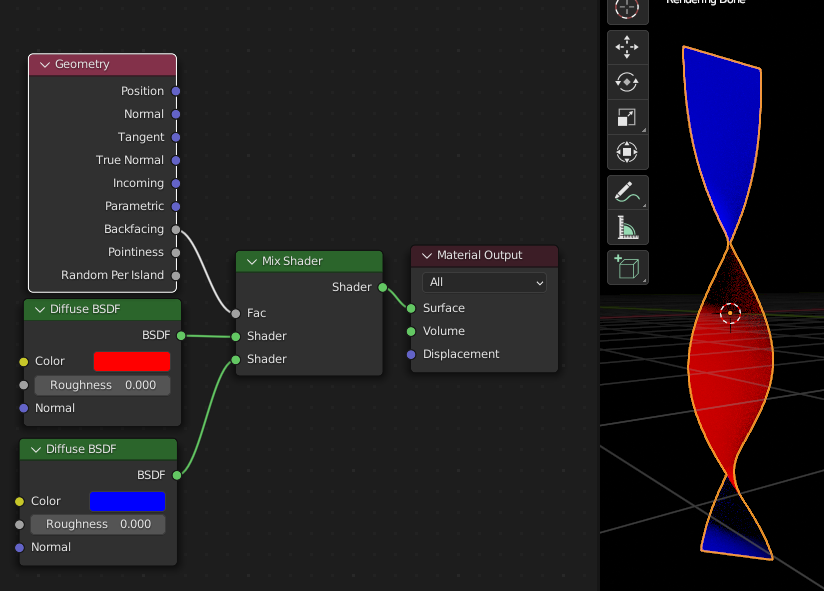
Blenderで裏面と表面で違うシェーダを適用
角丸長方形を描画
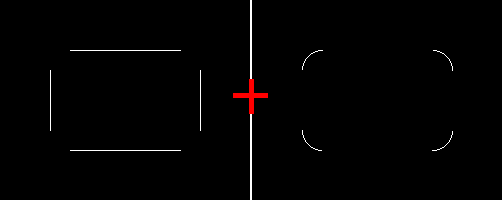
1/4ずつの円弧とブレゼンハムを組み合わせて角丸長方形(rounded rectangle)を描画する。
前回の円描画であえて1/4ずつ描画できるように作ったので、それをブレゼンハムと組み合わせる。
draw.hpp (rounded_rectangle)
#pragma once

#include <vector>


struct Image {
  std::vector<unsigned char> img;
  int width;
  int height;
};
void resize(Image* img, int w, int h) {
  img->width = w;
  img->height = h;
  img->img.resize(w * h);
}

//! @brief 画像のピクセルを着色する
//! @param [in,out] img 画像
//! @param [in] x 座標
//! @param [in] y 座標
//! @return なし
void plot(Image& img, int x, int y) {
  img.img[y * img.width + x] = 255;
}


enum class CPOS {
  left, right, top, bottom
};
//! @brief 円の指定した1/4を描画する
//! @param [out] img 画像
//! @param [in] cx 中心座標
//! @param [in] cy 中心座標
//! @param [in] r  半径
//! @param [in] bx 円の四分割したエリアの指定
//! @param [in] by 円の四分割したエリアの指定
//! @return なし
void arc4(Image& img, const int cx, const int cy, const int r, const CPOS bx, const CPOS by) {
  int x, y;//描画位置
  const int rr = r * r;//半径の二乗
  int dx, dy;
  int limx;
  int limy;

  if (bx == CPOS::right && by == CPOS::bottom) {
    // □□
    // □■
    //初期位置
    x = r;
    y = 0;
    dx = -1;
    dy = +1;
    limx = 0;
    limy = r;
  }
  else if (bx == CPOS::left && by == CPOS::bottom) {
    // □□
    // ■□
    x = 0;
    y = r;
    dx = -1;
    dy = -1;
    limx = -r;
    limy = 0;
  }
  else if (bx == CPOS::left && by == CPOS::top) {
    // ■□
    // □□
    x = -r;
    y = 0;
    dx = +1;
    dy = -1;
    limx = 0;
    limy = -r;
  }
  else if (bx == CPOS::right && by == CPOS::top) {
    // □■
    // □□
    x = 0;
    y = -r;
    dx = +1;
    dy = +1;
    limx = r;
    limy = 0;
  }

  //最初の一点
  //plot(img,x + cx, y + cy);

  while ((x != limx) || (y != limy)) {

    /////////////////////////
    // 次に描画するポイントを決定

    //次に描画するのは以下のいずれか。
    int xy1 = pow(x + dx, 2) + pow(y, 2);
    int xy2 = pow(x + dx, 2) + pow(y + dy, 2);
    int xy3 = pow(x, 2) + pow(y + dy, 2);

    // x*x + y*y == r*rなので
    // 上記各xyのうち最もr*rとの差が少ないx*x+y*yを選択
    xy1 = abs(xy1 - rr);
    xy2 = abs(xy2 - rr);
    xy3 = abs(xy3 - rr);

    if (xy1 < xy2) {
      if (xy1 < xy3) {
        // xy1
        x = x + dx;
        y = y;
      }
      else {
        // xy2
        x = x + dx;
        y = y + dy;
      }
    }
    else {
      if (xy2 < xy3) {
        // xy2
        x = x + dx;
        y = y + dy;
      }
      else {
        // xy3
        x = x;
        y = y + dy;
      }
    }

    /////////////////////////
    // 描画
    if (
      (img, x + cx < 0) ||
      (img, x + cx >= img.width) ||
      (img, y + cy < 0) ||
      (img, y + cy >= img.height)
      ) {
      continue;
    }
    plot(img, x + cx, y + cy);


  }

}
//! @brief ブレゼンハムの直線描画
//! @param [out] img 画像データ(一次元配列)へのポインタ
//! @param [in] width 画像の幅(画素数)
//! @param [in] height 画像の高さ(画素数)
//! @param [in] sx 線の始点X
//! @param [in] sy 線の始点Y
//! @param [in] ex 線の終点X
//! @param [in] ey 線の終点Y
//! @param [in] color 線の色
void Bresenham(
  Image& img,
  const int sx,
  const int sy,
  const int ex,
  const int ey
) {
  // https://ja.wikipedia.org/wiki/%E3%83%96%E3%83%AC%E3%82%BC%E3%83%B3%E3%83%8F%E3%83%A0%E3%81%AE%E3%82%A2%E3%83%AB%E3%82%B4%E3%83%AA%E3%82%BA%E3%83%A0

  const int dx = std::abs(ex - sx);
  const int dy = std::abs(ey - sy);

  const int nx = (sx < ex) ? 1 : -1;
  const int ny = (sy < ey) ? 1 : -1;

  int err = dx - dy;

  int x = sx;
  int y = sy;
  while (1) {

    plot(img, x, y);

    if (x == ex && y == ey)
      break;

    const int e2 = 2 * err;
    if (e2 > -dy) {
      err = err - dy;
      x += nx;
    }
    if (e2 < dx) {
      err = err + dx;
      y += ny;
    }
  }
}
//! @brief 角丸長方形を描画
//! @param [out] img 画像
//! @param [in] sx 長方形始点x
//! @param [in] sy 長方形始点y
//! @param [in] ex 長方形終点x
//! @param [in] ey 長方形終点y
//! @return なし
void rounded_rectangle(
  Image& img,
  const int sx, const int sy,
  const int ex, const int ey,
  const int r) {

  Bresenham(img, sx + r, sy    , ex - r, sy    );
  Bresenham(img, sx + r, ey    , ex - r, ey    );
  Bresenham(img, sx    , sy + r, sx    , ey - r);
  Bresenham(img, ex    , sy + r, ex    , ey - r);


  arc4(img, sx + r, sy + r, r, CPOS::left, CPOS::top);
  arc4(img, sx + r, ey - r, r, CPOS::left, CPOS::bottom);
  arc4(img, ex - r, sy + r, r, CPOS::right, CPOS::top);
  arc4(img, ex - r, ey - r, r, CPOS::right, CPOS::bottom);
}
呼び出し
#pragma warning(disable:4996)

#include <iostream>

#include "draw.hpp"


//! @brief PPM(RGB各1byte,カラー,テキスト)を書き込む
//! @param [in] fname ファイル名
//! @param [in] vmax 全てのRGBの中の最大値
//! @param [in] width 画像の幅
//! @param [in] height 画像の高さ
//! @param [in] p 画像のメモリへのアドレス
//! @details RGBRGBRGB....のメモリを渡すと、RGBテキストでファイル名fnameで書き込む
void pnmP3_Write(const char* const fname, const int width, const int height, const unsigned char* const p) { // PPM ASCII

  FILE* fp = fopen(fname, "wb");
  fprintf(fp, "P3\n%d %d\n%d\n", width, height, 255);

  size_t k = 0;
  for (size_t i = 0; i < (size_t)height; i++) {
    for (size_t j = 0; j < (size_t)width; j++) {
      fprintf(fp, "%d %d %d ", p[k], p[k], p[k]);
      k++;
    }
    fprintf(fp, "\n");
  }

  fclose(fp);
}
int main()
{
  Image img;
  resize(&img, 250, 200);

  // 中心
  int cx = 250;
  int cy = 250;

  //半径
  int r = 50;


  rounded_rectangle(img,
    50, // sx
    50, // sy
    200,// ex
    150,// ey
    20  // r
  );

  pnmP3_Write("a.pgm", img.width, img.height, img.img.data());


}
スキャンラインで円を塗りつぶす
円を描くプログラムを書いたのでついでに中も塗りつぶす。
#include <iostream>
#include <vector>

#include "Circle.hpp"

#pragma warning(disable:4996)

void pnmP2_Write(
  const char* const fname,
  const int width,
  const int height,
  const unsigned char* const p);
//! @brief 閉じた図形を塗りつぶし
//! @param [in,out] img 書き込み先
//! @param [in] rsx 図形を覆う座標(左側)
//! @param [in] rsy 図形を覆う座標(上側)
//! @param [in] rex 図形を覆う座標(右側)
//! @param [in] rey 図形を覆う座標(下側)
//! @param [in] pen 塗りつぶす色
//! @return なし
void fill_closed(Image& img, int rsx, int rsy, int rex, int rey,unsigned char pen) {

  unsigned char color = 150;

  for (int y = rsy; y <= rey; y++) {

    int begin = -1, end = -1;
    int b;

    for (int x = rsx; x <= rex; x++) {
      int p = img.img[y * img.width + x];

      // 図形の輪郭を見つけた場合
      if (p == pen) {
        // まだ始点を発見していない場合
        if (begin == -1) {

          // 図形の内側に入る
          for (b = x; b <= rex; b++) {
            if (img.img[y * img.width + b] != pen)
              break;
          }
          if (b == rex)
            break;
          x = begin = b;
        }
        // 既に始点が発見済みの場合は終点の発見となる
        else {
          end = x - 1;
          if (begin >= end)
            break;
          // 始点から終点までを塗る
          for (b = begin; b <= end; b++) {
            img.img[y * img.width + b] = color;
          }
          break;
        }
      }
    }
  }

}
int main(int argv,char** argc)
{


  int w = 100, h = 100;
  Image img;
  img.width = w;
  img.height = h;
  resize(&img, w, h);
  std::fill(img.img.begin(), img.img.end(), 0);

  int size = w * h;

  int cx = 30, cy = 30, r = 25;
  // 円を描く
  circle(img,cx,cy,r);

  // 矩形を想定する
  int rect_sx = cx - r - 1;
  int rect_sy = cy - r - 1;
  int rect_ex = cx + r + 1;
  int rect_ey = cy + r + 1;

  const int pen = 255;

  fill_closed(img, rect_sx, rect_sy, rect_ex, rect_ey, pen);


  pnmP2_Write(R"(C:\Users\szl\Desktop\mydev\out\b.pgm)", w, h, img.img.data());

  std::cout << "Hello World!\n";

  return 0;
}


//! @brief Portable Gray map
//! @param [in] fname ファイル名
//! @param [in] width 画像の幅
//! @param [in] height 画像の高さ
//! @param [in] p 画像のメモリへのアドレス
//! @details RGBRGBRGB....のメモリを渡すと、RGBテキストでファイル名fnameで書き込む
void pnmP2_Write(
  const char* const fname,
  const int width,
  const int height,
  const unsigned char* const p) { // PPM ASCII

  FILE* fp = fopen(fname, "wb");
  fprintf(fp, "P2\n%d %d\n%d\n", width, height, 255);

  size_t k = 0;
  for (size_t i = 0; i < (size_t)height; i++) {
    for (size_t j = 0; j < (size_t)width; j++) {
      fprintf(fp, "%d ", p[k]);
      k++;
    }
    fprintf(fp, "\n");
  }

  fclose(fp);
}
円を描くアルゴリズム(2)
前回の1/4だけ円弧を描くプログラムを四回呼び出して円を描く。
#pragma warning(disable:4996)

#include <iostream>


#include <vector>

//! @brief PPM(RGB各1byte,カラー,テキスト)を書き込む
//! @param [in] fname ファイル名
//! @param [in] vmax 全てのRGBの中の最大値
//! @param [in] width 画像の幅
//! @param [in] height 画像の高さ
//! @param [in] p 画像のメモリへのアドレス
//! @details RGBRGBRGB....のメモリを渡すと、RGBテキストでファイル名fnameで書き込む
void pnmP3_Write(const char* const fname, const int width, const int height, const unsigned char* const p) { // PPM ASCII

  FILE* fp = fopen(fname, "wb");
  fprintf(fp, "P3\n%d %d\n%d\n", width, height, 255);

  size_t k = 0;
  for (size_t i = 0; i < (size_t)height; i++) {
    for (size_t j = 0; j < (size_t)width; j++) {
      fprintf(fp, "%d %d %d ", p[k], p[k], p[k]);
      k++;
    }
    fprintf(fp, "\n");
  }

  fclose(fp);
}


struct Image {
  std::vector<unsigned char> img;
  int width;
  int height;
};
void resize(Image* img, int w, int h) {
  img->width = w;
  img->height = h;
  img->img.resize(w * h);
}

//! @brief 画像のピクセルを着色する
//! @param [in,out] img 画像
//! @param [in] x 座標
//! @param [in] y 座標
//! @return なし
void plot(Image& img, int x, int y) {
  img.img[y * img.width + x] = 255;
}


enum class CPOS {
  left,right,top,bottom
};
//! @brief 円の指定した1/4を描画する
//! @param [out] img 画像
//! @param [in] cx 中心座標
//! @param [in] cy 中心座標
//! @param [in] r  半径
//! @param [in] bx 円の四分割したエリアの指定
//! @param [in] by 円の四分割したエリアの指定
//! @return なし
void calc(Image& img, const int cx, const int cy, const int r, const CPOS bx, const CPOS by) {
  int x, y;//描画位置
  const int rr = r * r;//半径の二乗
  int dx, dy;
  int limx;
  int limy;

  if (bx==CPOS::right && by==CPOS::bottom) {
    // □□
    // □■
    //初期位置
    x = r;
    y = 0;
    dx = -1;
    dy = +1;
    limx = 0;
    limy = r;
  }
  else if (bx == CPOS::left && by == CPOS::bottom) {
    // □□
    // ■□
    x = 0;
    y = r;
    dx = -1;
    dy = -1;
    limx = -r;
    limy = 0;
  }
  else if (bx == CPOS::left && by == CPOS::top) {
    // ■□
    // □□
    x = -r;
    y = 0;
    dx = +1;
    dy = -1;
    limx = 0;
    limy = -r;
  }
  else if (bx == CPOS::right && by == CPOS::top) {
    // □■
    // □□
    x = 0;
    y = -r;
    dx = +1;
    dy = +1;
    limx = r;
    limy = 0;
  }

  //最初の一点
  //plot(img,x + cx, y + cy);

  while ((x != limx) || (y != limy)) {

    /////////////////////////
    // 次に描画するポイントを決定

    //次に描画するのは以下のいずれか。
    int xy1 = pow(x + dx, 2) + pow(y     , 2);
    int xy2 = pow(x + dx, 2) + pow(y + dy, 2);
    int xy3 = pow(x     , 2) + pow(y + dy, 2);

    // x*x + y*y == r*rなので
    // 上記各xyのうち最もr*rとの差が少ないx*x+y*yを選択
    xy1 = abs(xy1 - rr);
    xy2 = abs(xy2 - rr);
    xy3 = abs(xy3 - rr);

    if (xy1 < xy2) {
      if (xy1 < xy3) {
        // xy1
        x = x + dx;
        y = y;
      }
      else {
        // xy2
        x = x + dx;
        y = y + dy;
      }
    }
    else {
      if (xy2 < xy3) {
        // xy2
        x = x + dx;
        y = y + dy;
      }
      else {
        // xy3
        x = x;
        y = y + dy;
      }
    }

    /////////////////////////
    // 描画
    if (
      (img, x + cx < 0) ||
      (img, x + cx >=img.width) ||
      (img, y + cy < 0) ||
      (img, y + cy >= img.height)
      ) {
      continue;
    }
    plot(img,x + cx, y + cy);


  }

}
//! @brief 円を描画する
//! @param [in] img 画像データ
//! @param [in] cx  中心座標
//! @param [in] cy  中心座標
//! @param [in] r   半径
//! @return なし
void circle(Image& img,const int cx, const int cy, const int r) {

  // □□
  // □■
  calc(img,cx, cy, r, CPOS::right, CPOS::bottom);

  // □□
  // ■□
  calc(img, cx, cy, r, CPOS::left, CPOS::bottom);

  // ■□
  // □□
  calc(img, cx, cy, r, CPOS::left, CPOS::top);

  // □■
  // □□
  calc(img, cx, cy, r, CPOS::right, CPOS::top);

}
int main()
{
  Image img;
  resize(&img, 500, 500);

  // 中心
  int cx = 250;
  int cy = 250;

  //半径
  int r = 50;

  //円を描画
  circle(img,cx, cy, r);


  pnmP3_Write("a.pgm", img.width, img.height, img.img.data());


}
円を描くアルゴリズム(1)
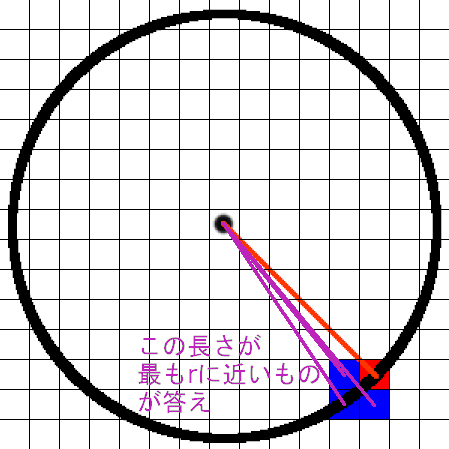
簡単に言うと、あるピクセルを描画した後、次に描画するピクセルはどれかを計算する。これを繰り返して円にする。
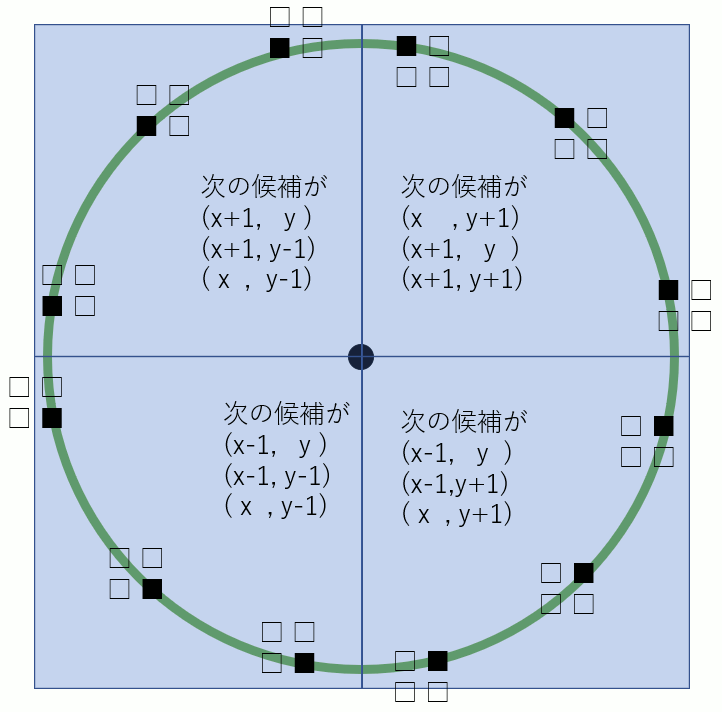
この時、例えば円を時計回りで描くなら、あるx,yを描画したら、次の候補は(x-1,y),(x-1,y+1),(x,y+1)のいずれかになる。
どれが正解かというと、中心からの距離が半径に最も近いものが答えとなる。
これが4パターンあり、x,yがそれぞれ前進する場合と後進する場合に分けられる。以下の図の■が現在描いているドット、□は次に描くドットの候補。
ソースコード(1/4)
1/4だけ描画するコード
#pragma warning(disable:4996)

#include <iostream>

#include <vector>

//! @brief PPM(RGB各1byte,カラー,テキスト)を書き込む
//! @param [in] fname ファイル名
//! @param [in] vmax 全てのRGBの中の最大値
//! @param [in] width 画像の幅
//! @param [in] height 画像の高さ
//! @param [in] p 画像のメモリへのアドレス
//! @details RGBRGBRGB....のメモリを渡すと、RGBテキストでファイル名fnameで書き込む
void pnmP3_Write(const char* const fname, const int width, const int height, const unsigned char* const p) { // PPM ASCII

  FILE* fp = fopen(fname, "wb");
  fprintf(fp, "P3\n%d %d\n%d\n", width, height, 255);

  size_t k = 0;
  for (size_t i = 0; i < (size_t)height; i++) {
    for (size_t j = 0; j < (size_t)width; j++) {
      fprintf(fp, "%d %d %d ", p[k], p[k], p[k]);
      k++;
    }
    fprintf(fp, "\n");
  }

  fclose(fp);
}


int width = 500;
int height = 500;
std::vector<unsigned char> img;

void plot(int x, int y) {
  img[y * width + x] = 255;
}

int main()
{
  img.resize(width * height);

  // 中心
  int cx = 250;
  int cy = 250;

  //半径
  int r = 50;
  const int rr = r * r;//半径の二乗

  int x, y;//描画位置
  //初期位置
  x = r;
  y = 0;

  //最初の一点
  plot(x + cx, y + cy);

  //反時計回りに描画していく(1/4)
  // 右下
  // □□
  // □■
  while (x > 0) {

    /////////////////////////
    // 次に描画するポイントを決定

    //次に描画するのは以下のいずれか。
    //1 { x - 1,y     };
    //2 { x - 1,y + 1 };
    //3 { x    ,y + 1 };
    int xy1 = pow(x - 1, 2) + pow(y, 2);
    int xy2 = pow(x - 1, 2) + pow(y + 1, 2);
    int xy3 = pow(x, 2) + pow(y + 1, 2);

    // x*x + y*y == r*rなので
    // 上記各xyのうち最もr*rとの差が少ないx*x+y*yを選択
    xy1 = abs(xy1 - rr);
    xy2 = abs(xy2 - rr);
    xy3 = abs(xy3 - rr);

    if (xy1 < xy2) {
      if (xy1 < xy3) {
        // xy1
        x = x - 1;
        y = y;
      }
      else {
        // xy2
        x = x - 1;
        y = y + 1;
      }
    }
    else {
      if (xy2 < xy3) {
        // xy2
        x = x - 1;
        y = y + 1;
      }
      else {
        // xy3
        x = x;
        y = y + 1;
      }
    }

    /////////////////////////
    // 描画
    plot(x + cx, y + cy);

  }


  pnmP3_Write("a.pgm", width, height, img.data());


}
ビット演算で市松模様を描く
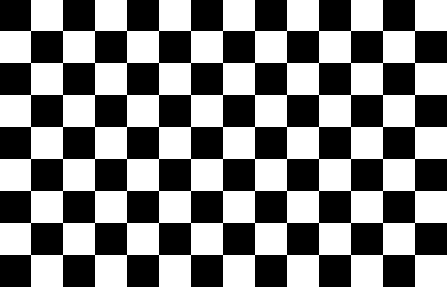
前にも書いたことがあるが、ビット演算で書き直す。
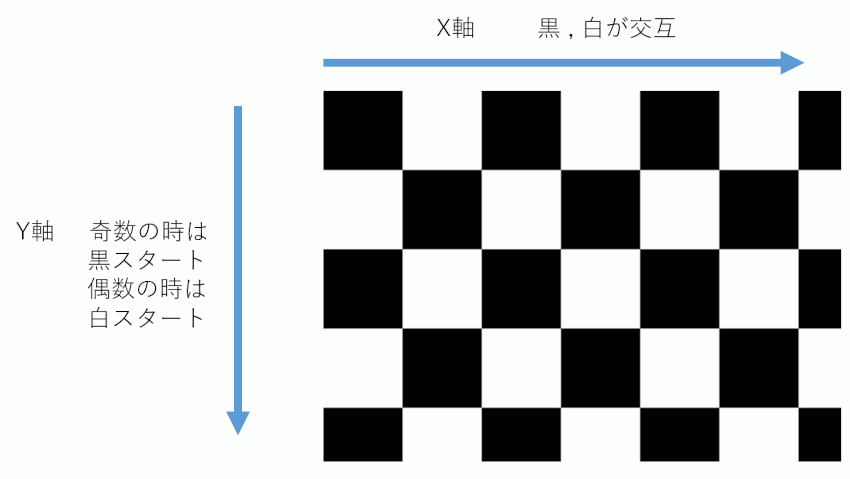
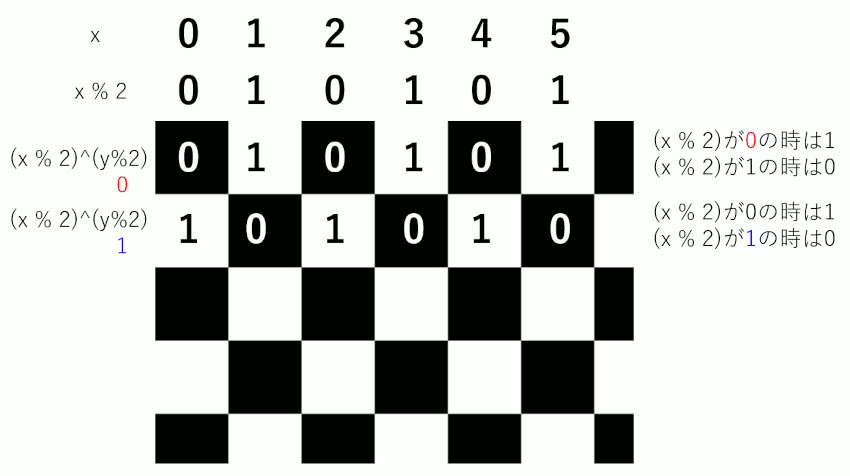
排他的論理和は、1^1、0^0の時は0、それ以外の時は1になる。
これを使い、x軸が偶数、奇数、偶数、奇数、...と並んでいるものに、y軸が偶数の時は奇数だけを1、y軸が奇数の時は偶数だけを1にすることで市松模様にする。
#include <iostream>
#include <vector>

#pragma warning(disable:4996)

void pnmP2_Write(
  const char* const fname,
  const int width,
  const int height,
  const unsigned char* const p);


int main()
{

  int w = 100, h = 50;
  int size = w * h;
  std::vector<unsigned char> image(w*h);

  for (size_t y = 0; y < h; y++) {
    for (size_t x = 0; x < w; x++) {
      size_t p = y * w + x;

      int f;


      /*
      if (y % 2) {
        f = (x % 2)? 1 : 0;
      }
      else {
        f = (x % 2) ? 0 : 1;
      }
      */
f = (x & 1) ^ (y & 1);
      image[p] = f * 255;
    }
  }

  pnmP2_Write(R"(C:\Users\szl\Desktop\mydev\out\a.pgm)", w, h, image.data());

}


//! @brief Portable Gray map
//! @param [in] fname ファイル名
//! @param [in] width 画像の幅
//! @param [in] height 画像の高さ
//! @param [in] p 画像のメモリへのアドレス
//! @details RGBRGBRGB....のメモリを渡すと、RGBテキストでファイル名fnameで書き込む
void pnmP2_Write(
  const char* const fname,
  const int width,
  const int height,
  const unsigned char* const p) { // PPM ASCII

  FILE* fp = fopen(fname, "wb");
  fprintf(fp, "P2\n%d %d\n%d\n", width, height, 255);

  size_t k = 0;
  for (size_t i = 0; i < (size_t)height; i++) {
    for (size_t j = 0; j < (size_t)width; j++) {
      fprintf(fp, "%d ", p[k]);
      k++;
    }
    fprintf(fp, "\n");
  }

  fclose(fp);
}
余談
今の時代は鬼滅の刃とかキーワードに入れておいたほうがヒットしやすいのだろうか。
XMLパーサーpugixml を試す(読み込み,日本語)
マルチバイトであればタグが日本語でも動作するが、Unicodeの場合タグが英語でなければ取得できない。
マルチバイトの場合
#include <iostream>

#include <string>

#include "pugixml.hpp"
const char* data() {
    return
        R"(
<?xml version="1.0" encoding="Shift-JIS"?>
<data date="2022-06-15">
  <名前>
    <a>田中</a>
    <b>中山</b>
    <c>山本</c>
  </名前>
</data>
)";
}
int main()
{
  pugi::xml_document doc;

  std::string txt = data();
  pugi::xml_parse_result result = doc.load_buffer(txt.data(), txt.size(), 0,pugi::xml_encoding::encoding_auto);


  std::cout << doc.child("data").attribute("date").value() << std::endl;

  for (auto point : doc.child("data").children("名前")) {

    std::cout << point.name() << std::endl;

    for (auto val : point.children()) {
      std::cout <<
        val.name() << " : " <<
        val.child_value() <<
        std::endl;


    }
  }

}
utf8の場合
#include <iostream>

#include <string>

#include "pugixml.hpp"
const char* data() {
  return
    u8R"(
<?xml version="1.0" encoding="UTF-8"?>
<data date="2022-06-15">
  <names>
    <a>田中</a>
    <b>中山</b>
    <c>山本</c>
  </names>
</data>
)";
}
int main()
{
  std::wcout.imbue(std::locale(""));

  pugi::xml_document doc;

  pugi::xml_parse_result result = doc.load_string(data());

  std::cout << doc.child("data").attribute("date").value() << std::endl;

  for (auto point : doc.child("data").children("names")) {

    std::cout << point.name() << std::endl;

    for (auto val : point.children()) {
      std::wcout <<
        pugi::as_wide(val.name()) << " : " <<
        pugi::as_wide(val.child_value()) <<
        std::endl;
    }
  }

}
XMLパーサーpugixml を試す(作成)
#include <iostream>
#include <sstream>
#include <fstream>

#include "pugixml.hpp"

int main()
{
  pugi::xml_document doc;

  pugi::xml_node theroot = doc.append_child("the_root");

  pugi::xml_node tag1 = theroot.append_child("tag1");
  tag1.append_child(pugi::node_pcdata).set_value("This ");
  tag1.append_child(pugi::node_pcdata).set_value("is ");
  tag1.append_child(pugi::node_pcdata).set_value("a ");
  tag1.append_child(pugi::node_pcdata).set_value("pen ");

  pugi::xml_node tag2 = theroot.insert_child_after("tag2", tag1);
  tag2.append_child(pugi::node_pcdata).set_value("tag2item");

  pugi::xml_node noclose = theroot.insert_child_after("no_close", tag1);
  noclose.append_attribute("text") = "abc";
  noclose.append_attribute("float") = 1.1;


  std::stringstream ss;
  doc.save(ss);
  std::cout << ss.str() << std::endl;

  // 表示ならこれもできる
  // doc.save(std::cout);

  // ファイル出力
  // std::ofstream outf("test.xml");
  // doc.save(outf);

}
