WordPressのコメント欄から名前とURIを消す話
要約
・コメント投稿時、ユーザ名/URI入力欄が表示されないようにする
・コメント表示時、万が一ユーザ名/URIデータがあっても表示されないようにする
コメント投稿時 入力欄を削除
入力欄を表示されないようにするため、functions.phpに以下を追記する
<?php

/*コメント欄から各項目を削除*/
function hide_comment_fields_author($defaults){
  $defaults['fields']['author'] = '';
  return $defaults;
}
add_filter( 'comment_form_defaults', 'hide_comment_fields_author');
function hide_comment_fields_email($defaults){
  $defaults['fields']['email'] = '';
  return $defaults;
}
add_filter( 'comment_form_defaults', 'hide_comment_fields_email');
function hide_comment_fields_url($defaults){
  $defaults['fields']['url'] = '';
  return $defaults;
}
add_filter( 'comment_form_defaults', 'hide_comment_fields_url');
/*コメント欄から各項目を削除 ここまで*/

?>
参考サイト。以下では上記処理を一括指定する方法が公開されている。というか、comment_form_defautsに$defaults['fields'][***]を指定する関数を指定しているので一つにまとめられる。
コメント表示時、名前/URI情報を表示しない
仮に情報としてこれらが入力されていても、表示されないようにする。
functions.php 側
まずfunctions.php側でコメント表示時に指定するコールバック関数を作成。
この時、URLや投稿者名を取得して表示する箇所を実装しないでおく。
なおついでアバターの記述も無効化した。
<?php

/* comments.phpで呼び出すwp_list_commentsに指定するコールバック関数 */
function mytheme_comment($comment, $args, $depth) {
   $GLOBALS['comment'] = $comment; ?>
   <li <?php comment_class(); ?> id="li-comment-<?php comment_ID() ?>">
     <div id="comment-<?php comment_ID(); ?>">
      <div class="comment-author vcard">
         <?php /*アバターも無効化*/ /*echo get_avatar($comment,$size='48',$default='<path_to_url>' );*/ ?>
         <?php /*コメント投稿時指定のURLを非表示*/ /*echo get_comment_author_link( $comment_ID );*/ ?>
         <?php /*コメント投稿時指定の投稿者名を非表示*/ /*printf(__('<cite class="fn">%s</cite> <span class="says">より:</span>'), get_comment_author())*/ ?>
      </div>
      <?php if ($comment->comment_approved == '0') : ?>
         <em><?php _e('Your comment is awaiting moderation.') ?></em>
         <br />
      <?php endif; ?>

      <div class="comment-meta commentmetadata"><a href="<?php echo htmlspecialchars( get_comment_link( $comment->comment_ID ) ) ?>"><?php printf(__('%1$s at %2$s'), get_comment_date(),  get_comment_time()) ?></a><?php edit_comment_link(__('(Edit)'),'  ','') ?></div>

      <?php comment_text() ?>

      <div class="reply">
         <?php comment_reply_link(array_merge( $args, array('depth' => $depth, 'max_depth' => $args['max_depth']))) ?>
      </div>
     </div>
<?php
        }
/* comments.phpで呼び出すwp_list_commentsに指定するコールバック関数 ここまで*/

?>
comments.php 側
comments.php側では、作成した関数をwp_list_commentsのコールバックに指定する。
<?php if (post_password_required()) { return; } ?> <div id="comments"> <?php if (have_comments()) :?> <h3 id="comments-count"><?php echo get_comments_number().' 件のコメント'; ?></h3> <ul id="comments-list"> <?php wp_list_comments(array( 'avatar_size'=>48, 'style'=>'ul', 'type'=>'all', 'callback'=>'mytheme_comment' )); ?> </ul> <?php if (get_comment_pages_count() > 1) : ?> <ul id="comments-pagination"> <li id="prev-comments"><?php previous_comments_link('<< 前のコメント'); ?></li> <li id="next-comments"><?php next_comments_link('次のコメント >>'); ?></li> </ul> <?php endif; endif; ?> <?php comment_form(); ?> </div><!-- comments -->
参考サイト。
https://deluxeblogtips.com/wordpress-remove-author-link-in/
あとがき
コメント欄でトラブルがあったのでこれを機に消してしまうことにした。
実際ほぼすべての状況において名前やメールアドレスを「サイト管理者が」持つことは有害無益なので入力欄などないほうがいい。
libwebpを使ってみる(Decode)
デコード。webpファイルを読み込み、ppmファイルに変換する。なおアルファ付き画像は扱わない。
#include <fstream>

#include "ppmP3_read.hpp"

#include <vector>

#include <webp/decode.h>

#pragma comment(lib,"libwebp.lib")


void ppmP3_write(
  const char* const fname,
  const int width,
  const int height,
  const unsigned char* const p,
  const int vmax
);


int main()
{
  // ファイルの画像の格納先
  std::vector<std::uint8_t> image;
  ///////////////////////////////////
  // webp形式の画像データをファイルから読み込む
  std::ifstream ifs(
    "C:\\test\\a.webp",
    std::ios::binary);
  ifs.seekg(0, std::ios::end);
  long long int size = ifs.tellg();
  ifs.seekg(0);

  // ファイル読み込み
  image.resize(size);
  ifs.read((char*)image.data(), size);

  //ファイルのデータサイズ
  const size_t datasize = image.size();
  ///////////////////////////////////

  // 画像データの情報の格納先
  int width;
  int height;
  uint8_t* rgb = nullptr;

  // 画像情報を取得する構造体
  WebPBitstreamFeatures info;

  // 画像情報を取得
  WebPGetFeatures(
    image.data(),
    datasize,
    &info
  );
  ///////////////////////////////////
  // 画像情報を表示
  printf("alpha   : %s\n", info.has_alpha?"true":"false");
  printf("format  : %s\n",
    (info.format == 0) ? "undefined":
    ((info.format == 1) ? "lossy" : "lossless"));
  printf("animation:%s\n", info.has_animation ? "true" : "false");
  ///////////////////////////////////

  if (info.has_alpha != 0) {

    // WebPDecodeRGBA でRGBAのデータ列に変換
  }
  else {

    // RGBのデータ列に変換。戻り値がRGGデータ
    rgb = WebPDecodeRGB(
      image.data(),
      datasize,
      &width,
      &height
    );
  }
  ///////////////////////////////////

  ppmP3_write("C:\\test\\fromwebp.ppm",
    width, height,
    rgb,
    255);
  // libWebPが確保したメモリの解放
  WebPFree(rgb);
}

//! @brief PPM(RGB各1byte,カラー,テキスト)を書き込む
//! @param [in] fname ファイル名
//! @param [in] width 画像の幅
//! @param [in] height 画像の高さ
//! @param [in] p 画像のメモリへのアドレス
//! @param [in] vmax 全てのRGBの中の最大値。普通の画像なら255
//! @details RGBRGBRGB....のメモリを渡すと、RGBテキストでファイル名fnameで書き込む
void ppmP3_write(
  const char* const fname,
  const int width,
  const int height,
  const unsigned char* const p,
  const int vmax
) {

  FILE* fp = fopen(fname, "wb");
  fprintf(fp, "P3\n%d %d\n%d\n", width, height, vmax);

  size_t k = 0;
  for (size_t i = 0; i < (size_t)height; i++) {
    for (size_t j = 0; j < (size_t)width; j++) {
      fprintf(fp, "%d %d %d ",
        p[k * 3 + 0],
        p[k * 3 + 1],
        p[k * 3 + 2]
      );
      k++;
    }
    fprintf(fp, "\n");
  }

  fclose(fp);
}
libwebpを使ってみる(Encode , Lossy)
libwebpを使ってみる(Encode , Lossless)
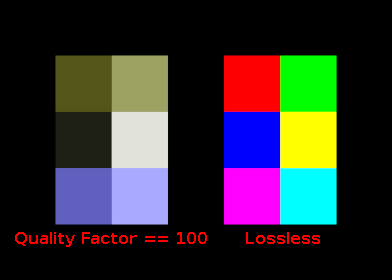
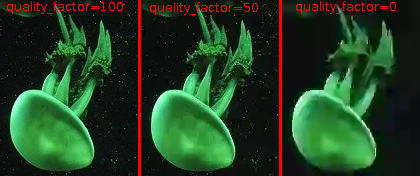
小規模な画像をLossyで保存すると色がかなり悲惨なことになる(QualityFactor==100.0でも)。
なのでテストのため少し大きめのPPMを読み込んで変換する。
#include "ppmP3_read.hpp"

#include <vector>

#include <webp/encode.h>

#pragma comment(lib,"libwebp.lib")


// https://suzulang.com/ppmp3_read-memalloc-ver/
#include "ppmP3_read.hpp"

// https://www.study.suzulang.com/2dcg-functions/nbyte-data-type
#include "NByteData.hpp"


int main()
{
  using PixelT = NByteData<3>;

  std::vector<PixelT> rgbdata;

  // 画像読み込み
  int width;
  int height;
  int vmax;

  // rgb画像読み込み
  ppmP3_read(
    "C:\\data\\b.ppm",
    &width,
    &height,
    &vmax,
    [&rgbdata](const size_t pixelcount) {
    rgbdata.resize(pixelcount);
    return (unsigned char*)&rgbdata[0];
  }
  );

  // 非可逆圧縮の品質 0.0f ~ 100.0f
  float quality_factor = 50.0f;

  uint8_t* output = 0;

  // 非可逆圧縮
  size_t size = WebPEncodeRGB(
    rgbdata.data()->data(),
    width,
    height,
    width * 3,      // stride 一行のメモリサイズ
    quality_factor, // 品質
    &output
  );
  printf("%zu", size);


  FILE* fp = fopen("C:\\data\\test-lossy-rgb.webp", "wb");
  fwrite(output, 1, size, fp);
  fclose(fp);


  WebPFree(output);

}
libwebpを使ってみる(Encode , Lossless)
libwebpを使って.webpファイルを出力してみる。
公式からダウンロード・展開
https://developers.google.com/speed/webp/download?hl=ja
展開する。
マニュアルは以下:
https://developers.google.com/speed/webp/docs/api
LosslessでRGB画像出力
#pragma warning(disable:4996)

#include <vector>

#include <webp/encode.h>

#pragma comment(lib,"libwebp.lib")

int main()
{
  // 作成したwebp形式のデータのアドレスを受け取るポインタ
  uint8_t* output = 0;

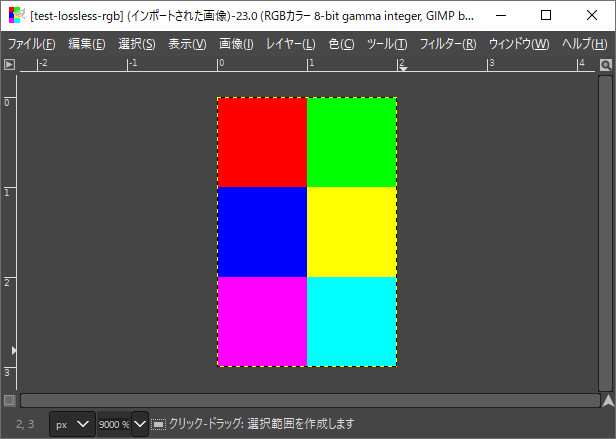
  // 2×3のRGB画像を作成
  std::vector<uint8_t> rgbdata = {
    255,  0,  0 /**/,   0,255,  0,
      0,  0,255 /**/, 255,255,  0,
    255,  0,255 /**/,   0,255,255
  };
  int width = 2;
  int height = 3;

  size_t size = WebPEncodeLosslessRGB(
    rgbdata.data(), // 変換したい画像へのポインタ
    width,          // 画像幅  ピクセル数
    height,         // 画像高さ ピクセル数
    width * 3,      // stride 一行のメモリサイズ
    &output         // データを受け取るポインタのアドレス
  );

  // 戻り値はoutputのバイト数
  printf("%zu", size);

  // ファイル出力
  FILE* fp = fopen("C:\\dev\\test-lossless-rgb.webp", "wb");
  fwrite(output, 1, size, fp);
  fclose(fp);

  // libwebpが確保したメモリの解放
  WebPFree(output);

}
LosslessでRGBA画像出力
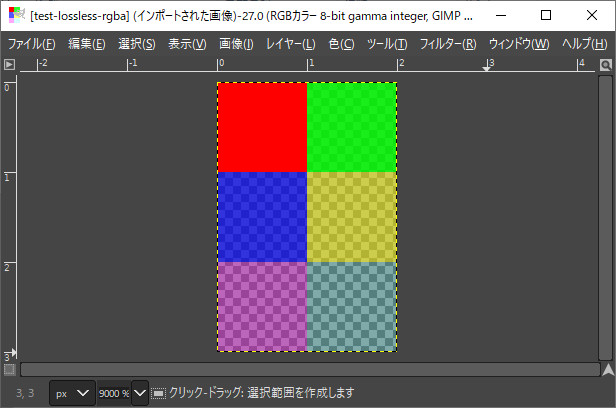
RGBAも可。
#pragma warning(disable:4996)

#include <vector>

#include <webp/encode.h>

#pragma comment(lib,"libwebp.lib")


int main()
{
  uint8_t* output = 0;

  std::vector<uint8_t> rgbdata = {
    255,  0,  0, 255 /**/,   0,255,  0, 212,
      0,  0,255, 170 /**/, 255,255,  0, 127,
    255,  0,255,  85 /**/,   0,255,255,  42
  };
  int width = 2;
  int height = 3;

  size_t size = WebPEncodeLosslessRGBA(
    rgbdata.data(),
    width,
    height,
    width * 4, // stride 一行のメモリサイズ
    &output
  );
  printf("%zu", size);


  FILE* fp = fopen("C:\\dev\\test-lossless-rgba.webp", "wb");
  fwrite(output, 1, size, fp);
  fclose(fp);


  WebPFree(output);

}
塗りつぶし Flood fill(3)再帰なし版を真面目に実装
以前作ったFloodFill。無理やり再帰なしにしたが、今度はちゃんとスタックを使ってまともに再帰なし版を書いた。
#pragma once


#pragma once

#include "NByteData.hpp"
#include <stack>

using uc3T = NByteData<3>;

//! @brief 座標計算などを行う補助クラス
class accessor {
  int width;
  int height;
public:
  void set(int Width, int Height) {
    width = Width;
    height = Height;
  }
  bool is_in(const int x, const int y) {
    if (x < 0 || y < 0 || x >= width || y >= height)
      return false;

    return true;

  }
  size_t get_pos(const int x, const int y) {
    return (size_t)y * width + (size_t)x;
  }

};
//! @brief floodfill本体
//! @param [in] x 対象の画素のX座標
//! @param [in] y 対象の画素のY座標
//! @param [in] targetcolor 塗りつぶし対象の色
//! @param [in] replacementcolor 塗りつぶし結果の色
//! @param [in,out] img 対象の画像データ
//! @param [in] acc 画素の座標等を求めたりする補助クラスのインスタンス
void ff_fill(
  int x,
  int y,
  uc3T targetcolor,
  uc3T replacementcolor,
  uc3T* img,
  accessor* acc) {

  using xyT = std::pair<int, int>;

  std::stack<xyT> stack;

  stack.push({ x,y });

  while (stack.empty() != true) {

    xyT xy = stack.top();
    stack.pop();
    x = xy.first;
    y = xy.second;

    if (acc->is_in(x, y) == false)
      continue;

    uc3T* node = &img[acc->get_pos(x,y)];

    if (*node != targetcolor) {
      continue;
    }

    *node = replacementcolor;

    stack.push({ x + 1, y });
    stack.push({ x - 1, y });
    stack.push({ x, y - 1 });
    stack.push({ x, y + 1 });
  }

  return;

}
//! @brief floodfillエントリポイント
//! @param [in] seedx 塗りつぶし開始点
//! @param [in] seedy 塗りつぶし開始点
//! @param [in] replacementcolor 塗りつぶし結果の色
//! @param [in,out] img 対象の画像データ
//! @param [in] Width 画像幅(画素数)
//! @param [in] Height 画像高さ(画素数)
void f_fill(
  int seedx, int seedy,
  uc3T replacementcolor,
  uc3T* img,
  int Width, int Height) {

  accessor acc;
  acc.set(Width, Height);
  if (acc.is_in(seedx, seedy) == false)
    return;

  uc3T targetcolor = img[acc.get_pos(seedx, seedy)];

  ff_fill(seedx, seedy, targetcolor, replacementcolor, img, &acc);

}
関連
WordPress + Gantry 5 ページごとのスタイルを設定
前回Gantry 5を有効にするまでやったので、各ページごとにスタイル等を設定していく方法を調べた。
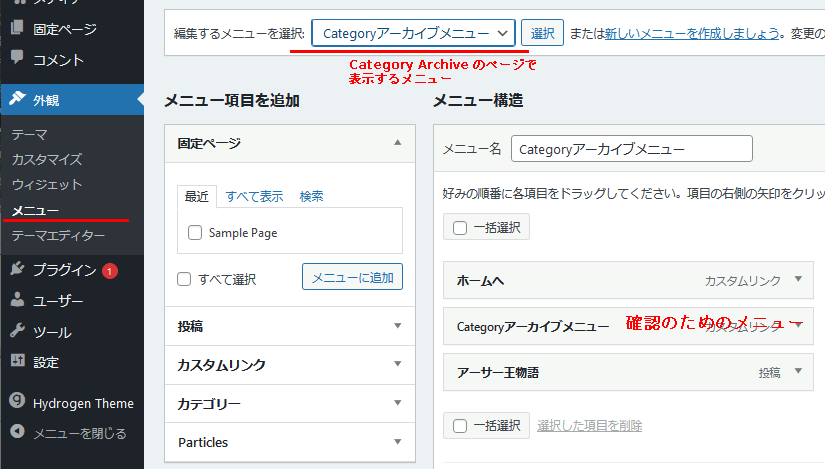
まず、設定の変更をわかりやすくするために、メニューを作成する。
カテゴリーアーカイブのページで表示されるメニュー、シングルページで表示されるメニュー、...と言った具合で作成しておく。
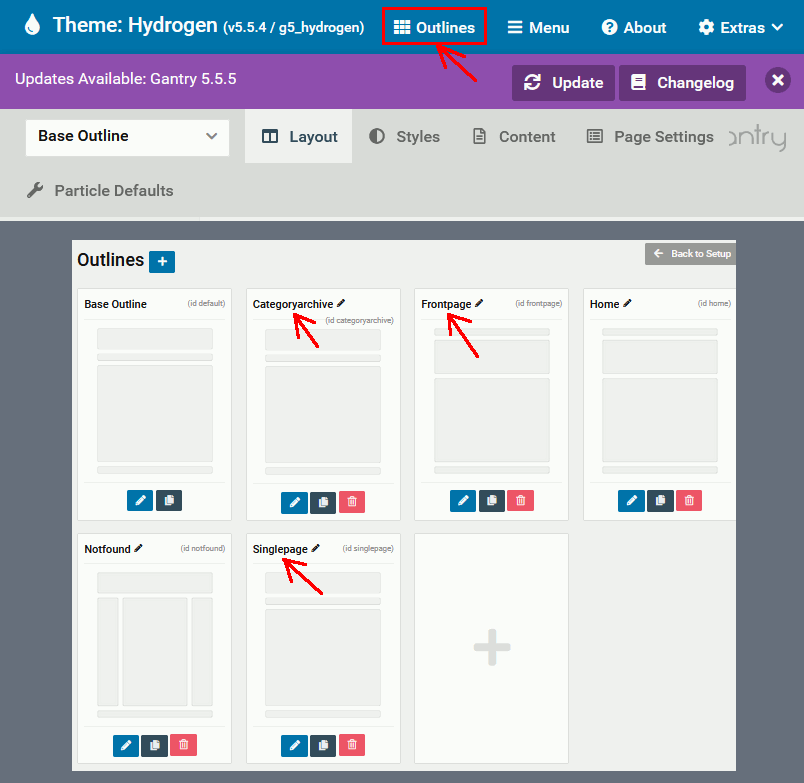
次に、アウトラインを作成する。
カテゴリーアーカイブのページ用のアウトライン、シングルページ 用のアウトライン 、...と言った具合で作成しておく。
ここで、一例としてカテゴリアーカイブのアウトラインを、カテゴリアーカイブのページに適用する事を考える。
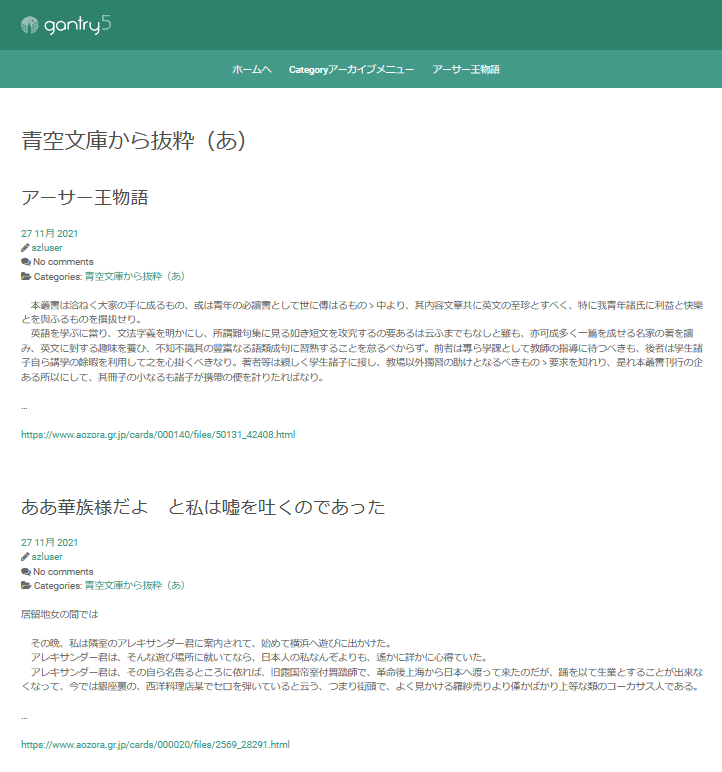
まず、カテゴリアーカイブページのアウトラインがちゃんとカテゴリアーカイブのページで表示される設定になっている事をわかりやすくするためにメニューを設定しておく。
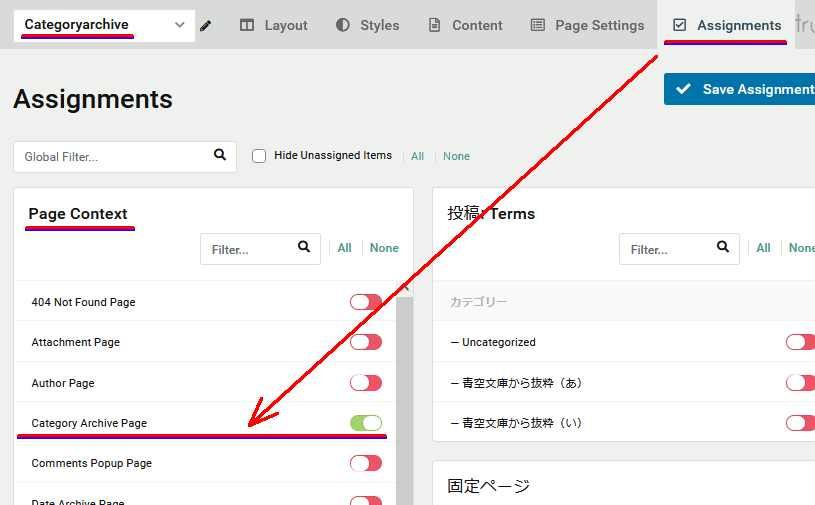
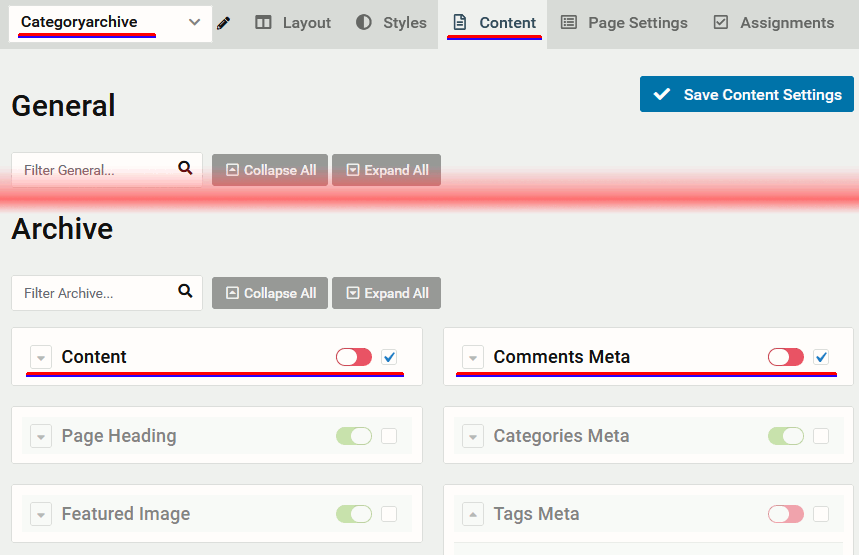
次に、Categoryarchiveアウトラインを選択した状態で、Assignmentsへ行き、Pate Contextの「Category Archive Page」のスイッチをONにする。
この設定で、Category Archive Pageに対しては、Categoryarchiveアウトラインを使用する、事になる。
この状態で設定を保存しカテゴリアーカイブを見てみると、ちゃんとアウトラインが反映されている。
ここで、例えばカテゴリアーカイブページでは本文を表示させないでタイトル一覧だけにしたいというような変更を加えてみる。
今度はContentへ行き、Archiveの項目の「Content」のスイッチをOFFにする。これでコンテンツ、つまり本文が表示されなくなる。ついでに、「Comments Meta」もOFFにし、No comments という部分も非表示にしてみる。
設定を保存して更新すると、本文が消えているのがわかる。
WordPressでGantry 5 を使う
Gantry 5 はテーマフレームワーク。Wordpress版もあるらしい。
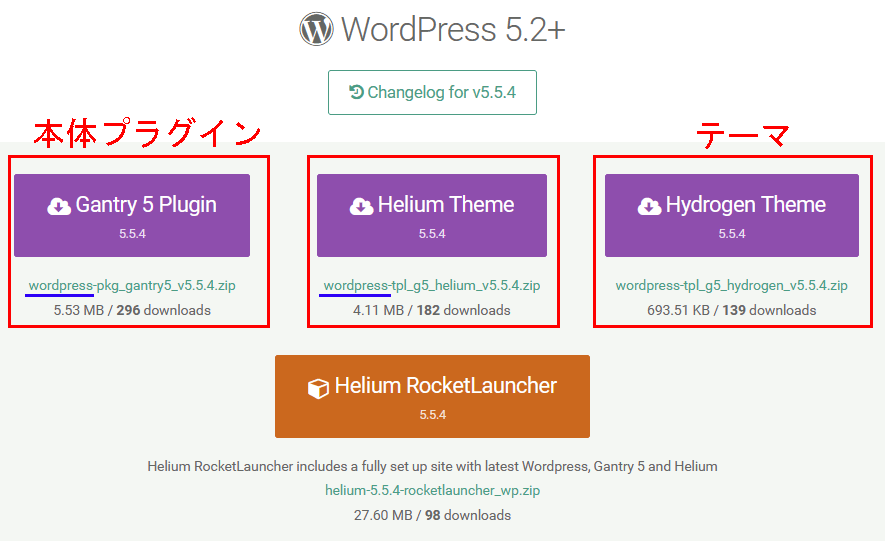
プラグインから検索してインストールもできる(Gantry 5 Framework)のだが、テーマもインストールしなければならず、テーマと本体のバージョンの違いによってはうまく動かないので公式からダウンロードしたほうがいい。
公式からプラグイン本体とテーマを一つ以上ダウンロードする
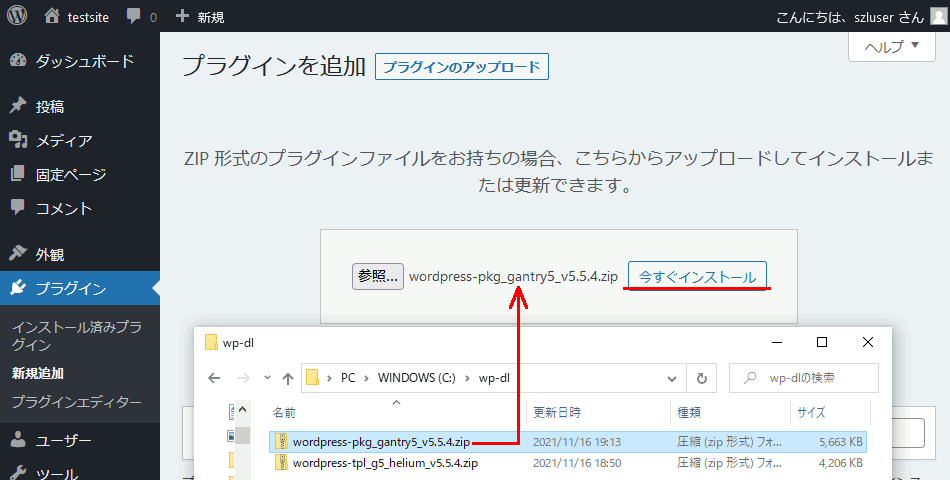
プラグインとテーマをインストールする
テーマを有効化するとテーマの設定項目が表示される。
Local by flywheel + All-in-One WP Migration + FTP clientでWordPressサイトのコピーをローカルに作る話
概要
・Local by flywheelで環境を作るときに、 PreferではなくCustomで作る。こうしないとphp.iniの設定などが難しい
・Local by flywheelで環境を作るときに、元のサイトとPHPのバージョンを合わせておく必要がある。少なくともPHP5系列とPHP7系列には互換性がないらしいのでここが違うと動かない
・Local by flywheelで作られた環境ではファイルアップロード容量がphp.iniの初期設定により小さくなっているので、php.ini.hbsのupload_max_filesize等々を編集し、All-in-One WP Migrationでエクスポートした.wpressファイルをインポートできるサイズに拡張しておく必要がある
・ Local by flywheel側で、All-in-One WP Migrationはデフォルトでは2021/11の時点で300Mしかインポートできないので、プラグインを編集して制約を撤廃する。
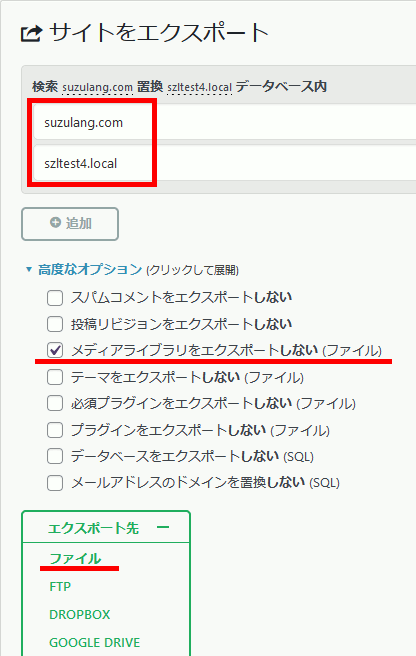
・元サイト側で、 All-in-One WP Migration でエクスポートをする際に、ドメイン名をローカルのドメイン名に文字列置換しておく
・元サイト側のサイズが極めて大きい場合、ローカル側のAll-in-One WP Migrationのインポート処理が終わらなくなってしまうので、メディアファイルを省いてエクスポートする。(私の場合全体で1GB近くあり、上記設定を行ってもインポート処理が進まなくなってしまったので、メディアファイル抜きで約300Mまで落とした)
・ローカル側にAll-in-One WP Migrationをインストールし、インポートする。結構時間がかかる
・元サイトにFTP接続し、wp-content/uploads/ ディレクトリを別途ダウンロードし、Local by flywheel側のwordpressのディレクトリに上書きする
Local by Flywheelで環境構築
ローカル環境を作るときはCustomで。あとPHPのバージョンを合わせる。
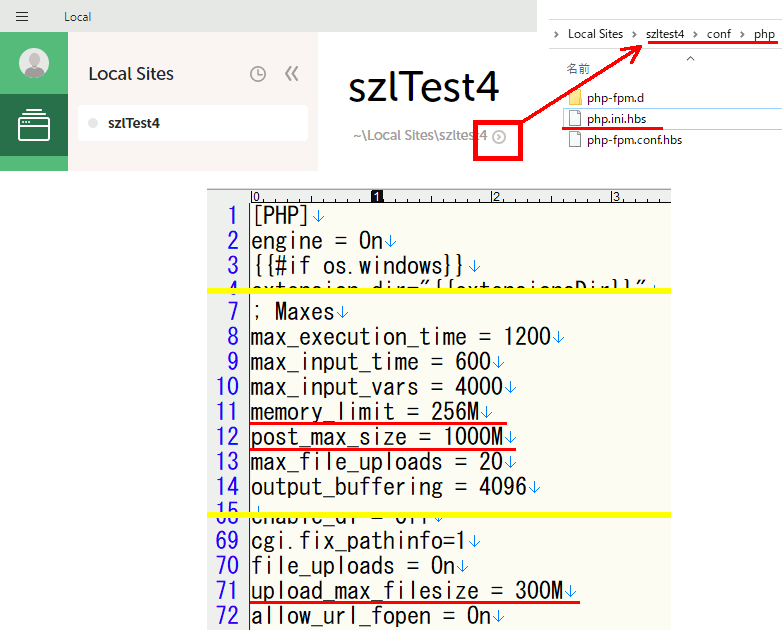
php.ini.hbs でアップロード上限をwpressファイル以上にあげておく。ただしwpressファイルが大きすぎるとそれでも無理かもしれない。
Local by Flywheel側のファイルアップロード上限撤廃
私は一応全部を2048Mに設定している
memory_limit = 2048M
post_max_size = 2048M
upload_max_filesize = 2048M
Local by Flywheel側のAll-in-One WP Migrationのファイルインポート上限撤廃
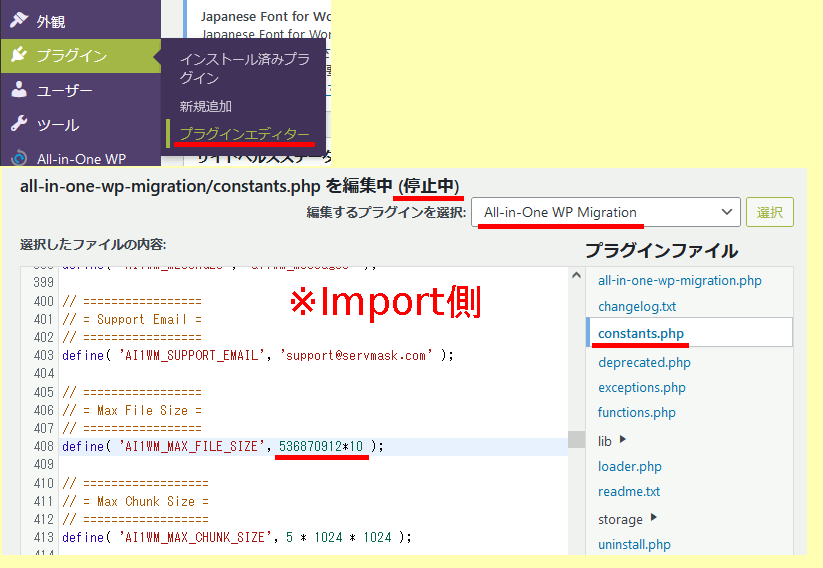
ローカル側のWordpressにログインし、All-in-One WP Migration をインストール。同プラグインのインポート上限を上げるためにプラグインエディタでAll-in-One WP Migrationを編集する
408行目あたりにある「Max File Size」の項目を 536870912*10 に変更
// = Max File Size =
// =================
define( 'AI1WM_MAX_FILE_SIZE', 536870912*10 );
元サイトのデータをエクスポート
元サイト側のAll-in-One WP Migrationで、エクスポート時、ドメインの置換を設定し、大きくなることが懸念される場合はメディアファイルをエクスポートしない設定をする。
Local by Flywheel側のwordpressにてインポート
ローカル側で普通にインポート→待つ。
ファイルが大きすぎる場合、あるいはローカルと元サイトでPHPバージョンが違う場合、100%から動かない。
なおファイルのサイズは360MBまで減らしても数分は待ったので安易に見切りをつけてはいけない。HDDかSSDかなど環境に持っても違うと思う。
メディアファイルを別途FTPでダウンロード・上書
最後にwp-content/uploads/ をサーバーからコピーして上書。完成。
icu::UnicodeStringで正規表現 icu::RegexMatcher
icu::RegexMatcher
#include <fstream> #include <iostream> #include <vector> #include <unicode/ucnv.h> #include <unicode/regex.h> // 要リンク #pragma comment(lib, "icuuc.lib") //regex.hに必要 #pragma comment(lib, "icuin.lib") // 以下のdllを要求される // icudt69.dll // icuuc69.dll // icuin69.dll regexに必要 int main() { std::fstream w( "C:\\dev\\icu-test\\converted.txt", std::ios::out | std::ios::binary | std::ios::trunc); std::u16string u16s = u"aい山うkえ👨👧經お经"; icu::UnicodeString ustr(u16s.c_str()); UErrorCode status = U_ZERO_ERROR; icu::RegexMatcher matcher(u"[う-お].+[あ-お]", 0, status); matcher.reset(ustr);
if (matcher.find()) { icu::UnicodeString ret; int start = matcher.start(status); // string index of start of match. int end = matcher.end(status); ustr.extract( start, end - start, ret ); w.write((char*)ret.getBuffer(), ret.length()*2); } ///////////////////////////////// }
いくつかの例
ICUライブラリで一文字replace
// char16のindexとその文字を構成するchar16の個数のリスト作成
std::vector<std::pair<int32_t, int32_t>> getIndexList(const icu::UnicodeString& s) {

  std::vector<std::pair<int32_t, int32_t>> c_c;

  UErrorCode err;
  icu::BreakIterator* bi = icu::BreakIterator::createCharacterInstance(
    icu::Locale::getDefault(), err);
  bi->setText(s);

  int32_t current = bi->first();
  while (current != icu::BreakIterator::DONE) {

    int32_t prev = current;
    current = bi->next();

    if (current == UBRK_DONE) break;

    c_c.emplace_back(prev, current - prev );

  }

  return c_c;
}
void WinPaint(HWND hWnd) { // 元の文字列の定義 std::u16string u16s = u"aあغ山👨👧經经"; //////////////////////////////////////// //////////////////////////////////////// icu::UnicodeString usr(u16s.c_str()); // char16のindexとその文字を構成するchar16の個数のリスト作成 std::vector<std::pair<int32_t, int32_t>> ilis = getIndexList(usr); // 文字の置き換え icu::UnicodeString B("B"); // 4文字目を「B」に書き換える // UnicodeString::replace(先頭index,置換前の要素数,置換後の文字) usr.replace(ilis[4].first, ilis[4].second, B); //////////////////////////////////////// ////////////////////////////////////////
  ////////////////////////////
  //フォトの設定
  HDC hdc;
  PAINTSTRUCT ps;
  hdc = BeginPaint(hWnd, &ps);
  SetTextColor(hdc, RGB(0, 0, 0));  //文字の色を設定
  SetBkColor(hdc, RGB(230, 230, 230));  //文字の背景色を設定
  HFONT backup = (HFONT)SelectObject(hdc, hFont1);  //Step2  フォントを適応
  TEXTMETRIC tm;
  GetTextMetrics(hdc, &tm);
  int TH = 10;

  ////////////////////////////
  //文字を一文字(書記素)ずつ表示

  UErrorCode err;
  icu::BreakIterator* bi = icu::BreakIterator::createCharacterInstance(
    icu::Locale::getDefault(), err);
  bi->setText(usr);

  int32_t current = bi->first();
  while (current != icu::BreakIterator::DONE) {

    int32_t prev = current;
    current = bi->next();

    if (current == UBRK_DONE) break;

    int32_t count = current - prev;//文字の長さ

    icu::UnicodeString e;
    usr.extract(prev, count, e);
    // win32api のWCHARはutf16なのでただキャストするだけで変換できる
    TextOutW(hdc, 10, TH, (WCHAR*)e.getBuffer(), e.length());//文字を書く

    //改行
    TH += tm.tmHeight+5;
  }


  SelectObject(hdc, backup);

  EndPaint(hWnd, &ps);
}
