GLSLのUniform Buffer Object (UBO) をとりあえず試す
GLSLのUBO。普通のUniform変数はlinkしたプログラムごとに設定するが、UBOは全てのプログラムで共通の変数を使うことができる。
今回はとりあえず動かすことに成功したのでひとまずコードを張っておきたい。
なおシェーダの準備などは作り置きの関数を使用。
GLSLのシェーダ関係の処理を関数化(C++)
ソースコード(C++)
#include <iostream>

#include <Windows.h>
#include "prepare_shader.hpp"
#include <gl/GL.h>
#include <gl/GLU.h>
#include <gl/freeglut.h>
#include <cassert>

#pragma comment(lib,"glew32.lib")

//ウィンドウの幅と高さ
int width, height;

GLuint buf_points1;
GLuint buf_points2;


GLuint programIDR;
GLuint programIDG;

GLuint uniformBufferID;
struct CMatrices {
  GLfloat mproj[16];
  GLfloat mmodel[16];
} _matrices;

void GetZRotate(GLfloat* m, GLfloat rad);
// シェーダとデータの設定
void init() {

  std::vector<GLfloat> points;

  GLfloat s=0.0;
  GLfloat v = 0.8;

  push_3(points, 0 + s, 0,   0);//座標 XYZ
  push_3(points, 0 + s, v,   0);
  push_3(points, v + s, 0,   0);
  prepare_buffer(&buf_points1, points.data(), points.size() * sizeof(GLfloat), GL_STATIC_DRAW);

  s = 0.1;
  points.clear();
  push_3(points, 0 + s, 0, 0);//座標 XYZ
  push_3(points, 0 + s, v, 0);
  push_3(points, v + s, 0, 0);
  prepare_buffer(&buf_points2, points.data(), points.size() * sizeof(GLfloat), GL_STATIC_DRAW);


  GLuint vtxShader;
  GLuint flagShaderR;
  GLuint flagShaderG;
  const char* vtxfile = "default.vert";
  const char* fragfileR = "default-R.frag";
  const char* fragfileG = "default-G.frag";

  std::string verr;
  std::string ferr;
  prepare_shader_byfile(&vtxShader, GL_VERTEX_SHADER, vtxfile, &verr);
  prepare_shader_byfile(&flagShaderR, GL_FRAGMENT_SHADER, fragfileR, &ferr);
  prepare_shader_byfile(&flagShaderG, GL_FRAGMENT_SHADER, fragfileG, &ferr);

  std::cout << verr << std::endl;
  std::cout << ferr << std::endl;

  std::string linkerr;
  link_program(&programIDR, { vtxShader ,flagShaderR }, nullptr, &linkerr);
  link_program(&programIDG, { vtxShader ,flagShaderG }, nullptr, &linkerr);

  loadidentity44(_matrices.mproj);
  loadidentity44(_matrices.mmodel);

  // UBOを作成
  glGenBuffers(1, &uniformBufferID);
  glBindBuffer(GL_UNIFORM_BUFFER, uniformBufferID);
  glBufferData(GL_UNIFORM_BUFFER, sizeof(CMatrices), &_matrices, GL_DYNAMIC_DRAW); //UBOの内容を書き込み
  glBindBuffer(GL_UNIFORM_BUFFER, 0);

}
//描画関数
void disp(void) {

  glViewport(0, 0, width, height);

  glClearColor(0.2, 0.2, 0.2, 1);
  glClear(GL_COLOR_BUFFER_BIT | GL_DEPTH_BUFFER_BIT);

  static int angle = 0;
  GetZRotate(_matrices.mmodel, angle++ * (3.14159 / 180.0));

  glBindBuffer(GL_UNIFORM_BUFFER, uniformBufferID);
  glBufferData(GL_UNIFORM_BUFFER, sizeof(CMatrices), &_matrices, GL_DYNAMIC_DRAW);
  glBindBuffer(GL_UNIFORM_BUFFER, 0);

  GLuint block_index_r = glGetUniformBlockIndex(programIDR, "Matrices");
  GLuint block_index_g = glGetUniformBlockIndex(programIDG, "Matrices");


  GLuint index = 0; //この数字はGL_MAX_UNIFORM_BUFFER_BINDINGS未満ならなんでもいい
  assert(index < GL_MAX_UNIFORM_BUFFER_BINDINGS);
  glUseProgram(programIDR);//使用するプログラムを変更
  glBindBufferBase(GL_UNIFORM_BUFFER, index, uniformBufferID);
  glUniformBlockBinding(programIDR, block_index_r, index);
  {
    auto bindbufP = EnableAndBindFArrayBuffer(0, buf_points1, 3, GL_FLOAT);//prepare_shader.hpp
    glDrawArrays(GL_TRIANGLES, 0, 3);
  }
  glUseProgram(programIDG);//使用するプログラムを変更
  glBindBufferBase(GL_UNIFORM_BUFFER, index, uniformBufferID);
  glUniformBlockBinding(programIDG, block_index_g, index);
  {
    auto bindbufP = EnableAndBindFArrayBuffer(0, buf_points2, 3, GL_FLOAT);//prepare_shader.hpp
    glDrawArrays(GL_TRIANGLES, 0, 3);
  }
  glUseProgram(0);

  glFlush();
}
//ウィンドウサイズの変化時に呼び出される
void reshape(int w, int h) {
  width = w; height = h;

  disp();
}

void timer(int value) {
  glutPostRedisplay();
  glutTimerFunc(50, timer, 0);
}

//エントリポイント
int main(int argc, char** argv)
{
  glutInit(&argc, argv);
  glutInitWindowPosition(100, 50);
  glutInitWindowSize(500, 500);
  glutInitDisplayMode(GLUT_SINGLE | GLUT_RGBA);

  glutCreateWindow("sample");
  glutDisplayFunc(disp);
  glutReshapeFunc(reshape);

  glutTimerFunc(10, timer, 0);

  glewInit();

  init();

  glutMainLoop();

  return 0;
}


//! @brief X軸回転行列を作成する
//! @param [out] m 結果を格納する要素数16の配列
//! @param [in] rad 回転角(ラジアン)
//! @return なし
void GetZRotate(GLfloat* m, GLfloat rad) {
  m[0] = cos(rad);
  m[1] = sin(rad);
  m[2] = 0;
  m[3] = 0;

  m[4] = -sin(rad);
  m[5] = cos(rad);
  m[6] = 0;
  m[7] = 0;

  m[8] = 0;
  m[9] = 0;
  m[10] = 1;
  m[11] = 0;

  m[12] = 0;
  m[13] = 0;
  m[14] = 0;
  m[15] = 1;

}
シェーダプログラム
default.vert
#version 460 core

layout (location = 0) in vec3 coord;

out vec4 vColor;

//Uniformブロック std140はメモリ配置方法
layout (std140) uniform Matrices {
  mat4 ProjectionMatrix;
  mat4 ModelViewMatrix;
};

void main()
{
  gl_Position = ProjectionMatrix * ModelViewMatrix * vec4(coord, 1.0);
}
default-g.frag
#version 460 core

in vec4 vColor;

out vec4 FragColor;

void main()
{
  FragColor[0] = 0.0;
  FragColor[1] = 1.0;
  FragColor[2] = 0.0;
  FragColor[3] = 1.0;
}
default-r.frag
#version 460 core

in vec4 vColor;

out vec4 FragColor;

void main()
{
  FragColor[0] = 1.0;
  FragColor[1] = 0.0;
  FragColor[2] = 0.0;
  FragColor[3] = 1.0;
}
コンソールアプリケーションでデバッグ用のウィンドウを表示-3-RGB,RGBA対応
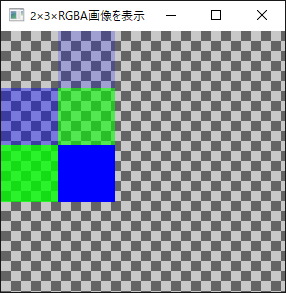
RGB画像だけではなく、RGBAにも対応する。
まずはウィンドウの本体のクラスを書く。これはデータのポインタを受け取ったら背景画像とブレンドして表示用画像を作成する。
CImageViewWindow.hpp
#pragma once


#include "gwindbg.hpp"
#include <mutex>
//! @brief DIBを扱う
struct DIBData {
  BITMAPINFO m_bmpInfo;   //!< CreateDIBSectionに渡す構造体
  LPDWORD m_lpPixel;      //!< 画素へのポインタ
  HBITMAP m_hBitmap;      //!< 作成したMDCのビットマップハンドル
  HDC m_hMemDC;           //!< 作成したMDCのハンドル

  int m_imagesizemax;     //!< 合計画素数(width*height)
  int m_width;            //!< 画像の幅(ピクセル,自然数)
  int m_height;           //!< 画像の高さ(ピクセル,自然数)

  int m_bitcount;
  DIBData() {
    DeleteDC(m_hMemDC);
    DeleteObject(m_hBitmap);
  }
  ~DIBData() {
    m_hBitmap = nullptr;
    m_hMemDC = nullptr;
    m_lpPixel = nullptr;
    m_width = 0;
    m_height = 0;
    m_bitcount = 0;
  }
  void create(int width, int height, int bitcount) {
    if (width != m_width || height != m_height) {
      if (m_hBitmap) {
        DeleteObject(m_hBitmap);
        m_hBitmap = nullptr;
      }
      if (m_hMemDC) {
        DeleteDC(m_hMemDC);
        m_hMemDC = nullptr;
      }
      //DIBの情報を設定する
      m_bmpInfo.bmiHeader.biSize = sizeof(BITMAPINFOHEADER);
      m_bmpInfo.bmiHeader.biWidth = width;
      m_bmpInfo.bmiHeader.biHeight = -height; //-を指定しないと上下逆になる
      m_bmpInfo.bmiHeader.biPlanes = 1;
      m_bmpInfo.bmiHeader.biBitCount = bitcount;
      m_bmpInfo.bmiHeader.biCompression = BI_RGB;

      HDC hdc = GetDC(nullptr);
      m_hBitmap = CreateDIBSection(hdc, &m_bmpInfo, DIB_RGB_COLORS, (void**)&m_lpPixel, nullptr, 0);
      m_hMemDC = CreateCompatibleDC(hdc);
      SelectObject(m_hMemDC, m_hBitmap);
      ReleaseDC(nullptr, hdc);

      m_width = width;
      m_height = height;
      m_bitcount = bitcount;
    }
  }
};
//! @brief 画素の値を透明度でブレンドする
//! @param [in] back 背景画像の色のr,g,bのいずれかの値
//! @param [in] data 塗りたい色のr,g,bのいずれかの値
//! @param [in] dataalpha 塗りたい色の透明度
//データの色の割合
unsigned char pixel_alpha_blend(
  unsigned char back,
  unsigned char data,
  unsigned char dataalpha
) {
  float weight_data = dataalpha / 255.0f;//データの色の割合
  float weight_bkc = 1.0 - weight_data;//背景色の割合
  int ret = data * weight_data + back * weight_bkc; if (data > 255)data = 255;
  return ret;
}
//! @brief RGB,RGBAの画像を表示するウィンドウのクラス。
class CImageViewWindow : public GraphicDebugWindow {

  DIBData dibdata_background; //!< 背景画像
  DIBData dibdata_result;     //!< 表示画像

  int m_magnification;    //!< 表示倍率
  unsigned char* m_img_p; //!< 画像データへのポインタ
  int m_img_width;        //!< 画像データの幅
  int m_img_height;       //!< 画像データの高さ
  int m_pixelbyte;        //!< 画像データのピクセルのバイト数。RGBなら3,RGBAなら4

  std::mutex m_mainmuitex;

public:
  CImageViewWindow() {}
  //! @brief 背景(透明を表現するチェスボードのような画像)を作成する
  void create_background_image() {

    const int blocksize = 10;

    if (get_hwnd() == nullptr)
      return;
    RECT rect;
    GetClientRect(get_hwnd(), &rect);

    //現在の背景画像が、画面サイズより小さかったら作り直す。
    //画面サイズより大きな背景画像が既に作成済みならそのまま使用する
    if (dibdata_background.m_width < rect.right || dibdata_background.m_height < rect.bottom) {

      dibdata_background.create(rect.right, rect.bottom, 32);
      int bkwidth = dibdata_background.m_width;
      int bkheight = dibdata_background.m_height;

      //背景画像の作成(チェスボードのような画像)
      for (int x = 0; x < bkwidth; x++) {
        for (int y = 0; y < bkheight; y++) {

          int pos = y * bkwidth + x;

          bool xb = (bool)((x / blocksize) % 2);
          bool yb = (bool)((y / blocksize) % 2);

          if (xb == yb) {
            dibdata_background.m_lpPixel[pos] = RGB(100, 100, 100);
          }
          else {
            dibdata_background.m_lpPixel[pos] = RGB(200, 200, 200);
          }

        }
      }
    }

  }
  //! @brief ウィンドウのサイズが変更されたときの関数
  void change_client_size() {
    create_background_image();

    //結果画像のサイズ変更(クライアント領域に合わせる)
    RECT rect;
    HWND hwnd = get_hwnd();
    if (hwnd == nullptr)
      return;
    GetClientRect(hwnd, &rect);
    dibdata_result.create(rect.right, rect.bottom, 32);

    //画像書き込み
    m_mainmuitex.lock();

    //背景を結果にコピー
    BitBlt(
      dibdata_result.m_hMemDC, 0, 0, dibdata_background.m_width, dibdata_background.m_height,
      dibdata_background.m_hMemDC, 0, 0, SRCCOPY);

    if (m_img_p) {
      for (int x = 0; x < m_img_width; x++) {
        for (int y = 0; y < m_img_height; y++) {
          int pos_src_pix = (y * m_img_width + x);// 元画像の画素の座標(ピクセル単位)

          {
            // 元画像の画素の色を取得
            unsigned int sr = m_img_p[pos_src_pix*m_pixelbyte + 0];
            unsigned int sg = m_img_p[pos_src_pix*m_pixelbyte + 1];
            unsigned int sb = m_img_p[pos_src_pix*m_pixelbyte + 2];
            unsigned int sa = m_img_p[pos_src_pix*m_pixelbyte + 3];

            // 書き込み先のピクセル座標の開始地点x,y
            int pos_dst_x_offset = x * m_magnification;
            int pos_dst_y_offset = y * m_magnification;
            if (pos_dst_x_offset >= dibdata_result.m_width)continue;
            if (pos_dst_y_offset >= dibdata_result.m_height)continue;

            int resultwidth = dibdata_result.m_width;
            unsigned char dr, dg, db;//表示ピクセル色
            for (int xblock = 0; xblock < m_magnification; xblock++) {
              for (int yblock = 0; yblock < m_magnification; yblock++) {
                int dx = pos_dst_x_offset + xblock;
                int dy = pos_dst_y_offset + yblock;
                if (dx >= dibdata_result.m_width)continue;
                if (dy >= dibdata_result.m_height)continue;

                int pos_dst_pix = (dy * resultwidth + dx);
                int pos_bk_pix = (dy * dibdata_background.m_width + dx);

                //透明度付きの場合だけ、背景色との混合を行う
                if (m_pixelbyte == 4) {
                  COLORREF bkcolor = dibdata_background.m_lpPixel[pos_bk_pix];//下地の色を取得
                  dr = pixel_alpha_blend(GetRValue(bkcolor), sr, sa);
                  dg = pixel_alpha_blend(GetGValue(bkcolor), sg, sa);
                  db = pixel_alpha_blend(GetBValue(bkcolor), sb, sa);
                }
                else {
                  dr = sr;
                  dg = sg;
                  db = sb;
                }
                dibdata_result.m_lpPixel[pos_dst_pix] = RGB(dr, dg, db);
              }
            }
          }
        }
      }
    }

    m_mainmuitex.unlock();

  }
  //! @brief 画面に画像を設定
  //! @param [in] width 画像幅
  //! @param [in] height 画像高さ
  //! @param [in] magnification 表示倍率。小さすぎる画像を大きく表示できる
  //! @param [in] p 画像データ。RGBRGBRGB...
  //! @param [in] pixelbyte 1ピクセルのバイト数 3か4
  //! @return なし
  void display(int width, int height, int magnification, unsigned char* p, int pixelbyte) {

    m_img_width = width;
    m_img_height = height;
    m_img_p = p;
    m_magnification = magnification;
    m_pixelbyte = pixelbyte;

    change_client_size();

    HWND hwnd = get_hwnd();
    if (hwnd == nullptr)
      return;
    InvalidateRect(hwnd, nullptr, TRUE);


  }
  virtual LRESULT WndProc(HWND hWnd, UINT msg, WPARAM wp, LPARAM lp)override
  {
    PAINTSTRUCT ps;
    HDC hdc;
    switch (msg)
    {
    case WM_SIZE:
      change_client_size();
      InvalidateRect(hWnd, nullptr, TRUE);
      break;
    case WM_SIZING:
      change_client_size();
      InvalidateRect(hWnd, nullptr, TRUE);
      break;
    case WM_PAINT:
      hdc = BeginPaint(hWnd, &ps);

      m_mainmuitex.lock();
      //DIBの内容をウィンドウに表示
      if (dibdata_background.m_hMemDC) {
        RECT rect;
        GetClientRect(hWnd, &rect);

        BitBlt(
          hdc, 0, 0,
          rect.right, rect.bottom,
          dibdata_result.m_hMemDC, 0, 0, SRCCOPY);
      }
      m_mainmuitex.unlock();
      EndPaint(hWnd, &ps);
      break;
    case WM_DESTROY:
      PostQuitMessage(0);
      return 0;
    }
    return DefWindowProc(hWnd, msg, wp, lp);
  }

};
gwindbg.hpp
GraphicDebugWindowはほとんど変わらないが以下のように変更する。
open関数はウィンドウ生成をスレッドに投げてしまうため、open関数終了時点でウィンドウ生成が完了していない可能性がある。このためopen関数呼び出し元で、「ウィンドウがまだないのに画像を設定する」という構図になる可能性がある。それを防ぐために、スレッド側でCreateWindowが完了するまではopen関数内で待機したい。このために、m_hwndがnullptrの間ループするのだが、空ループと同じようなもののため、最適化で消えてしまう可能性がある。そこでm_hwndにvolatileを付けて最適化を抑止する。さらにUpdateWindowはちゃんと描画が行われるまで待機する。
#pragma once

#include <Windows.h>
#include <thread>

class GraphicDebugWindow {

  //! @brief WNDCLASSに設定するウィンドウプロシージャ
  static LRESULT CALLBACK StaticWndProc(HWND hWnd, UINT message, WPARAM wParam, LPARAM lParam)
  {
    //CreateWindowの最後の引数で渡したthisポインタを取得
    GraphicDebugWindow* This = (GraphicDebugWindow*)GetWindowLongPtr(hWnd, GWLP_USERDATA);
    if (!This) {//取得できなかった(ウィンドウ生成中)場合
      if (message == WM_CREATE) {
        This = (GraphicDebugWindow*)((LPCREATESTRUCT)lParam)->lpCreateParams;
        if (This) {
          SetWindowLongPtr(hWnd, GWLP_USERDATA, (LONG_PTR)This);
          return This->WndProc(hWnd, message, wParam, lParam);
        }
      }
    }
    else {//取得できた場合(ウィンドウ生成後)
      return This->WndProc(hWnd, message, wParam, lParam);
    }
    return DefWindowProc(hWnd, message, wParam, lParam);
  }

  //メインループのスレッド
  std::unique_ptr<std::thread> m_mainloop;

  HINSTANCE hInstance;
  //ウィンドウができるまでループしたいが、m_hwndがnullptrである間ループするだけだと
  //最適化で消えてしまう可能性があるので、volatileを付けておく
  volatile HWND m_hwnd;
protected:

public:

  GraphicDebugWindow() {}

  bool registerWindowClass() {
    //インスタンスハンドルの取得
    hInstance = GetModuleHandle(0);

    WNDCLASS winc;

    winc.style = CS_HREDRAW | CS_VREDRAW;
    winc.lpfnWndProc = StaticWndProc;
    winc.cbClsExtra = winc.cbWndExtra = 0;
    winc.hInstance = hInstance;
    winc.hIcon = LoadIcon(NULL, IDI_APPLICATION);
    winc.hCursor = LoadCursor(NULL, IDC_ARROW);
    winc.hbrBackground = (HBRUSH)GetStockObject(WHITE_BRUSH);
    winc.lpszMenuName = NULL;
    winc.lpszClassName = TEXT("SZL_TEST_GUI_WINDOW");

    if (!RegisterClass(&winc))
      return false;

    return true;
  }

  //! @brief スレッドの内容
  int MainLoop(const TCHAR* title, int posx, int posy, int width, int height) {

    //メッセージループはウィンドウを生成したスレッドに属していなければいけないので
    //CreateWindowの時点でスレッドに入っていなければならないのでここに書く
    m_hwnd = CreateWindow(
      TEXT("SZL_TEST_GUI_WINDOW"), title,
      WS_OVERLAPPEDWINDOW | WS_VISIBLE,
      posx, posy, width, height, NULL, NULL,
      hInstance, this
    );

    if (m_hwnd == NULL) {
      return 0;
    }

    MSG msg;
    while (GetMessage(&msg, NULL, 0, 0)) {
      TranslateMessage(&msg);
      DispatchMessage(&msg);
    }

    //スレッドから抜けるときはウィンドウハンドルをnullptrにする
    m_hwnd = nullptr;

    return msg.wParam;

  }

  //! @brief ウィンドウ作成
  bool open(const TCHAR* title, int posx, int posy, int width, int height) {

    if (registerWindowClass() == false)
      return false;

    m_mainloop.reset(//! @brief スレッド作成
      new std::thread(
        &GraphicDebugWindow::MainLoop,
        this,
        title,
        posx,
        posy,
        width,
        height
      ));
    // 窓が生成されるまで待つ
    while (m_hwnd == nullptr);
    UpdateWindow(m_hwnd);
    return true;
  }

  //! @brief ウィンドウを閉じたいときに呼び出す
  void close() {
    if (m_hwnd) {
      SendMessage(m_hwnd, WM_DESTROY, 0, 0);
    }
    if (m_mainloop) {
      if (m_mainloop->joinable()) {
        m_mainloop->join();
      }
      m_mainloop.reset();
    }
  }

  void join() {
    if (m_mainloop) {
      if (m_mainloop->joinable()) {
        m_mainloop->join();
      }
      m_mainloop.reset();
    }
  }

  //! @brief 外にウィンドウハンドルを公開
  HWND get_hwnd() { return m_hwnd; }

  virtual ~GraphicDebugWindow() {
    close();
  }

  //! @brief メンバ関数版ウィンドウプロシージャ
  virtual LRESULT WndProc(HWND hWnd, UINT msg, WPARAM wp, LPARAM lp)
  {
    PAINTSTRUCT ps;
    HDC hdc;
    switch (msg)
    {
    case WM_DESTROY:
      PostQuitMessage(0);
      return 0;
    }
    return DefWindowProc(hWnd, msg, wp, lp);
  }

};
使用例
#include <iostream>
#include<vector>

#include "CImageViewWindow.hpp"

#pragma warning(disable:4996)


int main()
{
  CImageViewWindow gw;

#if 0
  gw.open(TEXT("2×3×RGB画像を表示"), 100, 100, 300, 300);

  typedef unsigned char rgb_t[3];

  rgb_t texdata[2*3];
  texdata[0][0] = 0;
  texdata[0][1] = 255;
  texdata[0][2] = 0;

  texdata[1][0] = 255;
  texdata[1][1] = 0;
  texdata[1][2] = 0;

  texdata[2][0] = 255;
  texdata[2][1] = 0;
  texdata[2][2] = 0;

  texdata[3][0] = 0;
  texdata[3][1] = 255;
  texdata[3][2] = 0;

  texdata[4][0] = 0;
  texdata[4][1] = 255;
  texdata[4][2] = 0;

  texdata[5][0] = 255;
  texdata[5][1] = 0;
  texdata[5][2] = 0;

  gw.display(2, 3, 57, &texdata[0][0], 3);

#else
  gw.open(TEXT("2×3×RGBA画像を表示"), 100, 100, 300, 300);

  typedef unsigned char rgba_t[4];

  rgba_t texdata[2 * 3];
  texdata[0][0] = 0;
  texdata[0][1] = 255;
  texdata[0][2] = 0;
  texdata[0][3] = 0;

  texdata[1][0] = 255;
  texdata[1][1] = 0;
  texdata[1][2] = 0;
  texdata[1][3] = 50;

  texdata[2][0] = 255;
  texdata[2][1] = 0;
  texdata[2][2] = 0;
  texdata[2][3] = 100;

  texdata[3][0] = 0;
  texdata[3][1] = 255;
  texdata[3][2] = 0;
  texdata[3][3] = 150;

  texdata[4][0] = 0;
  texdata[4][1] = 255;
  texdata[4][2] = 0;
  texdata[4][3] = 200;

  texdata[5][0] = 255;
  texdata[5][1] = 0;
  texdata[5][2] = 0;
  texdata[5][3] = 255;

  gw.display(2, 3, 57, &texdata[0][0], 4);

#endif


  gw.join();
}
実行結果
コンソールアプリケーションでデバッグ用のウィンドウを表示-2-画像表示
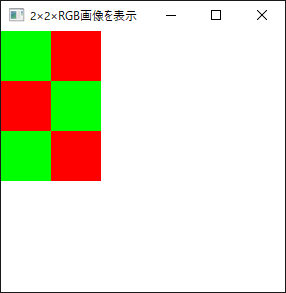
CG関係のプログラミングをやってるとコードから画像を作成して内容を確認したいといった時がある。PPMで出力して確認していたが何かと面倒だし、だからといってOpenGLでテクスチャに表示するのはさらに面倒なので確認用のウィンドウを作成したい。前回作ったウィンドウ表示用のクラスに、画像表示機能を付ける
CRGBViewWindow.hpp
#pragma once

#include "gwindbg.hpp"
#include <mutex>
//! @brief DIBを扱う
struct DIBData {
  BITMAPINFO m_bmpInfo;   //!< CreateDIBSectionに渡す構造体
  LPDWORD m_lpPixel;      //!< 画素へのポインタ
  HBITMAP m_hBitmap;      //!< 作成したMDCのビットマップハンドル
  HDC m_hMemDC;           //!< 作成したMDCのハンドル

  int m_imagesizemax;     //!< 合計画素数(width*height)
  int m_width;            //!< 画像の幅(ピクセル,自然数)
  int m_height;           //!< 画像の高さ(ピクセル,自然数)

  int m_bitcount;
  DIBData() {
    DeleteDC(m_hMemDC);
    DeleteObject(m_hBitmap);
  }
  ~DIBData() {
    m_hBitmap = nullptr;
    m_hMemDC = nullptr;
    m_lpPixel = nullptr;
    m_width = 0;
    m_height = 0;
    m_bitcount = 0;
  }
  void create(int width, int height, int bitcount) {
    if (width != m_width || height != m_height) {
      if (m_hBitmap) {
        DeleteObject(m_hBitmap);
        m_hBitmap = nullptr;
      }
      if (m_hMemDC) {
        DeleteDC(m_hMemDC);
        m_hMemDC = nullptr;
      }
      //DIBの情報を設定する
      m_bmpInfo.bmiHeader.biSize = sizeof(BITMAPINFOHEADER);
      m_bmpInfo.bmiHeader.biWidth = width;
      m_bmpInfo.bmiHeader.biHeight = -height; //-を指定しないと上下逆になる
      m_bmpInfo.bmiHeader.biPlanes = 1;
      m_bmpInfo.bmiHeader.biBitCount = bitcount;
      m_bmpInfo.bmiHeader.biCompression = BI_RGB;

      HDC hdc = GetDC(nullptr);
      m_hBitmap = CreateDIBSection(hdc, &m_bmpInfo, DIB_RGB_COLORS, (void**)&m_lpPixel, nullptr, 0);
      m_hMemDC = CreateCompatibleDC(hdc);
      SelectObject(m_hMemDC, m_hBitmap);
      ReleaseDC(nullptr, hdc);

      m_width = width;
      m_height = height;
      m_bitcount = bitcount;
    }
  }
};
class CRGBViewWindow : public GraphicDebugWindow {

  DIBData dibdata;

  //! @brief 表示倍率
  int m_magnification;

  std::mutex m_mainmuitex;

public:
  CRGBViewWindow() {
  }
  //! @brief 画像表示関数
  //! @param [in] width 画像幅
  //! @param [in] height 画像高さ
  //! @param [in] magnification 表示倍率。小さすぎる画像を大きく表示できる
  //! @param [in] p 画像データ。RGBRGBRGB...
  //! @return なし
  void display(int width, int height, int magnification, unsigned char* p) {

    m_magnification = magnification;

    int pixelcount = 3;

    m_mainmuitex.lock();

    dibdata.create(width, height, 24);

    if (p) {// 画像を仮想スクリーンへコピー
      for (int x = 0; x < width; x++) {
        for (int y = 0; y < height; y++) {
          int pos = (y * width + x)*pixelcount;
          SetPixel(dibdata.m_hMemDC, x, y, RGB(p[pos + 0], p[pos + 1], p[pos + 2]));
        }
      }
    }

    m_mainmuitex.unlock();

  }
  virtual LRESULT WndProc(HWND hWnd, UINT msg, WPARAM wp, LPARAM lp)override
  {
    PAINTSTRUCT ps;
    HDC hdc;
    switch (msg)
    {
    case WM_SIZING:
      InvalidateRect(hWnd, nullptr, TRUE);
      break;
    case WM_PAINT:
      hdc = BeginPaint(hWnd, &ps);
      m_mainmuitex.lock();

      //DIBの内容をウィンドウに表示
      if (dibdata.m_hMemDC) {
        StretchBlt(
          hdc, 0, 0,
          dibdata.m_width * m_magnification, dibdata.m_height * m_magnification,
          dibdata.m_hMemDC, 0, 0, dibdata.m_width, dibdata.m_height, SRCCOPY);
      }

      m_mainmuitex.unlock();
      EndPaint(hWnd, &ps);
      break;
    case WM_DESTROY:
      PostQuitMessage(0);
      return 0;
    }
    return DefWindowProc(hWnd, msg, wp, lp);
  }
};
使用例
#include <iostream>
#include<vector>

#include "CRGBViewWindow.hpp"

#pragma warning(disable:4996)


int main()
{
  CRGBViewWindow gw;
  gw.open(TEXT("2×2×RGB画像を表示"), 100, 100, 300, 300);

  typedef unsigned char rgb_t[3];

  rgb_t texdata[2*3];
  texdata[0][0] = 0;
  texdata[0][1] = 255;
  texdata[0][2] = 0;

  texdata[1][0] = 255;
  texdata[1][1] = 0;
  texdata[1][2] = 0;

  texdata[2][0] = 255;
  texdata[2][1] = 0;
  texdata[2][2] = 0;

  texdata[3][0] = 0;
  texdata[3][1] = 255;
  texdata[3][2] = 0;

  texdata[4][0] = 0;
  texdata[4][1] = 255;
  texdata[4][2] = 0;

  texdata[5][0] = 255;
  texdata[5][1] = 0;
  texdata[5][2] = 0;

  gw.display(2, 3, 50, &texdata[0][0]);

  gw.join();
}
コンソールアプリケーションでデバッグ用のウィンドウを表示-1
プログラムはコンソールで良いが画像での確認もしたい時にウィンドウが欲しくなるので、コンソールアプリから開けるウィンドウを作成する。
gwindbg.hpp
#pragma once

#include <Windows.h>
#include <thread>

class GraphicDebugWindow {
  //! @brief WNDCLASSに設定するウィンドウプロシージャ
  static LRESULT CALLBACK StaticWndProc(HWND hWnd, UINT message, WPARAM wParam, LPARAM lParam)
  {
    //CreateWindowの最後の引数で渡したthisポインタを取得
    GraphicDebugWindow* This = (GraphicDebugWindow*)GetWindowLongPtr(hWnd, GWLP_USERDATA);
    if (!This) {//取得できなかった(ウィンドウ生成中)場合
      if (message == WM_CREATE) {
        This = (GraphicDebugWindow*)((LPCREATESTRUCT)lParam)->lpCreateParams;
        if (This) {
          SetWindowLongPtr(hWnd, GWLP_USERDATA, (LONG_PTR)This);
          return This->WndProc(hWnd, message, wParam, lParam);
        }
      }
    }
    else {//取得できた場合(ウィンドウ生成後)
      return This->WndProc(hWnd, message, wParam, lParam);
    }
    return DefWindowProc(hWnd, message, wParam, lParam);
  }
  //メインループのスレッド
  std::unique_ptr<std::thread> m_mainloop;

  HINSTANCE hInstance;
  HWND m_hwnd;
public:

  GraphicDebugWindow() {}
  bool registerWindowClass() {
    //インスタンスハンドルの取得
    hInstance = GetModuleHandle(0);

    WNDCLASS winc;

    winc.style = CS_HREDRAW | CS_VREDRAW;
    winc.lpfnWndProc = StaticWndProc;
    winc.cbClsExtra = winc.cbWndExtra = 0;
    winc.hInstance = hInstance;
    winc.hIcon = LoadIcon(NULL, IDI_APPLICATION);
    winc.hCursor = LoadCursor(NULL, IDC_ARROW);
    winc.hbrBackground = (HBRUSH)GetStockObject(WHITE_BRUSH);
    winc.lpszMenuName = NULL;
    winc.lpszClassName = TEXT("SZL_TEST_GUI_WINDOW");

    if (!RegisterClass(&winc))
      return false;

    return true;
  }
  //! @brief スレッドの内容
  int MainLoop(const TCHAR* title,int posx,int posy,int width,int height) {

    //メッセージループはウィンドウを生成したスレッドに属していなければいけないので
    //CreateWindowの時点でスレッドに入っていなければならないのでここに書く
    m_hwnd = CreateWindow(
      TEXT("SZL_TEST_GUI_WINDOW"), title,
      WS_OVERLAPPEDWINDOW | WS_VISIBLE,
      posx, posy, width, height, NULL, NULL,
      hInstance, this
    );

    if (m_hwnd == NULL)
      return 0;

    MSG msg;
    while (GetMessage(&msg, NULL, 0, 0)) {
      TranslateMessage(&msg);
      DispatchMessage(&msg);
    }

    //スレッドから抜けるときはウィンドウハンドルをnullptrにする
    m_hwnd = nullptr;

    return msg.wParam;

  }
  //! @brief ウィンドウ作成
  bool open(const TCHAR* title, int posx, int posy, int width, int height) {

    if (registerWindowClass() == false)
      return false;

    m_mainloop.reset(//! @brief スレッド作成
      new std::thread(
        &GraphicDebugWindow::MainLoop,
        this,
        title,
        posx,
        posy,
        width,
        height
      ));

    return true;
  }
  //! @brief ウィンドウを閉じたいときに呼び出す
  void close() {
    if (m_hwnd ) {
      SendMessage(m_hwnd, WM_DESTROY, 0, 0);
    }
    if (m_mainloop) {
      if (m_mainloop->joinable()) {
        m_mainloop->join();
      }
      m_mainloop.reset();
    }
  }
  void join() {
    if (m_mainloop) {
      if (m_mainloop->joinable()) {
        m_mainloop->join();
      }
      m_mainloop.reset();
    }
  }
  //! @brief 外にウィンドウハンドルを公開
  HWND get_hwnd() {return m_hwnd;}
  virtual ~GraphicDebugWindow() {
    close();
  }
  //! @brief メンバ関数版ウィンドウプロシージャ
  virtual LRESULT WndProc(HWND hWnd, UINT msg, WPARAM wp, LPARAM lp)
  {
    PAINTSTRUCT ps;
    HDC hdc;
    switch (msg)
    {
    case WM_DESTROY:
      PostQuitMessage(0);
      return 0;
    }
    return DefWindowProc(hWnd, msg, wp, lp);
  }
};
使用例
コンソールにアルファベットを入力すると、ウィンドウに表示される。
'c'または'z'で抜ける。
#include <iostream>

#include "gwindbg.hpp"

#pragma warning(disable:4996)

int main()
{
  GraphicDebugWindow gw;
  gw.open(TEXT("入力したキー表示(zで終了)"), 100, 100, 300, 300);

  char a = 'a';
  while (a != 'z') {
    std::cin >> a;

    char text[10];
    sprintf(text, "%c", a);

    //ウィンドウが消されていたらループを抜ける
    if (gw.get_hwnd() == nullptr)
      break;

    // ウィンドウを消す
    if (a == 'c')
      gw.close();

    //ウィンドウの方に入力した文字を表示
    HDC dc = GetDC(gw.get_hwnd());
    TextOutA(dc, 0, 0, "  ", 2);
    TextOutA(dc, 0, 0, text, 1);
    ReleaseDC(gw.get_hwnd(), dc);

  }
  gw.close();
  std::cin >> a;
}
Blender Pythonで3Dカーソル周辺の頂点を分離する
import bpy
from bpy import context
from mathutils import Vector

radius = 30

# 3Dカーソルの位置を取得
center = bpy.context.scene.cursor.location

# 選択中のオブジェクトを取得
obj = context.active_object


bpy.ops.object.mode_set(mode="OBJECT")

for v in obj.data.vertices:

    # 3Dカーソルの周辺の頂点以外を選択
    if (center - v.co).length < radius:
        v.select = False
    else:
        v.select = True


bpy.ops.object.mode_set(mode='EDIT')

bpy.ops.mesh.separate(type='SELECTED')
bpy.ops.object.mode_set(mode="OBJECT")
vtk 9.0で表示(7) + win32api
VTKではなく、自作のウィンドウにレンダリングする方法。
#pragma once

// VTK内でstd::minにひっかからないため
#define NOMINMAX

#include<Windows.h>


// VTK_MODULE_INITに必要
#include <vtkAutoInit.h>

#include <vtkSmartPointer.h>
#include <vtkRenderer.h>
#include <vtkRenderWindow.h>
#include <vtkWin32RenderWindowInteractor.h> //win32api対応
#include <vtkInteractorStyleImage.h>

//円筒とその表示に必要
#include <vtkCylinderSource.h>
#include <vtkPolyDataMapper.h>


#pragma comment(lib,"vtkCommonCore-9.0.lib")
#pragma comment(lib,"vtkRenderingCore-9.0.lib")
#pragma comment(lib,"vtkInteractionStyle-9.0.lib")
#pragma comment(lib,"vtkFiltersSources-9.0.lib")
#pragma comment(lib,"vtkCommonExecutionModel-9.0.lib")

#pragma comment(lib,"vtkRenderingUI-9.0.lib") //win32api対応
#pragma comment(lib,"vtkRenderingOpenGL2-9.0.lib")

VTK_MODULE_INIT(vtkRenderingOpenGL2);
VTK_MODULE_INIT(vtkInteractionStyle);


vtkSmartPointer<vtkRenderWindowInteractor> iren;
vtkSmartPointer<vtkRenderWindow> renWin;
void init_vtk(HWND hwnd);
LRESULT CALLBACK WndProc(HWND hwnd, UINT msg, WPARAM wp, LPARAM lp) {

  RECT rect;
  GetClientRect(hwnd, &rect);

  switch (msg) {
  case WM_DESTROY:
    PostQuitMessage(0);
    return 0;
  case WM_ERASEBKGND://背景の描画を処理したことにする(ちらつき防止)
    return TRUE;

  case WM_PAINT:
    if (renWin) {
      //画面描画
      renWin->Render();
    }
    return 0;
  case WM_SIZING:
    //ウィンドウサイズ設定
    renWin->SetSize(rect.right, rect.bottom);
    InvalidateRect(hwnd, nullptr, FALSE);
    return 0;
  }
  return DefWindowProc(hwnd, msg, wp, lp);
}
int WINAPI WinMain(HINSTANCE hInstance, HINSTANCE hPrevInstance,
  PSTR lpCmdLine, int nCmdShow) {
  HWND hwnd;
  WNDCLASS winc;
  MSG msg;

  winc.style = CS_HREDRAW | CS_VREDRAW;
  winc.lpfnWndProc = WndProc;
  winc.cbClsExtra = winc.cbWndExtra = 0;
  winc.hInstance = hInstance;
  winc.hIcon = LoadIcon(NULL, IDI_APPLICATION);
  winc.hCursor = LoadCursor(NULL, IDC_ARROW);
  winc.hbrBackground = (HBRUSH)GetStockObject(WHITE_BRUSH);
  winc.lpszMenuName = NULL;
  winc.lpszClassName = TEXT("VTK-TEST");

  if (!RegisterClass(&winc)) return 0;

  hwnd = CreateWindow(
    TEXT("VTK-TEST"), TEXT("vtk test"),
    WS_OVERLAPPEDWINDOW | WS_VISIBLE ,
    CW_USEDEFAULT, CW_USEDEFAULT,
    500, 500,
    NULL, NULL,
    hInstance, NULL
  );

  if (hwnd == NULL) return 0;
init_vtk(hwnd);
  while (GetMessage(&msg, NULL, 0, 0)) DispatchMessage(&msg);
  return msg.wParam;
}
void init_vtk(HWND hwnd) {
  //////////////////////////////////////////////////////////////////
  //////////////////////////////////////////////////////////////////
  //////////////////////////////////////////////////////////////////
  //////////////////////////////////////////////////////////////////
  // Create a vtkCylinderSource
  vtkSmartPointer<vtkCylinderSource> cylinderSource = vtkSmartPointer<vtkCylinderSource>::New();
  cylinderSource->SetCenter(0.0, 0.0, 0.0);
  cylinderSource->SetRadius(5.0);
  cylinderSource->SetHeight(7.0);
  cylinderSource->SetResolution(100);
  // Create a mapper and actor
  vtkSmartPointer<vtkPolyDataMapper> mapper = vtkSmartPointer<vtkPolyDataMapper>::New();
  mapper->SetInputConnection(cylinderSource->GetOutputPort());
  vtkSmartPointer<vtkActor> actor = vtkSmartPointer<vtkActor>::New();
  actor->SetMapper(mapper);

  //////////////////////////////////////////////////////////////////
  //////////////////////////////////////////////////////////////////
  //////////////////////////////////////////////////////////////////
  //////////////////////////////////////////////////////////////////

  auto renderer = vtkSmartPointer<vtkRenderer>::New();
  renderer->AddActor(actor);
  renderer->ResetCamera();

  //////////////////////////////////////////////////////////////////
  //////////////////////////////////////////////////////////////////
  //////////////////////////////////////////////////////////////////
  //////////////////////////////////////////////////////////////////
  // VTKの表示領域をWin32apiのウィンドウに貼り付ける

  RECT rect;
  GetClientRect(hwnd, &rect);

  renWin = vtkRenderWindow::New();
  renWin->AddRenderer(renderer);

  renWin->SetParentId(hwnd);
  renWin->SetSize(rect.right, rect.bottom);

  iren = vtkSmartPointer<vtkWin32RenderWindowInteractor>::New();

  vtkSmartPointer<vtkInteractorStyleTrackballCamera> style =
    vtkSmartPointer<vtkInteractorStyleTrackballCamera>::New();

  iren->SetInteractorStyle(style);
  iren->SetRenderWindow(renWin);

}
vtk 9.0 で表示(6) ライトを追加
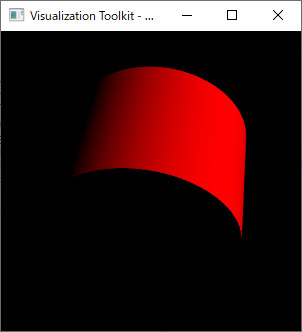
VTKでライトを使用。問題はデフォルトのカメラの位置からのライトがどうやっても消せないことで、ひとまずRender()の後にRemoveAllLightsで全てのライトを消すことで対処している。
より大きな問題は一番最初の描画ではライトの設定が反映されていないものが描画されること。多分バッファの更新ができていないのだと思う。要検討。
参考:
https://vtk.org/Wiki/VTK/Examples/Cxx/Lighting/Light
//VTK_MODULE_INITに必要
#include <vtkAutoInit.h>


#include <vtkSmartPointer.h>
#include <vtkRenderer.h>
#include <vtkRenderWindow.h>
#include <vtkRenderWindowInteractor.h>

//円筒とその表示に必要
#include <vtkCylinderSource.h>
#include <vtkPolyDataMapper.h>

//ライトに必要
#include <vtkLight.h>
#include <vtkLightCollection.h>

#pragma comment(lib,"vtkCommonCore-9.0.lib")
#pragma comment(lib,"vtkRenderingCore-9.0.lib")
#pragma comment(lib,"vtkInteractionStyle-9.0.lib")
#pragma comment(lib,"vtkFiltersSources-9.0.lib")
#pragma comment(lib,"vtkCommonExecutionModel-9.0.lib")

//必須
#pragma comment(lib,"vtkRenderingOpenGL2-9.0.lib")

//必須
VTK_MODULE_INIT(vtkRenderingOpenGL2);
VTK_MODULE_INIT(vtkInteractionStyle);

vtkSmartPointer<vtkActor> create_cylinder_and_map();
vtkSmartPointer<vtkLight> mylight() {

  double lightPosition[3] = { 0, 0, 3 };

  // Create a light
  double lightFocalPoint[3] = { 0,0,0 };
  vtkSmartPointer<vtkLight> light = vtkSmartPointer<vtkLight>::New();
  light->SetLightTypeToSceneLight();
  light->SetPosition(lightPosition[0], lightPosition[1], lightPosition[2]);
  light->SetFocalPoint(lightFocalPoint[0], lightFocalPoint[1], lightFocalPoint[2]);
  light->SetDiffuseColor(1, 0, 0);
  light->SetAmbientColor(0, 1, 0);
  light->SetSpecularColor(0, 0, 1);

  //light->SetConeAngle(10);
  //light->SetPositional(true); // required for vtkLightActor below

  return light;
}
int main(int /*argc*/, char ** /*argv*/)
{

  //////////////////////////////////////
  auto renderer = vtkSmartPointer<vtkRenderer>::New();
  renderer->ResetCamera();

  //////////////////////////////////////
  vtkSmartPointer<vtkActor> cylinder_actor = create_cylinder_and_map();
  renderer->AddActor(cylinder_actor);
  //////////////////////////////////////
  vtkSmartPointer<vtkLight> light = mylight();


  //////////////////////////////////////
  auto interactor = vtkSmartPointer<vtkRenderWindowInteractor>::New();

  //////////////////////////////////////
  auto renderWindow = vtkSmartPointer<vtkRenderWindow>::New();

  renderWindow->AddRenderer(renderer);
  renderWindow->SetInteractor(interactor);

  renderWindow->Render();

  // 効果がない(?)
  renderer->LightFollowCameraOff();

  vtkLightCollection* originalLights = renderer->GetLights();
  std::cout << "Originally there are " << originalLights->GetNumberOfItems() << " lights." << std::endl;
  //renderer->RemoveLight((vtkLight*)originalLights->GetItemAsObject(0));
  renderer->RemoveAllLights();// デフォルトのライトを消すために入れている

  // renderWindow->Render() の後にAddLightする
  renderer->AddLight(light);

  interactor->Start(); //イベントループへ入る

  return 0;
}
vtkSmartPointer<vtkActor> create_cylinder_and_map() {
  // Create a vtkCylinderSource
  vtkSmartPointer<vtkCylinderSource> cylinderSource = vtkSmartPointer<vtkCylinderSource>::New();
  cylinderSource->SetCenter(0.0, 0.0, 0.0);
  cylinderSource->SetRadius(5.0);
  cylinderSource->SetHeight(7.0);
  cylinderSource->SetResolution(100);

  // Create a mapper and actor
  vtkSmartPointer<vtkPolyDataMapper> mapper = vtkSmartPointer<vtkPolyDataMapper>::New();
  mapper->SetInputConnection(cylinderSource->GetOutputPort());
  vtkSmartPointer<vtkActor> actor = vtkSmartPointer<vtkActor>::New();
  actor->SetMapper(mapper);

  return actor;

}
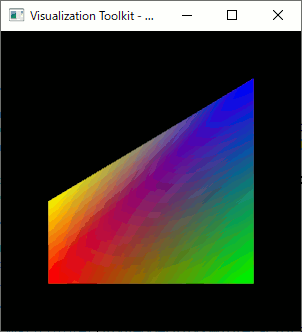
vtk 9.0 で表示(5) ポリゴンの頂点色を付けて表示
//VTK_MODULE_INITに必要
#include <vtkAutoInit.h>


#include <vtkSmartPointer.h>
#include <vtkRenderer.h>
#include <vtkRenderWindow.h>
#include <vtkRenderWindowInteractor.h>

#include <vtkPoints.h> // vtkPoints用
#include <vtkPolygon.h> // vtkPolygon用
#include <vtkPolyData.h> //vtkPolyData用
#include <vtkPolyDataMapper.h>

#include <vtkUnsignedCharArray.h> //色データ用
#include <vtkPointData.h> // 頂点データ用


//必須
#pragma comment(lib,"vtkCommonCore-9.0.lib")
#pragma comment(lib,"vtkRenderingCore-9.0.lib")
#pragma comment(lib,"vtkInteractionStyle-9.0.lib")
#pragma comment(lib,"vtkFiltersSources-9.0.lib")
#pragma comment(lib,"vtkCommonExecutionModel-9.0.lib")
#pragma comment(lib,"vtkCommonDataModel-9.0.lib ") // ポリゴン用

#pragma comment(lib,"vtkRenderingOpenGL2-9.0.lib")


//必須
VTK_MODULE_INIT(vtkRenderingOpenGL2);
VTK_MODULE_INIT(vtkInteractionStyle);


int main(int /*argc*/, char ** /*argv*/)
{


  //////////////////////////////////////
  vtkSmartPointer < vtkPoints > points = vtkSmartPointer < vtkPoints >::New();
  points->InsertNextPoint(0.0, 0.0, 0.0);
  points->InsertNextPoint(1.0, 0.0, 0.0);
  points->InsertNextPoint(1.0, 1.0, 0.0);
  points->InsertNextPoint(0.0, 0.4, 0.0);


  //////////////////////////////////////
  vtkSmartPointer<vtkPolygon> polygon = vtkSmartPointer<vtkPolygon>::New();
  polygon->GetPointIds()->SetNumberOfIds(4);//4頂点
  polygon->GetPointIds()->SetId(0, 0);
  polygon->GetPointIds()->SetId(1, 1);
  polygon->GetPointIds()->SetId(2, 2);
  polygon->GetPointIds()->SetId(3, 3);


  //////////////////////////////////////
  vtkSmartPointer<vtkCellArray> polylist = vtkSmartPointer<vtkCellArray>::New();
  polylist->InsertNextCell(polygon);

  //////////////////////////////////////
  vtkSmartPointer<vtkPolyData> polydata = vtkSmartPointer<vtkPolyData>::New();
  polydata->SetPoints(points);
  polydata->SetPolys(polylist);
  ////////////////////////////////////////////
  ////////////////////////////////////////////
  vtkSmartPointer<vtkUnsignedCharArray> colors = vtkSmartPointer<vtkUnsignedCharArray>::New();
  colors->SetNumberOfComponents(3);
  colors->SetName("Colors");

  colors->InsertNextTuple3(255, 0, 0);
  colors->InsertNextTuple3(0, 255, 0);
  colors->InsertNextTuple3(0, 0, 255);
  colors->InsertNextTuple3(255, 255, 0);

  polydata->GetPointData()->SetScalars(colors);

  ////////////////////////////////////////////
  ////////////////////////////////////////////
  //////////////////////////////////////
  // Create a mapper and actor
  vtkSmartPointer<vtkPolyDataMapper> mapper = vtkSmartPointer<vtkPolyDataMapper>::New();
  mapper->SetInputData(polydata);
  vtkSmartPointer<vtkActor> actor = vtkSmartPointer<vtkActor>::New();
  actor->SetMapper(mapper);

  //////////////////////////////////////
  auto renderer = vtkSmartPointer<vtkRenderer>::New();
  renderer->AddActor(actor);
  renderer->ResetCamera();

  //////////////////////////////////////
  auto interactor = vtkSmartPointer<vtkRenderWindowInteractor>::New();
  //////////////////////////////////////
  auto renderWindow = vtkSmartPointer<vtkRenderWindow>::New();
  renderWindow->AddRenderer(renderer);
  renderWindow->SetInteractor(interactor);
  renderWindow->Render();

  interactor->Start(); //イベントループへ入る

  return 0;
}
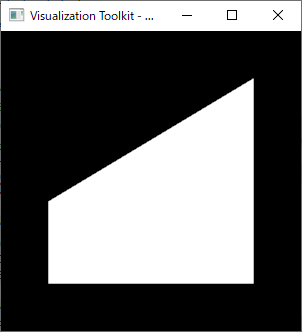
vtk 9.0 で表示(4) ポリゴンを表示
//VTK_MODULE_INITに必要
#include <vtkAutoInit.h>


#include <vtkSmartPointer.h>
#include <vtkRenderer.h>
#include <vtkRenderWindow.h>
#include <vtkRenderWindowInteractor.h>

#include <vtkPoints.h> // vtkPoints用
#include <vtkPolygon.h> // vtkPolygon用
#include <vtkPolyData.h> //vtkPolyData用
#include <vtkPolyDataMapper.h>

#pragma comment(lib,"vtkCommonCore-9.0.lib")
#pragma comment(lib,"vtkRenderingCore-9.0.lib")
#pragma comment(lib,"vtkInteractionStyle-9.0.lib")
#pragma comment(lib,"vtkFiltersSources-9.0.lib")
#pragma comment(lib,"vtkCommonExecutionModel-9.0.lib")
#pragma comment(lib,"vtkCommonDataModel-9.0.lib ") // ポリゴン用

//必須
#pragma comment(lib,"vtkRenderingOpenGL2-9.0.lib")

//必須
VTK_MODULE_INIT(vtkRenderingOpenGL2);
VTK_MODULE_INIT(vtkInteractionStyle);


int main(int /*argc*/, char ** /*argv*/)
{


  //////////////////////////////////////
  vtkSmartPointer < vtkPoints > points = vtkSmartPointer < vtkPoints >::New();
  points->InsertNextPoint(0.0, 0.0, 0.0);
  points->InsertNextPoint(1.0, 0.0, 0.0);
  points->InsertNextPoint(1.0, 1.0, 0.0);
  points->InsertNextPoint(0.0, 0.4, 0.0);


  //////////////////////////////////////
  vtkSmartPointer<vtkPolygon> polygon = vtkSmartPointer<vtkPolygon>::New();
  polygon->GetPointIds()->SetNumberOfIds(4);//4頂点
  polygon->GetPointIds()->SetId(0, 0);
  polygon->GetPointIds()->SetId(1, 1);
  polygon->GetPointIds()->SetId(2, 2);
  polygon->GetPointIds()->SetId(3, 3);

  //////////////////////////////////////
  vtkSmartPointer<vtkCellArray> polylist = vtkSmartPointer<vtkCellArray>::New();
  polylist->InsertNextCell(polygon);

  //////////////////////////////////////
  vtkSmartPointer<vtkPolyData> polydata = vtkSmartPointer<vtkPolyData>::New();
  polydata->SetPoints(points);
  polydata->SetPolys(polylist);


  //////////////////////////////////////
  // Create a mapper and actor
  vtkSmartPointer<vtkPolyDataMapper> mapper = vtkSmartPointer<vtkPolyDataMapper>::New();
  //mapper->SetInputConnection(cylinderSource->GetOutputPort());
  mapper->SetInputData(polydata);
  vtkSmartPointer<vtkActor> actor = vtkSmartPointer<vtkActor>::New();
  actor->SetMapper(mapper);

  //////////////////////////////////////
  auto renderer = vtkSmartPointer<vtkRenderer>::New();
  renderer->AddActor(actor);
  renderer->ResetCamera();

  //////////////////////////////////////
  auto interactor = vtkSmartPointer<vtkRenderWindowInteractor>::New();
  //vtkInteractorStyleTrackballCamera
  //////////////////////////////////////
  auto renderWindow = vtkSmartPointer<vtkRenderWindow>::New();
  renderWindow->AddRenderer(renderer);
  renderWindow->SetInteractor(interactor);
  renderWindow->Render();

  interactor->Start(); //イベントループへ入る

  return 0;
}
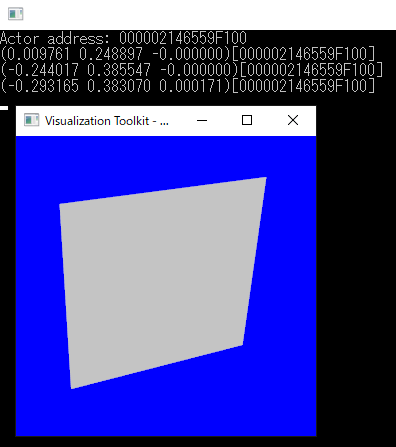
vtk 9.0 で表示(3) マウスピック
マウスクリックされたオブジェクトを特定する。
参考: https://vtk.org/Wiki/VTK/Examples/Cxx/Interaction/Picking
ソースコード
//VTK_MODULE_INITに必要
#include <vtkAutoInit.h>


#include <vtkSmartPointer.h>
#include <vtkRenderer.h>
#include <vtkRenderWindow.h>
#include <vtkRenderWindowInteractor.h>
#include <vtkInteractorStyleImage.h>
#include <vtkPropPicker.h>// ピックに必要
#include <vtkPolyDataMapper.h>
#include <vtkPlaneSource.h>


#ifdef _DEBUG
#pragma comment(lib,"vtkCommonCore-9.0d.lib")
#pragma comment(lib,"vtkRenderingCore-9.0d.lib")
#pragma comment(lib,"vtkInteractionStyle-9.0d.lib")
#pragma comment(lib,"vtkFiltersSources-9.0d.lib")
#pragma comment(lib,"vtkCommonExecutionModel-9.0d.lib")
#pragma comment(lib,"vtkRenderingOpenGL2-9.0d.lib")
#else
#pragma comment(lib,"vtkCommonCore-9.0.lib")
#pragma comment(lib,"vtkRenderingCore-9.0.lib")
#pragma comment(lib,"vtkInteractionStyle-9.0.lib")
#pragma comment(lib,"vtkFiltersSources-9.0.lib")
#pragma comment(lib,"vtkCommonExecutionModel-9.0.lib")
#pragma comment(lib,"vtkRenderingOpenGL2-9.0.lib")
#endif

//必須
VTK_MODULE_INIT(vtkRenderingOpenGL2);
VTK_MODULE_INIT(vtkInteractionStyle);


/////////////////////////////////////////////////////////////////////////////////////
/////////////////////////////////////////////////////////////////////////////////////


// 参考:
// https://vtk.org/Wiki/VTK/Examples/Cxx/Interaction/Picking
// Handle mouse events
class MouseInteractorStyle2 : public vtkInteractorStyleTrackballCamera
{
public:
  static MouseInteractorStyle2* New();
  vtkTypeMacro(MouseInteractorStyle2, vtkInteractorStyleTrackballCamera);

  virtual void OnLeftButtonDown()
  {
    int* clickPos = this->GetInteractor()->GetEventPosition();

    // ピック下オブジェクトを取得
    auto picker = vtkSmartPointer<vtkPropPicker>::New();
    picker->Pick(clickPos[0], clickPos[1], 0, this->GetDefaultRenderer());

    // オブジェクトがクリックされていたら位置とアドレスを出力
    if (picker->GetActor() != nullptr) {

      double* pos = picker->GetPickPosition();
      printf("(%lf %lf %lf)[%p]\n", pos[0], pos[1], pos[2], picker->GetActor());

    }

    // Forward events
    vtkInteractorStyleTrackballCamera::OnLeftButtonDown();
  }

private:

};
vtkStandardNewMacro(MouseInteractorStyle2);


// Execute application.
int main(int, char *[])
{
  auto planeSource = vtkSmartPointer<vtkPlaneSource>::New();
  planeSource->Update();

  // Create a polydata object
  vtkPolyData* polydata = planeSource->GetOutput();

  // Create a mapper
  auto mapper = vtkSmartPointer<vtkPolyDataMapper>::New();

  mapper->SetInputData(polydata);

  // Create an actor
  auto actor = vtkSmartPointer<vtkActor>::New();
  actor->SetMapper(mapper);

  std::cout << "Actor address: " << actor << std::endl;

  // A renderer and render window
  auto renderer = vtkSmartPointer<vtkRenderer>::New();
  auto renderWindow = vtkSmartPointer<vtkRenderWindow>::New();
  renderWindow->AddRenderer(renderer);

  // An interactor
  auto renderWindowInteractor = vtkSmartPointer<vtkRenderWindowInteractor>::New();
  renderWindowInteractor->SetRenderWindow(renderWindow);

  // Set the custom stype to use for interaction.
  auto style = vtkSmartPointer<MouseInteractorStyle2>::New();
  style->SetDefaultRenderer(renderer);

  renderWindowInteractor->SetInteractorStyle(style);

  // Add the actors to the scene
  renderer->AddActor(actor);
  renderer->SetBackground(0, 0, 1);

  // Render and interact
  renderWindow->Render();
  renderWindowInteractor->Initialize();
  renderWindowInteractor->Start();

  return EXIT_SUCCESS;
}
