libpngを試す(ファイル読み込み)
ソースコード
//参考元:
//http://zarb.org/~gc/html/libpng.html


#include <iostream>

#include <png.h>

#pragma comment(lib,"libpng16.lib")

//エラーの時強制終了
void abort_(const char* c) {
  printf(c);
  abort();
}
//! @brief pngファイル読み込み関数
//! @param [in] file_name ファイル名
//! @param [out] width 画像幅(ピクセル)
//! @param [out] height 画像高さ(ピクセル)
//! @param [out] color_type RGBかRGBAか...等
//! @param [out] bit_depth チャンネルのビット数
//! @param [out] row_pointers 画像データへのポインタのポインタ
void read_png(
  const char* file_name,
  int* width,
  int* height,
  png_byte* color_type,
  png_byte* bit_depth,
  png_bytep** row_pointers

) {


  png_byte  header[8];    // 8 is the maximum size that can be checked

  FILE *fp = fopen(file_name, "rb");
  if (!fp) {
    abort_("[read_png_file] File could not be opened for reading");
  }
  fread(header, 1, 8, fp);
  if (png_sig_cmp(header, 0, 8)) {
    abort_("[read_png_file] File is not recognized as a PNG file");
  }


  png_structp png_ptr;
  png_infop info_ptr;

  /* initialize stuff */
  png_ptr = png_create_read_struct(PNG_LIBPNG_VER_STRING, NULL, NULL, NULL);

  if (!png_ptr)
    abort_("[read_png_file] png_create_read_struct failed");

  info_ptr = png_create_info_struct(png_ptr);
  if (!info_ptr)
    abort_("[read_png_file] png_create_info_struct failed");

  if (setjmp(png_jmpbuf(png_ptr)))
    abort_("[read_png_file] Error during init_io");

  png_init_io(png_ptr, fp);
  png_set_sig_bytes(png_ptr, 8);

  png_read_info(png_ptr, info_ptr);
  /////////////////////////////////////////
  // 画像情報の取得
  *width = png_get_image_width(png_ptr, info_ptr);
  *height = png_get_image_height(png_ptr, info_ptr);
  *color_type = png_get_color_type(png_ptr, info_ptr);
  *bit_depth = png_get_bit_depth(png_ptr, info_ptr);
  //
  /////////////////////////////////////////
  int number_of_passes;
  number_of_passes = png_set_interlace_handling(png_ptr);
  png_read_update_info(png_ptr, info_ptr);

  /* read file */
  if (setjmp(png_jmpbuf(png_ptr)))
    abort_("[read_png_file] Error during read_image");
  /////////////////////////////////////////
  // 画像の読み込み
  *row_pointers = (png_bytep*) malloc(sizeof(png_bytep) * *height);

  for (int y=0; y < *height; y++)
    (*row_pointers)[y] = (png_byte*) malloc(png_get_rowbytes(png_ptr,info_ptr));

  png_read_image(png_ptr, *row_pointers);
  //
  /////////////////////////////////////////
  fclose(fp);
}
int main()
{
  int width;
  int height;
  png_byte color_type;
  png_byte bit_depth;

  png_bytep* row_pointers;

  ////////////////////////////////
  // 画像読み込み
  read_png(
    R"(c:\test\test.png)",
    &width,
    &height,
    &color_type,
    &bit_depth,
    &row_pointers
  );
  //
  ////////////////////////////////

  std::cout << "width : " << width << std::endl;
  std::cout << "height: " << height << std::endl;
  std::cout << "colortype: " << (int)color_type << std::endl;
  std::cout << "bitdepth: " << (int)bit_depth << std::endl;

  ////////////////////////////////
  //1ピクセルのバイト数を算出
  //RGBかRGBAだけ出力
  int pixelsize;
  switch (color_type){
  case PNG_COLOR_TYPE_RGB:
    pixelsize = bit_depth / 8 * 3;
    break;
  case PNG_COLOR_TYPE_RGB_ALPHA:
    pixelsize = bit_depth / 8 * 4;
    break;
  default:
    std::cout << "RGB/RGBA only" << std::endl;
  }
  //
  ////////////////////////////////
  ///////////////////////////////////////////////
  // PPM形式に変換して出力
  FILE* fp = fopen(R"(C:\test\out.ppm)", "wb");
  fprintf(fp, "P3\n%d %d\n%d\n", width, height, 255);

  size_t k = 0;
  for (size_t i = 0; i < (size_t)height; i++) {

    png_bytep yhead = row_pointers[i];

    for (size_t j = 0; j < (size_t)width; j++) {

      png_bytep xpix = yhead + pixelsize * j;

      fprintf(fp, "%d %d %d ", xpix[0], xpix[1], xpix[2]);
      k++;
    }
    fprintf(fp, "\n");
  }

  fclose(fp);
  //
  ///////////////////////////////////////////////
  ///////////////////////////////////////////////
  // メモリの解放
  for (size_t i = 0; i < (size_t)height; i++) {
    png_bytep yhead = row_pointers[i];
    free(yhead);
  }
  free(row_pointers);
  //
  ///////////////////////////////////////////////

  std::cout << "fin" << std::endl;

  int i;
  std::cin >> i;

}
実行結果

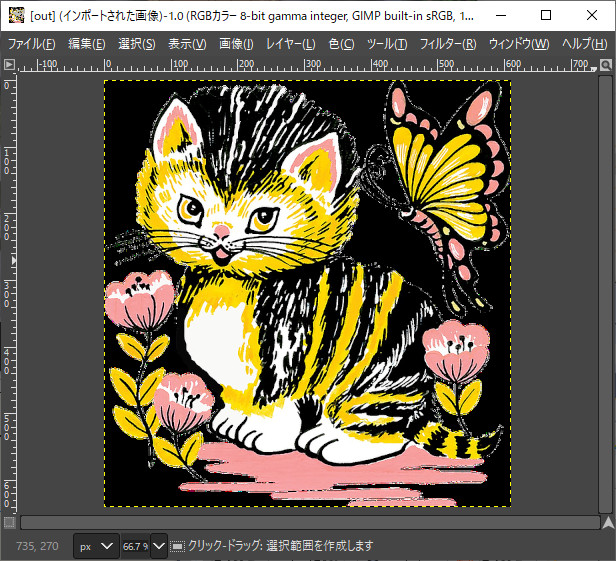
libpng 1bit / 4bit PNG_COLOR_TYPE_GRAY 出力
libpng PNG_COLOR_TYPE_PALETTEでパレットを使った出力
libpng パレット色(PNG_COLOR_TYPE_PALETTE)画像の読み込み
libpng 16bit PNG_COLOR_TYPE_GRAY 読み込み
libpngを試す(CMakeビルド)
ダウンロード
libpng
まず、以下へ行き、「Source code: 」から.zipをダウンロードする
http://www.libpng.org/pub/png/libpng.html
zlib
次にzlibをダウンロードする。libpng1637/RADMEには以下のように書かれている。
lpng1637\README
You should use zlib 1.0.4 or later to run this, but it MAY work with
versions as old as zlib 0.95.
CMake
ディレクトリ配置
例えば以下のようにディレクトリを構成する
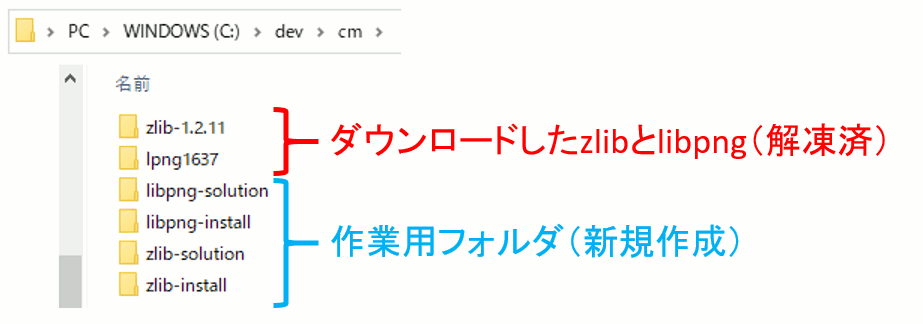
- C:\dev\cm\zlib-solution\
zlibをCMakeした結果得られる.slnが入る - C:\dev\cm\zlib-bin\
zlibの.slnをビルドした結果が入る - C:\dev\cm\libpng-solution\
libpngをCMakeした結果得られる.slnが入る - C:\dev\cm\libpng-bin\
libpngの.slnをビルドした結果が入る
CMakeでzlibのsln作成
以下のように設定し、ConfigureしてGenerateしてOpen Projectする。
VC++でzlibのslnをコンパイル
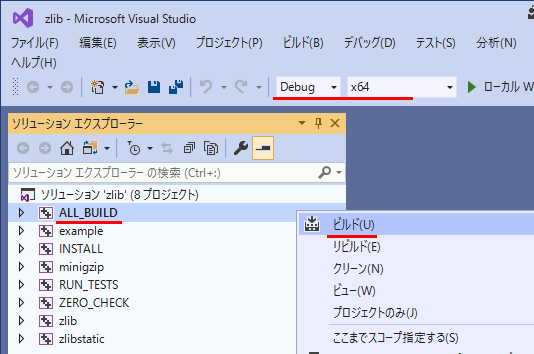
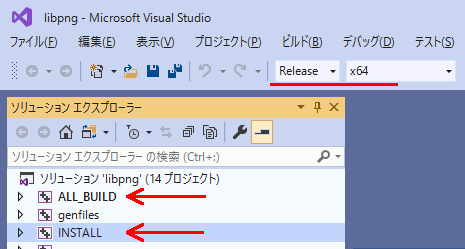
VC++からDebug x64 及び Release x64について、ALL_BUILDする。
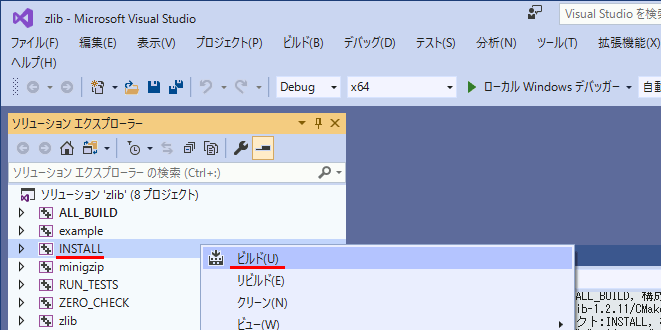
ALL_BUILDが終わったらINSTALLする。
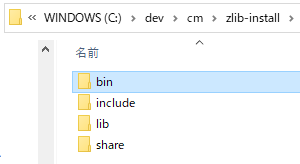
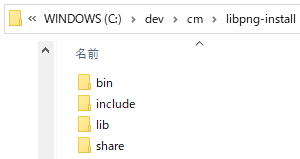
完了すると、zlib-installディレクトリに必要ファイルが出力されている
CMakeでlibpngのsln作成
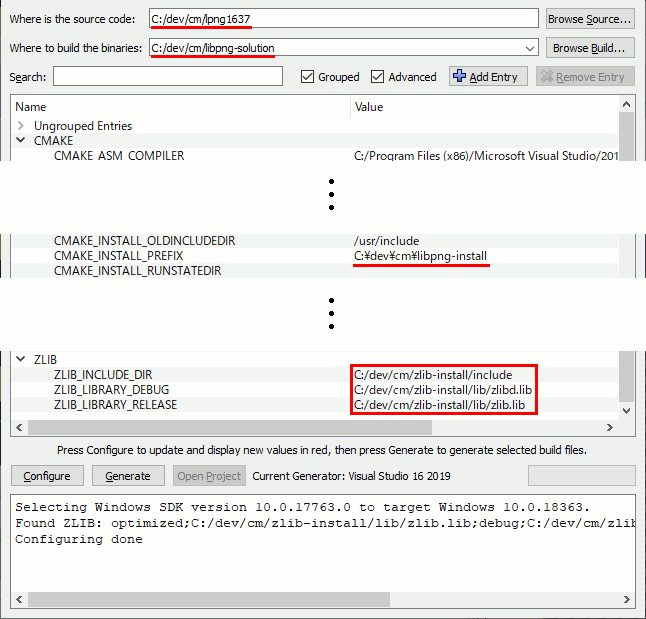
以下のように設定し、ConfigureしてGenerateしてOpen Projectする。
VC++でlibpngのslnをコンパイル
上記zlibと同じように、Debug x64 と Release x64 について、All_BUILD して INSTALL する
完了すると、libpng-installディレクトリに必要ファイルが出力されている
所感・次回
まだlibpngやってなかったことに自分でびっくりしている。
次回はライブラリを使うことを考える。
libpng 1bit / 4bit PNG_COLOR_TYPE_GRAY 出力
libpng PNG_COLOR_TYPE_PALETTEでパレットを使った出力
libpng パレット色(PNG_COLOR_TYPE_PALETTE)画像の読み込み
libpng 16bit PNG_COLOR_TYPE_GRAY 読み込み
setjmp / longjmp
setjmp , longjmp
C言語のsetjmpとlongjmpについて。
libpngのサンプルでsetjmpが出てきてびっくりしたので挙動の確認をしておきたい。
setjmp /longjmp はセットで使う。
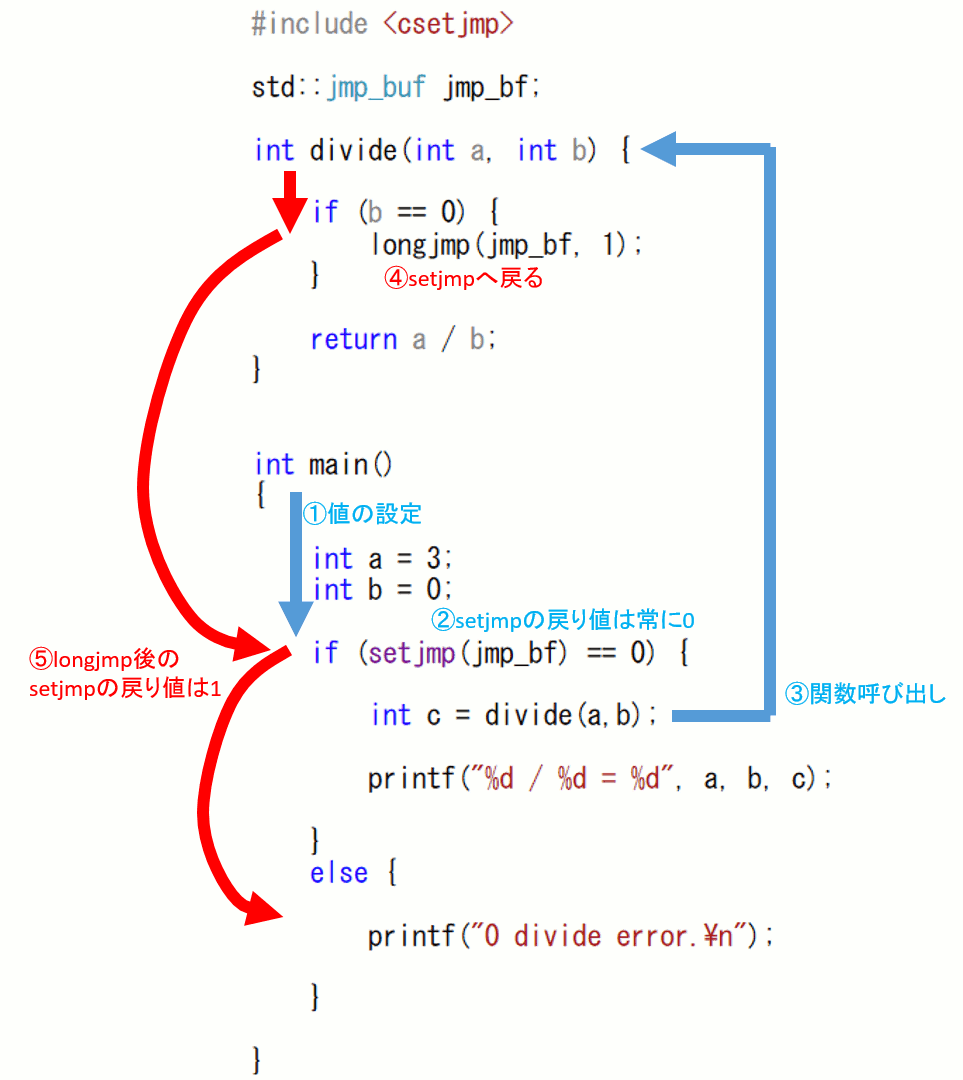
1.setjmpを一回呼び出すと、必ず0を返して戻ってくる。
2.その後、longjmpを呼び出すと、先ほどsetjmpが呼ばれた文まで戻り、再びsetjmpが呼ばれる。
3.その時のsetjmpの戻り値は、先に呼び出したlongjmpの第二引数となる
これだけだとgotoと似たようなものに思えるが、setjmpに対するlongjmpの呼び出しは、別の関数の中でもかまわない。関数を飛び越えて戻ってくる。
例1
動作
コード
#include <csetjmp>

std::jmp_buf jmp_bf;

int main()
{

  int a = 3;
  int b = 0;


  if (setjmp(jmp_bf) == 0) {

    if (b == 0) {

      longjmp(jmp_bf, 1);

    }

    int c = a / b;
    printf("%d / %d = %d", a, b, c);

  }
  else {

    printf("0 divide error.\n");

  }

}
C言語には例外(try...catch...)がない。この、「関数を飛び越えて戻ってくる」という特性を生かして、C言語で例外処理に近いことができる。
つまり、以下のC++コードに近いことができる。
例2 関数間ジャンプ
C++例外使用版
int main()
{

  int a = 3;
  int b = 0;


  try{

    int c = a / b;
    printf("%d / %d = %d", a, b, c);

  }
  catch(...) {

    std::cout << "0 divide error";

  }


  std::cout << "Hello World!\n";
}
setjmp使用版
#include <iostream>

#include <csetjmp>

std::jmp_buf jmp_bf;
int divide(int a, int b) {

  if (b == 0) {
    longjmp(jmp_bf, 1);//mainのsetjmpまで飛ぶ
  }

  return a / b;
}
int main()
{

  int a = 3;
  int b = 0;

  //初回は0
  //longjmp後は1
 if (setjmp(jmp_bf) == 0) {

    int c = divide(a,b);

    printf("%d / %d = %d", a, b, c);

  }
  else {

    printf("0 divide error.\n");

  }

}
動作
Visual Studioのオフラインインストーラーを作成する
Visual Studioのオフラインインストーラを作成する方法。
1.VSのインストーラをダウンロードする
https://visualstudio.microsoft.com/ja/downloads/?rr=https%3A%2F%2Fqiita.com%2F
2.コマンドラインから以下のようにコマンドを実行する
例えば以下のようになる。以下では加えて--lang ja-JPを指定し、言語を日本語のみに絞っている。VS丸ごと全部のイメージは非常に大きいので絞れるところは絞ったほうがいい
なお--langなどの「--」はハイフン二本。
その他にも、--addオプションでどのコンポーネントをダウンロードするかを指定できる。以下はVC++に必要なものを入れた・・・つもりなのだが実際に実行してみると結局オンラインダウンロードが必要になってしまった。自分が必要なものだけを確実に抜き出すのは結構難しいようだ。
※改行は入れない。全てスペース区切り。
--add Microsoft.VisualStudio.Component.CoreEditor
--add Microsoft.Component.MSBuild
--add Microsoft.VisualStudio.Component.IntelliCode
--add Microsoft.VisualStudio.Component.Roslyn.Compiler
--add Microsoft.VisualStudio.Component.TextTemplating
--add Microsoft.VisualStudio.Component.VC.CoreIde
--add Microsoft.VisualStudio.Component.VC.Redist.14.Latest
--add Microsoft.VisualStudio.ComponentGroup.NativeDesktop.Core
--add Microsoft.VisualStudio.Component.VC.ATL
--add Microsoft.VisualStudio.Component.VC.DiagnosticTools
--add Microsoft.VisualStudio.Component.VC.Tools.x86.x64
--add Microsoft.VisualStudio.Component.Windows10SDK.18362
--add Microsoft.Component.VC.Runtime.UCRTSDK
--add Microsoft.VisualStudio.Component.VC.140
--add Microsoft.VisualStudio.Component.VC.ATLMFC
--add Microsoft.VisualStudio.Component.VC.CLI.Support
--add Microsoft.VisualStudio.Component.VC.v141.x86.x64
--add Microsoft.VisualStudio.Component.Windows10SDK.16299
--add Microsoft.VisualStudio.Component.Windows10SDK.17134
--add Microsoft.VisualStudio.Component.Windows10SDK.17763
--lang ja-JP
コンポーネントID一覧:
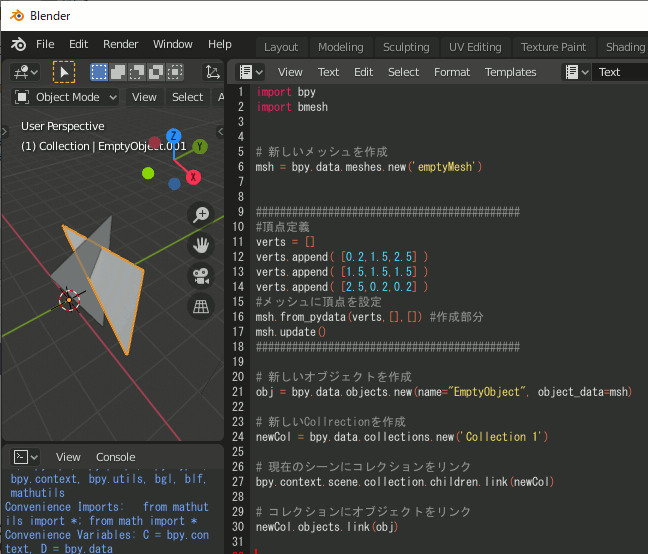
BlenderのPython Scriptを書くText Editorで日本語表示
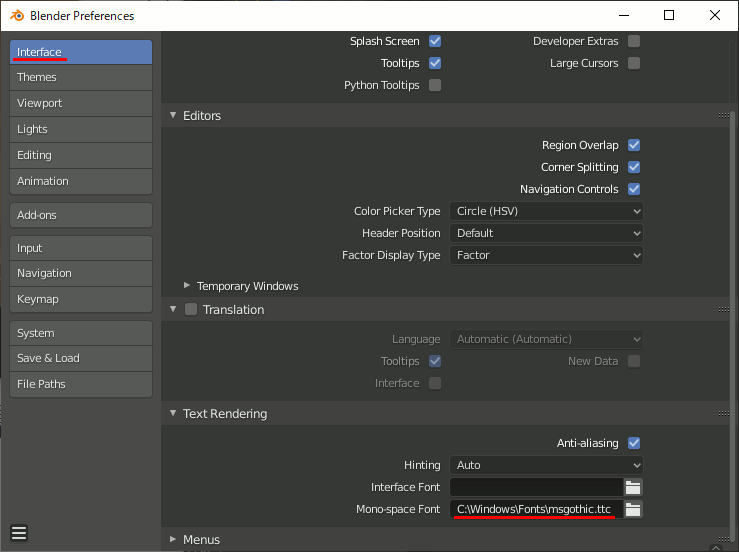
Edit → Preferences → Interface → Text Rendering → Mono-space Font
で日本語のあるフォントに変更すると日本語を表示できる。
ただしIMEは使えない。日本語の入力はできない。
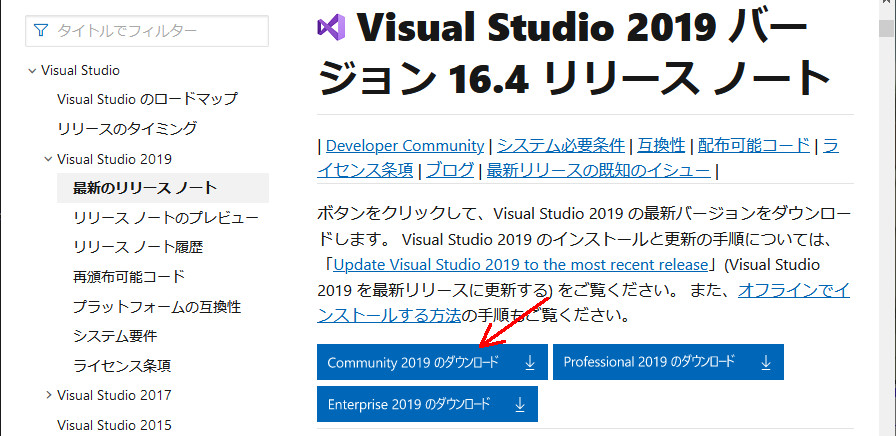
古いVisual Studioのダウンロード元
古いVisual Studioのダウンロードが必要だったので調べた。
左側のツリーを展開して青いボタンを押すとダウンロードできる。
https://docs.microsoft.com/ja-jp/visualstudio/productinfo/
glfwを試す(3)複数ウィンドウ
glfwでは複数のウィンドウを作れる。以下はそのサンプルコード。
ただし別に別スレッドで動いているというものでもない。メッセージループは一つ。
イベント処理時は、コールバック関数がウィンドウへのポインタを第一引数に渡すので、それを比較して呼び出し元を区別できるが、違う関数を呼び出しても問題ない(はずだ)し普通はそうすべきだと思う。
ソースコード
#include <cstdio> #include <Windows.h> #include <gl/GL.h> #include <GLFW/glfw3.h> #pragma comment(lib,"opengl32.lib") #pragma comment(lib,"glfw3.lib") // ウィンドウを格納する変数 GLFWwindow* window1; GLFWwindow* window2;//キー入力を処理するコールバック関数 void key_callback(GLFWwindow* pwin, int key, int scancode, int action, int mods) { if ( action != GLFW_PRESS) return; //ウィンドウの判別をポインタで行う if (window1 == pwin) { printf("window 1 "); } if (window2 == pwin) { printf("window 2 "); } //キーイベント if ( key == GLFW_KEY_UP) { printf("key up\n"); } else if ( key == GLFW_KEY_DOWN ) { printf("key down\n"); } else if ( key == GLFW_KEY_LEFT ) { printf("key left\n"); } else if ( key == GLFW_KEY_RIGHT ) { printf("key right\n"); } else { printf("\n"); } } // マウスクリックを処理するコールバック関数 void mouse_button_callback(GLFWwindow* pwin, int button, int action, int mods) { if (action != GLFW_PRESS) { return; } //ウィンドウの判別をポインタで行う if (window1 == pwin) { printf("window 1 "); } if (window2 == pwin) { printf("window 2 "); } //マウスイベント if (button == GLFW_MOUSE_BUTTON_LEFT) { printf("L - down\n"); } else if (button == GLFW_MOUSE_BUTTON_RIGHT) { printf("R - down\n"); } else if (button == GLFW_MOUSE_BUTTON_MIDDLE) { printf("M - down\n"); } else { printf("\n"); } }void render1(int width,int height);//window 1 用描画関数 void render2(int width, int height);//window 2 用描画関数int main() { if (glfwInit() == GL_FALSE) { return 1; } window1 = glfwCreateWindow(400,400,"window 1",NULL,NULL); window2 = glfwCreateWindow(400,400,"window 2",NULL,NULL); if (window1 == nullptr) { glfwTerminate(); return 1; } if (window2 == nullptr) { glfwTerminate(); return 1; } //////////////////////////////////////////// // コールバック関数の設定 glfwSetKeyCallback(window1, key_callback); glfwSetKeyCallback(window2, key_callback); glfwSetMouseButtonCallback(window1, mouse_button_callback); glfwSetMouseButtonCallback(window2, mouse_button_callback); // //////////////////////////////////////////// while (glfwWindowShouldClose(window1) == GL_FALSE) { int width, height; //////////////////////////////////////////////////////// glfwGetFramebufferSize(window1, &width, &height); glfwMakeContextCurrent(window1); render1(width,height); glfwSwapBuffers(window1); //////////////////////////////////////////////////////// glfwGetFramebufferSize(window2, &width, &height); glfwMakeContextCurrent(window2); render2(width, height); glfwSwapBuffers(window2); //////////////////////////////////////////////////////// // イベント取得 glfwWaitEvents(); } glfwTerminate(); }void render1(int width, int height) { glViewport(0, 0, width, height); glOrtho(-1, 1, -1, 1, -1, 1); glClearColor(0, 0, 0, 1); glClear(GL_COLOR_BUFFER_BIT); glBegin(GL_QUADS); glColor3d(1, 0, 0); glVertex2d(-0.7, -0.7); glColor3d(0, 1, 0); glVertex2d(-0.7, 0.7); glColor3d(0, 0, 1); glVertex2d(0.7, 0.7); glColor3d(1, 1, 1); glVertex2d(0.7, -0.7); glEnd(); } void render2(int width, int height) { glViewport(0, 0, width, height); glOrtho(-1, 1, -1, 1, -1, 1); glClearColor(0, 0, 0, 1); glClear(GL_COLOR_BUFFER_BIT); glBegin(GL_QUADS); glColor3d(0, 1, 1); glVertex2d(-0.7, -0.7); glColor3d(1, 0, 1); glVertex2d(-0.7, 0.7); glColor3d(1, 1, 0); glVertex2d(0.7, 0.7); glColor3d(0, 0, 0); glVertex2d(0.7, -0.7); glEnd(); }
glfwを試す(2)イベント
ドキュメントトップ
イベントの扱いについて。
キーの定数一覧:
ソースコード
#include <cstdio> #include <Windows.h> #include <gl/GL.h> #include <GLFW/glfw3.h> #pragma comment(lib,"opengl32.lib") #pragma comment(lib,"glfw3.lib") // 参考文献 //////////////////////////////////////// // https://www.glfw.org/docs/latest/input_guide.html
//キー入力を処理するコールバック関数 void key_callback(GLFWwindow* pwin, int key, int scancode, int action, int mods) { // https://www.glfw.org/docs/latest/group__keys.html#ga99aacc875b6b27a072552631e13775c7 // action ... GLFW_PRESS , GLFW_REPEAT , GLFW_RELEASE //特殊キー if (key == GLFW_KEY_UP && action == GLFW_PRESS) { printf("key up\n"); } if (key == GLFW_KEY_DOWN && action == GLFW_PRESS) { printf("key down\n"); } if (key == GLFW_KEY_LEFT && action == GLFW_PRESS) { printf("key left\n"); } if (key == GLFW_KEY_RIGHT && action == GLFW_PRESS) { printf("key right\n"); } if (key >= GLFW_KEY_A && key <= GLFW_KEY_Z) { if (action == GLFW_PRESS) { const char* key_name = glfwGetKeyName(key, 0); printf("key - %s\n", key_name); } } }// マウスクリックを処理するコールバック関数 void mouse_button_callback(GLFWwindow* pwin, int button, int action, int mods) { if (button == GLFW_MOUSE_BUTTON_LEFT && action == GLFW_PRESS) { printf("L - down\n"); } if (button == GLFW_MOUSE_BUTTON_RIGHT && action == GLFW_PRESS) { printf("R - down\n"); } if (button == GLFW_MOUSE_BUTTON_MIDDLE && action == GLFW_PRESS) { printf("M - down\n"); } }// マウスホイールを処理するコールバック関数 void mouse_wheel_callback(GLFWwindow* window, double xoffset, double yoffset) { if (yoffset < 0) { printf("wheel down \n"); } if (yoffset > 0) { printf("wheel up \n"); } }int main() { if (glfwInit() == GL_FALSE) { return 1; } GLFWwindow* window = glfwCreateWindow( 400, 400, "window title", NULL, NULL ); if (window == nullptr) { glfwTerminate(); return 1; } //////////////////////////////////////////// // コールバック関数の設定 glfwSetKeyCallback(window, key_callback); glfwSetMouseButtonCallback(window, mouse_button_callback); glfwSetScrollCallback(window, mouse_wheel_callback); // //////////////////////////////////////////// glfwMakeContextCurrent(window); while (glfwWindowShouldClose(window) == GL_FALSE) { int width, height; glfwGetFramebufferSize(window, &width, &height); ///////////////////// // 描画 glViewport(0, 0, width, height); glOrtho(-1, 1, -1, 1, -1, 1); glClearColor(0.2, 0.2, 0.2, 1); glClear(GL_COLOR_BUFFER_BIT); // ///////////////////// glfwSwapBuffers(window); // イベント取得 glfwWaitEvents(); } glfwTerminate(); }
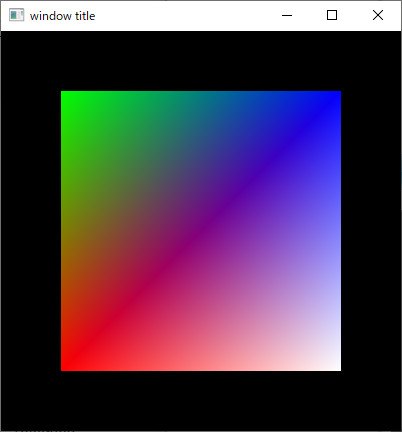
glfwを試す(1)
最近ではglutよりglfwという風潮がある。
そこでglfwでウィンドウを表示して簡単な描画までを行う。
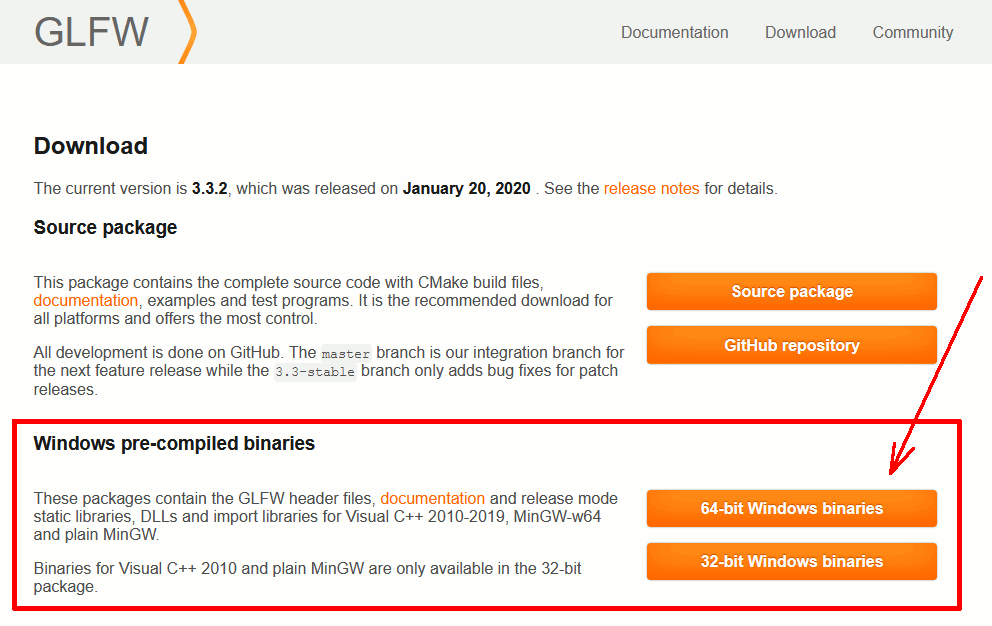
1.ダウンロード
https://www.glfw.org/download.html
2.ソースコード
#include <cstdlib> #include <iostream>
#include <Windows.h> #include <gl/GL.h> #include <GLFW/glfw3.h> #pragma comment(lib,"opengl32.lib") #pragma comment(lib,"glfw3.lib") int main() { //////////////////////////////////////////////////////////////////////////////// // GLFW の初期化 if (glfwInit() == GL_FALSE) { // 初期化に失敗したら終了 return 1; } //////////////////////////////////////////////////////////////////////////////// // ウィンドウを作成 GLFWwindow* window = glfwCreateWindow( 400, //width 400, //height "window title",//title NULL, //monitor NULL //share ); //////////////////////////////////////////////////////////////////////////////// // ウィンドウを作成できなければ終了 if (window == nullptr) { glfwTerminate(); return 1; } glfwMakeContextCurrent(window); while (glfwWindowShouldClose(window) == GL_FALSE) { int width, height; glfwGetFramebufferSize(window, &width, &height);
///////////////////// // 描画 glViewport(0, 0, width, height); glOrtho(-1, 1, -1, 1, -1, 1); glClearColor(0, 0, 0, 1); glClear(GL_COLOR_BUFFER_BIT); glBegin(GL_QUADS); glColor3d(1, 0, 0); glVertex2d(-0.7, -0.7); glColor3d(0, 1, 0); glVertex2d(-0.7, 0.7); glColor3d(0, 0, 1); glVertex2d( 0.7, 0.7); glColor3d(1, 1, 1); glVertex2d(0.7, -0.7); glEnd(); // /////////////////////glfwSwapBuffers(window); // イベント取得 glfwWaitEvents(); } glfwTerminate(); }
Blenderのply Exportの重複頂点
当然だが、File → Export → Stanford(.ply)でply出力できる。
しかしその時、出力されたPLYファイルを見ると、頂点が重複している。
重複頂点を削除するオプションがどうも見つからなかったので、別の方法を考える。最も確実な方法は、おそらくMeshLab等の有名どころを使って重複頂点削除コマンドを実行すること。
MeshLabで重複削除
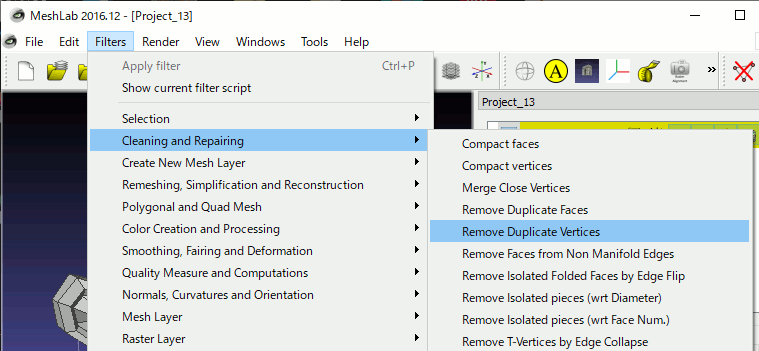
MeshLab → [Filters] → [Cleaning and Repairing] → [Remove Duplicate Vertices]
Blender Pythonで出力プログラムを書く
あるいは、plyは比較的わかりやすいフォーマットなので出力プログラムを自力で書いてもいいかもしれない。
import bpy

msh = bpy.context.active_object

fname = 'C:/test/' + msh.name + '.ply'

with open(fname, 'w') as myf:

    print( "ply" ,file=myf )
    print( "format ascii 1.0" ,file=myf )
    print( "element vertex",len(msh.data.vertices) ,file=myf )
    print( "property float x" ,file=myf )
    print( "property float y" ,file=myf )
    print( "property float z" ,file=myf )
    print( "property float nx" ,file=myf )
    print( "property float ny" ,file=myf )
    print( "property float nz" ,file=myf )
    print( "element face",len(msh.data.polygons) ,file=myf )
    print( "property list uchar int vertex_index" ,file=myf )
    print( "end_header" ,file=myf )
    for vt in msh.data.vertices:
        print(vt.co[0],vt.co[1],vt.co[2], " " ,end="",file=myf ) #頂点座標出力
        print(vt.normal[0],vt.normal[1],vt.normal[2],file=myf ) #頂点法線出力

    for f in msh.data.polygons:
        print( len(f.vertices) ," ", end="",file=myf ) #各面の頂点数出力
        for v in f.vertices:
            print( v ," ", end="" ,file=myf ) #各面を構成する頂点の頂点番号を出力
        print( "" ,file=myf )
処理結果
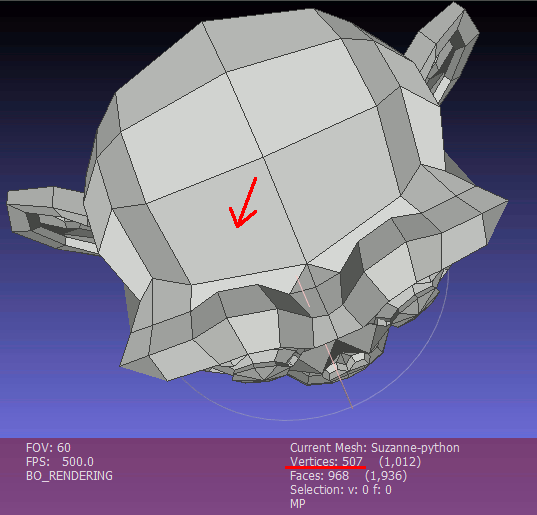
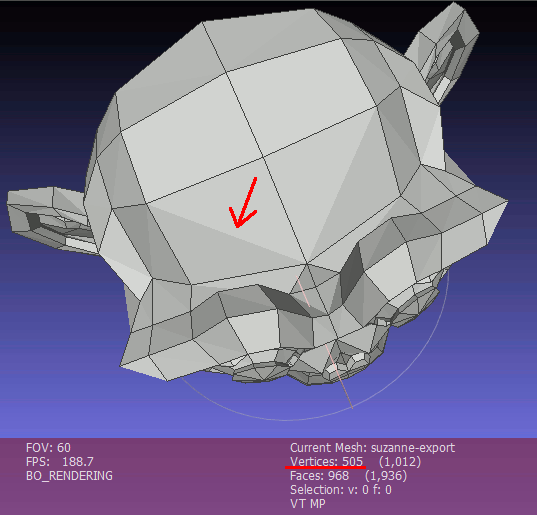
MeshLabで頂点数の確認をする。Verticesが減っているのがわかる
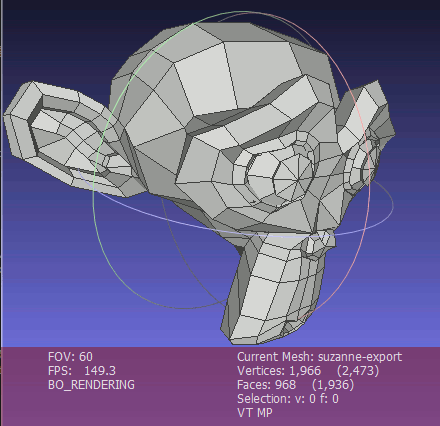
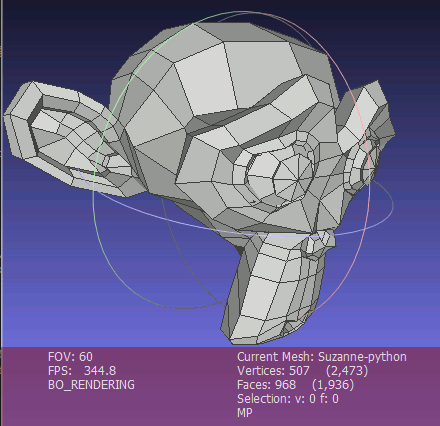
注意
以下のように、結果がやや異なる。頂点数の違いは重複と見なす距離の差だと思う(想像)。四角形以上のNgonの扱いも異なっている面法線の再計算の有無あたりかとも思うが不明。


