月火水木金土日
OpenGLで簡単な円を描く
※2020/09/08追記:正直、以下の方が簡単です。
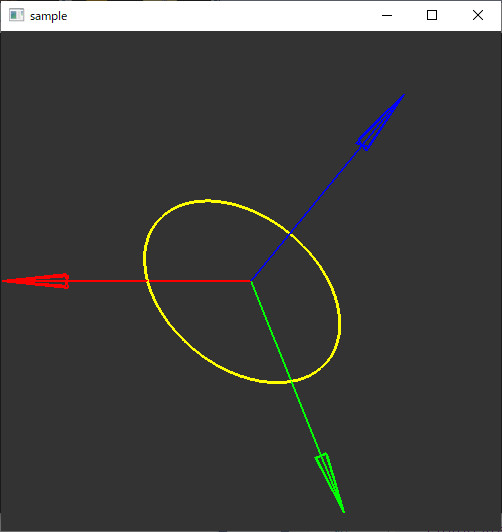
OpenGLで円を描くプログラム。
普通のやり方だと三角関数を使って正多角形を描くのだけれど、面倒なので、まず正方形を用意し、それをN分割することで円に近づける。
ただし今回、円はXY平面上にある。
ソースコード
円を描くプログラム(drawcircle.hpp)
//! @file drawcircle.hpp
#pragma once

#include <Windows.h>
#include <gl/GL.h>
#include <cmath>

//! @brief 座標を管理する構造体
struct coord_t {
  double x, y, z;
  coord_t() {}
  coord_t(double X, double Y, double Z) :x(X), y(Y), z(Z) {}
  coord_t(double* v3) {
    x = v3[0];
    y = v3[1];
    z = v3[2];
  }
  coord_t(const coord_t& src) {
    x = src.x;
    y = src.y;
    z = src.z;
  }

  inline bool normalize()
  {

    double len = static_cast<double>(sqrt(x * x + y * y + z * z));

    if (len < 1e-6) return false;

    len = 1.0 / len;
    x *= len;
    y *= len;
    z *= len;

    return true;
  }
  inline void mult(const double val) {
    x *= val;
    y *= val;
    z *= val;
  }


};

//! @brief a----c という辺をa--b--cと分割し、a--bを描画する。呼び出し側でGL_LINE_LOOPを使う限りb--cは勝手につながる
//! @param [in] offset 円の中心座標
//! @param [in] count 分割数
//! @param [in] r 半径
//! @param [in] a 始点
//! @param [in] c 終点
//! @return なし
inline void plot_ab(const coord_t offset, const int count, double r, coord_t a, coord_t c) {


  a.normalize();
  c.normalize();
  a.mult(r);
  c.mult(r);


  if (count == 0) {
    glVertex3d(a.x + offset.x, a.y + offset.y, a.z + offset.z);
    return;
  }

  //a----c  →   a--b--c
  coord_t b((a.x + c.x) / 2.0, (a.y + c.y) / 2.0, (a.z + c.z) / 2.0);
  b.normalize();
  b.mult(r);

  if (count == 1) {
    glVertex3d(a.x + offset.x, a.y + offset.y, a.z + offset.z);
    glVertex3d(b.x + offset.x, b.y + offset.y, b.z + offset.z);
  }
  else {

    plot_ab(offset, count - 1, r, a, b);
    plot_ab(offset, count - 1, r, b, c);

  }

}

//! @brief OpenGLで円を描く
//! @param [in] x 中心座標
//! @param [in] y 中心座標
//! @param [in] z 中心座標
//! @param [in] r 半径
//! @param [in] count 分割数 4 ぐらいがとりあえず適当
//! @return なし
inline void circle_xy(double x, double y, double z, double r, const int count) {

  coord_t center(x, y, z);


  coord_t p[4];
  p[0] = coord_t(-1, -1, 0);
  p[1] = coord_t(1, -1, 0);
  p[2] = coord_t(1, 1, 0);
  p[3] = coord_t(-1, 1, 0);


  glBegin(GL_LINE_LOOP);
  for (int i = 0; i < 4; i++) {

    int ia = i % 4;
    int ic = (i+1) % 4;

    coord_t a(p[ia].x, p[ia].y, p[ia].z);
    coord_t c(p[ic].x, p[ic].y, p[ic].z);
    plot_ab(center, count, r, a, c);
  }
  glEnd();

}
呼び出しサンプル
#include <iostream>
#include <Windows.h>
#include <gl/GL.h>
#include <gl/GLU.h>
#include <gl/freeglut.h>

#include <cassert>

// freeglut:
// http://freeglut.sourceforge.net/

//矢印描画関数
#include "drawarrow.hpp"
//円描画関数
#include "drawcircle.hpp"


//ウィンドウの幅と高さ
int width, height;

double rotate_angle=0;


//描画関数
void disp(void) {

  glClearColor(0.2, 0.2, 0.2, 1);
  glClear(GL_COLOR_BUFFER_BIT | GL_DEPTH_BUFFER_BIT);

  glEnable(GL_DEPTH_TEST);

  glViewport(0, 0, width, height);

  //カメラの設定
  glMatrixMode(GL_PROJECTION);
  glLoadIdentity();
  gluPerspective(60, width / (double)height, 0.1, 3);
  glMatrixMode(GL_MODELVIEW);

  glLoadIdentity();

  glTranslated(0, 0, -2);

  //表示用の回転
  glRotated(rotate_angle, 0, 1, 0);
  glRotated(rotate_angle, 1, 0, 0);

  //矢印を三つ描画
  glLineWidth(2);
  double from[3] = { 0,0,0 };
  double tox[3] = { 1,0,0 };
  double toy[3] = { 0,1,0 };
  double toz[3] = { 0,0,1 };
  glColor3d(1, 0, 0);
  drawArrow(from, tox);
  glColor3d(0, 1, 0);
  drawArrow(from, toy);
  glColor3d(0, 0, 1);
  drawArrow(from, toz);
  glLineWidth(1);

  //////////////////////////////////////
  //円を描画
  glLineWidth(3);
  glColor3d(1, 1, 0);
  circle_xy(0,0,0,0.5,4);

  glFlush();
}

//ウィンドウサイズの変化時に呼び出される
void reshape(int w, int h) {
  width = w; height = h;

  disp();
}

void timer(int value)
{
  rotate_angle += 5;

  disp();
  glutTimerFunc(100, timer, 0);
}

//エントリポイント
int main(int argc, char** argv)
{
  glutInit(&argc, argv);
  glutInitWindowPosition(100, 50);
  glutInitWindowSize(500, 500);
  glutInitDisplayMode(GLUT_SINGLE | GLUT_RGBA);

  glutCreateWindow("sample");
  glutDisplayFunc(disp);
  glutReshapeFunc(reshape);
  glutTimerFunc(1000, timer, 0);//タイマー
  glutMainLoop();

  return 0;
}
