スポンサーリンク
レイキャストを実装してみる(1) レイの生成
自分でレイキャストを実装してみる。なおレイキャストは視点からレイを飛ばし、オブジェクトに衝突した時点の色でピクセルを塗る方法で、オブジェクトに衝突したらそこから反射したレイをさらに飛ばすを繰り返すのはレイトレーシングという。
レイの生成
レイの生成は真面目にやると数式ばかりになって初学者にとってはつまらないだけなので、グリッドを使って直感的な方法で実現してみる。
1.Grid.hpp
#pragma once

#include<glm/glm.hpp>
#include<glm/gtc/type_ptr.hpp>

#include<vector>

// グリッド一つ分
class cell {
  glm::vec3 _min;  //始点
  glm::vec3 _vecx; //方向1
  glm::vec3 _vecy; //方向2

public:
  cell(glm::vec3 _min_, glm::vec3 _vec_x, glm::vec3 _vec_y) {
    _min = _min_;
    _vecx = _vec_x;
    _vecy = _vec_y;
  }
  const glm::vec3& cmin()const {
    return _min;
  }
  const glm::vec3& cvecx()const {
    return _vecx;
  }
  const glm::vec3& cvecy()const {
    return _vecy;
  }

  // セルの中心
  glm::vec3 center()const {
    return _min + _vecx / 2.f + _vecy / 2.f;
  }
};


class grid {
  std::vector<cell> _cells;
  int _xcount;
  int _ycount;
  float _xwidth;
  float _ywidth;
  glm::vec3 _center;

public:

  float xwidth()const { return _xwidth; }
  float ywidth()const { return _ywidth; }
  const glm::vec3& center()const { return _center; }

  size_t cellCount()const {
    return _cells.size();
  }
  cell& operator[](const size_t index) {
    return _cells[index];
  }
  const cell& operator[](const size_t index)const {
    return _cells[index];
  }
  grid() {}

  grid(const grid& g) {
    _cells = g._cells;
    _xcount = g._xcount;
    _ycount = g._ycount;
    _xwidth = g._xwidth;
    _ywidth = g._ywidth;
    _center = g._center;
  }
  grid& operator=(const grid& g) {
    _cells = g._cells;
    _xcount = g._xcount;
    _ycount = g._ycount;
    _xwidth = g._xwidth;
    _ywidth = g._ywidth;
    _center = g._center;
  }
  grid& operator=(grid&& g) {
    _cells = std::move(g._cells);
    _xcount = g._xcount;
    _ycount = g._ycount;
    _xwidth = g._xwidth;
    _ywidth = g._ywidth;
    _center = g._center;
    return *this;
  }

  // 平面一つ分。xcount × ycountのcellからなる
  grid(
    const glm::vec3 vecX,
    const glm::vec3 vecY,
    const glm::vec3 center,
    const float width,
    const float height,
    const int xcount,
    const int ycount) {

    _xcount = xcount;
    _ycount = ycount;
    _xwidth = width;
    _ywidth = height;

    _center = center;

    glm::vec3 NVecX = glm::normalize(vecX);
    glm::vec3 NVecY = glm::normalize(vecY);

    ////////////////////
    _cells.clear();

    // セル一個の縦方向、横方向のベクトル。長さはセル一個分
    const glm::vec3 CellVX = NVecX * (_xwidth / xcount);
    const glm::vec3 CellVY = NVecY * (_ywidth / ycount);

    // 面の始点
    const glm::vec3 Start = _center - NVecX * _xwidth / 2.f - NVecY * _ywidth / 2.f;

    for (size_t y = 0; y < ycount; y++) {
      for (size_t x = 0; x < xcount; x++) {

        // 各セルの始点
        glm::vec3 from =
          Start +
          CellVX * (float)x + CellVY * (float)y;

        // セルを記録
        _cells.push_back(
          cell(
            from,
            CellVX,
            CellVY
          )
        );

      }
    }

  }


  /*
  p0        p3
  +---------+
  |         |
  |         |
  |         |
  |         |
  +---------+
  p1        p2
  */
  glm::vec3 p0(const size_t index)const {
    return _cells[index].cmin();
  }
  glm::vec3 p1(const size_t index)const {

    return
      _cells[index].cmin() +
      _cells[index].cvecx();
  }
  glm::vec3 p2(const size_t index) const {
    return
      _cells[index].cmin() +
      _cells[index].cvecx() +
      _cells[index].cvecy();
  }
  glm::vec3 p3(const size_t index) const {
    return
      _cells[index].cmin() +
      _cells[index].cvecy();
  }

};
2.my_raycast.hpp
#pragma once

#include "Grid.hpp"

#include <array>

// レイキャスト用のクラス
class my_raycast {
  grid g[2];
  float _startZ;
  float _endZ;
  int _pxwidth;
  int _pxheight;
public:
  my_raycast() {}

  int width()const { return _pxwidth; }
  int height()const { return _pxheight; }

  // レイの開始点となるグリッド、終点となるグリッドを作成する
  void set(const float startZ_, const float endZ_, const int pxwidth_, const int pxheight_);

  //グリッド取得
  const grid& get_grid(const size_t index)const {
    return g[index];
  }

  //グリッドから作成するレイの数を取得
  int ray_count() {
    return g[0].cellCount();
  }

  //グリッドから作成するレイを取得
  std::array<glm::vec3, 2> get_ray(const size_t index)const;

  //始点グリッド、終点グリッドの中間の位置を取得(表示用)
  float lookatZ()const {
    return (_startZ + _endZ) / 2.f;
  }

};
3.my_raycast.cpp
#include "raycast.hpp"

void my_raycast::set(const float startZ_, const float endZ_, const int pxwidth_, const int pxheight_) {
  _startZ = startZ_;
  _endZ = endZ_;

  _pxwidth = pxwidth_;
  _pxheight = pxheight_;

  glm::vec3 vecx(1, 0, 0);
  glm::vec3 vecy(0, 1, 0);

  g[0] = grid(
    vecx,
    vecy,
    glm::vec3(0, 0, _startZ),
    1.f, 1.f,
    pxwidth_, pxheight_
  );
  g[1] = grid(
    vecx,
    vecy,
    glm::vec3(0, 0, _endZ),
    2.f, 2.f,
    pxwidth_, pxheight_
  );

}


std::array<glm::vec3, 2> my_raycast::get_ray(const size_t index)const {
  return
    std::array<glm::vec3, 2>{
    g[0][index].center(),
      g[1][index].center()
  };

}
表示
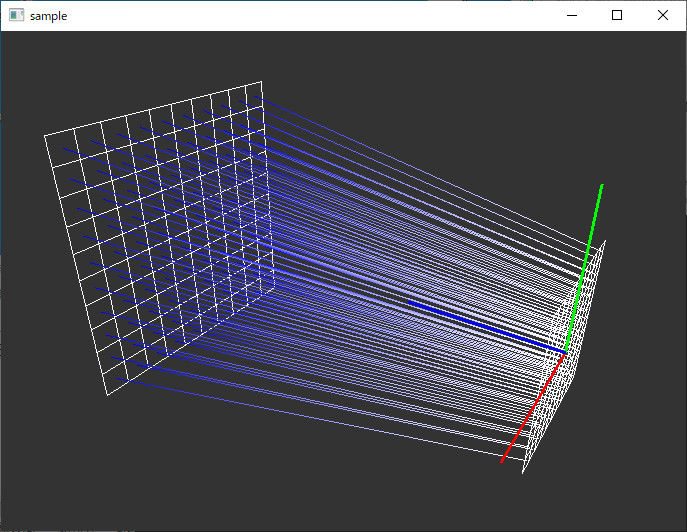
#include <iostream>
#include <array>

#include<GL/freeglut.h>
#include<gl/GL.h>

#include "raycast.hpp"

#include<glm/gtc/type_ptr.hpp>

#include<glm/gtc/matrix_transform.hpp>

//! @brief グリッドの可視化
//! @param [in] g グリッドオブジェクト
//! @param [in] dispcenter セルの中央を表示するか
void drawGrid(const grid& g, const bool dispcenter) {

  glLineWidth(1);
  glColor3d(1, 1, 1);
  for (size_t i = 0; i < g.cellCount(); i++) {
    glBegin(GL_LINE_LOOP);
    glVertex3fv(glm::value_ptr(g.p0(i)));
    glVertex3fv(glm::value_ptr(g.p1(i)));
    glVertex3fv(glm::value_ptr(g.p2(i)));
    glVertex3fv(glm::value_ptr(g.p3(i)));

    glEnd();
  }

  if (dispcenter) {
    glPointSize(1);
    glColor3d(1, 1, 1);
    glBegin(GL_POINTS);
    for (size_t i = 0; i < g.cellCount(); i++) {
      glVertex3fv(
        glm::value_ptr(g[i].center()));
    }
    glEnd();
  }
}


void drawXYZ() {
  glLineWidth(3);
  glBegin(GL_LINES);
  glColor3f(1, 0, 0);
  glVertex3f(0, 0, 0);
  glVertex3f(1, 0, 0);

  glColor3f(0, 1, 0);
  glVertex3f(0, 0, 0);
  glVertex3f(0, 1, 0);

  glColor3f(0, 0, 1);
  glVertex3f(0, 0, 0);
  glVertex3f(0, 0, 1);
  glEnd();
  glLineWidth(1);
}

//レイキャストオブジェクトの定義
my_raycast mydata;


//ウィンドウの幅と高さ
int width, height;

//描画関数
void disp(void) {

  glViewport(0, 0, width, height);

  glClearColor(0.2, 0.2, 0.2, 1);
  glClear(GL_COLOR_BUFFER_BIT | GL_DEPTH_BUFFER_BIT);

  glMatrixMode(GL_PROJECTION);
  glLoadIdentity();
  glm::mat4 proj = glm::perspectiveFov(glm::radians(45.f), (float)width, (float)height, 0.1f, 50.f);
  glLoadMatrixf(glm::value_ptr(proj));

  glMatrixMode(GL_MODELVIEW);
  glLoadIdentity();

  //////////////////////////////////////////
  //////////////////////////////////////////
  // カメラの設定 レイとグリッドの状態を可視化するための表示用
  float z = mydata.lookatZ();
  glm::mat4 look = glm::lookAt(
    glm::vec3(3, 2, z-2 ),// eye
    glm::vec3(0, 0, z ), // lookat
    glm::vec3(0,1, 0)   // up
  );
  glLoadMatrixf(glm::value_ptr(look));
  //////////////////////////////////////////
  // グリッドを表示 OpenGLでグリッドを可視化
  drawGrid(mydata.get_grid(0), false);//from
  drawGrid(mydata.get_grid(1), false);//to
  //////////////////////////////////////////
  // 作成したレイを表示 OpenGLでレイを可視化
  // 第0グリッドの各セルの中央から、台グリッドの各セルの中央へ線分を引く
  glBegin(GL_LINES);
  for (size_t i = 0; i < mydata.ray_count(); i++) {
    auto ray = mydata.get_ray(i);
    glColor3f(1.0, 1.0, 1.0);
    glVertex3fv(glm::value_ptr(ray[0]));
    glColor3f(0.0, 0.0, 1.0);
    glVertex3fv(glm::value_ptr(ray[1]));
  }
  glEnd();

  drawXYZ();

  glFlush();
}

//ウィンドウサイズの変化時に呼び出される
void reshape(int w, int h) {
  width = w; height = h;

  disp();
}

//エントリポイント
int main(int argc, char** argv)
{
  glutInit(&argc, argv);
  glutInitWindowPosition(100, 50);
  glutInitWindowSize(500, 500);
  glutInitDisplayMode(GLUT_SINGLE | GLUT_RGBA);

//レイキャスト用クラスにレイの始点・終点を設定
  mydata.set(
      0.f,//始点のZ座標
      3.f,//終点のZ座標
      10, //X方向の解像度
      10  //Y方向の解像度
  );


  glutCreateWindow("sample");
  glutDisplayFunc(disp);
  glutReshapeFunc(reshape);
  glutMainLoop();

  return 0;
}
この記事のトラックバックURL: