スポンサーリンク
libtiffを使ってみる(1) CMake , 読み込み
CMake
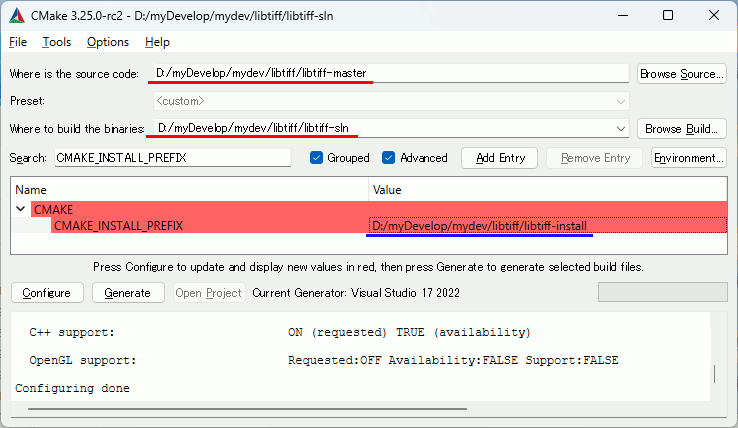
CMakeはかなり楽。
Where is the source code: D:/myDevelop/mydev/libtiff/libtiff-master
Where to build the binaries: D:/myDevelop/mydev/libtiff/libtiff-sln
CMAKE_INSTALL_PREFIX: D:/myDevelop/mydev/libtiff/libtiff-install
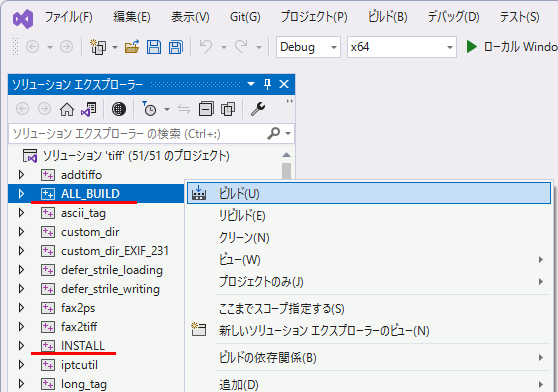
slnを開いて、ALL_BUILD → INSTALL 。
テストコード
せっかくなのでTIFFTAG_PHOTOMETRIC や TIFFTAG_PLANARCONFIG を取得する例を書いているが使っていないので消していい。
#include <iostream>

#ifdef _DEBUG
#pragma comment(lib, "tiffd.lib")
#else
#pragma comment(lib, "tiff.lib")
#endif

#include <tiffio.h>
#include <vector>
#include <cassert>

#pragma warning(disable:4996)


void pnmP3_Write(const char* const fname, const int width, const int height, const unsigned char* const p);

int main()
{

    // tiffファイルの読み込み
    TIFF* tif = TIFFOpen("D:\\Data\\test.tif", "r");
    if (tif == nullptr) {
        std::cout << "Error: Cannot open tiff file" << std::endl;
        return -1;
    }

    // tifデータの情報を取得
    std::uint32_t width, height;
    std::uint16_t bits_per_sample, samples_per_pixel;
    std::uint16_t photometric;
    std::uint16_t planar_config;
    std::uint16_t sample_format;
    TIFFGetField(tif, TIFFTAG_IMAGEWIDTH, &width);                  // 画像の幅
    TIFFGetField(tif, TIFFTAG_IMAGELENGTH, &height);                // 画像の高さ
    TIFFGetField(tif, TIFFTAG_BITSPERSAMPLE, &bits_per_sample);     // 1画素あたりのビット数
    TIFFGetField(tif, TIFFTAG_SAMPLESPERPIXEL, &samples_per_pixel); // 1画素あたりのサンプル数
    TIFFGetField(tif, TIFFTAG_PHOTOMETRIC, &photometric);           // 画像のフォーマット
    TIFFGetField(tif, TIFFTAG_PLANARCONFIG, &planar_config);        // 画像の格納形式
    TIFFGetField(tif, TIFFTAG_SAMPLEFORMAT, &sample_format);        // 画像のデータフォーマット

    // 8bitのみ対応
    assert(bits_per_sample == 8);
    // RGBの場合はAは不透明に設定される
    assert(samples_per_pixel == 3 || samples_per_pixel == 4);


    size_t image_size = width * height;

    // 画像を読み込むためのバッファを作成
    std::uint32_t* buffer = (std::uint32_t*)_TIFFmalloc(image_size * sizeof(std::uint32_t));

    // 画像を保存するためのバッファを作成
    std::vector<std::uint8_t> mydata(image_size * 3); // RGBの3チャンネルだけ使用


    // 画像を読み込む
    if (TIFFReadRGBAImage(tif, width, height, buffer, 0)) {
        for (size_t i = 0; i < image_size; i++) {
            mydata[i * 3 + 0] = TIFFGetR(buffer[i]);
            mydata[i * 3 + 1] = TIFFGetG(buffer[i]);
            mydata[i * 3 + 2] = TIFFGetB(buffer[i]);
        }
    }

    _TIFFfree(buffer);


    // tiffオブジェクトを解放
    TIFFClose(tif);


    pnmP3_Write("test.ppm", width, height, mydata.data());


    std::cout << "Hello World!\n";
}

//////////////////////////////////////////////////
//////////////////////////////////////////////////
//////////////////////////////////////////////////
//////////////////////////////////////////////////

//! @brief PPM(RGB各1byte,カラー,テキスト)を書き込む
//! @param [in] fname ファイル名
//! @param [in] vmax 全てのRGBの中の最大値
//! @param [in] width 画像の幅
//! @param [in] height 画像の高さ
//! @param [in] p 画像のメモリへのアドレス
//! @details RGBRGBRGB....のメモリを渡すと、RGBテキストでファイル名fnameで書き込む
void pnmP3_Write(const char* const fname,const int width, const int height, const unsigned char* const p) { // PPM ASCII

    FILE* fp = fopen(fname, "wb");
    fprintf(fp, "P3\n%d %d\n%d\n", width, height, 255);

    size_t channelsize = 3;

    size_t k = 0;
    for (size_t i = 0; i < (size_t)height; i++) {
        for (size_t j = 0; j < (size_t)width; j++) {
            fprintf(fp, "%d %d %d ", p[k * channelsize + 0], p[k * channelsize + 1], p[k * channelsize + 2]);
            k++;
        }
        fprintf(fp, "\n");
    }

    fclose(fp);
}
この記事のトラックバックURL:

