スポンサーリンク
Bezier曲線を描いてみる
コード
#pragma warning(disable:4996)

#include <iostream>

#include "Bresenham.hpp"

#include <array>
#include <vector>

using rgb_t = std::array<unsigned char, 3>;

struct Image_t {
  int width;
  int height;
  std::vector<rgb_t> data;
  Image_t(int _width_, int _height_) {
    width = _width_;
    height = _height_;
    data = std::vector<rgb_t>(width * height);
  }

  inline int pos(const int x, const int y)const {
    return y * width + x;
  }
  inline bool valid(const int x, const int y)const {
    if (x < 0)return false;
    if (y < 0)return false;
    if (x >= width)return false;
    if (y >= height)return false;
  }
};

void ppmP3_write(
  const char* const fname,
  const int width,
  const int height,
  const unsigned char* const p
);


struct coord_t { int x, y; };


void Bresenham(
  Image_t& img,
  const coord_t s,
  const coord_t e,
  const rgb_t color
) {
  Bresenham(img.data.data(), img.width, img.height, s.x, s.y, e.x, e.y, color);
}

//! @brief 画像をクリア
//! @param [in,out] img クリアする画像
//! @param [in] color クリアする色
//! @return なし
void fill(Image_t& img, const rgb_t color) {
  std::fill(img.data.begin(), img.data.end(), color);
}
//! @brief 大きさのある点(矩形)を書き込む
//! @param [in,out] img 書き込む画像
//! @param [in] pos 書き込む位置
//! @param [in] color 書き込む色
//! @param [in] size 点の大きさ
//! @return なし
void plot(Image_t& img, const coord_t pos, const rgb_t color, const int size) {

  int bx = pos.x - size / 2;
  int ax = bx + size;
  int by = pos.y - size / 2;
  int ay = by + size;
  for (size_t x = bx; x < ax; x++) {
    for (size_t y = by; y < ay; y++) {
      if (img.valid(x, y)) {
        img.data[img.pos(x, y)] = color;
      }
    }
  }

}
//! @brief Bézier Curve
//! @param [in,out] img 書き込む画像
//! @param [in] 制御点三点
//! @param [in] color 書き込む色
//! @return なし
//! @sa https://ja.javascript.info/bezier-curve
void Bezier(Image_t& img,const std::array<coord_t,3>& points, const rgb_t& color) {

  const int step=30;


  coord_t P1 = points[0];
  coord_t P2 = points[1];
  coord_t P3 = points[2];

  for (size_t s = 0; s < step; s++) {
    double t = s / (double)step;
    double ti = 1.0 - t;
    coord_t P;

    P.x =
      pow(ti, 2) * P1.x +
      2 * ti * t * P2.x +
      pow(t, 2) * P3.x;
    P.y =
      pow(ti, 2) * P1.y +
      2 * ti * t * P2.y +
      pow(t, 2) * P3.y;

    if (img.valid(P.x, P.y)) {

      plot(img, P, color, 3);

    }
  }

}
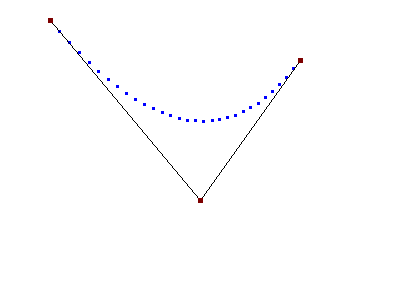
int main()
{
  Image_t img(400,300);

  fill(img, rgb_t{ 255,255,255 });

  std::array<coord_t,3> vcd;

  vcd[0] = { 50,20 };

  vcd[1] = {200,200};

  vcd[2] = { 300,60 };


  Bezier(img, vcd, rgb_t{ 0,0,255 });// ベジェ曲線を描く

  Bresenham(img, vcd[0], vcd[1], rgb_t{ 0,0,0 });// ブレゼンハムでハンドルを結ぶ線を描く
  Bresenham(img, vcd[2], vcd[1], rgb_t{ 0,0,0 });

  plot(img, vcd[0], rgb_t{ 125,0,0 }, 5);// ハンドルを描画
  plot(img, vcd[1], rgb_t{ 125,0,0 }, 5);
  plot(img, vcd[2], rgb_t{ 125,0,0 }, 5);

  ppmP3_write("abc.ppm", img.width, img.height, (unsigned char*)img.data.data());
}


//! @brief PPM(RGB各1byte,カラー,テキスト)を書き込む
//! @param [in] fname ファイル名
//! @param [in] width 画像の幅
//! @param [in] height 画像の高さ
//! @param [in] p 画像のメモリへのアドレス
//! @param [in] vmax 全てのRGBの中の最大値。普通の画像なら255
//! @details RGBRGBRGB....のメモリを渡すと、RGBテキストでファイル名fnameで書き込む
void ppmP3_write(
  const char* const fname,
  const int width,
  const int height,
  const unsigned char* const p
) {

  FILE* fp = fopen(fname, "wb");
  fprintf(fp, "P3\n%d %d\n%d\n", width, height, 255);

  size_t k = 0;
  for (size_t i = 0; i < (size_t)height; i++) {
    for (size_t j = 0; j < (size_t)width; j++) {
      fprintf(fp, "%d %d %d ",
        p[k * 3 + 0],
        p[k * 3 + 1],
        p[k * 3 + 2]
      );
      k++;
    }
    fprintf(fp, "\n");
  }

  fclose(fp);
}
なお、ハンドルを結ぶ直線を描画するブレゼンハムは作り置きのものを使う。
実行例
この記事のトラックバックURL: