スポンサーリンク
ブレゼンハムで線分描画
そのまま、ブレゼンハムのC++での実装。
元のコードはWikipediaから:
Bresenham.hpp
//! @brief ブレゼンハムの直線描画
//! @param [out] img 画像データ(一次元配列)へのポインタ
//! @param [in] width 画像の幅(画素数)
//! @param [in] height 画像の高さ(画素数)
//! @param [in] sx 線の始点X
//! @param [in] sy 線の始点Y
//! @param [in] ex 線の終点X
//! @param [in] ey 線の終点Y
//! @param [in] color 線の色
template<typename PixelType>
void Bresenham(
  PixelType* img,
  const int width,
  const int height,
  const int sx,
  const int sy,
  const int ex,
  const int ey,
  const PixelType color
) {
  // https://ja.wikipedia.org/wiki/%E3%83%96%E3%83%AC%E3%82%BC%E3%83%B3%E3%83%8F%E3%83%A0%E3%81%AE%E3%82%A2%E3%83%AB%E3%82%B4%E3%83%AA%E3%82%BA%E3%83%A0

  const int dx = std::abs(ex - sx);
  const int dy = std::abs(ey - sy);

  const int nx = (sx < ex) ? 1 : -1;
  const int ny = (sy < ey) ? 1 : -1;

  int err = dx - dy;

  int x = sx;
  int y = sy;
  while (1) {

    if (x >= 0 && y >= 0 && x < width && y < height) {
      img[y*width + x] = color;
    }

    if (x == ex && y == ey)
      break;

    const int e2 = 2 * err;
    if (e2 > -dy) {
      err = err - dy;
      x += nx;
    }
    if (e2 < dx) {
      err = err + dx;
      y += ny;
    }
  }
}
使用例
データは前に作ったNByteDataを使用して、3Byteで1ピクセルとする。
https://www.study.suzulang.com/2dcg-functions/nbyte-data-type
#pragma warning(disable:4996)

#include <iostream>
#include <vector>

#include"NByteData.hpp"

#include"Bresenham.hpp"


void ppmP3_write(
  const char* const fname,
  const int width,
  const int height,
  const unsigned char* const p,
  const int vmax
);
int main() { using ucrgb = NByteData<3>; // RGB 計3Byteのデータ型 int width = 200; int height = 200; std::vector<ucrgb> image; ucrgb Red = ucrgb{ 255,0,0 }; ucrgb White = ucrgb{ 255,255,255 }; image.resize(width*height, White);
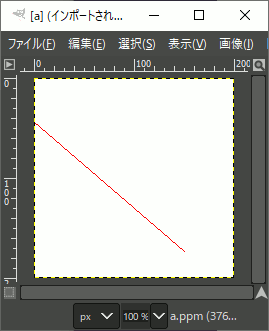
// 直線描画 Bresenham(image.data(), width, height, -23, 24, 150, 173, Red);
// 結果をファイルへ保存 ppmP3_write(R"(C:\test\a.ppm)",width,height,image.data()->data(),255); }
//! @brief PPM(RGB各1byte,カラー,テキスト)を書き込む
//! @param [in] fname ファイル名
//! @param [in] width 画像の幅
//! @param [in] height 画像の高さ
//! @param [in] p 画像のメモリへのアドレス
//! @param [in] vmax 全てのRGBの中の最大値。普通の画像なら255
//! @details RGBRGBRGB....のメモリを渡すと、RGBテキストでファイル名fnameで書き込む
void ppmP3_write(
  const char* const fname,
  const int width,
  const int height,
  const unsigned char* const p,
  const int vmax
) {

  FILE* fp = fopen(fname, "wb");
  fprintf(fp, "P3\n%d %d\n%d\n", width, height, vmax);

  size_t k = 0;
  for (size_t i = 0; i < (size_t)height; i++) {
    for (size_t j = 0; j < (size_t)width; j++) {
      fprintf(fp, "%d %d %d ",
        p[k * 3 + 0],
        p[k * 3 + 1],
        p[k * 3 + 2]
      );
      k++;
    }
    fprintf(fp, "\n");
  }

  fclose(fp);
}
実行結果
この記事のトラックバックURL: