スポンサーリンク
KdTreeを自作してみる(1)ツリー作成
KdTreeを愚直に作成してみる。
mykdtree.hpp
#include<eigen/Dense>
#include <vector>
struct node{
   node(size_t index, int axis) : index(index), axis(axis){}
   size_t index; // 頂点ID
   int axis;     // 0:x, 1:y, 2:z
   node* left;   // ツリー1
   node* right;  // ツリー2
};
// pがpivotの左側にあるかどうかを判定
bool isLeft(const Eigen::Vector3d& pivot, const Eigen::Vector3d& p, int axis) {
   return p[axis] < pivot[axis];
}
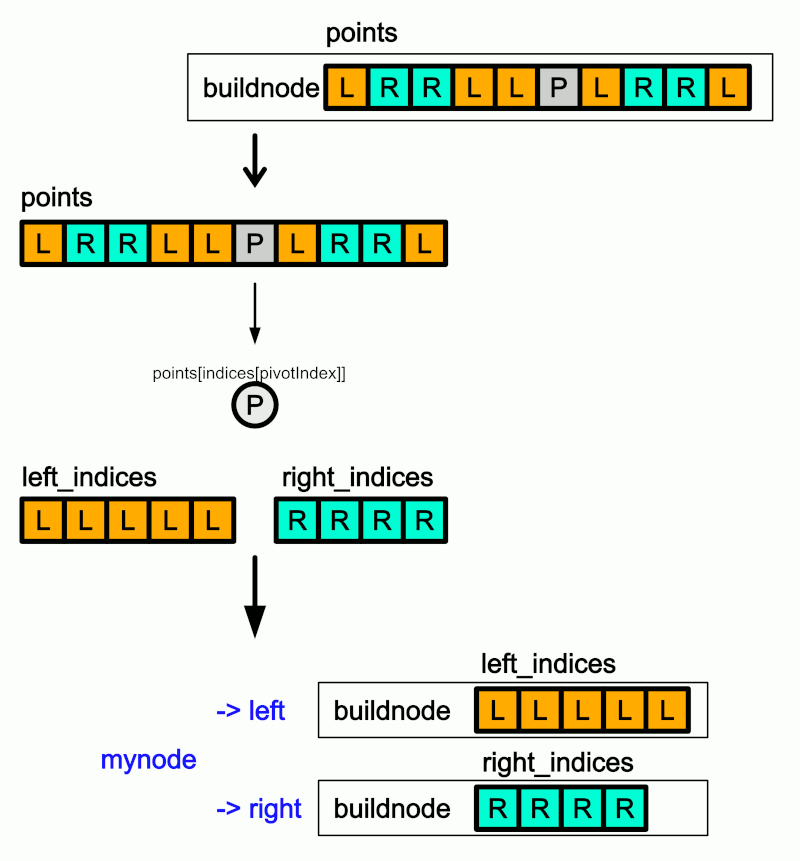
// 再帰的にツリー作成
node* buildnode(const std::vector<Eigen::Vector3d>& points, std::vector<size_t>& indices,int axis) {

   if(indices.size()==0)
      return nullptr;
   if(indices.size()==1){
      // 最後のノードに頂点idを与えて返る
      node* mynode = new node(indices[0],axis);
      mynode->left = nullptr;
      mynode->right = nullptr;
      return mynode;
   }

   // pivot を決定
   size_t pivotIndex = indices.size() / 2;

   // indexの配列の中央をpivotとする
   Eigen::Vector3d Pivot = points[indices[pivotIndex]];

   std::vector<size_t> left_indices;  // ツリーの左側にセットするindexリスト
   std::vector<size_t> right_indices; // ツリーの右側にセットするindexリスト

   // pivot で分割
   for (size_t i = 0; i < indices.size(); i++) {
      if (i == pivotIndex) {
         continue;
      }

      if (isLeft(Pivot, points[indices[i]], axis)) {
         // ツリーの左側にセットするindexリスト更新
         left_indices.push_back(indices[i]);
      }
      else {
         // ツリーの右側にセットするindexリスト更新
         right_indices.push_back(indices[i]);
      }
   }

   // 新たなノード作成
   node* mynode = new node(indices[pivotIndex],axis);
   mynode->left = buildnode(points, left_indices, (axis+1) % 3);   // 左側を構築
   mynode->right = buildnode(points, right_indices, (axis+1) % 3); // 右側を構築

   return mynode;
}
class mykdtree {

   std::vector<Eigen::Vector3d>& _points;
   node* node_root;
public:
   mykdtree(std::vector<Eigen::Vector3d>& points) : _points(points) {}

   // ツリーの構築
   void build() {

      // 最初のindexリストを作成
      std::vector<size_t> indices(_points.size());
      for (size_t i = 0; i < _points.size(); i++) {
         indices[i] = i;
      }

      // 再帰的にツリー作成
      node_root = buildnode(_points, indices, 0/*X軸*/);

   }
   node* getRoot() {
      return node_root;
   }

};
// デバッグ用 ツリー内のすべてのindexを取得する関数
void getAllIndices(node* root, std::vector<size_t>& indices) {


   if (root == nullptr) {
      return;
   }

   // 現在のノードのindexを追加
   indices.push_back(root->index);

   // 左部分木のindexを取得
   getAllIndices(root->left, indices);

   // 右部分木のindexを取得
   getAllIndices(root->right, indices);
}

テストコード
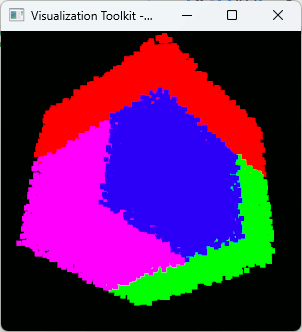
点群を分割できていることを確認するために、ツリーで分割した領域を着色してみる。
#include <iostream>

//VTK_MODULE_INITに必要
#include <vtkAutoInit.h>


#include <vtkSmartPointer.h>
#include <vtkRenderer.h>
#include <vtkRenderWindow.h>
#include <vtkRenderWindowInteractor.h>

#include <vtkPolyDataMapper.h>


#pragma comment(lib,"opengl32.lib")
#pragma comment(lib,"psapi.lib")
#pragma comment(lib,"dbghelp.lib")
#pragma comment(lib,"ws2_32.lib")

#include <Eigen/Core>
#include <array>

#include <vtkActor.h>
#include <vtkPoints.h>
#include <vtkPolyData.h>
#include <vtkUnsignedCharArray.h>
#include <vtkPointData.h>
#include <vtkVertexGlyphFilter.h>
#include <vtkProperty.h>

#include "mykdtree.hpp"

//必須
VTK_MODULE_INIT(vtkRenderingOpenGL2);
VTK_MODULE_INIT(vtkInteractionStyle);

// VTK表示用
struct MyVtkCloud {
   std::vector<Eigen::Vector3d> points;
   std::array<unsigned char, 3> color;
   std::vector<std::array<unsigned char, 3> > color_array;

   vtkSmartPointer<vtkActor> actor;
   void makeActor() {
      // VTKのデータ構造に変換
      vtkSmartPointer<vtkPoints> vtk_points = vtkSmartPointer<vtkPoints>::New();
      vtkSmartPointer<vtkUnsignedCharArray> vtk_colors = vtkSmartPointer<vtkUnsignedCharArray>::New();
      vtk_colors->SetNumberOfComponents(3); // RGB
      vtk_colors->SetName("Colors");

      for (size_t i = 0; i < points.size(); ++i) {
         // 点を追加
         vtk_points->InsertNextPoint(points[i].x(), points[i].y(), points[i].z());

         if (color_array.size() == 0) {
            vtk_colors->InsertNextTypedTuple(color.data());
         }
         else {
            vtk_colors->InsertNextTypedTuple(color_array[i].data());
         }
      }

      ////////////////////////////////////////////////////////////
      vtkSmartPointer<vtkPolyData> polyData = vtkSmartPointer<vtkPolyData>::New();
      polyData->SetPoints(vtk_points);
      polyData->GetPointData()->SetScalars(vtk_colors);
      ////////////////////////////////////////////////////////////
      vtkSmartPointer<vtkVertexGlyphFilter> vertexFilter = vtkSmartPointer<vtkVertexGlyphFilter>::New();
      vertexFilter->SetInputData(polyData);
      vertexFilter->Update();
      ////////////////////////////////////////////////////////////
      vtkSmartPointer<vtkPolyDataMapper> mapper = vtkSmartPointer<vtkPolyDataMapper>::New();
      mapper->SetInputConnection(vertexFilter->GetOutputPort());

      vtkSmartPointer<vtkActor> actor = vtkSmartPointer<vtkActor>::New();
      actor->SetMapper(mapper);

      // 頂点サイズを指定
      actor->GetProperty()->SetPointSize(5); // ここで頂点サイズを指定します

      this->actor = actor;
   }
};


int main(int /*argc*/, char** /*argv*/)
{
   MyVtkCloud cloud1;


   srand((unsigned int)7);
   // ランダムな点群を作成
   for (size_t i = 0; i < 50000; ++i) {
      cloud1.points.push_back(Eigen::Vector3d::Random());
   }
   cloud1.color = std::array<unsigned char, 3>{ 0, 255, 0 };
   cloud1.makeActor();

   // ツリー作成
   mykdtree kdtree(cloud1.points);
   kdtree.build();


   ////////////////////////////////////////////////////////
   ////////////////////////////////////////////////////////
   // 各領域を着色して表示
   std::vector<size_t> indices_left;
   std::vector<size_t> indices_right_right;
   std::vector<size_t> indices_right_left_right;
   std::vector<size_t> indices_right_left_left;

   node* root = kdtree.getRoot();

   // X軸の分割、左側のノードを取得 (赤)
   getAllIndices(root->left, indices_left);

   // X軸の分割、右側のノードの右を取得 (緑)
   getAllIndices(root->right->right, indices_right_right);

   // X軸の分割、右側のノードの左の右を取得 (青)
   getAllIndices(root->right->left->right, indices_right_left_right);

   // X軸の分割、右側のノードの左の左を取得 (紫)
   getAllIndices(root->right->left->left, indices_right_left_left);

   MyVtkCloud cloud_L;
   for (auto i : indices_left)cloud_L.points.push_back(cloud1.points[i]);
   cloud_L.color = std::array<unsigned char, 3>{ 255, 0, 0 };
   cloud_L.makeActor();

   MyVtkCloud cloud_RR;
   for (auto i : indices_right_right)cloud_RR.points.push_back(cloud1.points[i]);
   cloud_RR.color = std::array<unsigned char, 3>{ 0, 255, 0 };
   cloud_RR.makeActor();

   MyVtkCloud cloud_RLR;
   for (auto i : indices_right_left_right)cloud_RLR.points.push_back(cloud1.points[i]);
   cloud_RLR.color = std::array<unsigned char, 3>{ 0, 0, 255 };
   cloud_RLR.makeActor();

   MyVtkCloud cloud_RLL;
   for (auto i : indices_right_left_left)cloud_RLL.points.push_back(cloud1.points[i]);
   cloud_RLL.color = std::array<unsigned char, 3>{ 255, 0, 255 };
   cloud_RLL.makeActor();
   ////////////////////////////////////////////////////////
   ////////////////////////////////////////////////////////

   //////////////////////////////////////
   // 表示
   auto renderer = vtkSmartPointer<vtkRenderer>::New();
   renderer->AddActor(cloud_L.actor);
   renderer->AddActor(cloud_RR.actor);
   renderer->AddActor(cloud_RLR.actor);
   renderer->AddActor(cloud_RLL.actor);
   renderer->ResetCamera();

   //////////////////////////////////////
   auto interactor = vtkSmartPointer<vtkRenderWindowInteractor>::New();

   //////////////////////////////////////
   auto renderWindow = vtkSmartPointer<vtkRenderWindow>::New();
   renderWindow->AddRenderer(renderer);
   renderWindow->SetInteractor(interactor);
   renderWindow->Render();

   interactor->Start(); //イベントループへ入る

   return 0;
}

この記事のトラックバックURL: